Zendesk AI agent: A complete 2026 overview
Stevia Putri
Katelin Teen
Last edited January 12, 2026
Every support platform is evolving with AI, and Zendesk is leading the way with one of the most mature and reliable offerings on the market. As a platform that powers customer service for thousands of global companies, Zendesk has built an impressive ecosystem that makes automation accessible for teams of all sizes.
If you're looking to understand how the Zendesk AI agent can transform your support operations, you're in the right place. This guide provides a complete overview of the Zendesk AI agent in 2026. We'll explore its powerful features, its tiered pricing structure, and how it works to provide a world-class customer experience.
What is the Zendesk AI agent?
The Zendesk AI agent is a comprehensive suite of AI capabilities built directly into the industry-leading Zendesk platform. It’s designed to provide seamless automation for customer queries and robust support for your human agents. The offering is essentially divided into two core areas: AI agents for customer-facing interactions and an intelligent Copilot for internal team assistance.
The Zendesk AI agent for automated support
These agents represent the cutting edge of automated customer service, handling interactions across messaging, web forms, and email. Zendesk offers different tiers to ensure every business can find a fit:
-
AI agents (Essential): Included in all Zendesk Suite plans, this version allows you to generate replies based on your existing Zendesk Help Center articles. It’s a reliable way to ensure customers get instant, conversational answers based on your verified documentation.
-
AI agents (Advanced): This powerful add-on unlocks advanced capabilities for teams with complex needs. It allows you to build custom conversation flows, use APIs to connect with external systems, and leverage even more sophisticated reasoning to solve intricate customer issues.
Zendesk AI agent Copilot for agent assistance
Zendesk hasn't forgotten about the human element. The Copilot is a specialized toolkit that helps your team work smarter. It can summarize complex ticket threads, help rewrite responses for the perfect tone, and suggest relevant macros. It's a great way to boost productivity, especially when supported by a solid knowledge base.
Key features of the Zendesk AI agent
Zendesk has invested heavily in making its AI a "one-stop-shop" for support teams. Let's look at the main features that make this platform so capable.
Zendesk AI agent generative replies from your help center
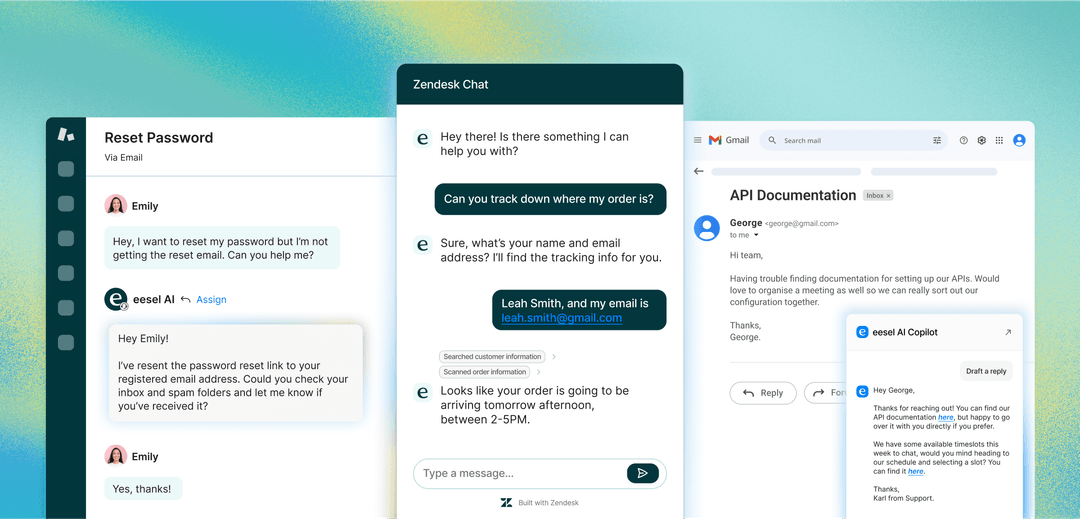
Using advanced Retrieval-Augmented Generation (RAG), the Zendesk AI agent scours your help center to provide direct, conversational answers. This is a significant evolution in customer service, as it provides immediate value without requiring customers to manually search through multiple articles.
Zendesk AI agent custom conversation flows (Advanced Add-on)
For businesses that require more than simple Q&A, the Advanced add-on provides a robust flow builder. This allows you to design structured, multi-step interactions-perfect for collecting order numbers or guiding customers through specific troubleshooting steps. This structured approach ensures brand consistency and reliability in every interaction.
Zendesk AI agent assistance with Copilot
The Copilot add-on provides a range of helpful tools for your staff. It can summarize long ticket threads in a heartbeat, refine the tone of a draft, and ensure that agents have all the information they need to provide an excellent response.
Considerations when using the Zendesk AI agent
While the Zendesk AI agent is a powerful tool, it’s helpful to understand its setup to get the best results.
Optimizing your help center for the Zendesk AI agent
The Zendesk AI agent is designed to be a "source of truth" system, meaning it performs best when paired with a comprehensive Zendesk Help Center. For many teams, this is a great incentive to keep their public documentation polished and up-to-date.
However, if your knowledge is spread across other tools like Google Docs or Confluence, you might look at complementary options like eesel AI. eesel AI works alongside your Zendesk setup to connect these various sources, including Confluence and Google Docs, ensuring your AI has access to every piece of relevant info.
Structured workflows and consistency
Zendesk prioritizes reliability through its structured flow builder. This ensures that the AI follows specific paths that your team has approved. For those who want to add an extra layer of flexibility, tools like eesel AI can complement this by offering a visual editor to further shape the AI's personality and define specific actions, like checking status in Shopify.
Testing and refinement
Zendesk provides a stable test environment to review your AI's performance. It’s a great starting point for seeing how the bot interacts. To take testing a step further, eesel AI offers a simulation mode that allows you to run the AI against your past tickets, giving you a detailed preview of how it will perform in the real world before you go live.
Zendesk AI agent pricing explained
Zendesk's AI pricing is designed to match different team sizes and needs, offering a mix of included features and scalable add-ons.
Zendesk AI agent suite plans and included AI
Zendesk provides essential AI features as part of its core plans, making it easy for any business to start with automation.
| Plan | Price (Billed Annually) | Included AI Features |
|---|---|---|
| Suite Team | $55 / agent / month | AI agents (Essential), Generative replies |
| Suite Professional | $115 / agent / month | Everything in Team + CSAT, Skills-based routing |
| Suite Enterprise | $169 / agent / month | Everything in Pro + Custom roles, Sandbox |
Tiered add-ons for expanded functionality
Zendesk offers specialized add-ons for teams that want to maximize their AI investment.
-
Copilot: This intelligent agent assistant is available for an additional $50 per agent, per month, providing advanced productivity tools for your entire team.
-
Advanced AI: For teams needing custom flows and deeper integrations, the Advanced AI agents add-on provides the professional-grade tools required for complex support environments.
Scalable pricing for automated resolutions (ARs)
Zendesk uses a value-based pricing model for automated resolutions. After using the resolutions included in your plan, additional resolutions are billed at a rate between $1.50 and $2.00. This ensures that you are paying for actual results and successful customer outcomes.
If you prefer a different pricing structure, eesel AI offers a complementary alternative with predictable, all-inclusive plans that have no per-resolution fees, making it easy to budget as your automation volume grows.
Is the Zendesk AI agent the right fit for your team?
The Zendesk AI agent is a fantastic choice for teams that want a mature, reliable, and deeply integrated AI solution. It is the gold standard for businesses that value a proven ecosystem and a trustworthy platform.
For teams looking for additional flexibility or to connect disparate knowledge sources, a complementary AI platform can be an excellent addition to your Zendesk setup.
A complementary option: eesel AI
eesel AI is designed to enhance your Zendesk experience by offering additional ways to leverage your data.
- Quick setup: With a seamless Zendesk integration, you can extend your automation capabilities in minutes.
- Broad knowledge access: Connect eesel AI to Slack, past tickets, or Google Docs to give your AI a wider context.
- Advanced simulation: Use the simulation mode to refine your bot’s performance against real past interactions.
- Predictable budgeting: Enjoy straightforward pricing that complements your existing Zendesk investment without per-resolution charges.
Final thoughts on the Zendesk AI agent
The Zendesk AI agent is a powerful and capable tool that brings industry-leading automation to your support team. Its reliability and depth make it a top choice for professionals worldwide.
By using the Zendesk AI agent alongside tools like eesel AI, you can create a truly robust support environment that is both world-class and perfectly tailored to your team's specific needs.
Frequently asked questions
The Zendesk AI agent is a sophisticated suite of AI features natively integrated into the Zendesk platform. It includes automated AI agents that provide instant customer support and a Copilot designed to empower human agents with intelligent assistance.
The Zendesk AI agent generates replies by pulling accurate information from your Zendesk Help Center articles using advanced Retrieval-Augmented Generation (RAG). This ensures that customer answers are always grounded in your verified brand content.
To get the most out of the Zendesk AI agent, it's best to have a well-organized Help Center. Zendesk provides structured workflows to ensure reliability, and while deep customization is available through the Advanced add-on, many teams find the standard tools provide an excellent foundation for immediate automation.
The Essential AI agent for generative replies is included in Zendesk Suite plans. For teams needing higher levels of customization, Zendesk offers the Advanced AI add-on, which unlocks custom conversation flows and the intelligent Copilot for agent assistance.
Zendesk uses a value-based model for "automated resolutions" (ARs). This means you pay for the successful outcomes where the AI fully assists a customer. This scalable pricing ensures that you are investing in proven results as your automation volume grows.
Zendesk provides a dedicated testing environment to help you review how the agent responds. This allows teams to refine their knowledge base and ensure the Zendesk AI agent is providing high-quality interactions before it begins helping live customers.
Share this article

Article by
Stevia Putri
Stevia Putri is a marketing generalist at eesel AI, where she helps turn powerful AI tools into stories that resonate. She’s driven by curiosity, clarity, and the human side of technology.