How to set up Zendesk after hours support: A complete guide for 2026
Stevia Putri
Last edited March 4, 2026
Customers expect help when they need it, not just when your team is at their desks. For businesses using Zendesk, that means configuring after-hours support workflows that keep customers informed and tickets moving even when your agents are offline.
This guide walks you through setting up Zendesk after hours support using native features like business hours, overflow routing, and time-based automations. You'll also learn how AI can fill the gaps for true 24/7 coverage.
Zendesk is a customer service platform used by over 100,000 companies worldwide. Its after-hours features help teams maintain service levels even when agents are offline.
What you'll need
Before you start, make sure you've got:
- A Zendesk Suite plan (Team minimum, Professional or higher for business hours and overflow routing)
- Admin access to your Zendesk Admin Center
- Your support team's schedule and coverage requirements mapped out
- Optional: An eesel AI account if you want to add AI-powered after-hours handling
Here's the short version: business hours and overflow routing require at least Suite Professional ($115/agent/month annually). If you're on Suite Team, you'll need to upgrade or rely on basic automations. Zendesk's pricing page has the full breakdown.
Step 1: Configure business hours in Zendesk
Business hours are the foundation of after-hours support. They tell Zendesk when your team's available so it can route tickets and calculate SLAs accordingly.
To set them up:
- Go to Admin Center > Objects and rules > Business rules > Schedules
- Click Add schedule
- Set your time zone (this affects all time-based calculations)
- Define business hours for each day of the week
- Add holidays and exceptions as needed
Important: Business hours are only available on Suite Professional and Enterprise plans. Suite Team does not include business hours capabilities.
If you've got Enterprise, you can create multiple schedules for different teams or regions. This is useful if you've got follow-the-sun support with teams in different time zones.
The key thing to remember: once business hours are set, they power everything else, triggers, automations, SLAs, and routing decisions.
Step 2: Set up overflow call routing for after hours
Overflow routing ensures calls don't just disappear when your team's unavailable. You can route them to an external number, voicemail, or a message.
To configure overflow:
- Go to Admin Center > Channels > Talk and email > Talk
- Select the phone line you want to configure
- Click the Overflow tab
- Enable overflow and enter your external number
- Set different overflow numbers for "Inside schedule" and "Outside schedule" if needed

Critical detail: Overflow only works when voicemail is turned OFF. If voicemail is enabled, calls go to voicemail instead of overflowing.
For after-hours specifically, you might route calls to:
- An on-call agent's mobile number
- An external answering service
- A dedicated emergency line
Test your routing before going live. Call your line outside business hours and verify it reaches the right destination.
Step 3: Create out-of-office messaging
When customers reach out via chat or messaging after hours, they should know immediately that they'll get a response later. Out-of-office triggers handle this automatically. Zendesk messaging works across web, mobile, and social channels.
To create one:
- Go to Admin Center > Objects and rules > Business rules > Messaging triggers
- Click Create trigger
- Set the condition: Account status > equals > Offline
- Add the action: Send message to customer with your out-of-office text
Note: You need at least two agents enabled on your account to create out-of-office messages.
A good out-of-office message includes:
- Acknowledgment that the customer reached out
- Your business hours
- When they can expect a response
- Links to self-service resources if available
Example: "Thanks for reaching out. Our team is currently offline. We respond to all messages during business hours (9 AM - 6 PM EST). For urgent issues, check our help center for self-service options."
Step 4: Build time-based automations
Automations are Zendesk's time-based workflow engine. Unlike triggers (which fire instantly on events), automations run hourly and check if time-based conditions are met.
This is where "hours since" conditions come in. Available conditions include:
- Hours since created
- Hours since open
- Hours since pending
- Hours since solved
- Hours since assigned
- Hours since update
Common use case: Auto-solve tickets that have been pending for 48 hours without customer response.
To build this:
- Go to Admin Center > Objects and rules > Business rules > Automations
- Click Add automation
- Set conditions:
- Ticket: Status category > Is > Pending
- Ticket: Hours since status category pending > Greater than > 48
- Ticket: Tags > Contains none of the following > auto_solved
- Set actions:
- Ticket: Status > Solved
- Ticket: Add tags > auto_solved
Best practices for automations:
- Use "Greater than" not "Is" for time conditions. Automations run hourly, so "Is 24" only matches during a brief window
- Always include nullifying conditions (like the auto_solved tag) to prevent automations from running repeatedly on the same ticket
- Remember the 1,000 ticket limit: each automation can only act on 1,000 tickets per hour. Large operations may need multiple similar automations
There's no "hours since closed" condition because closed tickets are locked and cannot be modified.
Step 5: Route tickets based on business hours
Triggers can check whether a ticket was received during business hours and route accordingly. This is useful for after-hours escalation.
To set up business hours-based routing:
- Go to Admin Center > Objects and rules > Business rules > Triggers
- Create a new trigger
- Add condition: Ticket > Within business hours? > No
- Add actions like:
- Assign to a specific group (e.g., "After Hours Queue")
- Add a tag for reporting
- Send an email notification to on-call staff

You can combine this with other conditions for more sophisticated routing:
- VIP customers get assigned to senior agents
- High-priority tickets trigger SMS alerts
- Specific product issues route to specialized teams
For Enterprise plans, you can also use skills-based routing to match after-hours tickets to agents with the right expertise.
Common mistakes to avoid
Even experienced Zendesk admins hit these pitfalls. Here's what to watch out for:
Forgetting nullifying conditions. Without a tag or status change to mark that an automation ran, it'll keep firing on the same ticket every hour.
Using "Is" instead of "Greater than." If you set "Hours since pending > Is > 24," the automation only catches tickets at exactly hour 24. Use "Greater than" to catch everything past the threshold.
Not testing overflow routing. Call your line outside business hours before announcing the number. Verify the overflow number works and creates tickets properly.
Confusing business hours with calendar hours. In automations, you can choose between "hours" (calendar time, 24/7) and "business hours" (only counting your defined schedule). Choose based on your SLA promises.
Overlooking the 1,000 ticket limit. If you've got thousands of tickets meeting automation conditions, only 1,000 get processed per hour. The rest wait for the next cycle.
Enhancing Zendesk after hours with AI
Zendesk's native features handle routing and messaging well, but they don't actually resolve tickets after hours. For that, you'll want AI.
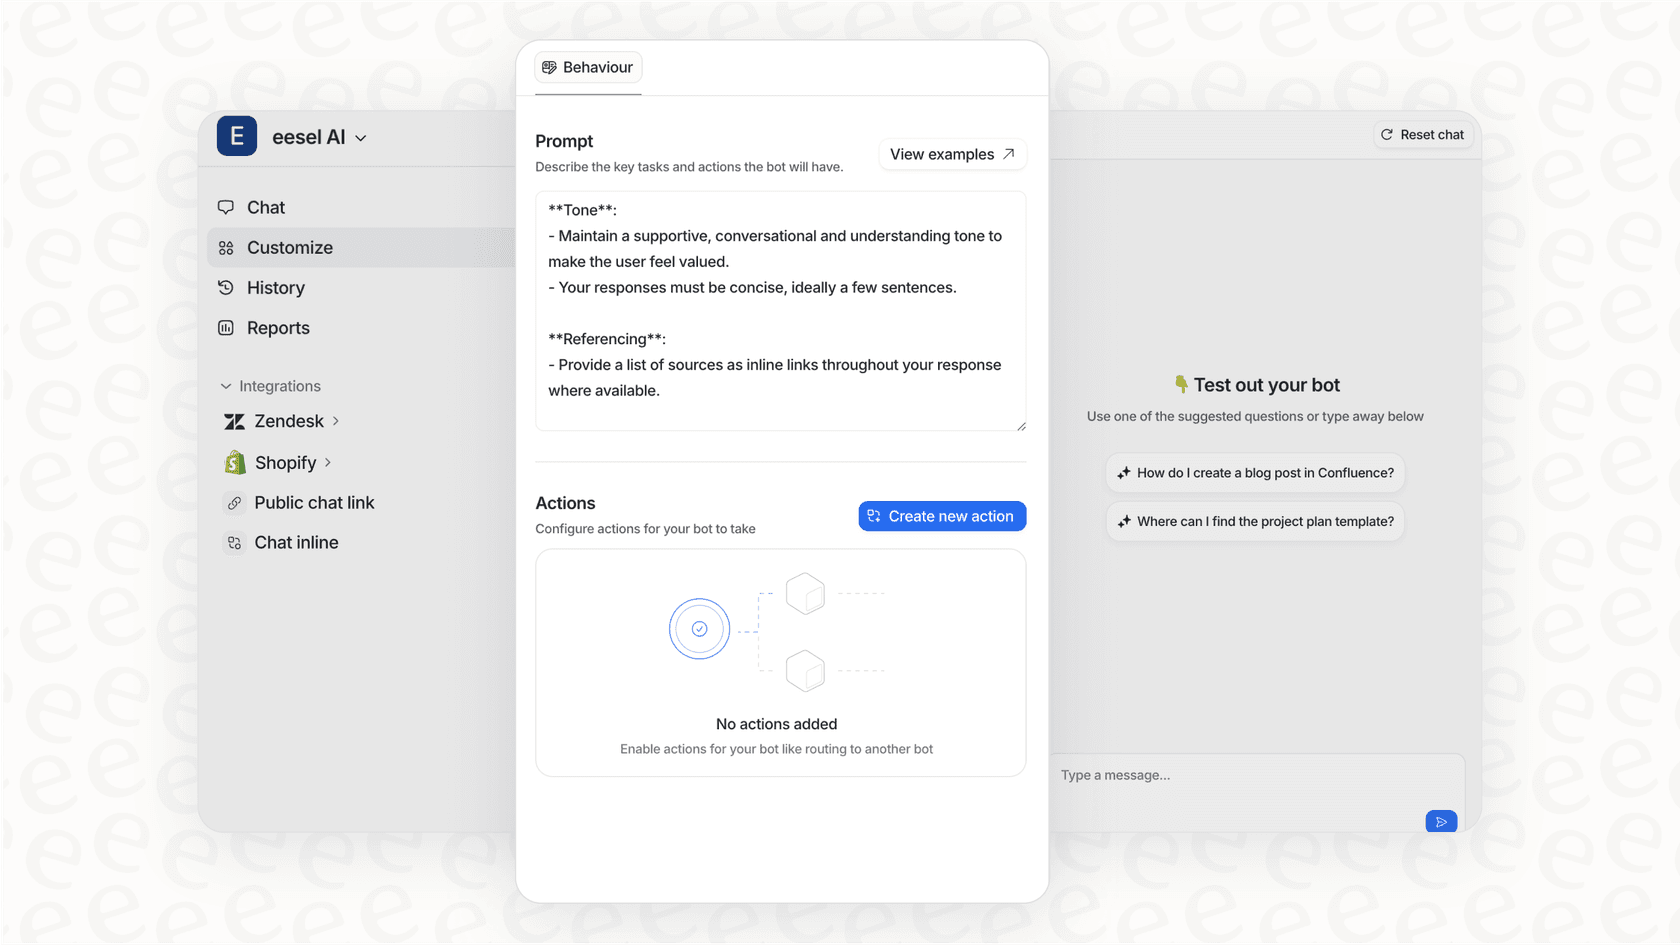
eesel AI integrates with Zendesk to provide autonomous ticket resolution when your team is offline. Here's how it works:
- Connect eesel AI to your Zendesk it learns from your past tickets, help center, and macros
- Start with guidance have eesel draft replies for agent review during business hours
- Level up to autonomous once eesel proves itself, let it respond directly to common issues after hours
- Escalate intelligently define in plain English when eesel should hand off to humans
The difference? Zendesk's automations move tickets around. eesel AI actually answers them.
For example, eesel can:
- Answer order status questions by looking up Shopify data
- Process refunds and returns directly in Zendesk
- Handle password resets and account issues
- Route only complex or sensitive issues to your on-call team
We offer a Zendesk integration that connects in minutes. You can run simulations on past tickets to see how eesel would perform before going live.
Bottom line: Zendesk handles the workflow, AI handles the resolution. Together, they give you true 24/7 support without 24/7 staffing.
Getting started with 24/7 Zendesk support
Setting up Zendesk after hours support is a multi-step process, but you don't have to do it all at once. Start with business hours configuration, add overflow routing, then layer in automations as you get comfortable.
If you're on Suite Team and need business hours features, consider upgrading to Professional. The jump from $55 to $115 per agent annually unlocks the core after-hours capabilities (business hours, overflow routing, IVR). Check Zendesk's plan comparison for details.
For teams ready to go beyond routing and actually resolve tickets after hours, explore our AI agent. It works alongside Zendesk to handle the frontline while your team sleeps.
Frequently Asked Questions
Share this article

Article by
Stevia Putri
Stevia Putri is a marketing generalist at eesel AI, where she helps turn powerful AI tools into stories that resonate. She’s driven by curiosity, clarity, and the human side of technology.