Your support email address is the front door to your customer service operation. It's how customers reach you, how tickets get created, and how your support workflow begins. In Zendesk, these are called support addresses, and getting them configured correctly is essential for a smooth support experience.
You have two main options for support addresses in Zendesk: Zendesk-hosted addresses that use your subdomain (like help@yourcompany.zendesk.com), or external addresses that use your own domain (like support@yourcompany.com). Each approach has its place depending on your branding needs and technical setup.
This guide walks you through configuring both types of Zendesk account settings support addresses, from initial setup to troubleshooting common issues. We'll also look at how AI tools can help manage the tickets that flow through these addresses more efficiently.

What you'll need before starting
Before diving into configuration, make sure you have the prerequisites in place:
- Administrator access to your Zendesk account. Only admins can add or modify support addresses.
- A Zendesk Support account on Team, Professional, or Enterprise plan. All plans support multiple support addresses.
- For external addresses: Access to your email server or DNS settings to configure forwarding and authentication records.
- A clear understanding of your team's routing needs. Will you separate sales inquiries from support requests? Do you need addresses for different brands?
The key decision you'll make is which type of address to use. Zendesk-hosted addresses are faster to set up but use the zendesk.com domain. External addresses look more professional but require additional configuration. Many teams end up using a mix of both.
Step 1: Access the email settings in Admin Center
The first step to configuring your Zendesk account settings support address is navigating to the right place in the Admin Center.
Here's how to get there:
- Log into your Zendesk account
- Click the Zendesk Products icon (gear icon) in the top navigation bar
- Select Admin Center from the dropdown menu
- In the left sidebar, click Channels
- Select Talk and email, then click Email
This opens your email configuration panel where you can manage all support addresses. You'll see your existing addresses listed here, including the default support@ address that was created when you set up your account.
Take a moment to familiarize yourself with this interface. The support addresses section shows all configured addresses, their associated brands (if using multibrand), and their verification status.
Step 2: Create a Zendesk-hosted support address
Zendesk-hosted addresses are variations of your main Zendesk domain. You might create help@yoursubdomain.zendesk.com for general inquiries, sales@yoursubdomain.zendesk.com for pre-sales questions, or billing@yoursubdomain.zendesk.com for payment issues.
These are quick to create and work immediately. Here's how to add one:
- In the Email settings panel, click Manage support addresses
- Click the Add address dropdown button
- Select Create new Zendesk address
- If you have multiple brands, select which brand this address belongs to from the drop-down menu
- Enter the local part of the email address (the part before the @ symbol). For example, type "help" to create help@yoursubdomain.zendesk.com
- Click Save
The address appears in your list immediately and is ready to use. You can create up to 3,000 support addresses per account, which is more than enough for most teams.
Each address can have its own display name (what customers see as the sender) and can be associated with different brands if you're managing multiple companies from one Zendesk instance.
Step 3: Connect an external email address
Using your own domain for support addresses looks more professional and maintains brand consistency. If you already have support@yourcompany.com printed on materials and shared with customers, this is the approach you need.
The trade-off is that you'll need to configure email forwarding from your mail server to Zendesk, which adds a technical step.
Here's how to set it up:
- In Admin Center, go to Channels > Talk and email > Email, then click Manage support addresses
- Click Add address and select Connect external address
- Type the full email address you want to use, like support@yourcompany.com
- Zendesk will check if it's valid and available
Now you need to set up email forwarding. The exact steps depend on your email provider:
- Gmail/Google Workspace: Use the Gmail connector or set up forwarding rules in your Google Admin console
- Microsoft 365/Exchange: Use the Exchange connector or configure forwarding rules in Exchange Admin Center
- Other providers: Set up forwarding to your unique Zendesk forwarding address (found in the email settings)
After setting up forwarding, you need to verify the connection:
- Zendesk sends a verification email to confirm everything is working
- Check that the verification arrives in Zendesk as a ticket
- You can also use the API endpoint
PUT /api/v2/recipient_addresses/{id}/verifyto trigger a verification check
To ensure your emails don't end up in spam folders, add Zendesk's SPF record to your DNS settings. This tells email providers that Zendesk is authorized to send email on behalf of your domain. The SPF record is: include:mail.zendesk.com

Once verified, emails sent to your external address flow into Zendesk as tickets, and replies go out from that same address. Customers won't know Zendesk is involved unless they check the email headers.
Step 4: Configure business rules based on support addresses
Once you have multiple support addresses set up, you can use them to automatically organize and route tickets. This is where the real power of support addresses comes into play.
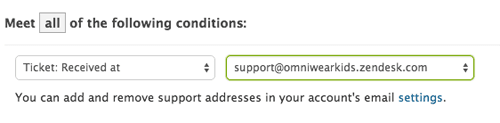
Zendesk provides a "Ticket: received at" condition that you can use in triggers, views, and SLA policies. Here are some practical applications:
Automatic routing with triggers:
Create a trigger that says: "If received at = sales@company.com, then assign to Sales Team and set priority to High." This ensures sales inquiries reach the right team immediately.
Filtered views:
Create views that show only tickets sent to specific addresses. Your billing team can have a view showing only billing@ tickets, while your technical team sees only support@ tickets.
SLA policies:
Apply different response time targets based on the address. Tickets to sales@ might have a 4-hour response SLA, while support@ tickets have a 1-hour SLA.
Multibrand organization:
If you manage multiple brands, each support address is associated with a specific brand. Tickets automatically inherit the brand based on which address they were sent to, ensuring the right branding appears in all customer communications.
Common issues and troubleshooting
Even with clear instructions, things sometimes go wrong. Here are the most common problems and how to fix them.
Verification emails never arrive
If you're setting up an external address and the verification email doesn't show up as a ticket, your forwarding isn't working. Double-check the forwarding address in your email server settings. Make sure there are no typos and that forwarding is actually enabled. Some providers require you to confirm forwarding via a separate email.
Replies show the wrong "from" address
By default, Zendesk replies from the same address the ticket was sent to. If replies are coming from a different address, check your trigger settings. You might have a trigger that's overriding the default behavior. Also verify that your support address has the correct display name set.
Emails going to spam
This usually happens with external addresses that haven't set up SPF and DKIM authentication. Add Zendesk's SPF record (include:mail.zendesk.com) to your DNS. For DKIM, you may need to add CNAME records pointing to Zendesk's servers. These records prove to email providers that Zendesk is authorized to send email on your domain's behalf.
"Forwarding status: failed"
If Zendesk shows a failed forwarding status, your mail server might be blocking the forwarding attempt. Check your server logs for rejected connections. Some corporate email servers have strict security policies that block automatic forwarding. You may need to whitelist Zendesk's IP addresses or use an authenticated connection method.
External address already in use
Each external email address can only be connected to one Zendesk account at a time. If you try to add an address that's already in use, Zendesk will show an error. You'll need to disconnect it from the other account first or use a different address.
Best practices for managing support addresses
Once you have multiple addresses, organization becomes important. Here are some patterns that work well:
Use clear naming conventions. Stick to standard prefixes like support@, help@, sales@, billing@, and info@. Avoid creative spellings or department-specific jargon that customers might not guess.
Set up business rules based on address. Use the "Ticket: received at" condition in triggers to route tickets automatically. This reduces manual work and ensures tickets reach the right team quickly.
Monitor address usage. Periodically check which addresses are actually receiving tickets. You might discover addresses that are no longer needed or identify gaps where customers are trying to reach you through addresses you haven't set up yet.
Test before announcing. Always send test emails to new addresses from different providers (Gmail, Outlook, Yahoo) to make sure they all create tickets correctly. Check that replies come from the expected address and that attachments work properly.
Document your structure. Keep an internal document listing all your support addresses, what they're for, and which teams handle them. This helps new team members understand your routing logic.
Managing support more efficiently with eesel AI
Once your support addresses are configured and working, you might notice patterns in the tickets coming in. Many are repetitive: password resets, order status checks, refund requests. This is where AI can help.
eesel AI integrates directly with Zendesk to handle these routine inquiries automatically. Unlike basic auto-responders, eesel AI learns from your past tickets and help center articles to provide accurate, contextual responses. It can draft replies for your agents to review, or handle simple requests entirely on its own.
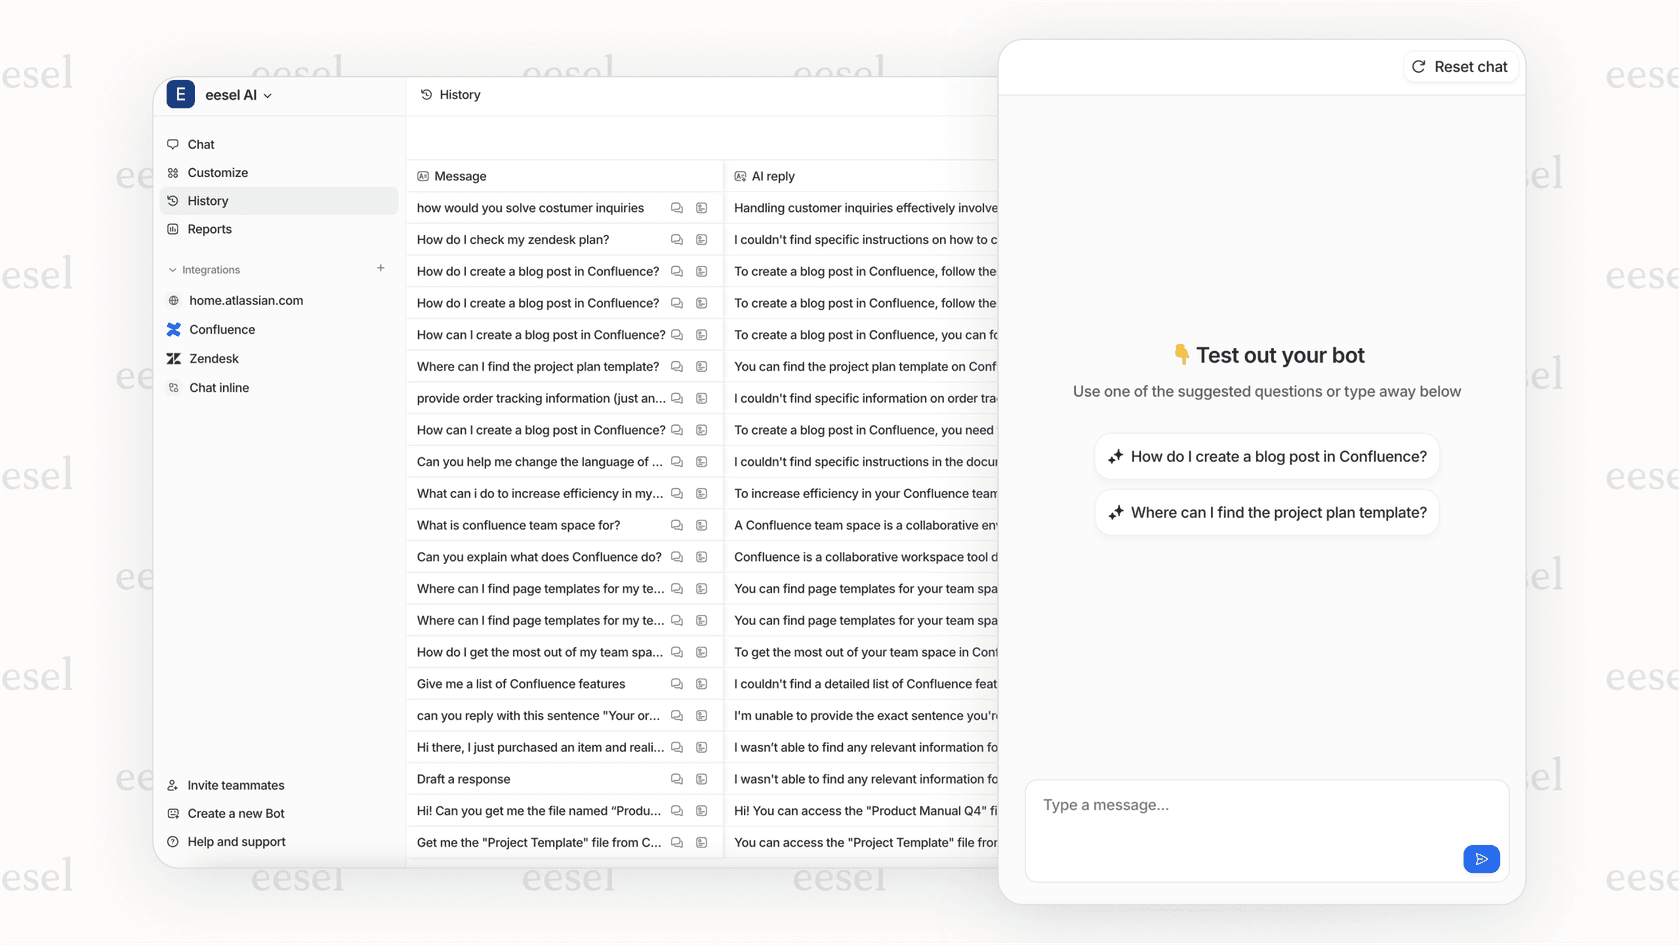
The setup is straightforward. You connect eesel AI to your Zendesk account, and it immediately starts learning your tone, policies, and common issues. You can run simulations on past tickets to see how it would respond before turning it on for real customers. Most teams start with eesel AI drafting replies for review, then expand to full automation as confidence grows.
For teams dealing with high email volumes, this can mean the difference between a backlog that grows all day and one that stays manageable. Our AI Agent product handles the frontline responses, while AI Copilot helps your human agents draft faster, more consistent replies.
