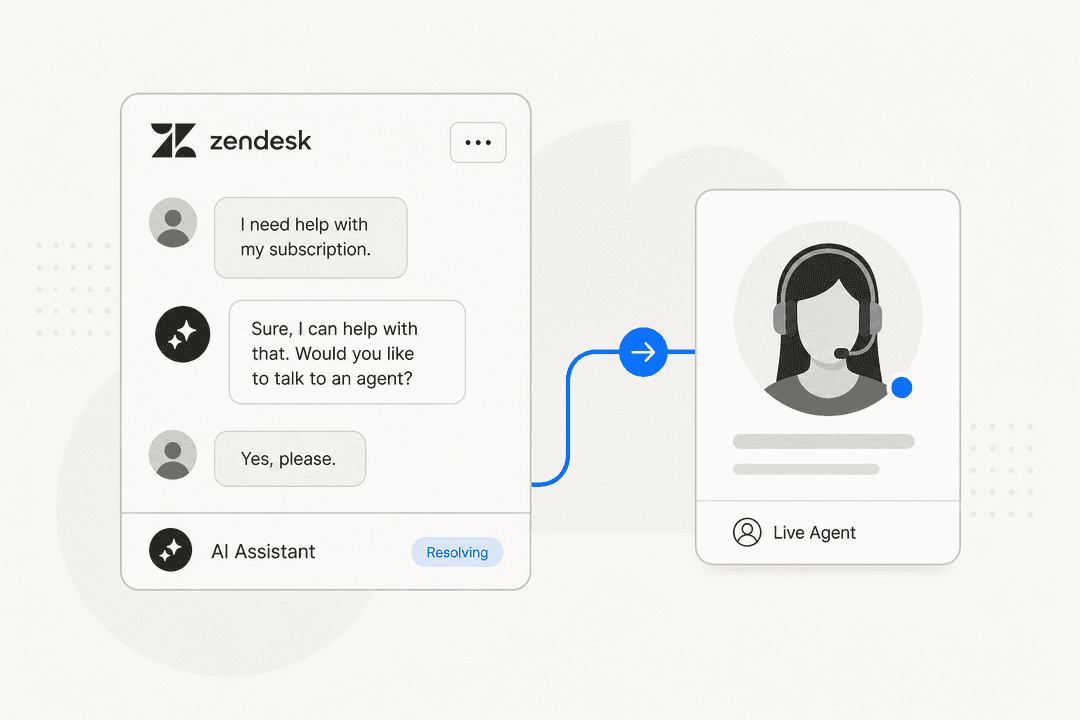
Getting AI agents to handle customer conversations is only half the battle. The other half is knowing exactly when to hand off to a human, and making sure that handoff is seamless. That's where escalation rules come in.
Zendesk's AI agent escalation rules let you define when conversations should transfer from AI to human agents, how that transfer happens, and what context gets passed along. Whether you're dealing with complex technical issues, frustrated customers asking for a supervisor, or sensitive billing disputes, well-configured escalation rules ensure nothing falls through the cracks.
This guide walks you through setting up Zendesk AI agent escalation rules step by step. By the end, you'll have a clear framework for deciding when to escalate, how to build escalation flows in the dialogue builder, and how to pass context so your human agents can pick up right where the AI left off.
What you'll need
Before diving into configuration, make sure you have the following in place:
- A Zendesk Suite plan (Team, Professional, or Enterprise) or Support plan
- The AI Agent Advanced add-on (required for the dialogue builder and custom escalation flows)
- Admin access to your Zendesk account
- A clear understanding of your support workflow and team capacity
The AI Agent Advanced add-on is what unlocks the dialogue builder, escalation blocks, and custom conversation flows. Without it, you're limited to Zendesk's basic AI agent capabilities, which include simple escalation to human agents but not the granular control we'll cover here.
Step 1: Define your escalation strategy
Before touching any settings, you need a clear strategy for when escalations should happen. Zendesk's documentation recommends considering several factors:
Team capacity and availability. If you have four agents handling 200-250 conversations daily, escalating too many messaging conversations will overload your team and create long wait times. In this scenario, you'd want to reserve messaging escalations for high-impact issues like product questions or shipping failures that directly affect revenue or customer satisfaction.
Query complexity and urgency. Some issues simply require human judgment: billing disputes, account cancellations, VIP customer requests, or technical problems that need troubleshooting beyond what your knowledge base covers.
Channel considerations. You have three escalation channels to work with: messaging (for live chat handoffs), ticket creation (for async follow-up), and email (for specific department routing). Each serves different purposes depending on your team's availability and the customer's preference.
Business hours. Escalating to live agents outside working hours frustrates customers. Your strategy should account for after-hours handling, perhaps defaulting to ticket creation instead of live chat transfers when no agents are online.
Take time to map out which types of queries should trigger each escalation method. This upfront planning makes the technical configuration much smoother.
Step 2: Access the dialogue builder
Once your strategy is clear, it's time to open the dialogue builder where you'll construct your escalation flows.
Navigate to Admin Center > Channels > AI agents. Select the AI agent you want to configure, then click into the dialogue builder. You'll see a visual workflow canvas where you can map out conversation paths using blocks.
The dialogue builder is the heart of Zendesk's advanced AI agent configuration. It uses a visual, drag-and-drop interface that lets you create complex conversation flows without writing code. Think of it as a flowchart where each step represents something the AI agent says, asks, or does.

Familiarize yourself with the interface. You'll see options to add various block types, connect them with paths, and configure the details of each step. The canvas shows your conversation flow from start to finish, making it easy to visualize the customer journey.
Step 3: Build escalation paths with escalation blocks
Now for the core configuration: setting up escalation blocks that trigger handoffs to human agents.
Escalation blocks are specific components in the dialogue builder that define how a conversation gets transferred when the AI agent can't (or shouldn't) resolve the issue. Here's how to create one:
- Click the plus (+) icon where you want the escalation to occur in your conversation flow
- Select Escalation from the block options
- Enter an AI agent message that tells the customer what's happening (for example: "I'm connecting you with a specialist who can help with this")
- Choose your escalation method from the three options:
Send an email creates a ticket via email to a specific department or agent. You'll configure the recipient email, ticket title, and optional email content. This works well for non-urgent issues or when you want to route to a specific team (like billing@ or technical@).
Forward to an agent transfers the conversation to an available human agent in real-time. By default, this goes to the group you specified when integrating your AI agent with Zendesk, but you can specify a different escalation team in the Details panel. You can also set an escalation fallback dialogue (like a "Failed escalation reply") if the transfer doesn't work.
Custom escalation doesn't transfer to a specific endpoint. Instead, it uses actions to add labels or set field values for analytics purposes. This is useful when you want to mark conversations for reporting but handle the actual routing through other means.
- (Optional) Add actions in the Details panel to perform tasks when escalation happens, such as adding tags, setting custom fields, or updating ticket properties
- Click Save to store your changes or Publish to make them live
You can create multiple escalation paths for different scenarios. For example, you might have one path for billing escalations that emails the finance team, and another for technical issues that forwards to your tier-2 support group.
Step 4: Add availability checks
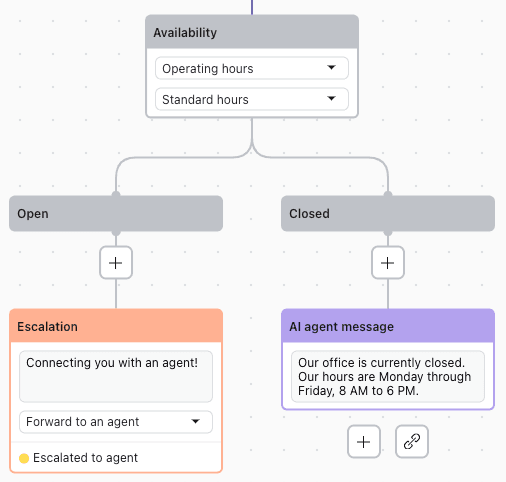
One of the most common escalation mistakes is transferring customers to live agents when nobody is actually available. Zendesk solves this with availability blocks.
Availability blocks check whether human agents are online and able to take conversations before allowing an escalation to proceed. This is especially important for synchronous channels like messaging, where customers expect immediate responses.
To add availability checking:
- Before your escalation block in the dialogue flow, click the plus (+) icon
- Select Availability to add an availability block
- Configure the block to check agent availability based on your business hours and agent status
- Create two paths from the availability block:
- If agents are available: route to your escalation block
- If no agents are available: route to an alternative (like offering to create an email ticket instead)
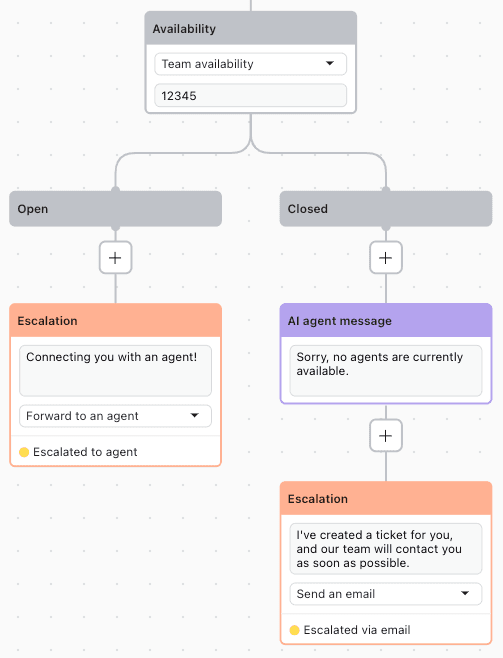
This approach ensures customers never get stuck waiting for an agent who isn't there. Instead, they get a helpful alternative that sets proper expectations.
Step 5: Configure context passing
A smooth escalation isn't just about transferring the conversation. It's about transferring the context so the human agent doesn't make the customer repeat information.
Zendesk lets you pass context through metadata, custom fields, and actions. Before an escalation happens, your AI agent can:
- Gather key information like order numbers, customer names, or account details
- Add tags that categorize the issue type or urgency
- Update ticket fields with specific values for routing
- Capture the full conversation history
In the escalation block's Details panel, use the Add action button to configure these data capture steps. For example, you might add an action that sets a "Priority" field to "High" for billing disputes, or tags tickets with "technical-escalation" for engineering issues.
For more advanced context passing, you can use metadata passed from your chat widget into Zendesk ticket fields. This requires some technical setup in your web integration, but it means data like customer ID, order history, or page context flows directly into the ticket the agent sees.
The goal is simple: when a human agent opens an escalated ticket, they should see everything the AI agent already learned about the customer's issue.
Step 6: Test and refine your escalation flows
Never push escalation flows to production without testing. Zendesk provides tools to verify your flows work as expected.
Test each escalation path by simulating conversations that should trigger handoffs. Verify that:
- The escalation triggers at the right moment in the conversation
- Context (tags, fields, conversation history) passes correctly to the human agent
- Availability checks work during and outside business hours
- Fallback options activate when escalations fail
- Email escalations create tickets with correct routing and subject lines
Monitor your escalation performance metrics after going live. Look at escalation rates by category, time to agent response after escalation, and customer satisfaction scores on escalated tickets. Use this data to refine your rules over time.
Common escalation scenarios and best practices
Different situations call for different escalation approaches. Here are patterns that work well:
High-priority customers. Use custom fields to identify VIP accounts and create escalation rules that bypass normal queues, routing directly to senior agents or account managers.
Multi-intent conversations. When customers ask multiple questions at once, Zendesk's AI Agent Advanced can now handle multiple intents in sequence. However, if the first intent requires escalation, the conversation hands off before resolving subsequent questions. Design your flows to either handle all intents before escalating, or set expectations that additional questions may need separate follow-up.
Email vs. messaging differences. Email AI agents can be configured to handle multiple use cases before escalating (controlled by the automation threshold setting). Messaging conversations are more synchronous, so escalation decisions happen in real-time based on the dialogue flow.
Avoiding over-escalation. Too many escalations defeat the purpose of AI automation. Reserve human handoffs for situations that truly require human judgment or authority. For everything else, improve your AI agent's knowledge base and conversation flows to increase resolution rates.
Enhancing Zendesk AI agent escalations with eesel AI
Zendesk's escalation framework is robust, but it's designed around Zendesk-native data sources. If your organization stores knowledge across multiple platforms, you might find the AI agent escalating more often than necessary simply because it can't access relevant information.
This is where we can help. At eesel AI, we've built an AI agent that integrates directly with Zendesk but pulls knowledge from wherever it lives: your Zendesk Help Center, Confluence, Google Docs, Notion, and dozens of other sources.

The result is fewer unnecessary escalations because the AI actually has access to the information customers need. When escalations do happen, our platform passes comprehensive context to your human agents, including citations to the exact source documents the AI referenced.
We also offer something Zendesk doesn't: simulation on your historical tickets before going live. You can test how our AI would have handled past conversations, measure projected escalation rates, and refine your approach before customers ever interact with the bot.
If you're already invested in Zendesk's ecosystem but want more flexible escalation rules without complex dialogue builder configuration, our AI agent lets you define escalation logic in plain English. No flowcharts, no blocks, just natural language instructions like "escalate billing disputes over $500 to the finance team."
Start optimizing your escalation strategy today
Well-designed escalation rules are the difference between AI automation that frustrates customers and AI automation that actually helps them. The key is being intentional about when to escalate, how to handle the handoff, and what context to preserve.
Zendesk's dialogue builder gives you granular control over this process, but it requires upfront planning and ongoing refinement. Start with clear escalation criteria based on your team's capacity and customer needs. Build availability checks to prevent transfers to absent agents. Pass context religiously so human agents can be productive from the first interaction. And test everything before exposing it to real customers.
If you find yourself hitting limitations with Zendesk's native capabilities, whether that's knowledge source restrictions, complex configuration overhead, or the need for better pre-deployment testing, our team at eesel AI is happy to show you an alternative approach. Book a demo and we'll walk you through how we handle escalations differently.