When customers reach out for support, the form they use shapes their entire experience. A well-designed ticket form captures the right information upfront, routes requests to the right team automatically, and reduces the back-and-forth that frustrates both customers and agents.
Zendesk ticket forms are the foundation of this experience. They determine what information customers provide when submitting requests and how that information is organized for your support team. Getting your account settings right for these forms is essential for running an efficient support operation.

This guide walks you through configuring Zendesk account settings for ticket forms. Whether you are setting up your first form or managing dozens for different request types, you will learn the administrative steps to create, customize, and optimize your forms.
If you are looking for ways to customize the appearance and behavior of forms beyond basic configuration, our guide to Zendesk request form customization covers advanced options including JavaScript API integration and custom development.
What you'll need
Before configuring ticket forms, confirm you have:
- A Zendesk account with admin access
- The appropriate plan for your desired features: multiple ticket forms require Suite Growth+ or Support Enterprise
- Basic understanding of ticket fields (custom fields must be created separately before adding to forms)
- Access to the Admin Center (not the legacy admin interface)
With prerequisites sorted, let's start with the configuration process.
Step 1: Access the ticket forms settings in your Zendesk account
Navigate to Admin Center > Objects and rules > Tickets > Forms to manage your ticket forms.
The Forms page displays all your ticket forms in two tabs: Active and Inactive. Active forms are available to agents and (if configured) end users. Inactive forms are hidden from both groups but can be reactivated later.
Every Zendesk account starts with at least one standard form: the Default ticket form. This form automatically includes all your active ticket fields when it is the only active form. Once you create additional forms, new fields you create will not automatically appear on the default form; you must manually add them.
The default form serves as a fallback. If a brand in your account cannot access its assigned form, Zendesk uses the default form instead. For this reason, Zendesk recommends keeping the default form assigned to all brands even when using multiple forms.
Step 2: Create a new ticket form
Click Add form to create a custom ticket form for specific request types. You will see the form editor with several configuration options.
Form name: This is what agents see in the ticket interface dropdown. Choose something descriptive like "Technical Support" or "Billing Inquiry."
End-user visibility: Check "Editable for end users" to make the form available in your help center. If you only want agents to use this form, leave this unchecked.
End-user name: Optionally display a different name to customers. For example, agents might see "Sales Request Form" while customers see "Contact Sales."
Brand restrictions: If you manage multiple brands, limit which ones can use this form. This is useful when different brands serve different purposes and need different intake fields.
Adding fields: Drag fields from the right panel onto your form, then reorder them by dragging within the form area. Available fields include:
- Text (single-line and multi-line)
- Dropdown menus
- Checkboxes
- Date pickers
- Numeric fields
- Regular expression validation fields
- Multi-select fields
- Lookup relationship fields
Important limitation: Field properties are set at the field level, not the form level. If you make a field required, it will be required on every form where it appears. You cannot make the same field required on one form but optional on another. Plan your field strategy accordingly.
Step 3: Configure form fields and conditional logic

Field arrangement: The order fields appear on the form matters for user experience. Place required fields first, group related fields together, and consider the logical flow of information gathering. Drag and drop to reorder.
Conditional fields: For more dynamic forms, you can show or hide fields based on other selections. This requires the conditional ticket fields feature, available on most plans.
To set up conditional logic:
- Create all the fields you need first (both the trigger field and the conditional fields)
- In the ticket form editor, find the conditional fields section
- Define rules like: "Show Product Model field only when Product Category equals Hardware"
Common field configuration mistakes to avoid:
- Creating too many required fields, which increases form abandonment
- Using conditional logic that creates circular dependencies
- Forgetting that field properties apply globally across all forms
- Not testing forms with actual data before making them live
Step 4: Manage and organize multiple ticket forms
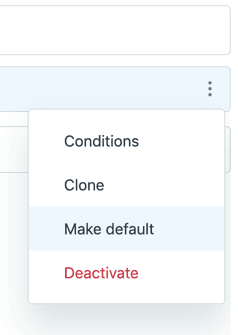
Changing the default form: Move your cursor over the form you want as default, click the options menu, and select Make default. The previous default remains visible to end users unless you edit it and deselect "Form name for end users."
Reordering forms: The order forms appear on the Forms page is the same order they appear in dropdowns for agents and end users. Click and drag form names to reorder. The first form in the list is used by default for AI agent tickets.
Activating and deactivating: Deactivate forms you are not currently using. This hides them from both agents and end users without deleting the form or affecting tickets where it was previously applied. Reactive forms by switching to the Inactive tab and selecting Activate.
Cloning vs creating new: Clone an existing form when you need a similar form with slight modifications. This saves time compared to building from scratch. Create new forms when the requirements are substantially different.
Step 5: Present forms to end users
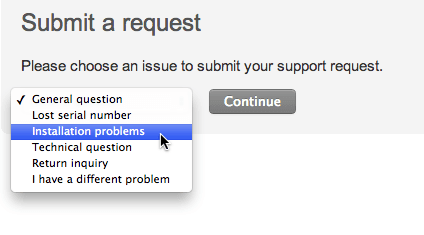
Help center integration: Forms marked as visible to end users automatically appear in your help center's "Submit a request" page. Users select the form that matches their need, then see the relevant fields for that request type.
Web Widget (Classic): Embed support directly on your website. Navigate to Admin Center > Channels > Classic > Web Widget to configure which forms appear in the widget. Note that some field types (Regex, Date, Multi-select) are not supported in the Web Widget.
Direct form URLs: Link directly to specific forms using URL parameters. The format is:
https://{company}.zendesk.com/hc/en-us/requests/new?ticket_form_id={form_id}
You can also pre-fill fields by adding parameters like tf_subject=Issue description or tf_{field_id}=value for custom fields.
Testing before going live: Always test forms from an end-user perspective before making them widely available. Create test tickets, verify fields appear correctly, and confirm conditional logic works as expected.
Common issues and troubleshooting
Even with correct configuration, issues can arise. Here are solutions to common problems:
Form not appearing for end users: Check that "Editable for end users" is selected in the form settings. Also verify the form is active, not inactive.
Fields not showing as expected: Remember that field properties are global. If a field is required, it is required everywhere. If a field is hidden by conditional logic, check that the trigger field has the correct value.
Default form changing unexpectedly: This can happen when brand restrictions are misconfigured. If a brand cannot access its assigned form, Zendesk falls back to the default form. Review brand assignments in your form settings.
Form order not reflecting in dropdowns: Changes to form order take effect immediately, but browser caching might delay the update. Try clearing cache or testing in an incognito window.
When forms become too complex: An alternative approach
Ticket forms work well for structured, predictable request types. But they have limitations. Forms are static, require maintenance as your business changes, and force customers to categorize their own issues before they understand your support structure.
Signs your form strategy needs rethinking:
- You have dozens of forms and customers still choose the wrong one
- Conditional logic has become a maze of dependencies
- Adding a new product or service requires updating multiple forms
- Customers abandon forms because they are too long or confusing
eesel AI for Zendesk offers a different approach. Instead of configuring static forms, you deploy an AI agent that learns from your existing Zendesk data (past tickets, macros, help center articles) and handles intake conversationally.

The AI gathers context naturally through conversation rather than rigid form fields. It determines the right department based on the conversation content, not what the customer selected from a dropdown. And it can resolve common issues without human intervention, not just capture information.
For teams already using Zendesk, eesel AI integrates directly with your existing setup. You do not need to replace anything. The AI works alongside your current configuration, handling routine conversations while escalating complex issues to your team.
Choosing the right ticket form strategy
Configuring Zendesk account settings for ticket forms gives you control over how customers interact with your support system. The steps are straightforward: access the Forms page in Admin Center, create forms for different request types, configure fields and conditional logic, organize multiple forms effectively, and present them to end users through your help center or Web Widget.
Best practices for maintaining forms over time:
- Review forms quarterly to ensure they still match your business needs
- Monitor which forms customers use most and which they avoid
- Keep forms as simple as possible while capturing necessary information
- Document your form strategy so your team understands the logic
If you find yourself spending more time managing forms than improving customer experience, consider whether a conversational AI approach might better serve your team and customers. eesel AI's AI Agent handles the complexity of intake automatically, letting you focus on solving problems rather than configuring forms.