Configuring your Zendesk account properly from the start saves hours of headaches later. Whether you're setting up a new instance or optimizing an existing one, understanding where to find and how to adjust your account settings is essential for running an efficient support operation.
This guide walks you through the core configuration steps every Zendesk administrator should complete. We'll cover everything from basic account information to security settings and communication channels. By the end, you'll have a solid foundation for your support platform.
While Zendesk offers extensive customization options, some teams find that AI-powered alternatives like eesel AI can reduce the configuration burden by learning from existing help desk data automatically. But let's focus on getting your Zendesk account set up first.

What you'll need before you start
Before diving into configuration, make sure you have:
- Administrator access to your Zendesk account (only admins can modify account settings)
- A clear understanding of your team's support workflow and routing needs
- Your company's branding assets (logo, preferred colors, favicon)
- A list of email domains and communication channels you plan to connect
- Basic familiarity with Zendesk's interface navigation
It's also worth documenting your current setup if you're migrating from another platform. This helps ensure you don't miss critical configurations during the transition.
Step 1: Access the Admin Center
The Zendesk Admin Center is your central hub for all account configuration. Here's how to get there:
- Log into your Zendesk account
- Click the Zendesk Products icon (gear icon) in the top navigation bar
- Select Admin Center from the dropdown menu
Once inside, you'll see a sidebar navigation menu organized by categories: Account, People, Workspaces, Channels, and more. The search bar at the top lets you quickly find specific settings without hunting through menus.
Familiarize yourself with this layout. You'll be spending a lot of time here as you configure and maintain your account.
Step 2: Configure general account settings
Start with the foundational settings that affect your entire account. Navigate to Admin Center > Account to access these options.
Account basics:
- Account name: This appears in notifications and emails sent from your account
- Time zone: Sets the default for your entire account (individual users can override this)
- Default language: Determines the language for system messages and default content
Business hours and scheduling: Setting accurate business hours is critical because they affect SLA calculations and automation triggers. Go to Admin Center > Objects and rules > Schedules to define:
- Your standard business hours for each day
- Holiday schedules for time off
- Multiple schedules if you have teams in different time zones
Branding and customization: Under Admin Center > Account > Brand management, you can customize:
- Your account logo and favicon
- Header colors and page background colors
- Custom domains (host mapping) for a branded experience
- Multiple brands if you're managing several support portals

Sandbox environments: Before making major changes to your live account, consider using a sandbox. Zendesk offers sandbox environments where you can test configurations safely. This is especially valuable for enterprise accounts making significant workflow changes.
Step 3: Set up user roles and permissions
Getting your team structure right from the start prevents access issues later. Navigate to Admin Center > People to manage users and permissions.
Understanding access levels:
| Role | Capabilities |
|---|---|
| Account Owner | Full control, billing access, can delete account |
| Administrator | Full configuration access, user management |
| Agent | Can view and respond to tickets, limited settings access |
| Light Agent | Can view tickets and add private comments only |
| End User | Can submit and view their own tickets only |
Setting up your team:
- Add team members: Go to People > Team members and invite users by email
- Assign roles: Give each user the appropriate access level based on their responsibilities
- Create groups: Organize agents into logical teams (Tier 1 Support, Billing, Technical, etc.) under People > Groups
- Configure end-user access: Decide who can submit tickets:
- Open: Anyone can view your help center and submit tickets
- Closed: Only users you add can sign in and submit requests
- Restricted: Only approved email domains can submit requests
Custom user fields: If you need to track additional information about your users (department, VIP status, account tier), you can create custom user fields under People > User fields. This data can then be used in triggers, automations, and reports.
Step 4: Configure security and authentication
Security settings protect your account and customer data. Navigate to Admin Center > Account > Security to configure these options.
Two-factor authentication (2FA): Require administrators and agents to use 2FA for an additional layer of security. You can enforce this account-wide or for specific roles.
Password policies: Set minimum password requirements including:
- Minimum character length
- Complexity requirements (uppercase, lowercase, numbers, symbols)
- Password expiration intervals
- Prevention of password reuse
IP restrictions: If your team works from specific locations, you can restrict account access to approved IP addresses. This prevents unauthorized access even if credentials are compromised.
Single Sign-On (SSO): For enterprise teams, configure SSO integration with your identity provider (SAML, JWT, or OAuth). This lets users log in with their existing company credentials and simplifies user management.
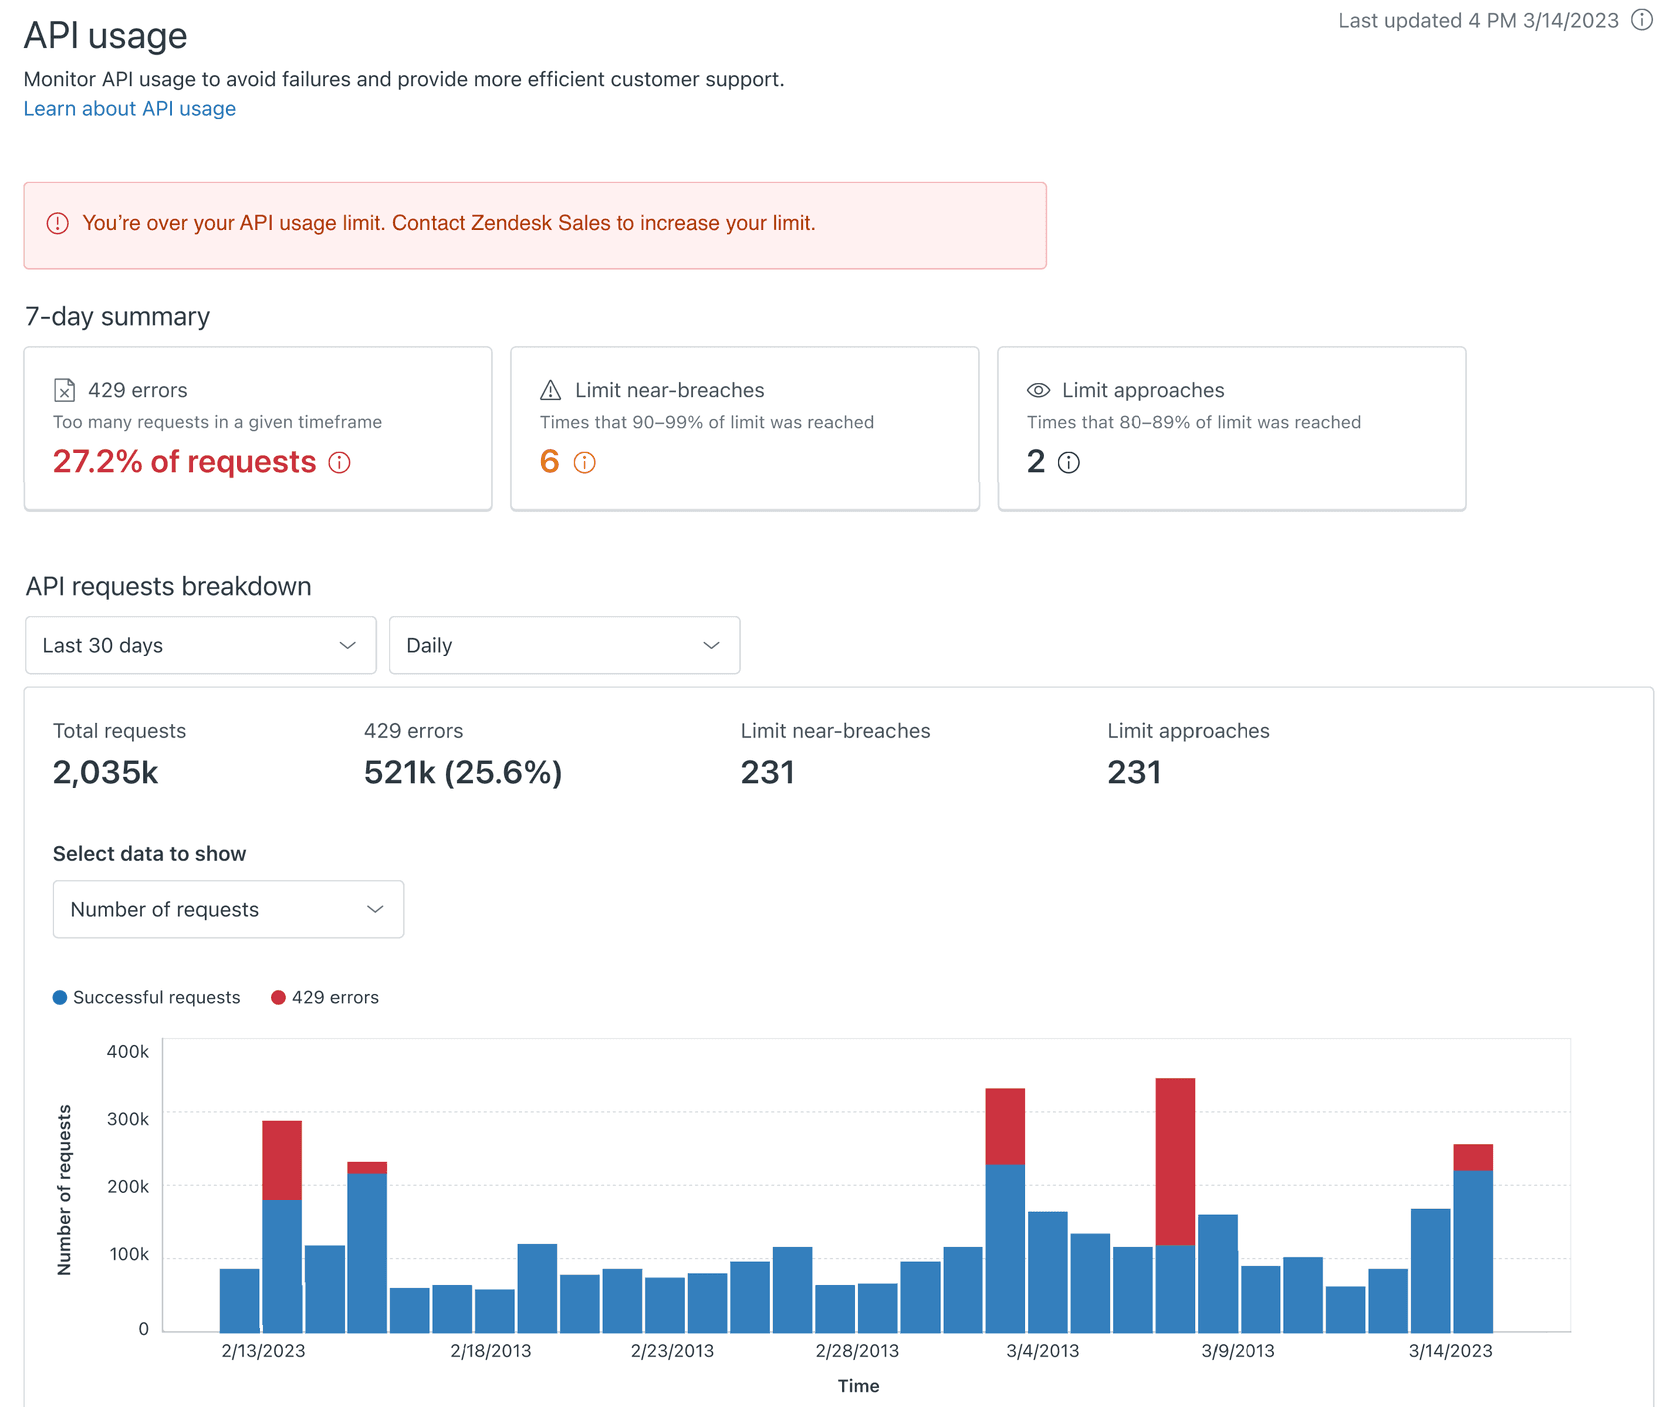
API access management: Under Admin Center > Apps and integrations > APIs, you can:
- Generate API tokens for integrations
- Enable or disable password access for API authentication
- View API activity and usage
- Restrict API access by IP if needed
Step 5: Set up communication channels
Your customers need ways to reach you. Configure your channels under Admin Center > Channels.
Email channel: The email channel is usually the first to set up:
- Add your support email address (e.g., support@yourcompany.com)
- Configure DNS records (SPF, DKIM, CNAME) for email authentication
- Set up email templates and signatures
- Configure email routing rules
Proper email authentication prevents your messages from landing in spam folders. Zendesk provides specific DNS records to add to your domain's DNS configuration.
Zendesk Talk (phone): If you offer phone support:
- Enable Talk in your account settings
- Purchase or port phone numbers
- Set up IVR menus and routing
- Configure business hours for call routing
- Set up voicemail and callback options
Messaging and social channels: Connect additional channels based on your customers' preferences:
- Web Widget: Embed chat on your website
- Social media: Connect Facebook, X (Twitter), WhatsApp
- Mobile SDK: Add support to your mobile apps
Customer satisfaction (CSAT): Enable CSAT surveys to measure customer happiness. You can configure:
- When surveys are sent (after ticket resolution, etc.)
- Survey question customization
- Response tracking and reporting
Common configuration mistakes to avoid
Even experienced admins sometimes overlook these critical settings:
-
Forgetting business hours: SLA targets calculate based on business hours. If you don't set these correctly, your SLA reporting will be inaccurate.
-
Skipping email authentication: Without proper SPF and DKIM records, your support emails may go to spam. Always complete the DNS configuration.
-
Overlooking agent workspace customization: The default ticket view isn't optimized for every team. Take time to set up views, macros, and shortcuts that match your workflow.
-
Missing security basics: Enable 2FA for all admins and require strong passwords. Security breaches are much harder to fix than they are to prevent.
-
Not documenting changes: Keep a record of significant configuration changes. When something breaks six months later, you'll thank yourself for the documentation.
Managing your Zendesk account more efficiently
Zendesk's flexibility is both a strength and a challenge. The extensive configuration options mean you can tailor the platform to your exact needs, but they also require ongoing maintenance and optimization.
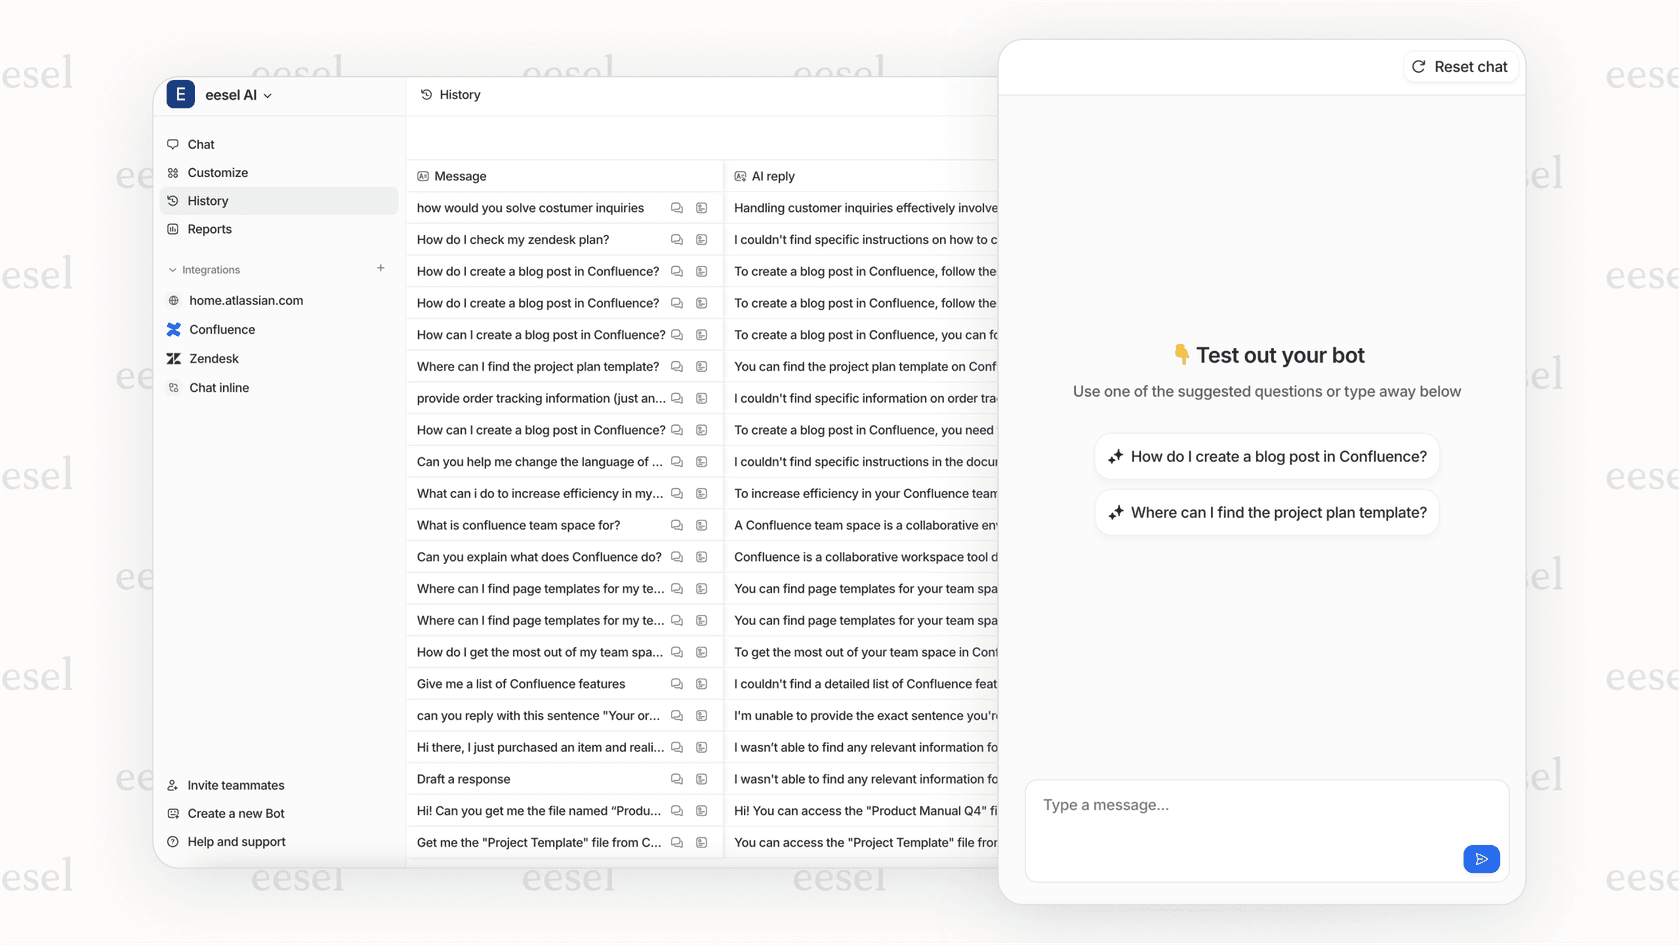
For teams looking to reduce the configuration overhead, AI-powered support solutions offer an alternative approach. Instead of manually configuring rules, triggers, and workflows, these tools learn from your existing help desk data to understand your business context automatically.
eesel AI, for example, connects directly to your Zendesk account and learns from your past tickets, help center articles, and macros. This means it can start assisting with responses or handling routine inquiries without weeks of setup and fine-tuning.
The key is choosing the approach that fits your team's resources and support volume. If you have dedicated administrators and complex routing needs, Zendesk's native configuration tools give you the control you need. If you're looking to get up and running quickly with AI assistance, an integrated solution might be worth exploring.
Whichever path you choose, starting with a solid account configuration (as outlined in this guide) gives you the foundation for effective customer support.
