If you're managing a support team in Zendesk, getting your agent groups set up correctly is one of the most important foundations for smooth operations. Groups determine how tickets get routed, who can see what, and how your team collaborates on customer issues.
Here's everything you need to know about creating and structuring agent groups in Zendesk, from the basic setup to strategic organization that scales with your team.
What are Zendesk agent groups and why do they matter?
Agent groups in Zendesk are collections of team members organized by shared criteria. Think of them as buckets that hold your agents based on skills, responsibilities, or the types of tickets they handle. According to Zendesk's documentation, groups are fundamental to how tickets flow through your support operation.
Here's what makes groups essential:
- Ticket routing: Groups determine which agents receive which tickets
- Access control: Views, macros, and business rules can be restricted by group
- Workflow organization: Reports and analytics can be filtered by group performance
- Collaboration: Agents within the same group can easily share context and workload
Every agent in Zendesk must belong to at least one group, though they can be members of multiple groups simultaneously. This flexibility lets you build complex organizational structures without limiting individual agent capabilities.
The way you structure your groups directly impacts how efficiently your team operates. Poorly planned groups lead to tickets sitting unassigned, agents overwhelmed with irrelevant requests, and reporting that doesn't reflect reality. Well-designed groups create clear ownership, balanced workloads, and insights you can act on.
How to create agent groups in Zendesk
Creating groups is straightforward, but doing it right requires some planning. Here's the process:
Step 1: Access the Groups page in Admin Center
Navigate to Admin Center → People → Team → Groups to see your existing groups and create new ones. You can learn more about the Groups page in Zendesk's help documentation.
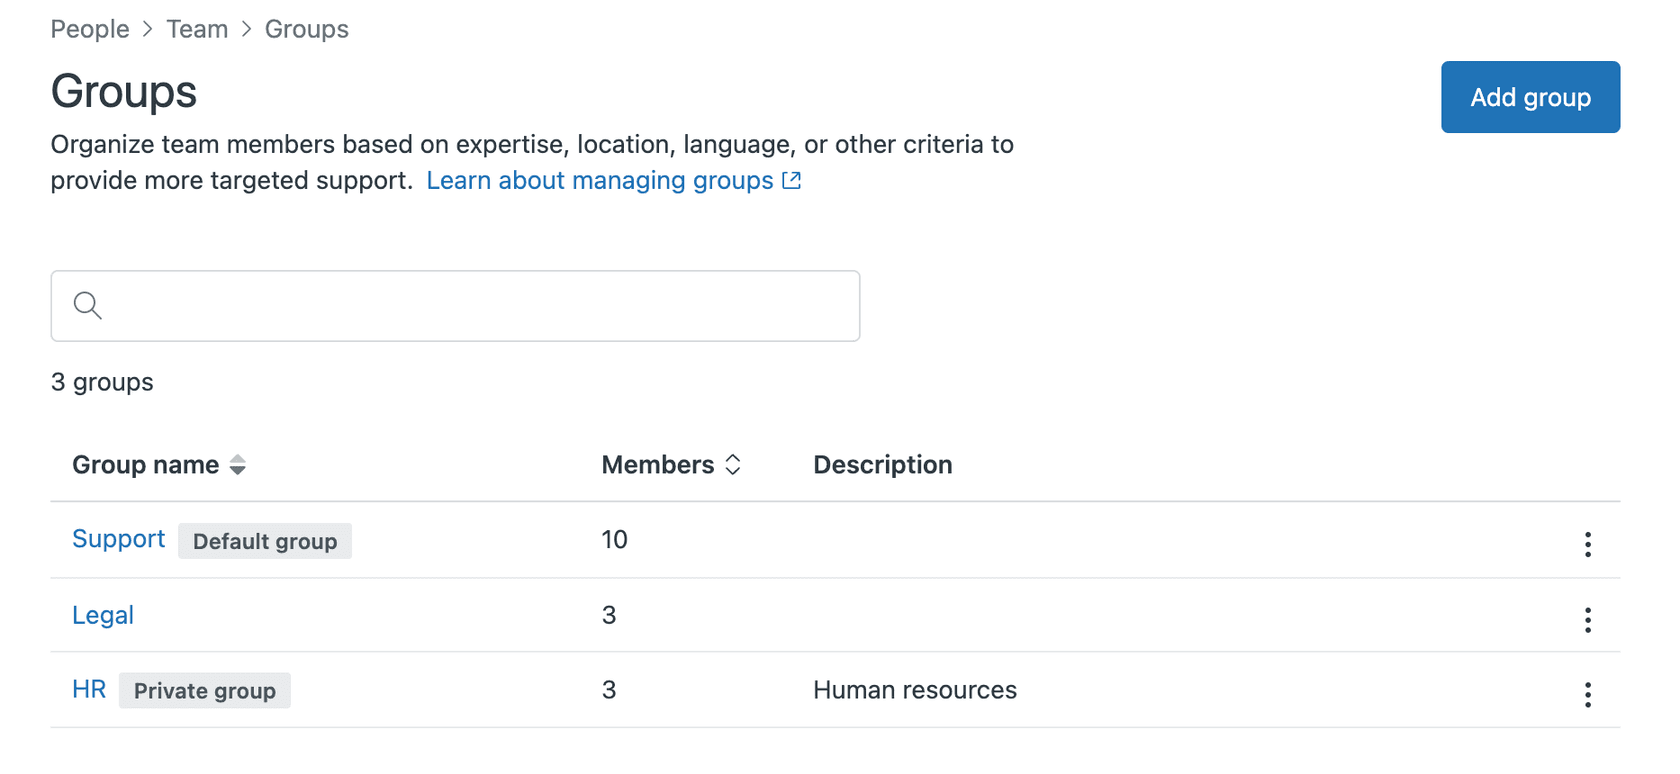
You'll need admin permissions to create and manage groups. If you don't see the Admin Center option, check with your account administrator about getting the right access level.
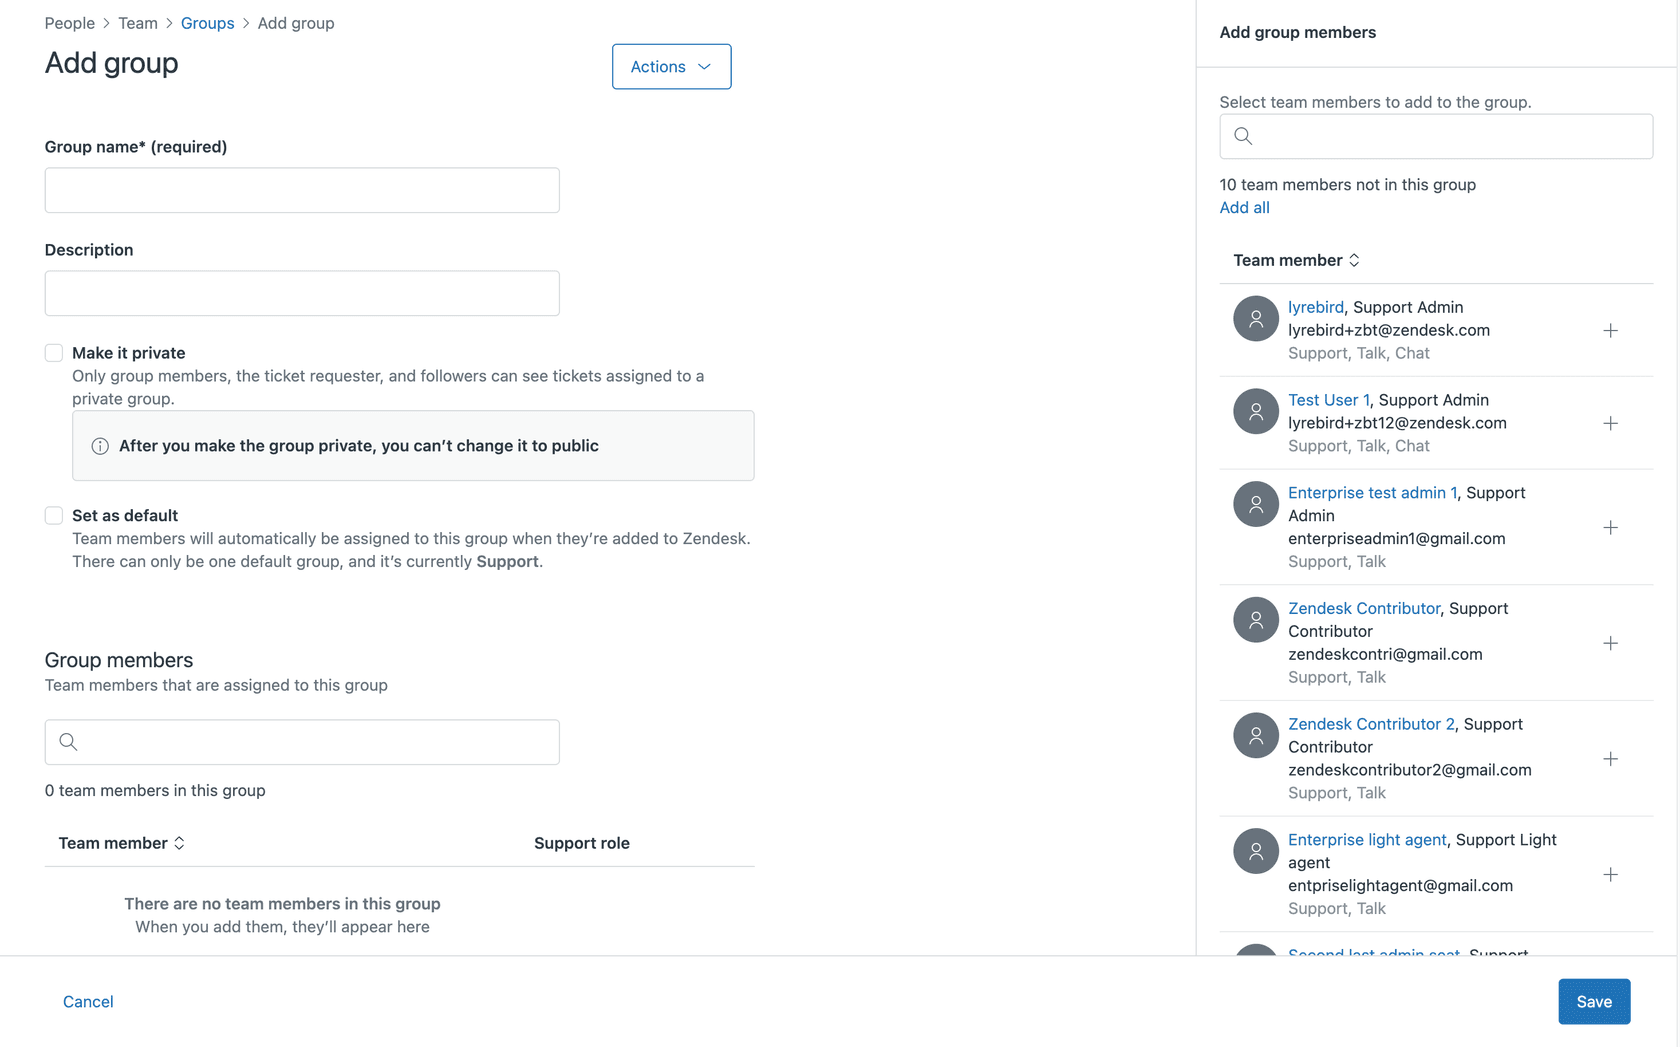
Step 2: Create a new group
Click Add group and enter the essential details:
- Group name: Use something clear and descriptive (e.g., "Level 1 Support" or "Billing Team")
- Description: Optional but recommended for larger teams
For detailed instructions on creating groups, see Zendesk's guide on creating and managing groups.
Good naming conventions matter. Avoid vague names like "Group A" or "Team 1." Instead, use names that immediately tell other admins what the group does.
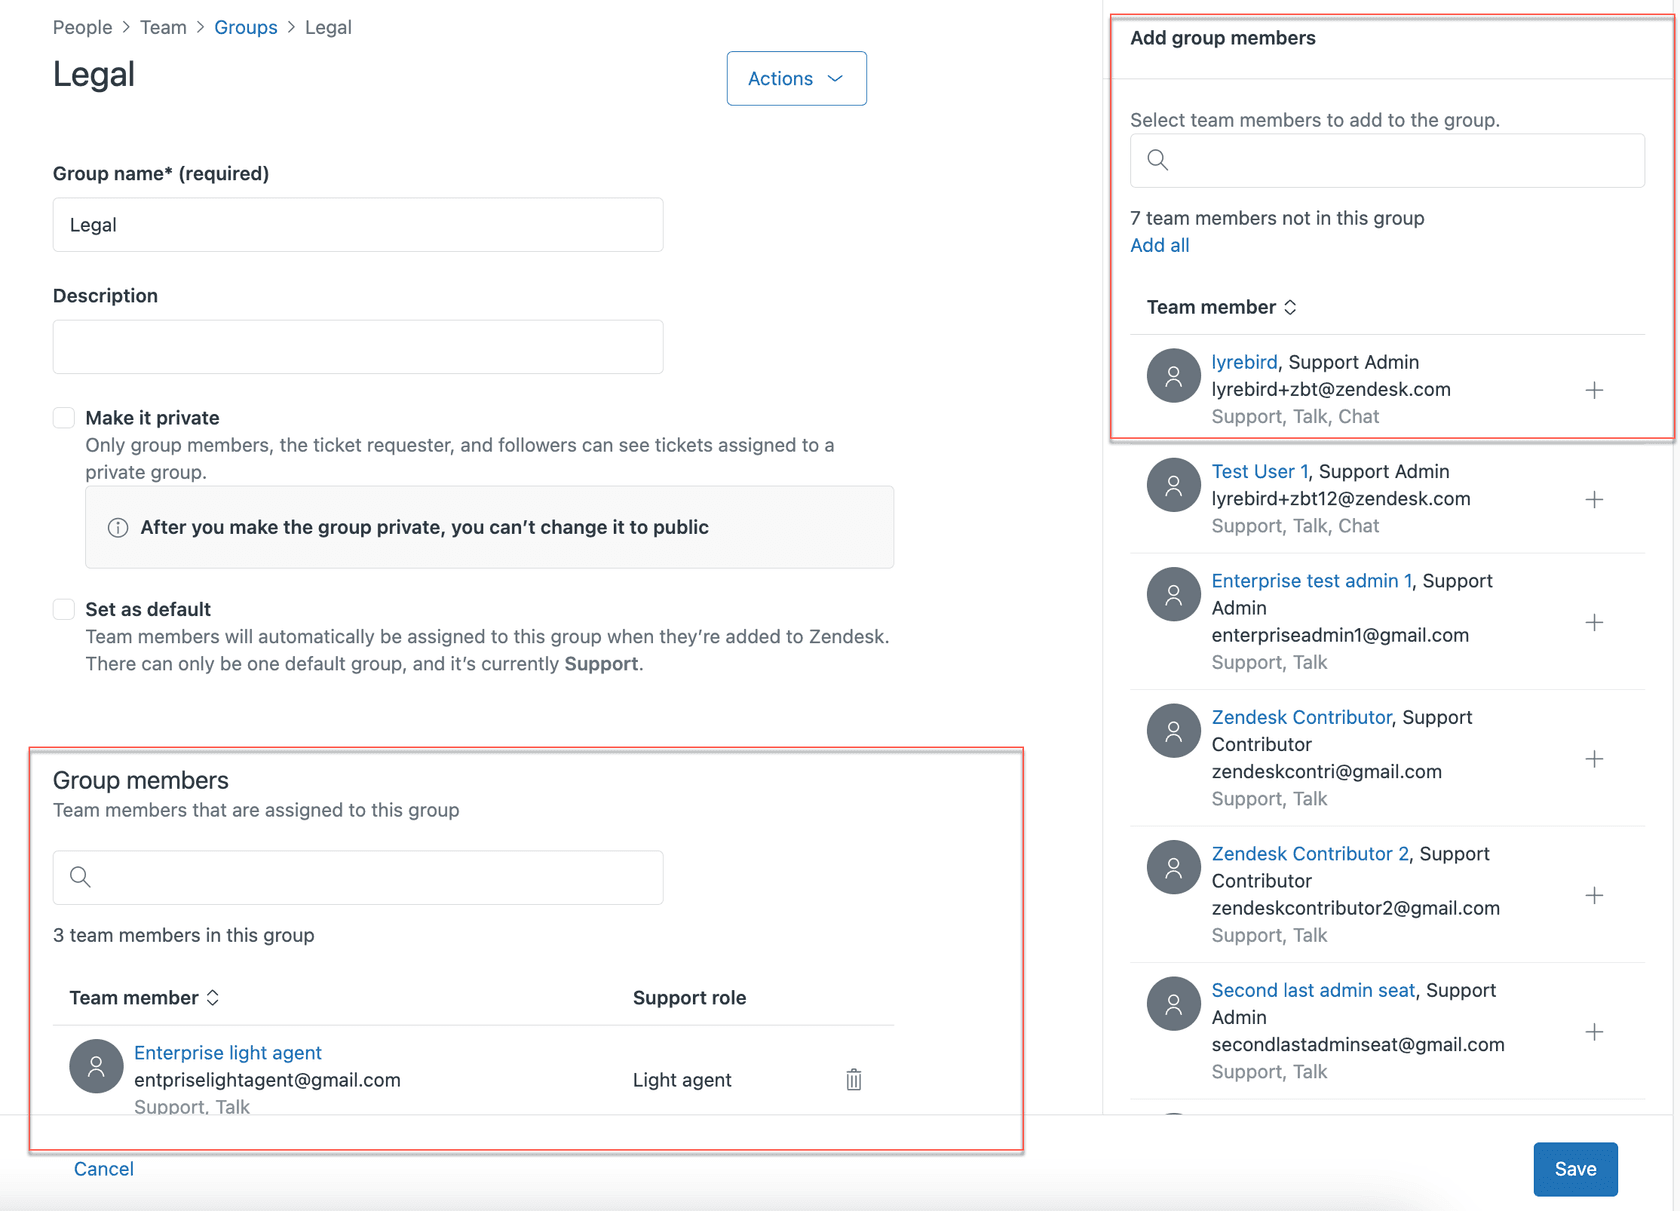
Step 3: Add agents to the group
Under Add group members, click the plus sign next to each agent you want to include. You can also click Add all to include everyone at once, then remove individuals as needed.
For more details on managing team members, check out Zendesk's article on adding and removing team members from groups.
The search function helps you find specific team members quickly if you have a large organization. You can search by name or email address.
Step 4: Set group options
Choose your group settings:
- Make it the default group: All new agents will automatically join this group
- Make it private (Enterprise plans only): Restricts ticket visibility to group members
Important note about private groups: once you make a group private, you can't convert it back to public. This setting is permanent, so be certain before enabling it. Learn more about creating private ticket groups in Zendesk.
Step 5: Save and verify
Click Create group (or Save if editing). The new group appears in your groups list immediately. Double-check that the member count matches what you expected.
After creation, you can edit the group anytime to add or remove members, change the description, or adjust settings (except for the private group setting, which is locked).
Strategic group structure models
Now that you know how to create groups, let's look at how to organize them strategically. The right structure depends on your support model, team size, and business needs.
By support tier (Level 1, 2, 3)
This is the classic escalation model. Structure your groups to match support complexity:
- Level 1: General support handling common issues and initial triage
- Level 2: Technical specialists for complex problems
- Level 3: Expert engineers or product specialists for escalations
Best for: Technical support teams, IT help desks, organizations with clear escalation paths
Tickets start at Level 1 and move up as needed. This keeps specialists focused on complex issues while junior agents handle routine requests.
By expertise or product line
Organize groups around what your team supports:
- Product specialists: Software team, Hardware team, API support
- Functional areas: Billing, Account Management, Technical Support
- Service types: Onboarding, Renewals, Troubleshooting
Best for: Multi-product companies, teams with specialized knowledge requirements
This model ensures customers reach agents who understand their specific needs. It works especially well when your products require distinct expertise that takes time to develop.
By region or language
For global support teams, geography and language matter:
- Regional groups: Americas, EMEA, APAC
- Language groups: English, Spanish, German, Japanese support
- Time zone coverage: Follow-the-sun handoff groups
Best for: Global organizations, multilingual support teams, 24/7 coverage needs
Regional grouping helps with time zone coverage and cultural context. Language-based groups ensure customers communicate in their preferred language, which significantly impacts satisfaction scores.
By customer segment or SLA
Some customers need different service levels:
- Tier-based: Enterprise, Business, Standard customers
- SLA-based: Platinum SLA, Gold SLA, Silver SLA
- Relationship-based: Strategic accounts, High-value customers
Best for: B2B support, tiered service offerings, organizations with formal SLAs
This structure ensures your highest-value customers get appropriate attention. It also makes SLA reporting cleaner since you can track performance by segment.
Hybrid approaches
Most organizations end up with hybrid structures that combine multiple models:
- Regional groups with tiered sub-structures (Americas Level 1, Americas Level 2)
- Product groups with language splits (Software - English, Software - Spanish)
- Segment-based with expertise specialization (Enterprise Technical, Enterprise Account)
The key is starting simple and adding complexity only when necessary. A structure that's too complicated creates more problems than it solves.
Best practices for group management
Creating groups is just the beginning. Keeping them organized requires ongoing attention.
Keep group names clear and consistent
Establish naming conventions early:
- Use consistent terminology ("Support" not "Help Desk" in some places)
- Include location or function in the name when relevant
- Avoid abbreviations that new team members won't understand
- Consider adding creation dates for temporary groups
Document the purpose of each group
In the description field, note:
- What types of tickets this group handles
- Any special requirements for group membership
- Who manages the group
- When the group was created and why
This documentation helps future admins understand your structure.
Regularly audit group memberships
Set a calendar reminder to review groups quarterly:
- Remove agents who have changed roles or left the company
- Check that new agents are in appropriate groups
- Verify default group assignments still make sense
- Look for unused groups that can be archived
Plan for scaling
Your group structure should grow with your team:
- Design for 2-3x your current size
- Create naming conventions that accommodate expansion
- Consider how new products or regions will fit
- Document your organizational logic for future hires
Consider how groups interact with other Zendesk features
Groups don't exist in isolation. They connect to:
- Views: Group-restricted views show only relevant tickets
- Macros: Some macros can only be used by certain groups
- Triggers: Auto-assignment rules often route by group
- Reporting: Group-based reports track team performance
Before creating a new group, think through how it will interact with your existing workflow rules.
Common pitfalls to avoid
- Too many groups: Having 50+ groups creates administrative overhead and confusion
- Overlapping responsibilities: Agents in multiple groups with similar purposes creates assignment conflicts
- Orphaned groups: Groups with no active members or no assigned tickets clutter your setup
- Inconsistent naming: Makes it hard to find the right group quickly
- Overly complex hierarchies: Simple structures are easier to maintain and explain
Working with private groups (Enterprise)
Private groups are an Enterprise-only feature that adds a layer of security for sensitive tickets.
What private groups do
When a ticket is assigned to a private group:
- Only agents in that group can see the ticket
- Admins and team leaders can see all private group tickets by default
- Collaborators added to a private ticket can see that specific ticket but not others in the group
- The ticket requester (if they're an agent) can't access it through the Agent Workspace
When to use private groups
Consider private groups for:
- Security incident response
- Executive support requests
- HR or personnel-related issues
- Legal or compliance matters
- Financial data access requests
Creating private groups
The process is identical to creating standard groups, except you select Make it private before saving. Remember: this setting can't be undone. Once private, always private.
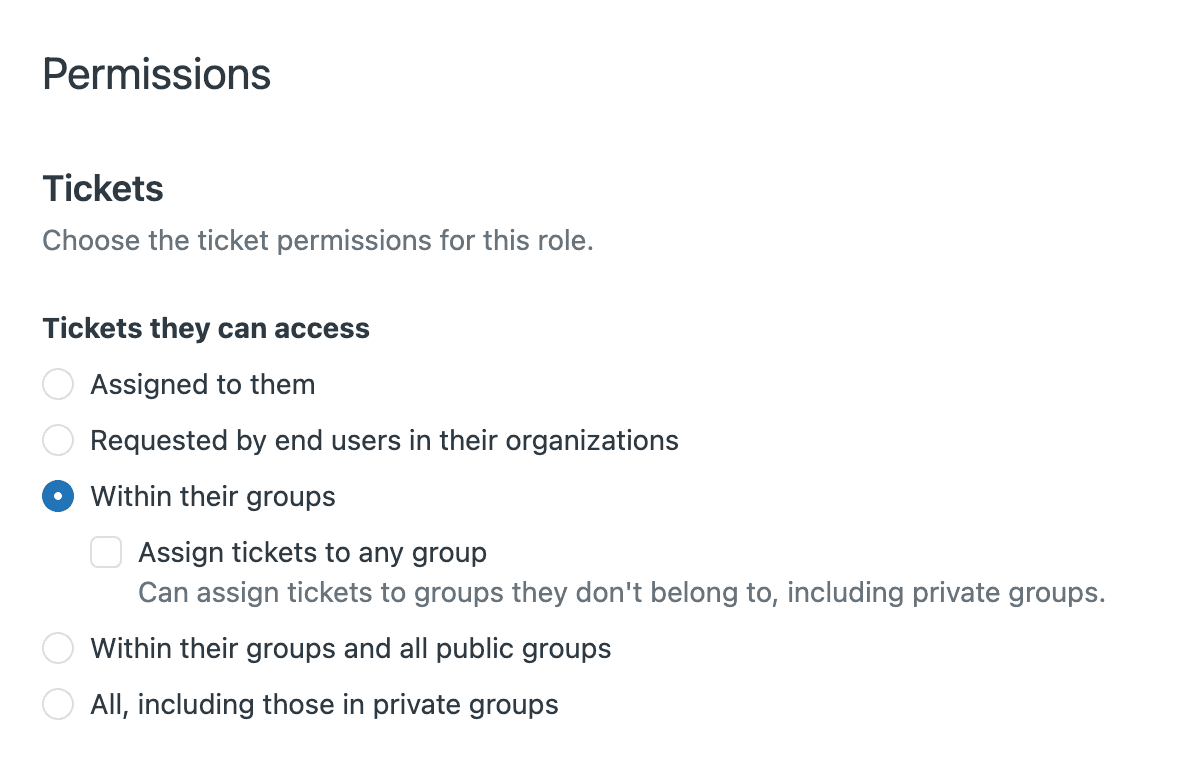
Access permissions
Access to private group tickets is controlled at the role level. For custom roles, you can configure specific permissions to view private group tickets. Among native roles, only Admins and Team Leaders have this access by default.
Integrating agent groups with AI teammates
Modern support teams are increasingly using AI teammates alongside human agents. Understanding how AI agents work with your group structure can help you design more efficient workflows.

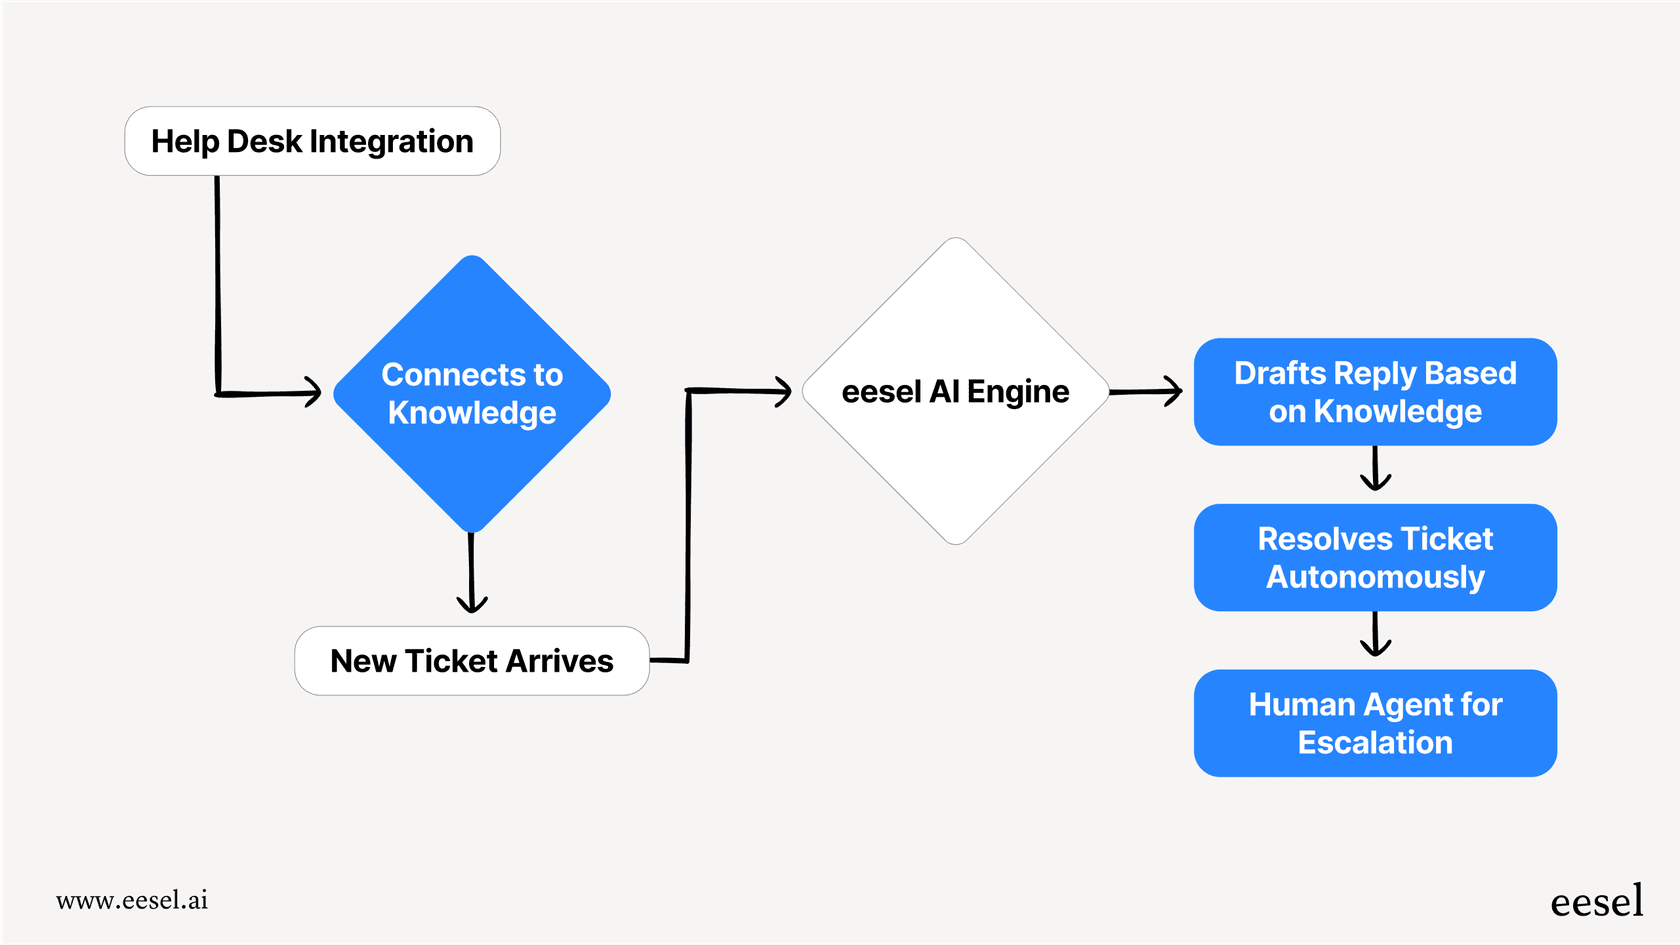
AI teammates like eesel AI can be integrated into your Zendesk groups just like human agents. Here's how this works in practice:
AI agents within groups: You can assign AI teammates to specific groups to handle routine tickets automatically. For example, an AI agent in your "Level 1 Support" group can resolve common FAQs while escalating complex issues to human agents. eesel AI's AI Agent can achieve up to 81% autonomous resolution in mature deployments.
Escalation paths: When an AI agent encounters a ticket it can't resolve, it can escalate within the group structure. A ticket might start with an AI agent in the Billing group, then escalate to a human specialist in the same group if the issue requires human judgment. Learn more about AI agent escalations in Zendesk.
Group-based routing: AI can help with initial triage and routing. By analyzing ticket content, an AI teammate can suggest or automatically assign tickets to the most appropriate group based on the issue type, customer segment, or required expertise. AI Triage handles the operational work that clogs support queues.
Consistent handoffs: When AI and human agents work within the same group structure, ticket handoffs are smoother. The AI provides context and summary information that human agents can pick up seamlessly. You can also use AI Copilot to draft replies for human agents to review.
If you're looking to enhance your Zendesk setup with AI capabilities, eesel AI integrates directly with Zendesk and works within your existing group structure. This means you don't need to restructure your groups to add AI you just invite eesel to the groups where it'll add the most value. Check out our complete guide to AI and automation in customer support for more strategies.
Start organizing your support team with Zendesk groups
Well-structured agent groups are the foundation of efficient support operations. They determine how work flows through your team, who handles what, and how you measure performance.
The key takeaways:
- Start with a simple structure that matches your current needs
- Use clear, consistent naming conventions
- Document why each group exists
- Audit memberships regularly
- Plan for growth from the beginning
Whether you're setting up Zendesk for the first time or reorganizing an existing instance, taking time to think through your group structure pays dividends in operational efficiency.
And if you're looking to augment your team with AI capabilities, consider how an AI teammate could fit into your group structure. eesel AI's Zendesk integration works alongside your human agents within your existing Zendesk groups, handling routine tickets and escalating complex issues to the right people. You can invite eesel to your team and see how it fits into your workflow without restructuring everything you've built.
