


You control an AI agent from the CLI the same way you control any service you run: install a command-line tool, authenticate once, then drive the whole lifecycle with commands you can script and version. The loop is install, connect your data, set the agent's instructions, simulate it on real history, trigger runs, watch the activity log, and gate risky actions behind approvals.
For a support agent specifically, eesel ships this as a real tool: @eesel/cli (an npm binary), plus an MCP server, webhooks, and Network Access. The docs go as far as saying everything on the site can be done from the terminal. That is the difference between a product that has a CLI bolted on and one you can actually operate without a browser.
One honest caveat up front: not every vendor gives you this. eesel does not publish a separate versioned REST API you can point a Postman collection at. The programmable surface is the CLI, MCP, webhooks, and Network Access. If your mental model of "control from the CLI" is CRUD calls against /v1/agents, adjust it. The CLI is the control plane here, and for day-to-day operation it is faster than a REST wrapper anyway.
Why control an agent from the command line at all
I build integrations for a living, so I will admit my bias: I would rather run something from a terminal than click through a settings page I have to relearn every quarter. But the case here is bigger than personal taste.
A dashboard is a fine place to understand an agent. It is a poor place to operate one at any scale. The moment you want the same change applied to three agents, or a config that lives in a Git repo next to the rest of your infrastructure, or a rollout that a CI job can run without a human, the browser becomes the bottleneck. Everything you do by hand is a step you cannot repeat, review, or roll back cleanly.
The command line fixes that by turning agent operations into text. A command you can paste into a runbook. A config you can diff. A run you can trigger from a cron job or a webhook. And, increasingly, a surface that another AI agent can drive, which is exactly why eesel's docs tell coding agents to use the CLI rather than trying to click around the dashboard in a browser.
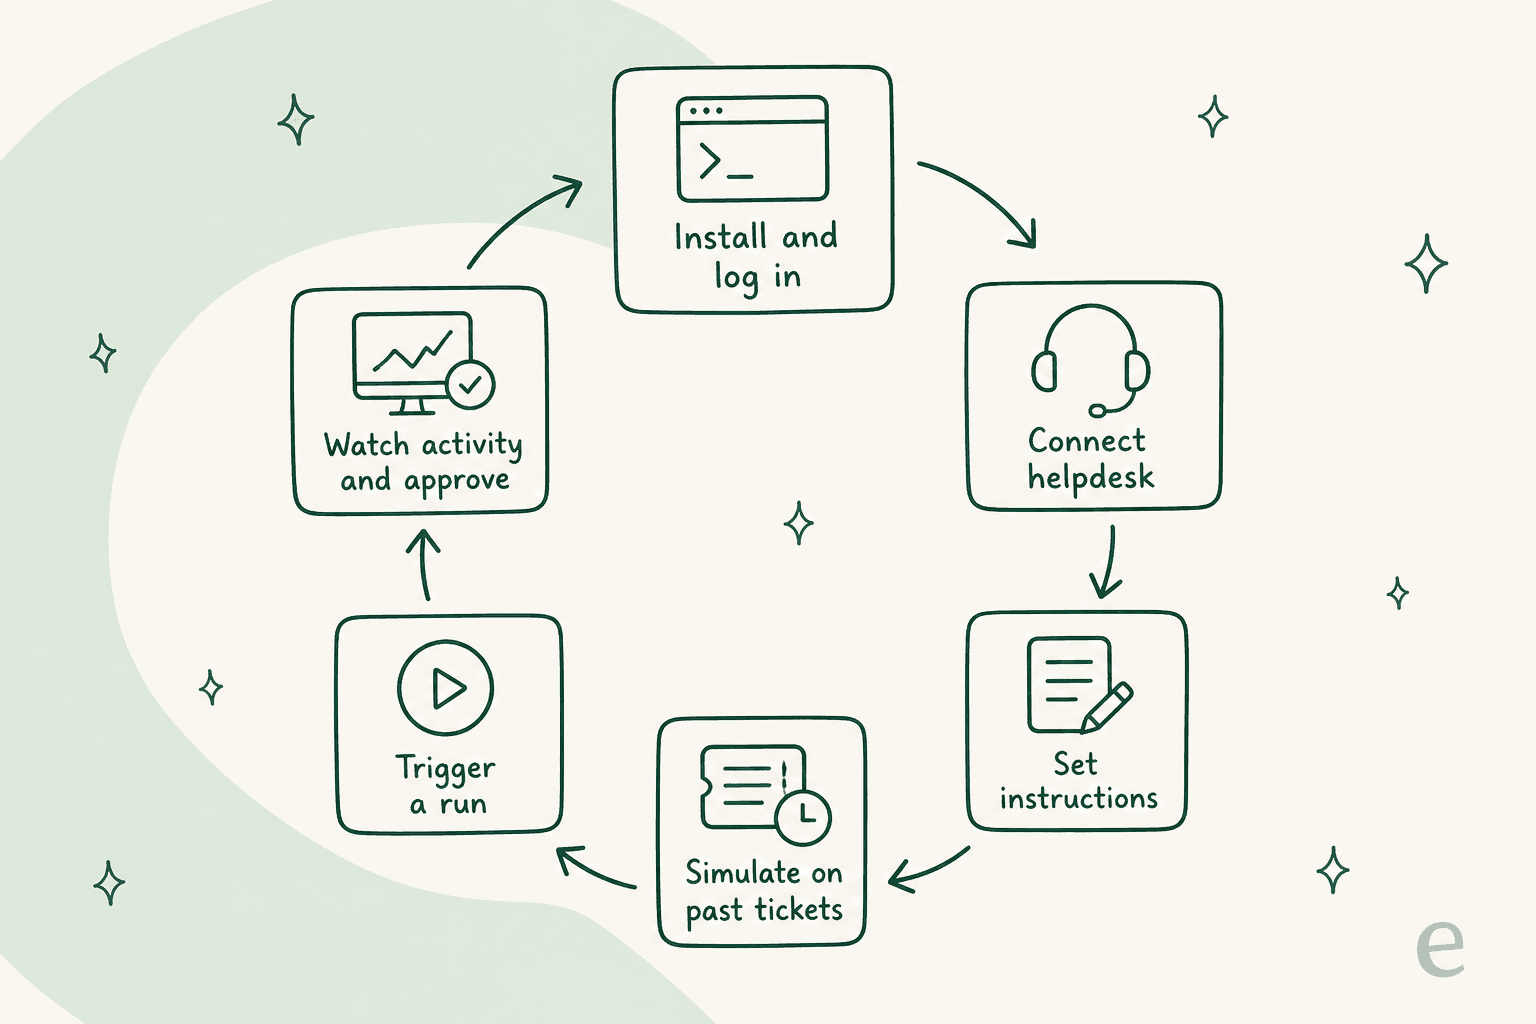
The rest of this guide walks that loop step by step. I will use eesel's CLI for the concrete commands because it is the one I know is real and can point you at the docs for, but the shape applies to any agent platform that takes the terminal seriously.
What you need before you start
Three things, and none of them take long.
- A recent Node.js. eesel's CLI needs Node 18.17 or newer. Most machines built in the last couple of years already have it.
- An agent platform with a real CLI. This is the one to check carefully. Plenty of tools advertise "developer-friendly" and then hand you a settings page. Look for published CLI docs with an actual command list before you commit.
- A data source to connect. For a support agent that means a helpdesk, a knowledge base, or past tickets. The agent is only as good as what it can read.
You do not necessarily need an account to start. eesel's CLI can spin up an anonymous workspace so you can test a bubble on a website with no signup, which is a nice way to see the whole flow before you decide anything.
Step 1: install the CLI and log in
There are three ways to get eesel's CLI, and they map to three different situations.
If you just want to try it against a website with zero commitment:
npx @eesel/cli init chat-bubble --site https://your-site.com
That runs without an account and stands up an anonymous workspace. If you want it installed for real, either grab it globally from npm:
npm i -g @eesel/cli
or use the install script:
curl -fsSL https://dashboard.eesel.ai/eesel-cli/install | sh
Once it is installed, authenticate:
eesel login
eesel whoami
eesel login opens the browser once to link the terminal to your workspace, and whoami confirms which account and agent you are pointed at. From here on you can stay in the terminal.
A detail worth calling out for anyone scripting this: every command prints JSON, and lists print one object per line. That means you can pipe output straight into jq or a script without scraping human-readable text. You can also narrow the output with --fields (for example --fields id,status) so a script only sees the keys it needs.
Step 2: connect a helpdesk or data source
An agent with nothing to read is a party trick. The first real thing you do is give it a source.
eesel integrations connect zendesk
Swap zendesk for whichever platform you run. eesel connects to Zendesk, Freshdesk, Gorgias, Front, Help Scout, HubSpot, Salesforce, and Jira Service Management, among others. The command handles the OAuth handshake and reports back when the source is live.
Check the state at any point:
eesel status
status tells you what is connected, what the agent knows about, and whether anything is still syncing. It is the command I run most, because it answers the only question that matters mid-setup: is this thing actually ready.
Step 3: set the agent's instructions
This is where "control" gets real. The instructions are the standing rules the agent follows: tone, what it is allowed to answer, when it should escalate, which actions it can take on its own.
eesel instructions
That reads the current instructions so you can see exactly what the agent is operating under, and lets you edit them. Because it is text, you can keep your instructions in a file in version control and treat a change to how the agent behaves like any other reviewed change, with a diff and a history, instead of a mystery edit someone made in a settings panel three weeks ago.
If you take one habit from this guide, take that one. An agent's behaviour drifting because nobody can see who changed what is the single most common way these rollouts quietly go wrong.
Step 4: simulate before you let it loose
Here is the part most people skip, and it is the part I would fight for.
We have spent years putting AI agents on live support queues, and the lesson that stuck is that a confident-sounding bot is not the same as a correct one. A model will happily give a wrong answer in a reassuring voice. The only way to catch that before a customer does is to test it against reality first.
eesel does this as a simulation that replays your past tickets and scores the agent's answers against what your team actually sent. You invoke it by asking, for example, to run a simulation on your recent tickets. It hands back where the agent would have matched your team, where it would have missed, and what to change in the instructions. One thing it deliberately does not do is invent a resolution rate or a cost forecast, and I would be wary of any tool that claims to, because that number is a guess dressed up as a measurement.
Run the simulation, read the gaps, fix the instructions from Step 3, and run it again. That loop is the whole point of doing this from the terminal: each pass is a command you can repeat, not a click-through you have to remember.
Step 5: trigger runs and read the activity log
Now you operate it. Talk to the agent directly:
eesel chat "Where is my order #DL-4821?"
And read what it has been doing, newest first:
eesel activity
eesel activity is the observability surface. It lists runs so you can spot patterns, and you can open a single run to see exactly what the agent read, decided, and did. When something looks off, this is where you look before anything else. Errors are structured too: a failed command prints a single JSON line to stderr with an error, a hint, and whether it is retryable, and exits non-zero. That is what makes the CLI safe to wire into a CI job. A script can tell the difference between "you typed the command wrong" and "the service had a hiccup, try again."
Step 6: gate actions with approvals
You do not have to choose between a fully autonomous agent and a useless one. The middle ground is a human-in-the-loop approvals queue, and it is a first-class thing on the command line.
eesel approvals list
eesel approvals approve <id>
eesel approvals deny <id>
When the agent wants to take an action you have not fully trusted yet, it lands in the approvals queue instead of just happening. You review it from the terminal and approve or deny. Once a particular kind of action has earned your trust, promote it to automatic:
eesel approvals approve <id> --always
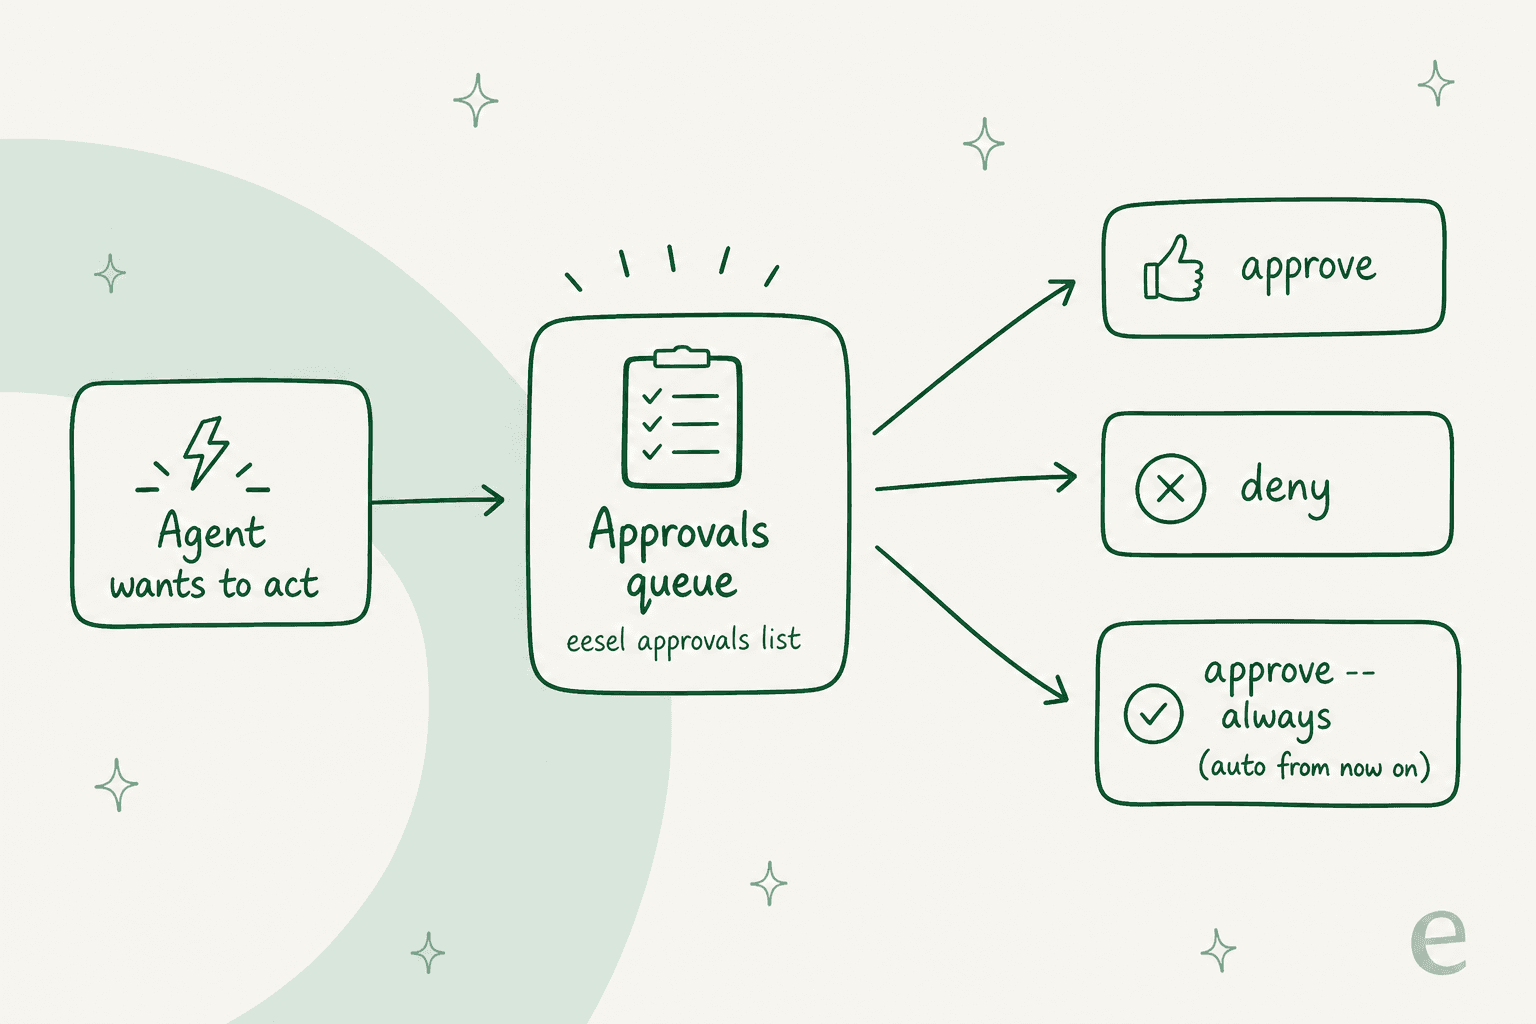
This is how you dial autonomy up gradually rather than flipping a scary switch. Start with everything gated, watch what the agent proposes, and use --always to hand over the actions you have seen it get right, one category at a time.
Beyond the CLI: the other three control surfaces
The CLI is the surface you will live in, but it is not the only way to drive the agent. It helps to see the full set, because each one answers a different question.
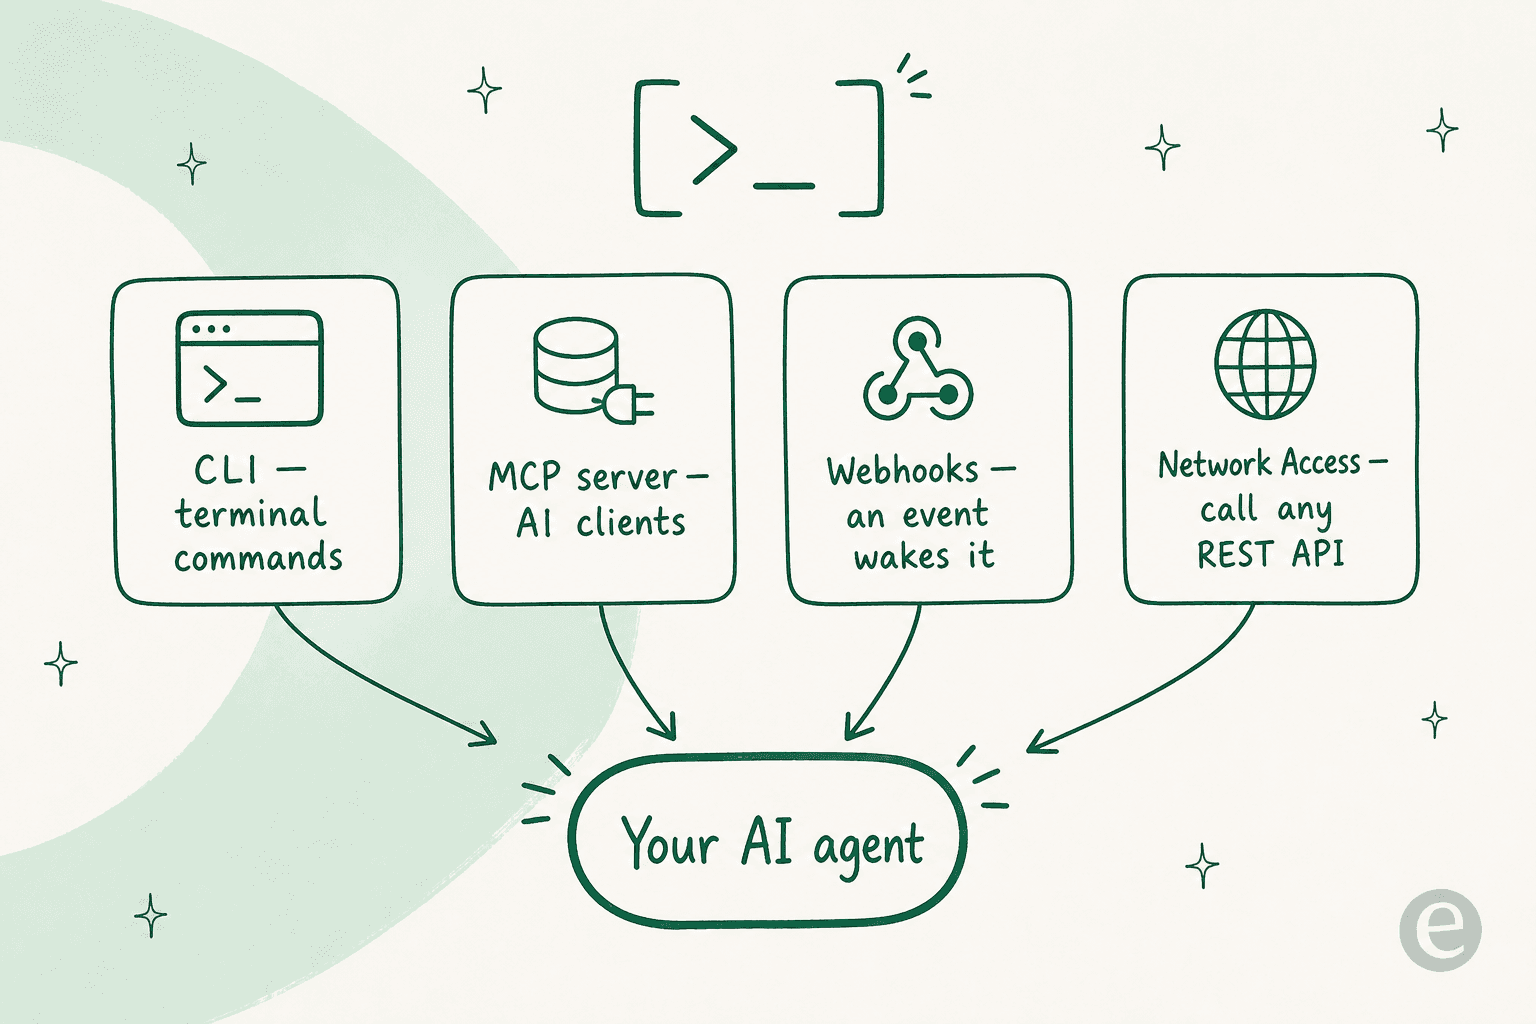
- MCP server, for when another AI is the operator. Every eesel workspace is also an MCP server. Running
npx @eesel/cli mcp tokenprints a URL, a 30-day token, and a paste-readyclaude mcp addcommand, so a client like Claude can call the same operations as tools. This is how you let a coding agent manage your support agent. - Webhooks, for when an outside event should drive the agent. A unique webhook URL wakes the agent when something happens elsewhere in your stack, so a new order or a form submission can kick off a run without anyone typing a command.
- Network Access, for when the agent needs to reach out. You allowlist a domain and attach an auth header, and the agent can then call that REST API with GET, POST, PATCH, or DELETE during a run. Credentials are stored as headers and never shown to the model, which is the detail your security team will ask about.
For headless environments, you skip the interactive login entirely: set EESEL_API_URL and EESEL_API_TOKEN (and EESEL_AGENT_ID to pin a specific agent) as environment variables, and the CLI authenticates from those. That is what makes it drop cleanly into a CI pipeline.
Common mistakes to avoid
A few things I have watched trip people up, so you can skip the lesson:
- Going live without simulating. The most expensive mistake on this list. Run Step 4. Every time.
- Editing instructions by hand in a hurry. If your agent's behaviour is not in version control, you will eventually have an outage nobody can explain. Treat
eesel instructionsoutput like code. - Turning on full autonomy on day one. Start with everything in the approvals queue and earn each
--alwayspromotion. Trust is built one action category at a time. - Ignoring the exit codes. The CLI returns structured errors and non-zero exits for a reason. A script that does not check them will happily march past a failure.
- Assuming a REST API exists. If you are evaluating a vendor and your plan depends on a documented REST endpoint, confirm it exists before you build on it. With eesel the honest answer is that the CLI, MCP, webhooks, and Network Access are the surface, and that is plenty for controlling an agent, just not the same as a REST product.
Try eesel
If you want a support agent you can genuinely run from the terminal, eesel is built for it. The CLI installs in one command, connects to the helpdesk you already run, simulates against your real past tickets before it touches a live conversation, and keeps every action behind an approvals queue until you say otherwise. Pricing is one fixed monthly price from $299/month for 500 credits (1 credit per ticket), and the free plan includes 100 credits with no credit card, so you can script the whole rollout and see it work before you spend anything.
Frequently Asked Questions
How do I control an AI agent from the CLI?
@eesel/cli, running eesel login, and driving everything else from the terminal. The CLI docs spell out the full command set.Can you run an AI support agent without a dashboard?
Is there a REST API for controlling AI agents?
How much does it cost to run an AI agent from the command line?
How do I keep an AI agent from taking the wrong action?
eesel approvals list to see pending actions, then approve or deny each one, and simulate the agent against your past tickets first so you see how it would have answered. Adding --always to an approval promotes a repeated action to automatic once you trust it.