If your support team has ever spent more time scrolling through a chaotic list of macros than actually helping customers, you are not alone. As teams grow, what starts as a handy collection of canned responses quickly turns into an unwieldy mess. Agents can't find the right macro when they need it. New hires struggle to learn which response fits which situation. And somehow, three different versions of the same refund policy exist, each saying something slightly different.
The good news? There is a simple, built-in way to bring order to the chaos. In this guide, we will walk through how to organize Zendesk macros by category using the double-colon method, a naming trick that most admins do not know about. We will also cover ready-to-use templates for different industries and share what to do when your macro library outgrows this approach entirely.

What you need to get started
Before diving in, make sure you have the basics covered:
- Administrator access to Zendesk you will need permissions to edit shared macros for your team
- A clear picture of your support topics think about the main reasons customers contact you (orders, billing, technical issues)
- About 30 to 60 minutes the initial organization takes some focus, but the payoff is immediate
The double-colon method explained
Here is the trick most Zendesk administrators miss: you can create nested categories by using a specific syntax in your macro titles. Instead of naming a macro "Return Policy Info," you name it "Orders::Returns::Return Policy Info."
Zendesk automatically recognizes the double colons (::) as category separators. When agents open their macro menu, they see a clickable "Orders" folder. Clicking it reveals the "Returns" subfolder. Inside that, they find your macro. It works exactly like the folder structure on your computer.
Why do so many teams not know about this? The Zendesk interface does not advertise it. Unlike ticket fields or help center articles, there is no obvious "category" option when creating a macro. The feature is hidden in plain sight, working silently whenever you use the right syntax.
Here is what the transformation looks like:
Before: A flat, alphabetical list of 50 macros. Agents scroll and scroll, hoping to spot the right one.
After: A clean hierarchy. Orders contains Returns, Changes, and Cancellations. Billing contains Payments, Refunds, and Invoicing. Agents navigate in seconds.
The syntax is straightforward:
- One level: Category::Macro Name (example: "Billing::Payment Question")
- Two levels: Category::Subcategory::Macro Name (example: "Orders::Returns::Return Policy Info")
- Three levels: Category::Subcategory::Sub-subcategory::Macro Name (example: "Orders::Returns::Damaged Item::Request Photo")
Each set of double colons creates a new nested level. You can go as deep as you need, though most teams find two levels sufficient.
Step-by-step: organizing your macros
Step 1: Audit and clean up existing macros
Start with some housekeeping. Before you reorganize anything, you need to know what you are working with.
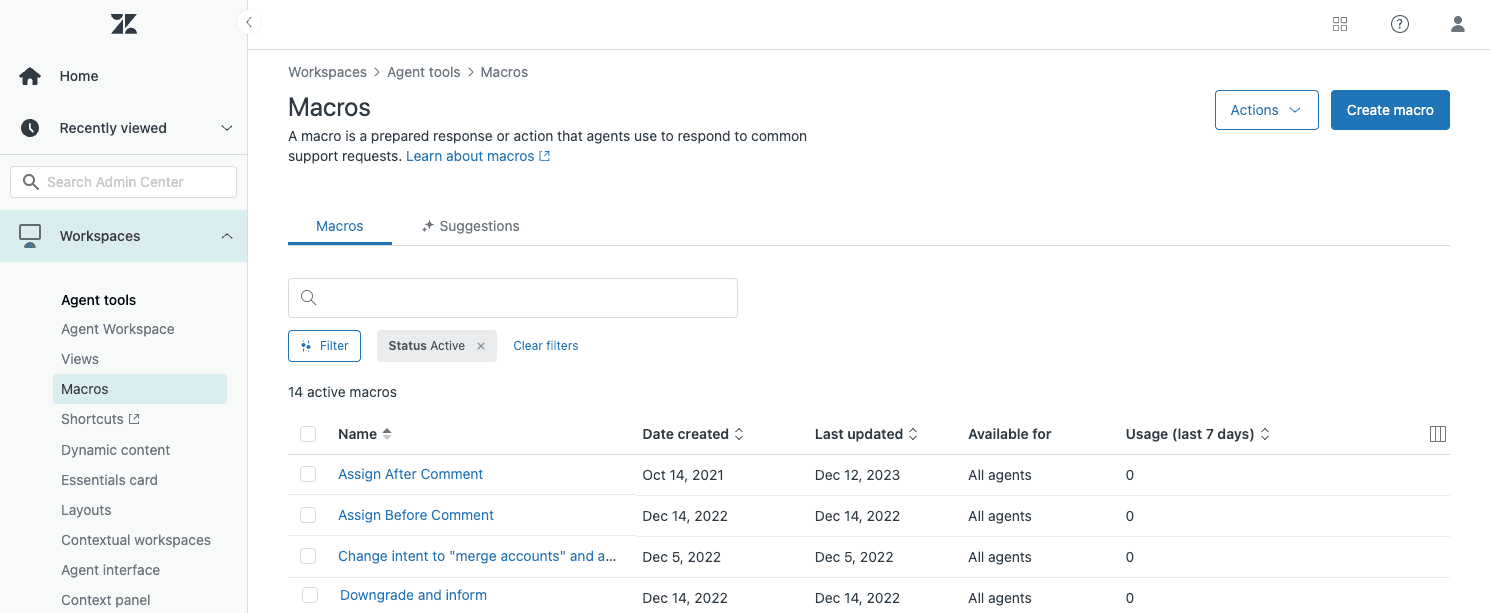
Head to Admin Center > Workspaces > Agent Tools > Macros. Review your active macros and ask:
- Which macros have not been used in the last 90 days?
- Are there duplicates or near-duplicates?
- Which macros contain outdated information (old policies, discontinued products)?
Deactivate anything that is no longer relevant. Delete duplicates. This cleanup makes the reorganization much faster and ensures agents only see current, useful macros.
Step 2: Design your category structure
Now think like your agents. How do they look for information when a ticket arrives? The best category structures mirror how your team thinks about customer issues.
Start with three to five broad parent categories based on your most common ticket types. Good starting points include:
- Orders
- Billing
- Technical Support
- Account Management
- Shipping
Once you have parent categories, map out subcategories within each. Under Orders, you might have Returns, Changes, and Cancellations. Under Billing, you might have Payments, Refunds, and Subscription Issues.
Pro tip: align your macro categories with your ticket field taxonomy. If you have a "Category" dropdown on tickets with values like "Orders," "Billing," and "Technical," use those same names for your macro categories. This creates a consistent mental model for agents.
Step 3: Rename macros with category syntax
Now for the actual reorganization. Edit each macro title to follow the Category::Subcategory::Macro Name format.
For example:
- "Return Policy Info" becomes "Orders::Returns::Return Policy Info"
- "How do I reset my password?" becomes "Technical::Login Issues::Password Reset Instructions"
- "Refund request" becomes "Billing::Refunds::Process Refund"
Zendesk does not offer bulk renaming, so this step takes some time. Prioritize your most-used macros first. You will see immediate benefits even with just your top 10 or 20 reorganized.
After renaming, refresh your agent interface to see the changes. The macro menu will now display your new category structure.

Step 4: Add child categories if needed
If you have a large macro library (50 or more), consider adding deeper nesting. The same double-colon syntax works for multiple levels.
For example:
- "Orders::Returns::Damaged Item::Request Photo"
- "Orders::Returns::Damaged Item::Approve Replacement"
- "Orders::Returns::Changed Mind::Process Return"
Be careful not to over-categorize. If a subcategory contains only one or two macros, it is probably too specific. Aim for five to ten macros per final-level category. This keeps navigation quick without creating unnecessary clicks.
Also, note that different parent categories can have different nesting depths. Your Orders category might go three levels deep, while Billing stays at two levels. That is perfectly fine.
Ready-to-use category templates
Not sure where to start? Here are templates for three common business types. Adapt them to your specific needs.
E-commerce template
Orders
- Orders::New Order::How to Place an Order
- Orders::New Order::Checkout Errors
- Orders::Changes::Add Items to Order
- Orders::Changes::Update Shipping Address
- Orders::Cancellations::Cancel Before Shipment
- Orders::Cancellations::Cancel After Shipment
Shipping
- Shipping::Status::Where Is My Order?
- Shipping::Status::Tracking Link Request
- Shipping::Issues::Lost Package
- Shipping::Issues::Damaged in Transit
- Shipping::Returns::Return Policy Info
- Shipping::Returns::Generate Return Label
Billing
- Billing::Payments::Payment Failed
- Billing::Payments::Update Payment Method
- Billing::Refunds::Refund Status
- Billing::Refunds::Process Refund
SaaS template
Account
- Account::Setup::Getting Started Guide
- Account::Setup::Invite Team Members
- Account::Billing::Update Billing Info
- Account::Billing::Invoice Request
- Account::Cancellation::Cancel Subscription
- Account::Cancellation::Cancellation Confirmation
Technical
- Technical::Login Issues::Password Reset
- Technical::Login Issues::Two-Factor Problems
- Technical::Integrations::API Documentation
- Technical::Integrations::Webhook Setup
- Technical::Bug Reports::Report a Bug
- Technical::Bug Reports::Bug Workaround
Product
- Product::Feature Requests::Submit Feature Request
- Product::Feature Requests::Request Status Update
- Product::How-To::Create a Project
- Product::How-To::Import Data
Services template
Booking
- Booking::New::Availability Check
- Booking::New::Schedule Appointment
- Booking::Changes::Reschedule Request
- Booking::Changes::Update Appointment Details
- Booking::Cancellations::Cancel Appointment
- Booking::Cancellations::Cancellation Policy
Service
- Service::Inquiry::Service Details
- Service::Inquiry::Pricing Information
- Service::Complaint::Acknowledge Complaint
- Service::Complaint::Escalation Process
- Service::Feedback::Request Review
- Service::Feedback::Thank You for Feedback
General
- General::Hours::Business Hours
- General::Hours::Holiday Schedule
- General::Policies::Terms of Service
- General::Policies::Privacy Policy
Best practices for macro organization
Once your categories are in place, a few habits will keep your macro library healthy:
Use answer-style titles. Macro titles should describe what the macro does, not what the customer asked. Instead of "How do I reset my password?" use "Password Reset Instructions." Instead of "Where is my order?" use "Order Status Update." This helps agents quickly identify the right macro for their response.
Include multiple actions per macro. Macros can do more than insert text. They can set ticket status, assign to a group, add tags, set priority, and update custom fields. A well-built macro handles the entire workflow, not just the comment.
Schedule quarterly reviews. Set a calendar reminder to review your macro library every three months. Deactivate outdated macros, update any with changed policies, and check usage stats to see which macros agents actually use.
Avoid common mistakes:
- Do not add signatures to macro text. Use Zendesk's built-in signature feature instead, so signatures update globally from one place.
- Do not create separate macros for each language. Use Dynamic Content if your plan supports it, so one macro serves all languages.
- Do not let agents create unlimited personal macros without oversight. This leads to a fragmented, inconsistent experience.
When you have outgrown macros
Here is the reality: macros work well until they don't. As your team scales, you will hit limitations.
You might have outgrown macros if:
- You have 100 or more macros and maintenance takes hours each month
- Agents still struggle to find the right macro despite your category structure
- You manage multiple brands and cannot easily separate macro libraries
- You need to update the same information across dozens of macros (like a phone number or policy link)
- You want responses that adapt to the specific customer and ticket, not one-size-fits-all templates
These are not failures of organization. They are signs that your team is ready for the next level.
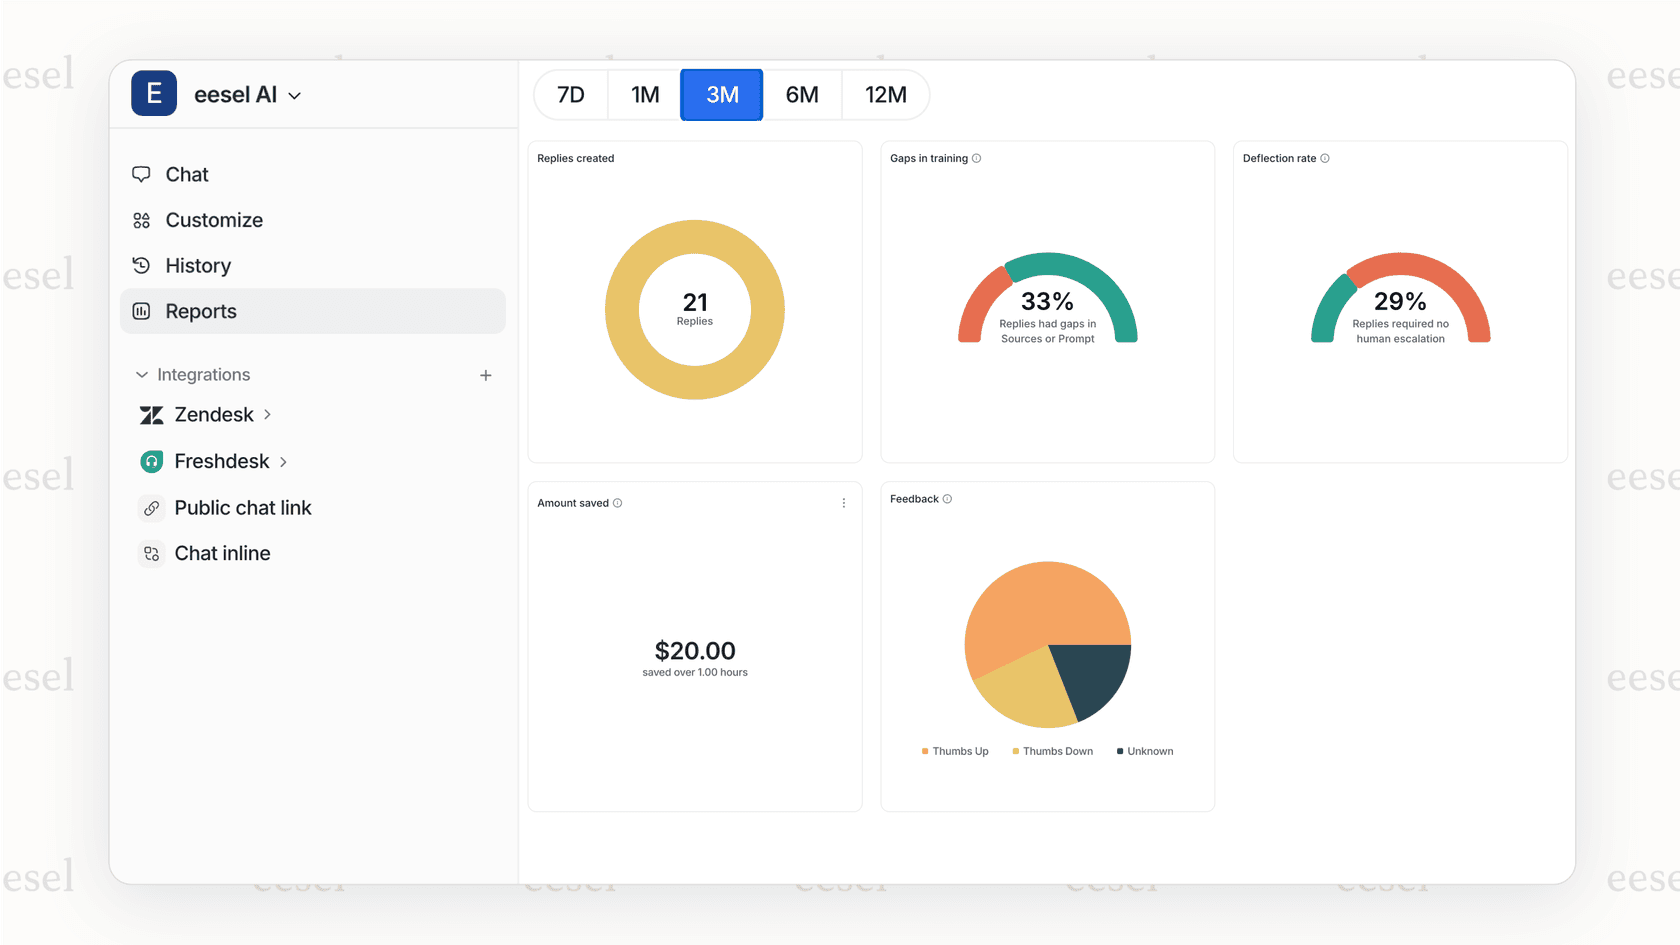
This is where we come in. At eesel AI, we have built an AI teammate for customer support that learns from your ticket history, help center, and yes, your existing macros. Instead of manually maintaining a static library, you get dynamic responses that adapt to each conversation.
Our AI Agent can handle frontline support autonomously, learning your tone and policies from day one. Our AI Copilot drafts responses for your agents to review, trained on your best past replies. And because we integrate directly with Zendesk, setup takes minutes, not weeks.
The transition is gradual. Many teams start with eesel AI drafting responses alongside their existing macros, then expand to full automation as confidence grows. You can read more about this approach in our guide to managing and organizing Zendesk macros by category.
Start organizing your Zendesk macros today
The double-colon method is one of those small tricks that makes a big difference. In under an hour, you can transform a chaotic macro list into a clean, navigable system that helps agents respond faster and more consistently.
Start with your ten most-used macros. Apply the Category::Subcategory::Macro Name format. Watch how quickly agents adapt to the new structure. Then gradually work through the rest of your library.
And when you are ready to move beyond static templates entirely, we are here to help. Invite eesel to your team and see how an AI teammate that learns your business can take your support to the next level.