Getting tickets to the right agent quickly is one of the most impactful things you can do for customer satisfaction. When a billing question sits in a general queue for hours because no one realized it needed a specialist, everyone loses. The customer waits longer than necessary. Your agents waste time routing tickets manually. And your metrics take a hit.
Skills based routing solves this by matching tickets to agents based on qualifications rather than just who's available. Instead of round-robin assignment that treats every agent as interchangeable, you can route French-speaking customers to bilingual agents, technical issues to your product specialists, and VIP requests to your most experienced team members.
This guide walks through setting up Zendesk skills based routing. We'll cover the native approach using Zendesk's built-in features, then explore how tools like eesel AI can simplify the process by learning your team's expertise automatically.
What is skills based routing and why use it?
Skills based routing is a ticket assignment strategy that directs customer requests to agents with the most relevant qualifications. Rather than sending every ticket to the next available agent, the system considers what skills are needed to resolve the issue and matches accordingly.
Here's how it works in practice. A customer submits a ticket about a complex integration issue. Your trigger detects keywords like "API" and "webhook," adds a "Technical" skill tag to the ticket, and routes it to agents who have that skill assigned. If no technical agents are currently available, the ticket can either wait for one (if marked as Required) or route to any available agent after a timeout period (if marked as Optional).
The benefits are straightforward. Customers reach qualified agents faster, which typically means faster resolution times and higher satisfaction scores. Agents spend more time solving problems in their areas of expertise and less time escalating or transferring tickets. And your team can handle more volume without adding headcount because the routing itself happens automatically.
Most teams organize skills around a few common categories:
- Language for multilingual support teams
- Product knowledge for companies with multiple product lines
- Technical expertise for complex troubleshooting
- Compliance certifications for regulated industries
- Experience level for tiered support structures
Setting this up in Zendesk requires some initial configuration. You'll need to define your skills, create conditions that apply them to tickets, assign those skills to agents, and configure routing rules. The process is powerful but can become complex to maintain as your team grows.
An alternative approach is using an AI teammate like eesel AI that learns who handles what by analyzing your existing ticket history. Instead of manually tagging every possible skill combination, our AI recognizes patterns in how tickets have been handled and routes new ones accordingly. This can reduce setup time from days to minutes.
Prerequisites and planning
Before you start configuring skills based routing, make sure you have the necessary access and plan level. Zendesk restricts this feature to specific tiers, and you'll need administrative privileges to set it up.
Plan requirements:
| Feature | Required Plan | Source |
|---|---|---|
| Skills based routing | Suite Enterprise or higher | Zendesk Support |
| Omnichannel routing | Team plans and above | Zendesk Support |
| Support plan | Enterprise | Zendesk Support |
Access requirements:
- Admin access to the Zendesk Admin Center
- Permission to modify business rules (triggers, automations)
- Ability to edit agent profiles for skill assignment
Preparation:
- Document your team's skill structure before configuring (which agents speak which languages, who handles technical issues, etc.)
- Identify the ticket conditions that indicate each skill is needed (keywords, form selections, custom field values)
- Decide whether to use Required or Optional skills for each category
If you're on a lower-tier plan or want to avoid the complexity of manual skill configuration, eesel AI works with any Zendesk plan and doesn't require Enterprise-level access. Our AI learns routing patterns from your existing tickets without needing predefined skill labels.
Step 1: Create skill types and skills
The setup process starts in the Admin Center. Navigate to Admin Center > Objects and rules > Business rules > Skills. This is where you'll create and manage all skills for your account.
If you don't see the Skills option in your menu, confirm you're on an Enterprise plan and have the appropriate admin permissions.
Start by creating skill types, which are categories for organizing related skills. You can create up to 10 skill types per account. Common types include:
- Language (French, Spanish, German, etc.)
- Product (Product A, Product B, specific modules)
- Expertise Level (Junior, Senior, Specialist)
- Department (Billing, Sales, Technical)
To create a skill type:
- Click the New skill type button
- Enter a unique name (max 96 characters)
- Press Enter to save
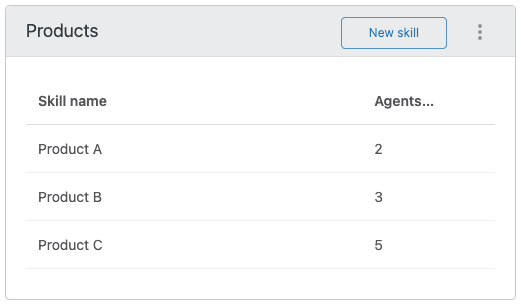
Within each skill type, you can add up to 30 individual skills. For example, under a "Language" type you might add French, Spanish, and German. Under a "Product" type you might add your different product lines or modules.
Keep your initial setup simple. Start with 3-5 core skill types that cover your most common routing scenarios. You can always add more later as you refine your process.
Step 2: Define skill conditions
Once you've created skills, you need to define when each skill gets applied to tickets automatically. This happens through conditions you set in the skill configuration.
For each skill, you'll define ticket conditions that determine when that skill should be added. These conditions work similarly to Zendesk triggers, checking ticket properties like:
- Requester language
- Ticket subject or description keywords
- Custom field values
- Ticket form selection
- Channel (email, chat, web form)
You'll also choose whether each skill is Required or Optional:
- Required: The ticket will only route to agents who have ALL required skills assigned. If no matching agent is available, the ticket waits.
- Optional: The ticket can route to any agent, but the system prefers agents with matching skills.
For example, you might make "French Language" a required skill for tickets from French-speaking customers, ensuring they always reach a bilingual agent. But you might make "Technical" optional, so technical tickets prefer technical agents but can still be handled by others during high-volume periods.
Step 3: Assign skills to agents
With your skills and conditions defined, the next step is assigning those skills to the agents who have them. This tells the system which agents are qualified to handle which types of tickets.
To assign skills to an agent:
- Go to the skill type in Admin Center
- Click on the specific skill
- Select Manage to add agents
- Choose the agents who have this skill
You can assign multiple skills to each agent, and agents can have skills from multiple skill types. This flexibility lets you build complex routing scenarios. An agent might have both "French" and "Technical" skills, making them the ideal match for technical tickets from French-speaking customers.
When planning assignments, consider skill coverage across your team. If only one agent has a particular skill combination, that creates a bottleneck. Make sure you have enough agents with common skill sets to handle expected volume.
Step 4: Configure routing rules
Now that skills are created, conditions defined, and agents assigned, you need to configure how tickets actually get routed. Zendesk offers two approaches: standalone skills based routing and omnichannel routing.
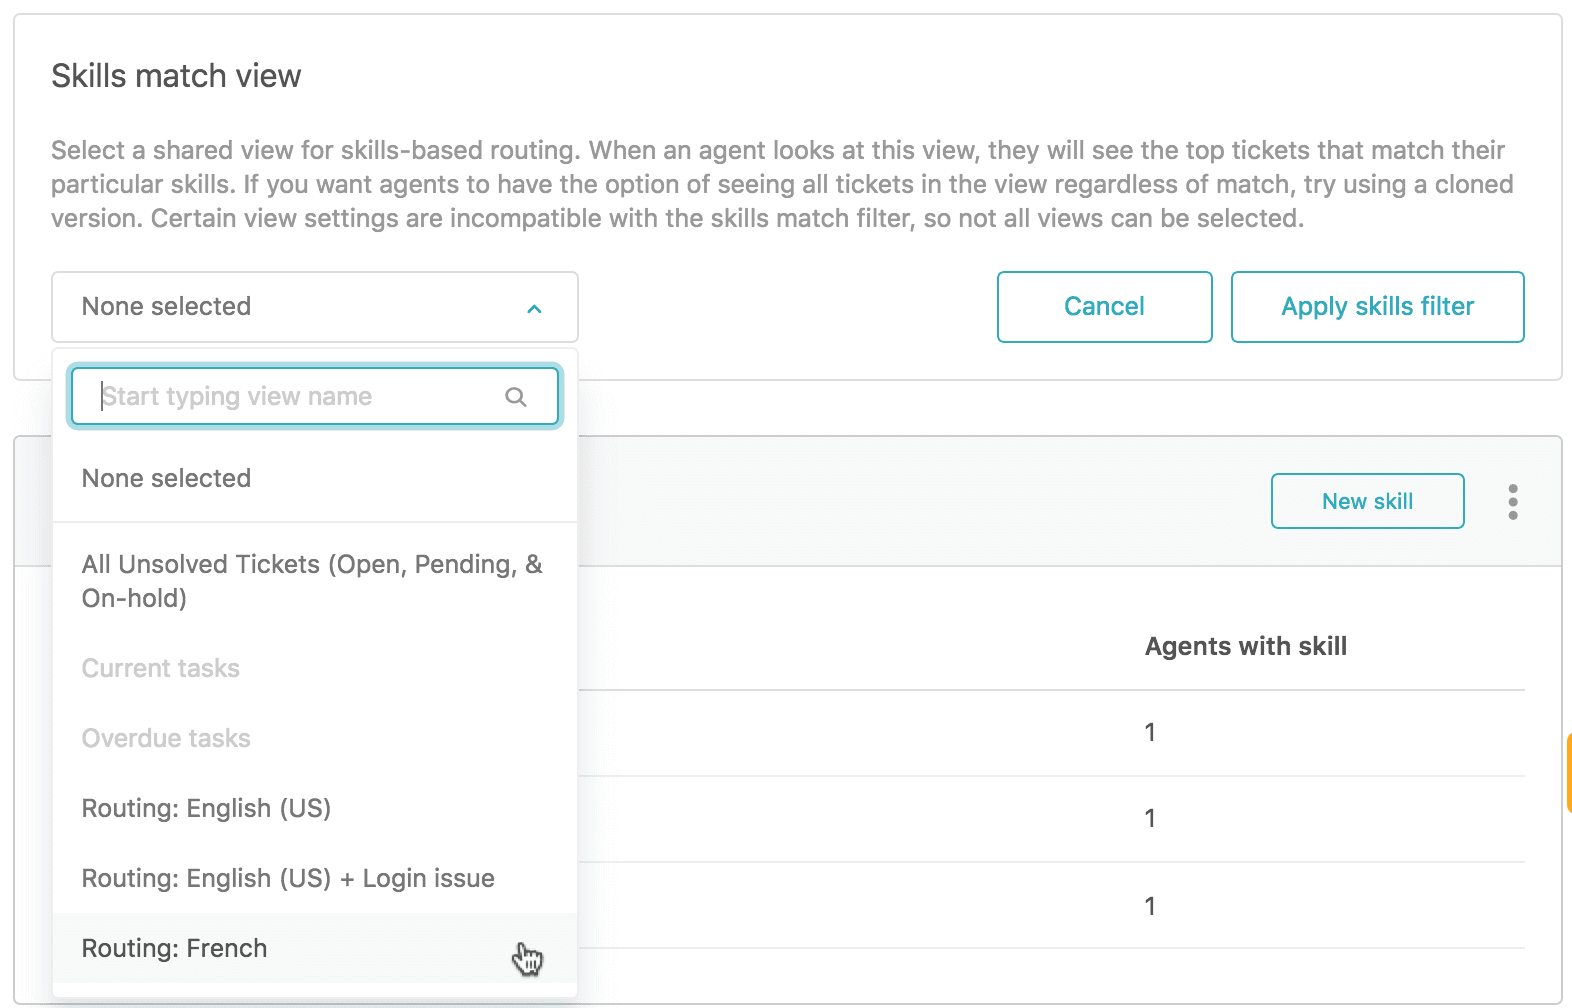
Standalone skills based routing works through views. Agents use specialized views to identify tickets matching their skills and manually assign them to themselves. This approach is simpler to set up but requires more agent involvement.
Omnichannel routing automatically assigns tickets to agents based on skills, availability, and capacity. This is the more sophisticated option and better for high-volume teams.
To enable omnichannel routing:
- Go to Admin Center > Objects and rules > Omnichannel routing > Routing configuration
- Click Set up omnichannel routing
- Turn on the routing option
- Configure capacity rules (how many tickets each agent can handle)
- Set up agent statuses (Online, Away, Offline)
You'll also need to create triggers that add your routing tag to tickets. Zendesk uses a specific tag (like auto_routing) to identify which tickets should be automatically routed. Create triggers that apply this tag based on your criteria, such as ticket form, priority, or group assignment.
Skills timeout is an important setting to configure. This determines how long the system waits for an agent with matching skills before routing to any available agent. Set this based on your service level agreements and customer expectations.
Before going live, test your configuration with sample tickets. Submit test inquiries that should trigger different skills and verify they route to the expected agents.
Common challenges and how to solve them
Even with careful planning, teams often hit snags when implementing skills based routing. Here are the most common issues and how to address them.
Over-engineering with too many skill types. It's tempting to create a skill for every possible scenario, but this quickly becomes unmanageable. Stick to your initial 3-5 core skill types. Remember, you can have up to 10 skill types and 30 skills per type, but you don't need to use all of them.
Agents lacking combined skills for complex tickets. If a ticket requires both "French" and "Technical" skills but no agent has both, that ticket can't be routed in Required mode. Plan for common skill combinations and ensure you have agents who cover them. Alternatively, use Optional skills so tickets can still be assigned.
Maintenance overhead as team changes. When agents join, leave, or change roles, you need to update their skill assignments. This ongoing maintenance is often underestimated. Consider quarterly reviews of your skill structure to keep it current.
Plan limitations. Skills based routing requires an Enterprise plan. If you're on a lower tier, you'll need to upgrade or consider alternatives. Some teams use workarounds with triggers and groups, but these don't offer the same flexibility as true skills based routing.
A simpler alternative: intelligent routing with eesel AI
Setting up skills based routing in Zendesk works well for teams with the right plan and resources to maintain it. But it's not the only way to get tickets to the right agents. If the manual configuration feels overwhelming, there's a simpler approach.
eesel AI learns your routing patterns automatically by analyzing your existing ticket history. Instead of manually defining every skill and condition, our AI recognizes who handles what based on actual past assignments. When a new ticket comes in, it routes intelligently without any predefined skill labels.
Here's how it differs from Zendesk's native approach:
| Approach | Setup Time | Maintenance | Plan Requirements |
|---|---|---|---|
| Zendesk skills based routing | Days to weeks | Ongoing skill management | Enterprise only |
| eesel AI intelligent routing | Minutes | Automatic learning | Works with any plan |
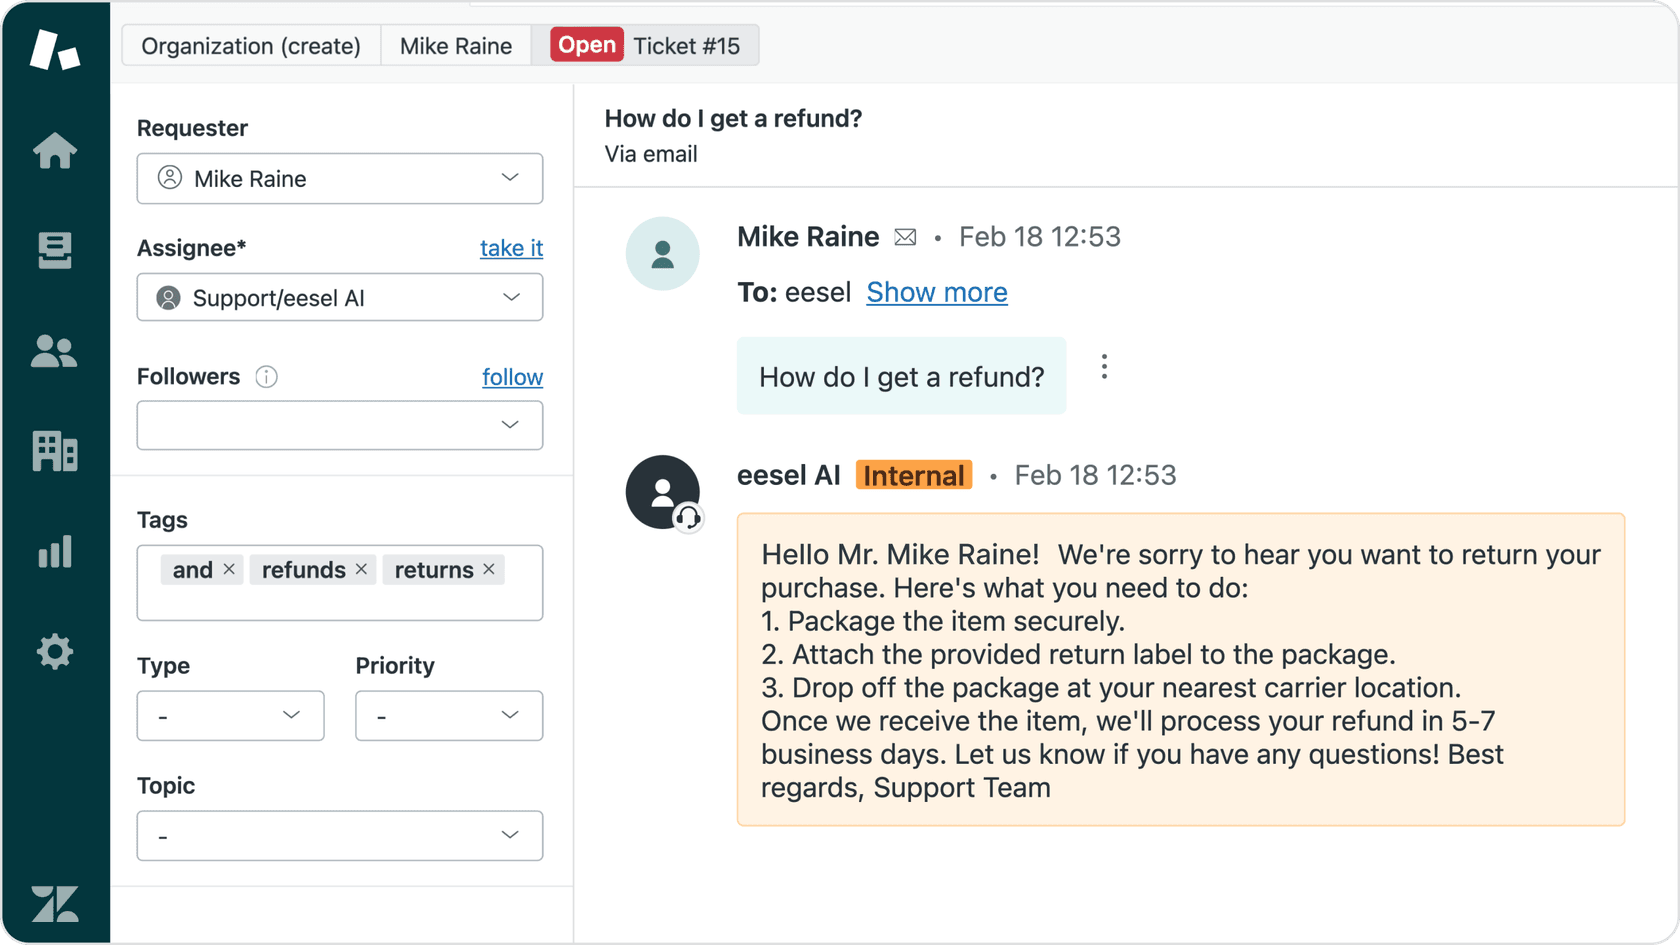
Our AI Triage product handles the routing automatically, while AI Agent can resolve common tickets entirely without human intervention. Both integrate directly with Zendesk and learn from your existing data.
The key advantage is that you don't need to predict every skill combination upfront. As your team evolves and new types of tickets emerge, the AI adapts without manual reconfiguration.
Getting started with smarter ticket routing
Setting up Zendesk skills based routing takes planning and ongoing maintenance, but the payoff is worth it for many teams. Customers reach qualified agents faster. Agents work on tickets that match their expertise. And you reduce the manual work of triaging and reassigning.
Let's break down what you need to do:
- Confirm you're on an Enterprise plan with admin access
- Document your team's skill structure before configuring
- Create 3-5 core skill types with relevant skills
- Define conditions for when each skill applies
- Assign skills to agents based on their qualifications
- Configure standalone or omnichannel routing rules
- Test thoroughly before going live
Start simple and expand as you learn what works. You can always add more skill types later as your needs evolve.
If the setup complexity is holding you back, or if you're on a lower-tier Zendesk plan, try eesel AI for intelligent routing that learns from your existing tickets. It works with any Zendesk plan and gets you up and running in minutes instead of days.
Either way, the goal is the same: getting every ticket to the agent best equipped to resolve it. That's better for your customers, your agents, and your metrics.