How to create Zendesk Explore custom attribute formulas: A complete guide
Stevia Putri
Last edited February 26, 2026
Custom reporting in Zendesk Explore starts with understanding how to build formulas. Most support teams eventually hit a wall with default metrics. They need to group tickets by response time performance, categorize by custom fields, or create date groupings that don't exist out of the box. Standard calculated attributes can help with this.
This guide walks you through everything you need to know about writing Zendesk Explore custom attribute formulas. You'll learn the syntax, see practical examples you can copy and adapt, and understand how to troubleshoot when things don't work as expected.
What are standard calculated attributes in Zendesk Explore?
Standard calculated attributes let you create custom groupings and dimensions for your reports. Unlike calculated metrics (which measure things like counts or averages), attributes categorize your data into buckets you define.
Here's the difference:
- Calculated metrics answer "how many?" or "how long?" They return numbers you can sum, average, or count.
- Calculated attributes answer "which group?" They return categories you can use in rows, columns, or filters.
For example, you might create an attribute that groups tickets as "Fast response" or "Slow response" based on first reply time. Or combine year and month into a single sortable date field. Or flag tickets containing specific keywords in the subject line.
To use calculated attributes, you need Zendesk Explore Professional or Enterprise. The Lite plan doesn't include this feature. You'll also need editor or admin permissions in Explore.
If you find yourself spending hours building complex Explore reports, there's another approach. eesel AI reads your Zendesk data directly and can automate actions based on ticket content without manual formula writing.
Understanding the formula syntax
Zendesk Explore uses a SQL-like formula language. The syntax is straightforward once you understand the building blocks.
Basic structure
Most formulas follow an IF-THEN-ELSE pattern:
IF [condition] THEN "result" ELSE "other result" ENDIF
The keywords IF, THEN, ELSE, and ENDIF are required. Conditions go in parentheses. Text results go in quotes.
Referencing fields
Use square brackets to reference existing attributes:
[Ticket status]
[Ticket channel]
[Assignee name]
For numeric metrics, wrap them in VALUE():
VALUE(First reply time (min))
VALUE(Ticket age (days))
Logical operators
Combine conditions with AND and OR:
IF ([Ticket channel]="Email" AND [Ticket priority]="Urgent") THEN "Priority email" ENDIF
Negate with NOT:
IF NOT [Ticket status]="Solved" THEN "Open" ENDIF
Common functions
- CONTAINS([field], "text") checks if text appears in a field
- IN checks if a value is in a list:
[Priority] IN ("High", "Urgent") - DATE_FORMAT([date], "MM") formats dates
- STRING([number]) converts numbers to text
- LEFTPART([text], 5) extracts characters from the start
Validation
As you type, Explore shows a red error indicator if your formula has problems. A green checkmark means the syntax is valid. Don't worry about red text while you're typing; it disappears once the formula is complete.
Step-by-step: Creating your first custom attribute
Let's walk through creating a practical custom attribute. We'll build one that categorizes tickets by response time performance.
Step 1: Open the report builder
Navigate to Explore in your Zendesk account. Click the Reports icon in the left sidebar, then click "New report." Select your dataset (for this example, use Support - Tickets) and click "Start report."
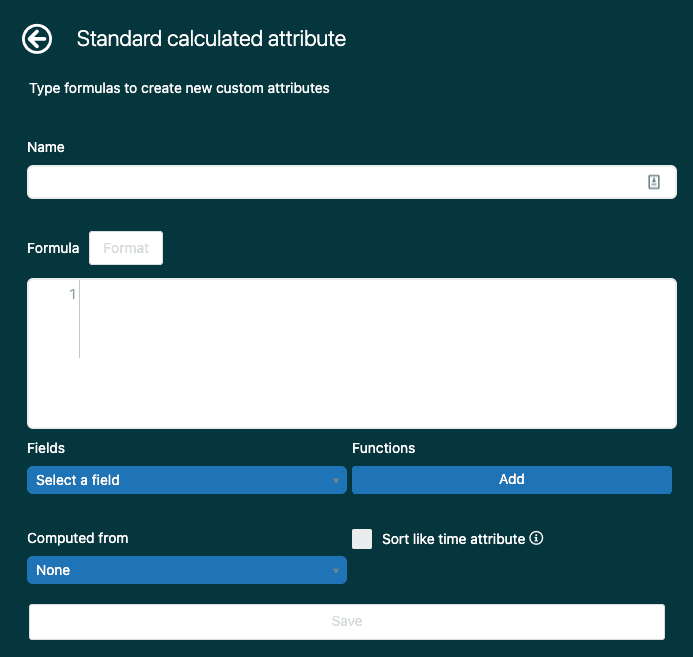
Step 2: Access the calculations menu
In the right sidebar, click the calculations icon (it looks like a calculator). From the dropdown menu, select "Standard calculated attribute."
Step 3: Name your attribute
Give your attribute a clear, descriptive name. For this example, use "Response time category." Avoid quotation marks, parentheses, or square brackets in the name; these can cause errors if you reference this attribute in other calculations.
Step 4: Build your formula
In the formula field, enter this example:
IF VALUE(First reply time (min)) < 10 THEN "Fast (< 10 min)"
ELIF VALUE(First reply time (min)) < 30 THEN "Normal (10-30 min)"
ELSE "Slow (> 30 min)"
ENDIF
You can type directly in the formula field or use the selectors below. The Fields menu lists all available attributes and metrics. The Functions menu shows logical operators and transformations. Click to insert them into your formula.
Step 5: Configure computed from settings
The "Computed from" dropdown determines which attribute drives the calculation. For response time categories, select "Ticket ID" so each ticket gets categorized individually. Choosing the wrong attribute here is a common source of unexpected results.
Step 6: Save and add to your report
Click Save. Your new attribute now appears in the Calculated attributes folder. To use it, click Add in the Rows, Columns, or Filters panel, expand Calculated attributes, and select your attribute.
10 ready-to-use custom attribute formulas
These formulas solve common support reporting scenarios. Copy them directly or adapt them to your needs.
Formula 1: Response time categories
Groups tickets by first reply time performance for SLA reporting.
IF VALUE(First reply time (min)) < 10 THEN "Fast (< 10 min)"
ELIF VALUE(First reply time (min)) < 30 THEN "Normal (10-30 min)"
ELSE "Slow (> 30 min)"
ENDIF
Formula 2: Ticket channel groups
Simplifies channel reporting by grouping related channels together.
IF [Ticket channel] IN ("Email", "Web form") THEN "Written"
ELIF [Ticket channel] IN ("Phone", "Chat") THEN "Live"
ELSE "Other"
ENDIF
Formula 3: Subject line flags
Identifies tickets with urgent keywords for prioritization.
IF CONTAINS([Ticket subject], "urgent") OR CONTAINS([Ticket subject], "ASAP")
THEN "Flagged"
ELSE "Standard"
ENDIF
Formula 4: Joined year-month attribute
Creates a sortable date grouping that displays as "2024-01", "2024-02", etc.
STRING([Ticket created - Year]) + "-" + DATE_FORMAT([Ticket created - Date], "MM")
Formula 5: SLA performance buckets
Categorizes tickets by SLA achievement status.
IF [SLA status] = "Achieved" THEN "Met SLA"
ELIF [SLA status] = "Breached" THEN "Missed SLA"
ELSE "No SLA"
ENDIF
Formula 6: Ticket age groups
Groups tickets by how long they've been open for backlog analysis.
IF VALUE(Ticket age (days)) <= 1 THEN "0-1 days"
ELIF VALUE(Ticket age (days)) <= 7 THEN "2-7 days"
ELIF VALUE(Ticket age (days)) <= 30 THEN "8-30 days"
ELSE "Over 30 days"
ENDIF
Formula 7: Group-assignee combination
Creates combined team member identifiers for detailed assignment tracking.
[Ticket group] + " - " + [Assignee name]
Formula 8: Priority with escalation flag
Adds visual indicators to high-priority items in reports.
IF [Ticket priority] = "Urgent" THEN "🔴 URGENT"
ELIF [Ticket priority] = "High" THEN "🟡 HIGH"
ELSE [Ticket priority]
ENDIF
Formula 9: Custom field categorization
Groups tickets by custom dropdown values into broader categories.
IF [Category] = "Billing" THEN "Revenue"
ELIF [Category] IN ("Technical", "Bug") THEN "Product"
ELIF [Category] = "Account" THEN "Customer Success"
ELSE "General"
ENDIF
Formula 10: Time-of-day groupings
Analyzes ticket patterns by business hours versus after-hours.
IF VALUE([Ticket created - Hour]) >= 9 AND VALUE([Ticket created - Hour]) <= 17
THEN "Business hours"
ELSE "After hours"
ENDIF
Common formula errors and how to fix them
Even experienced admins run into formula problems. Here are the most common issues and their solutions.
Syntax errors from missing ENDIF Every IF statement needs a matching ENDIF. If your formula shows a red error after you think it's complete, count your IFs and ENDIFs. They should match.
Field name errors
Explore is picky about field names. Use the Fields selector to insert them correctly rather than typing from memory. The system name (like [Ticket status]) might differ from what you see in reports (like "Status").
Data type mismatches
You can't compare text to numbers directly. If you're checking a numeric value like first reply time, use VALUE(First reply time (min)) not just [First reply time (min)].
NULL value handling Tickets with empty fields can break your logic. Add NULL checks for robust formulas:
IF VALUE(First reply time (min)) != NULL AND VALUE(First reply time (min)) < 10
THEN "Fast"
ENDIF
Performance issues Complex formulas with nested IF statements can slow down large reports. If your report times out, try simplifying the formula or adding more filters to reduce the dataset size.
Testing tip: Always test new formulas with a small date range (like the last 7 days) before applying them to larger reports. This makes troubleshooting faster.
Advanced tips for better reporting
Once you're comfortable with basic formulas, these techniques will help you build more powerful reports.
Using calculated attributes with dashboard filters Calculated attributes work as dashboard filters just like default attributes. Create a "Priority group" attribute, add it to multiple reports, and users can filter the entire dashboard by priority category.
Combining multiple calculated attributes You can reference one calculated attribute in another. Build simple attributes first, then combine them into more complex logic. This makes troubleshooting easier than writing one massive formula.
When to use SWITCH instead of IF For multiple conditions checking the same field, SWITCH is cleaner than nested IFs:
SWITCH ([Ticket priority]) {
  CASE "Urgent": "🔴"
  CASE "High": "🟡"
  CASE "Normal": "🟢"
  DEFAULT: "⚪"
}
Documentation and naming conventions Name your attributes descriptively so other team members understand their purpose. Consider a naming convention like "CAT - [description]" for calculated attributes to distinguish them from default fields.
For more advanced reporting recipes, including how to report on custom ticket fields and duration tracking, see our Zendesk Explore recipe for custom ticket fields guide.
Automating insights from your Zendesk data
Custom attributes in Explore help you categorize and report on ticket data. But reporting is only half the battle. The real value comes from acting on those insights.
Here's the challenge: by the time you've built the report, filtered the results, and identified a trend, the moment to act may have passed. Tickets that needed fast responses have already waited. Issues that needed escalation have already frustrated customers.
This is where automation helps. Instead of manually categorizing tickets in reports, you can automatically route, prioritize, and respond based on the same logic in your formulas.
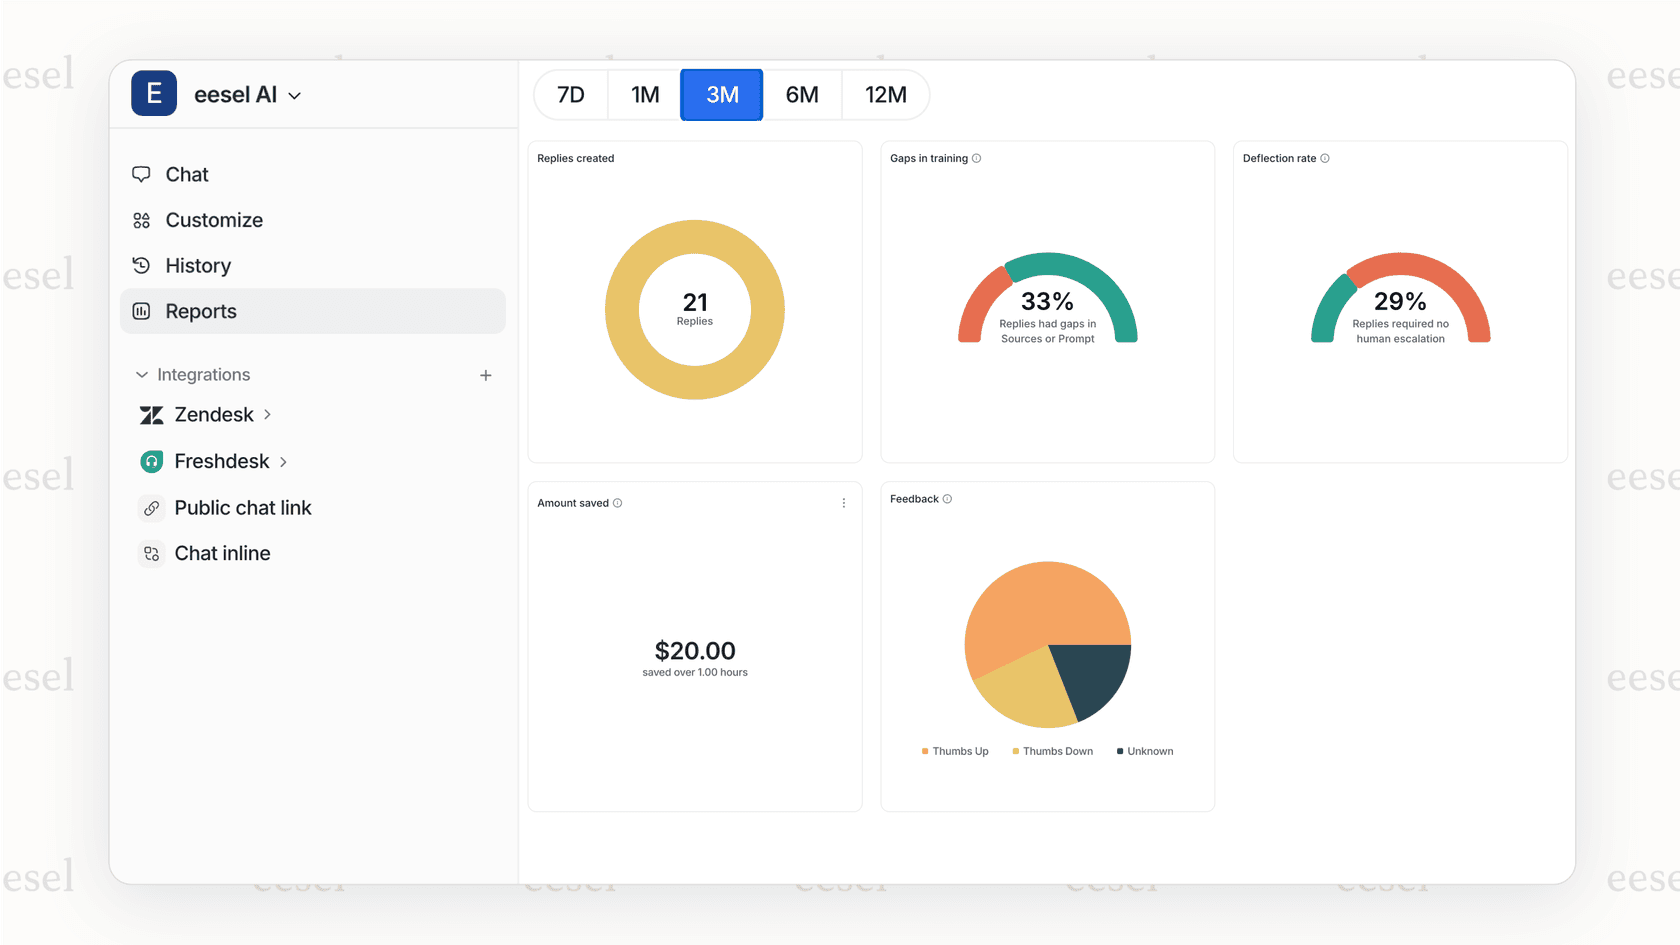
eesel AI connects directly to Zendesk and reads your ticket data, including custom fields. Our AI agents can categorize tickets, route them to the right team, draft responses, and escalate when needed, all without manual report building.
For example, instead of creating a report showing "tickets with urgent keywords," an AI agent can automatically prioritize those tickets as they arrive and notify the appropriate team. Instead of tracking SLA breaches in a dashboard, the agent can escalate at-risk tickets before they breach.
If you're spending significant time building Explore reports to track issues that should be handled automatically, consider whether an AI agent could help. You can explore our Zendesk integration or try eesel AI free to see how it works with your existing setup.
