What "automation settings" actually means in Zendesk
The phrase "Zendesk automation settings" trips people up because it points at three different tools, and Zendesk uses the word "automation" for one specific one of them. Here's the mental model worth getting right before you touch a single setting.
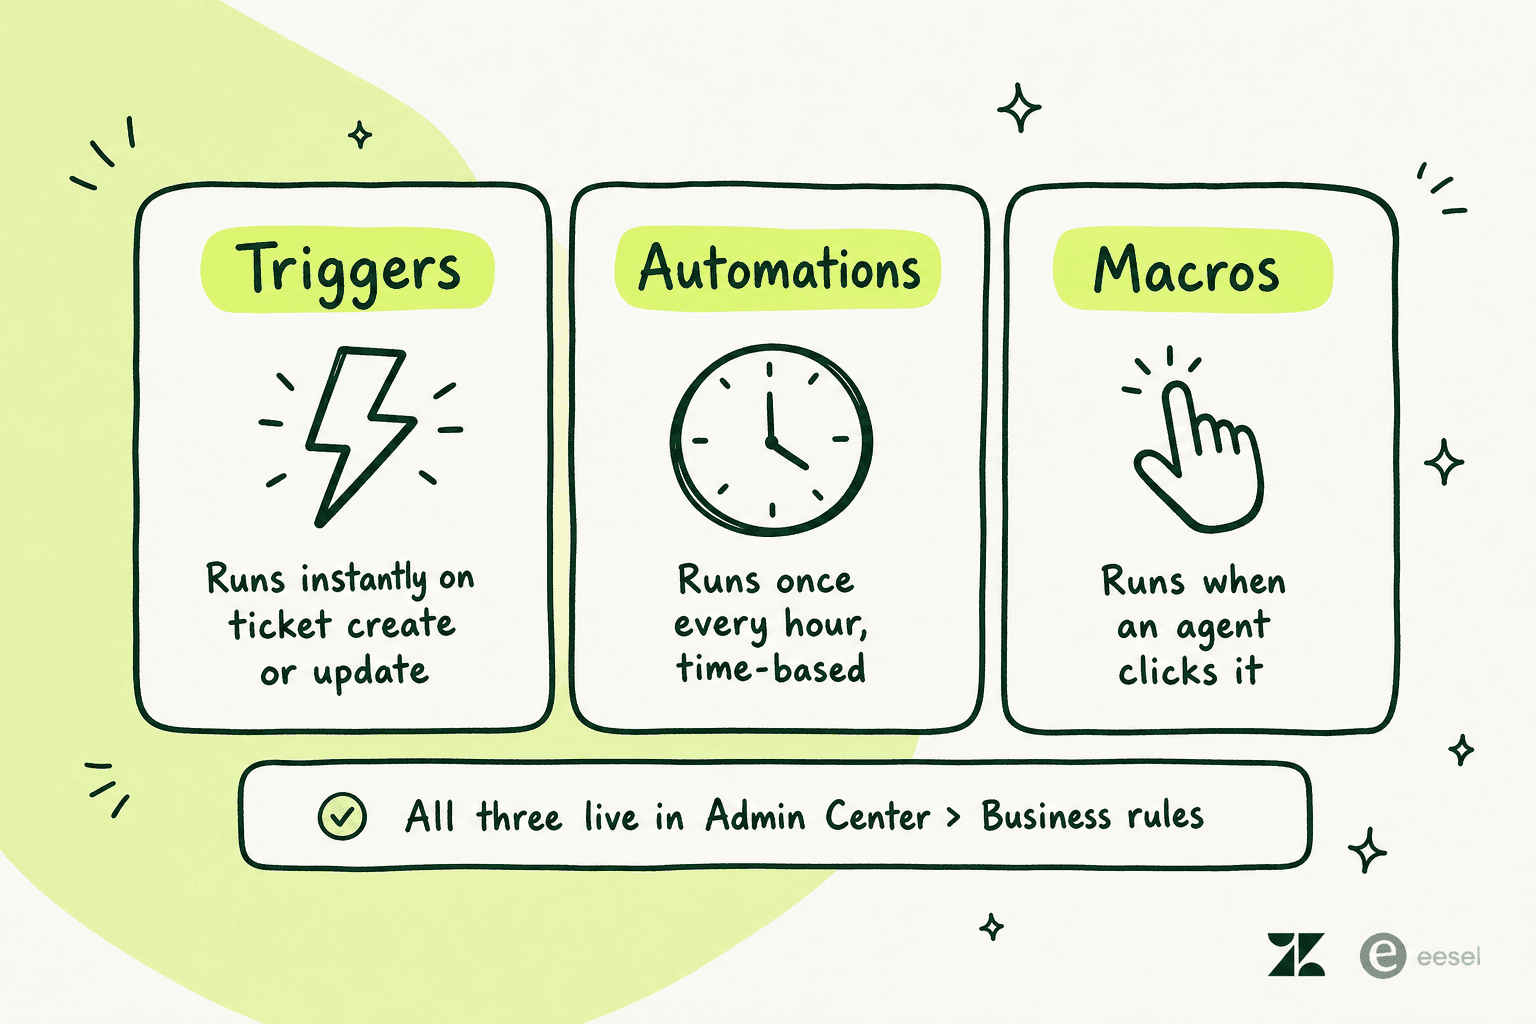
- Triggers are event-driven. They check their conditions the instant a ticket is created or updated, and fire right away. This is your routing, tagging, and notification layer. Per Zendesk's docs, you can have up to 7,000 active ticket triggers.
- Automations are time-driven. They run once every hour against all non-closed tickets and fire when a time condition is met, like "solved more than 96 hours ago." This is your escalation, reminder, and auto-close layer.
- Macros are manual. They're pre-saved bundles of field changes plus canned reply text that an agent applies with one click. Nothing about them is automatic; an agent chooses to run them.
The single most useful question when you're building anything: does this need to happen the moment something changes, or after a period of time? Instant means trigger. After X hours or days means automation. A human deciding to apply it means macro. If you want a longer worked walkthrough of the whole rules engine, our Zendesk business rules setup guide goes deeper, and we keep a running explainer on Zendesk automation generally.
Where to find your automation settings
Everything lives under one roof. Go to Admin Center > Objects and rules > Business rules, and you'll see Triggers, Automations, and Macros as separate sections. If you're new to the layout, the Zendesk Admin Center overview maps out where each settings group sits.
One thing worth knowing up front: on non-Enterprise plans, business rules are visible to all agents but only editable by admins. On Enterprise, you can scope who sees and edits them with custom roles and permissions. So if you can see the settings but can't change them, that's a permissions gate, not a bug.
Setting up triggers (the instant layer)
New Zendesk accounts ship with a set of standard triggers already switched on, and they're doing real work, so don't go disabling things blindly. The standard ticket triggers handle the email notifications customers and agents rely on: "notify requester of received request," "notify assignee of assignment," "notify assignee of comment update," and so on.
The most important rule about triggers: never deactivate all of them. They are your email delivery layer. Turn them all off and your customers stop getting any email at all.
To build a custom trigger:
- Go to Admin Center > Objects and rules > Business rules > Triggers and click Add trigger.
- Name it something a future admin will understand, then add your conditions. A condition is
category | operator | value, for exampleTicket | Channel | Email. - Add a
Ticket | Is | CreatedorTicket | Is | Updatedcondition to narrow the scope. Without one, the trigger evaluates on every create and update and bloats the trigger cycle. - Add your actions: assign a group, set a tag, fire a notification, or call a webhook.
- Save. Triggers run top to bottom in list order, so drag it into the right position.
A few setup habits that save you pain later:
- Clone before you modify a standard trigger. Deactivate the original, edit the clone. That way you can always revert. Our guide on Zendesk email triggers and notifications walks through the notification ones specifically.
- Consider deactivating "Notify all agents of received request." It's on by default and floods every agent's inbox on anything bigger than a tiny team.
- Use the
Assignee | Changedcondition, notIs created, when you want reassignment notifications. This is one of the most common "why isn't my trigger firing" issues in the Zendesk community. - Mind the cycle. When a trigger fires and updates a ticket, the whole cycle restarts (the fired trigger is skipped on the re-run). So a routing trigger near the top can change what a notification trigger near the bottom sees. Order matters, and conflicting triggers that both set the assignee produce results that are hard to predict (the last one to fire wins, but it's rarely obvious which that is).
Triggers can also call webhooks, which is how most teams wire Zendesk into Slack, Jira, or Salesforce. If you're building toward AI-assisted routing, it's worth reading how Zendesk triggers and workflow setup feeds into more advanced automation, and how teams handle ticket tagging with AI once the basic tags are in place.
Setting up automations (the time-based layer)
Automations are where most people get burned, because of one rule that isn't obvious from the settings screen: every automation must be able to stop itself.
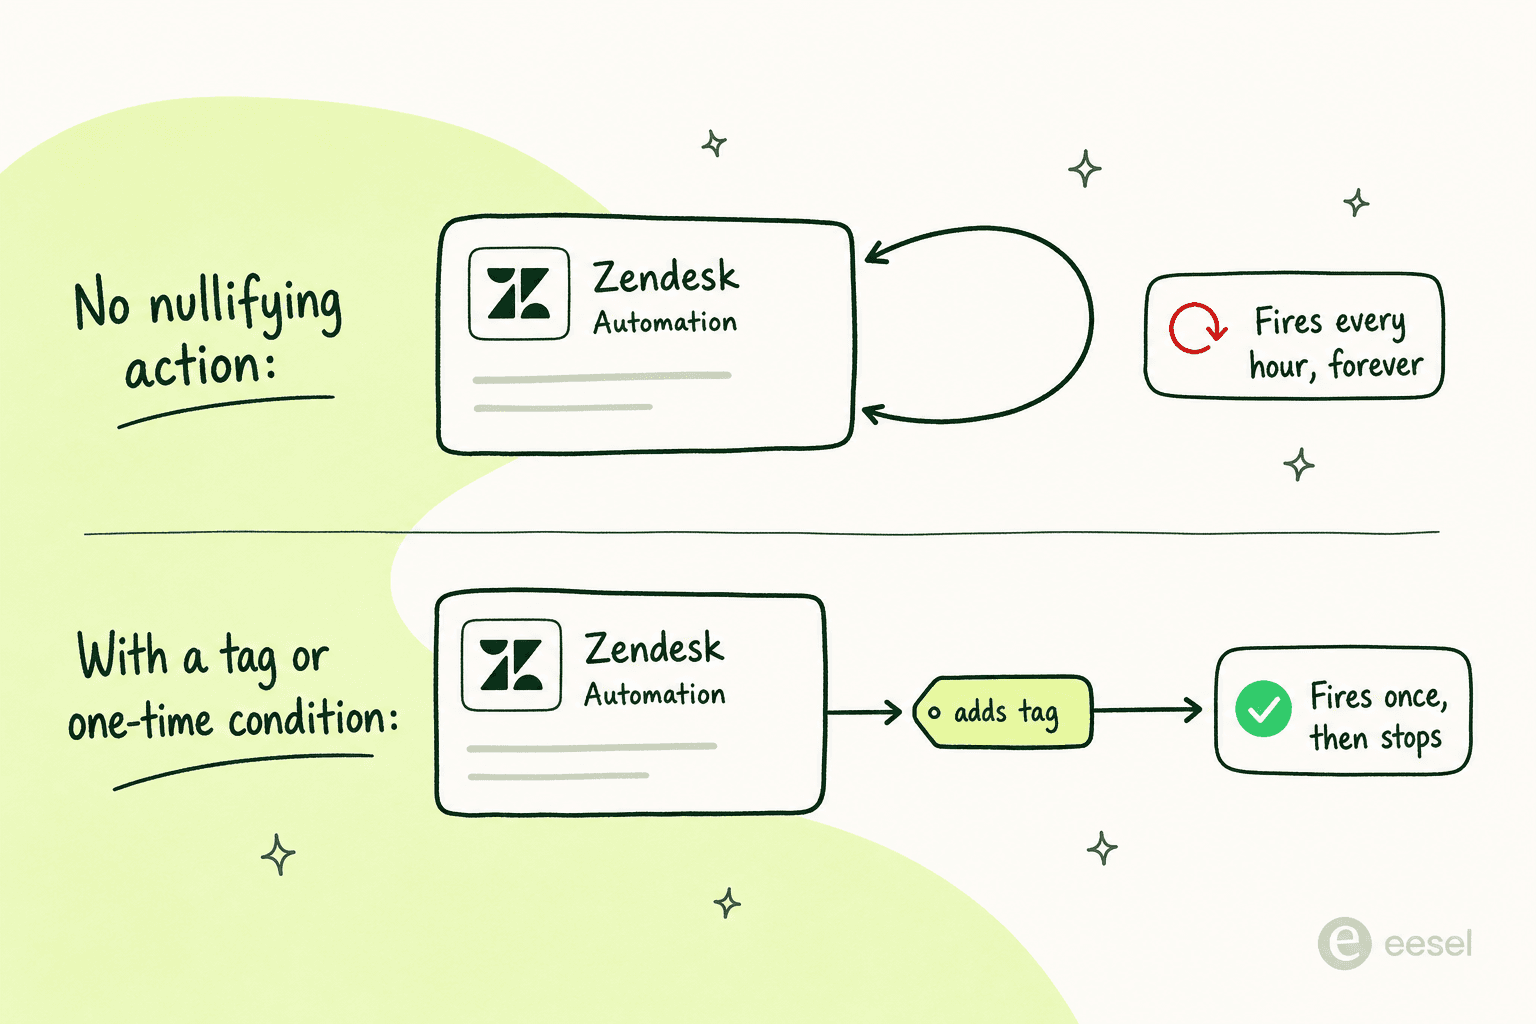
Because automations re-check every non-closed ticket every hour, an automation whose conditions stay true will fire again and again, forever. To prevent that, every automation needs one of two things, per Zendesk's automations documentation:
- An action that nullifies one of its own conditions (the classic example: the standard "close ticket 4 days after solved" automation checks for
Status | Is | Solvedand then sets status to Closed, so it can't match again), or - A condition that can only be true once, like
Hours since created | Is | 4.
In practice, the most reliable pattern is tag-based: add a condition Tags | Does not contain | reminder_sent, and add an action that applies the reminder_sent tag. The first hour it matches, fires, and tags itself. Every hour after, the tag blocks it.
To create one:
- Go to Admin Center > Objects and rules > Business rules > Automations and click Add automation.
- Name it and add your conditions, including your loop-breaker.
- Use Preview match for the conditions before saving. This shows you exactly which existing tickets would be hit, and it's the single best way to avoid accidentally blasting an action across thousands of old tickets.
- Add actions and create.
A couple of setting-level details that matter:
- Prefer
Greater thanoverIsfor time conditions. Automations don't run on the hour, they run at some random point during each hour, so an "is exactly 4 hours" window can be missed entirely on a busy account.Greater than | 4reliably catches it on the next pass. - Add a tracking tag to every automation. Zendesk has no native usage report for automations, so a tag like
auto_closed_96hlets you count fires in Explore later, and helps with the automation audit log workflow.
The most common automations teams set up, with worked guides for each:
- Close tickets after solved for 24h (or the standard 96-hour version)
- Remind customers after 24 hours pending
- Escalate unassigned tickets and broader SLA-based escalation automations
- Notify a manager on an SLA breach, which pairs well with agent performance and SLA tracking
- Archive old tickets and close stale tickets after multi-step reminders
If you want the full comparison of when to reach for one versus the other, Zendesk's own triggers versus automations article is the canonical reference.
Setting up macros
Macros are the simplest of the three and the easiest win. A macro bundles ticket field changes (status, priority, group, tags) with canned reply text, so an agent handling a common issue clicks once instead of typing the same thing for the hundredth time.
You build them in Admin Center > Workspaces > Agent tools > Macros, and agents can also save personal macros from inside a ticket. A few habits keep a macro library usable:
- Name them consistently. A format like
[Support] Close - Not reproduciblemakes them searchable when an agent is mid-ticket. See macro templates for starting points. - Always bundle a reply with the field change. A macro that only flips a status to Solved wastes the chance to send the closing message too. The macro actions guide covers what you can stack into one.
- Audit periodically. There's no native macro usage report either, so retire anything with zero use in 90 days to keep the list short.
Macros also pair naturally with triggers, for example adding followers automatically with triggers or macros, and they're the human-in-the-loop counterpart to the AI macro templates for refunds, exchanges, and shipping that automate the same patterns end to end.
The limits nobody puts in the settings screen
This is the part of "Zendesk automation settings" that doesn't show up until you hit it. The rules engine is powerful, but it has hard ceilings and a few quirks worth knowing before you build something important on top of them.
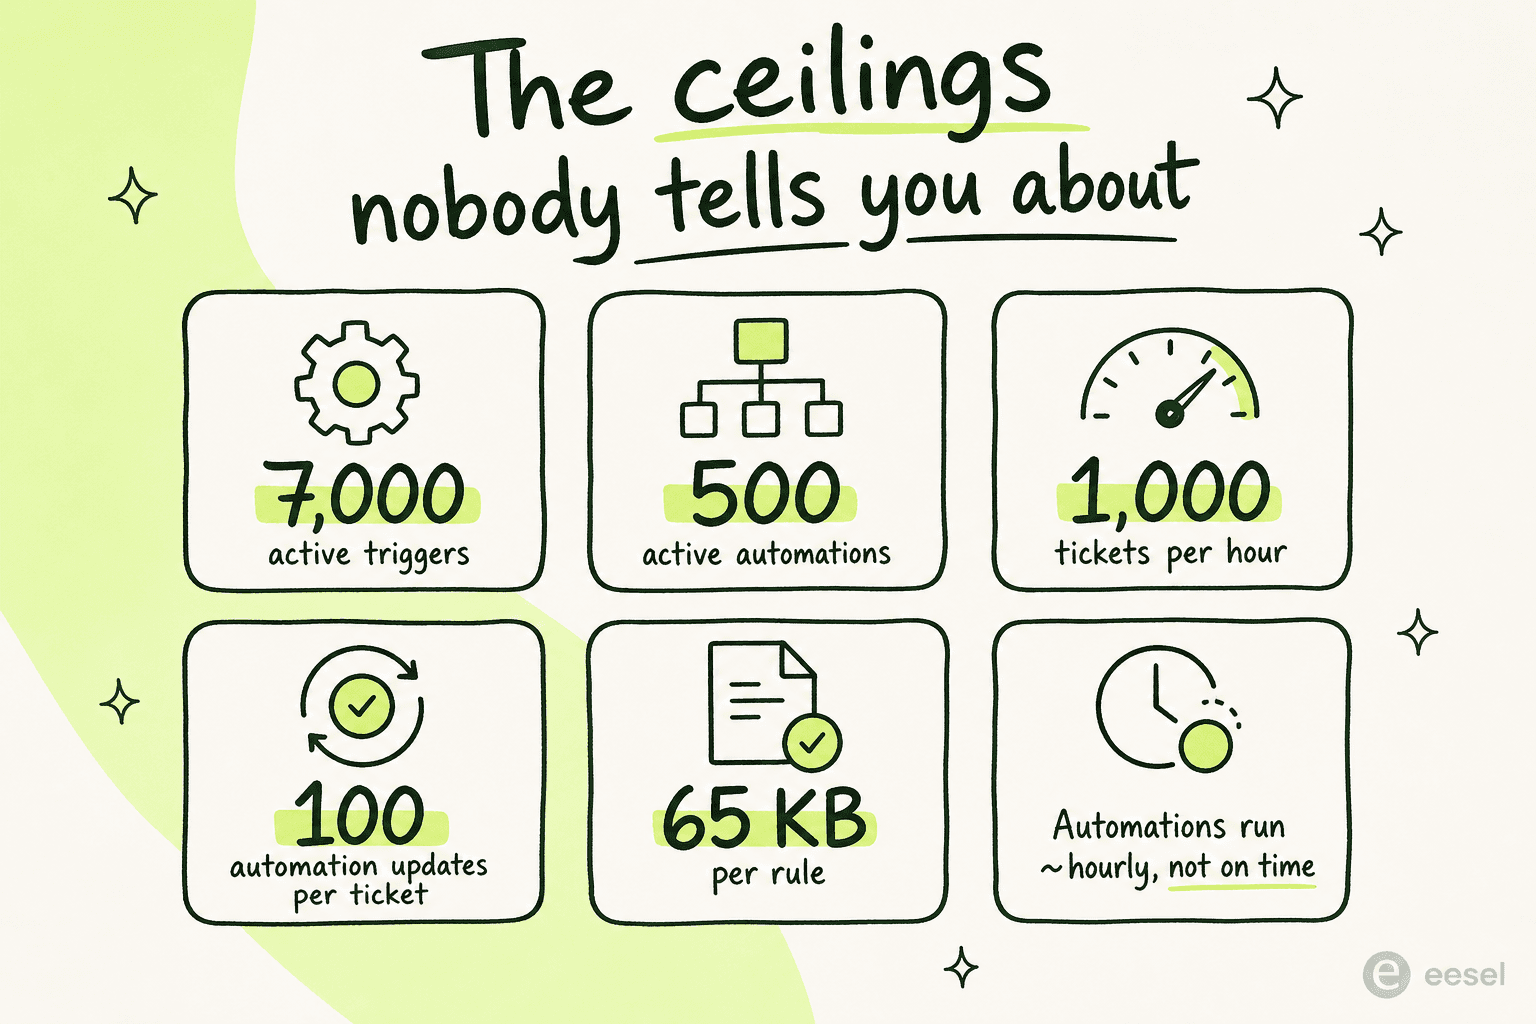
- The 100-update-per-ticket cap is silent. Automations can update any single ticket a maximum of 100 times. When a ticket hits it, Zendesk drops a system note ("The maximum number of ticket updates that can be made by automations has been exceeded"), but that note isn't searchable in the UI. You only catch it through the ticket audit API.
- Automations are throttled at 1,000 tickets per hour. A big retroactive cleanup automation will spill into subsequent hours, and there's no built-in view of which automations are being throttled.
- Timing is approximate. Because automations run at some point within each hour, anything that needs minute-level precision (tight SLA-linked actions) can't lean on automations alone.
- Triggers don't run on closed tickets. Post-close workflows like data cleanup or a delayed CSAT trigger need a workaround.
- The automations editor still can't type-to-search. This is the one users complain about most. As one admin put it in the comments on Zendesk's own automations doc in March 2026:
"It's so annoying to work in. We can't start typing to find any of the condition fields. If I need a condition based on a custom ticket field, I have to scroll and scroll."
Admin comment on Creating and managing automations for time-based events, Zendesk Help Center
None of these are deal-breakers on their own. Together, they're a decent signal of the bigger limitation: triggers, automations, and macros are great at moving tickets around, but none of them can actually answer a ticket. A trigger can route a billing question to the billing group; it can't read the question, check the account, and write the reply. That's the wall.
Where Zendesk's automation hits a wall, and what to do about it
Once a team has wrung everything they can out of business rules, the next ask is usually some version of "can the system just handle the easy tickets end to end?" That's a different kind of automation, and it's where a lot of teams start looking past the native rules engine, and often past Zendesk's own AI add-on too.
The honest version: Zendesk has its own AI agents and Copilot, and for some teams they're a fine fit. But two complaints come up repeatedly. One is cost: the advanced AI is priced separately, often per resolution, which our Zendesk AI pricing calculator guide digs into. The other is that it's still a configuration project. In our customer research, a US healthcare and physical-therapy team running about 500 Zendesk tickets a month told us they had "kicked the tires" on native Zendesk AI and found it "largely inadequate and overpriced" before going looking for other options.
The piece rules can't give you is judgement. And the most common buyer worry isn't that AI is too weak, it's the opposite: that it'll confidently answer things it shouldn't. As one support lead put it plainly when describing what they wanted, there are "certain tickets I don't want to go through AI" at all. That control, deciding which tickets the AI is even allowed to touch, is exactly what a good AI layer adds on top of your existing triggers and automations. There's more on AI agents versus rule-based chatbots if you want the full distinction, plus a roundup of Zendesk AI alternatives and a free-tier comparison.
Try eesel for Zendesk
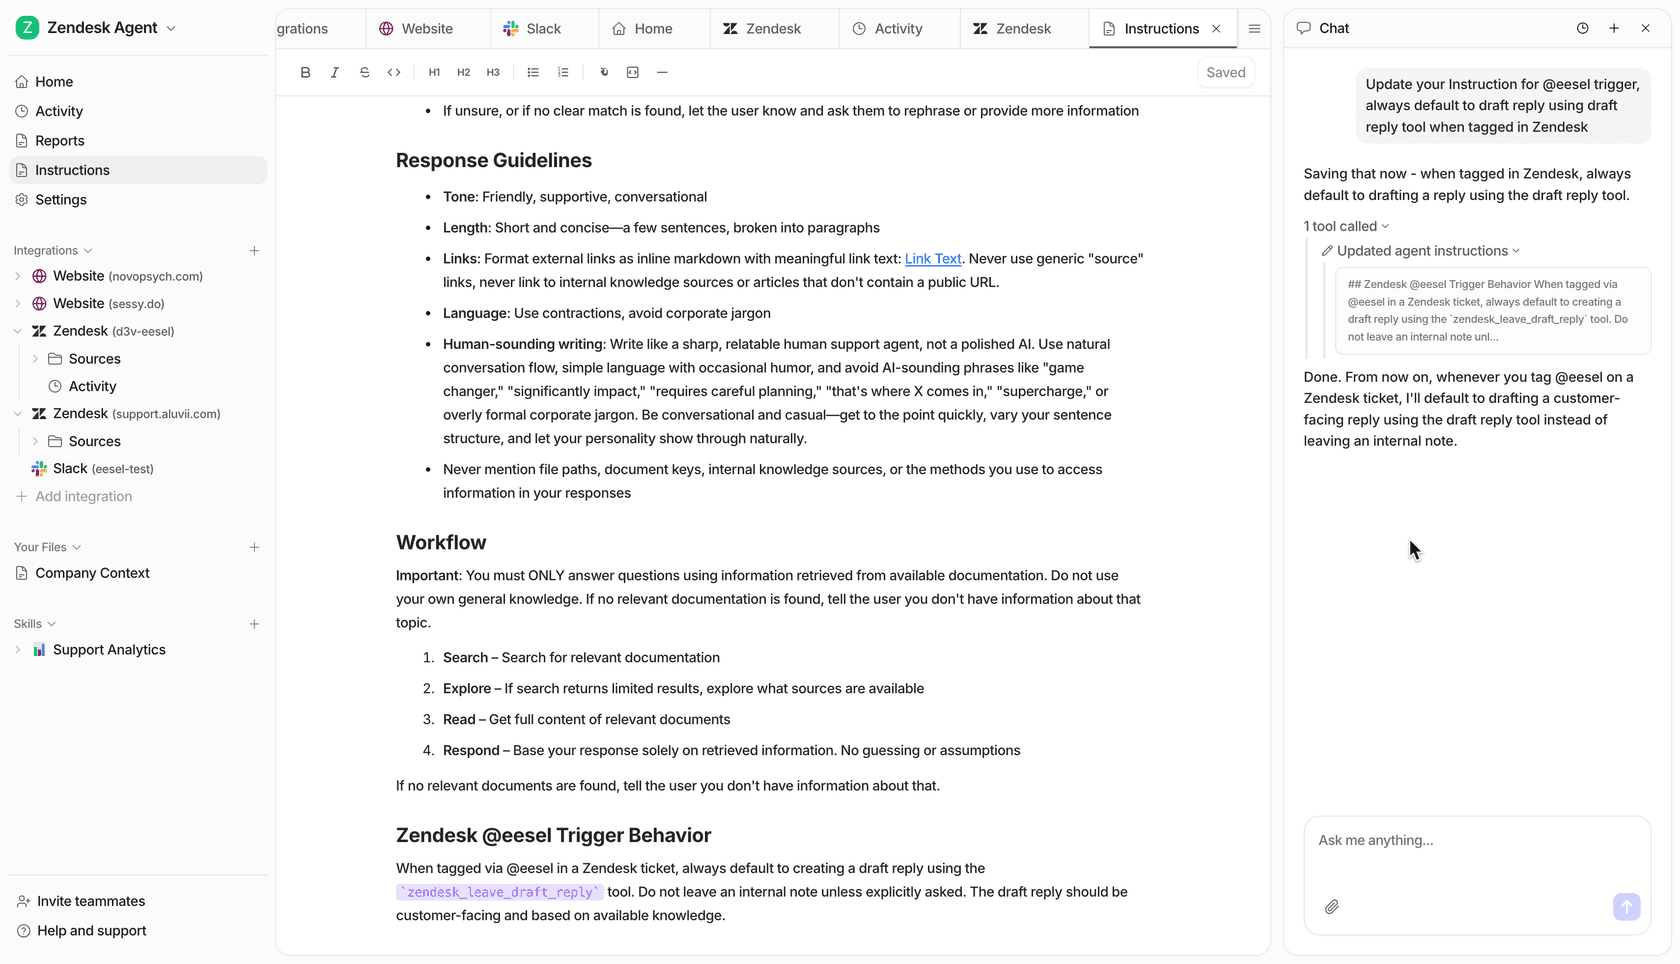
eesel AI installs as a native AI agent inside your Zendesk account, so it runs alongside the triggers, automations, and macros you just set up rather than asking you to rebuild anything. It learns from your past Zendesk tickets, help center articles, and existing macros, drafts on-brand replies, updates ticket fields, and respects the business rules, SLAs, and business hours you've already configured.
Two things make it a different shape from Zendesk's own AI. First, you can simulate it on your real past tickets before it ever touches a live one, so you see exactly what it would have replied and where the gaps are. Second, you configure behaviour by describing it in plain language instead of building out another rules tree, and you choose precisely which tickets it's allowed to handle, leaving the rest alone.
The pricing is also flatter: $0.40 per ticket handled, no per-seat fees and no per-resolution surprises. Ecosa runs over 10,000 tickets a month through eesel on Zendesk and reports handling 75% of tier-1 tickets, integrated in under an hour. As Mikita Tsybulka at Gcore, who evaluated it head-to-head against other tools, put it:
"I've tested many AI agent solutions, but so far Eesel is one of the best. It has many features we need, such as broad sources availability, variety of options, integrations, and so on. Highly recommended."
Mikita Tsybulka, Gcore, via eesel AI for Zendesk
If you've got your Zendesk automation settings dialed in and the next bottleneck is the volume of tickets that still need a human to actually read them, that's the gap worth testing. You can start free and run a simulation on your own ticket history in an afternoon.
Frequently Asked Questions
Where are the automation settings in Zendesk?
What is the difference between a trigger and an automation in Zendesk?
How many automations can you have in Zendesk?
How much do Zendesk automation features cost?
Can AI replace Zendesk automations and macros?

Article by
Alicia Kirana Utomo
Kira is a writer at eesel AI with a Computer Science background and over a year of hands-on experience evaluating AI-powered customer service tools. She focuses on breaking down how helpdesk platforms and AI agents actually work so that support teams can make better buying decisions.