When a customer submits a support request, every second counts. The faster you route that ticket to the right team, set the correct priority, and acknowledge the customer's concern, the better your chances of resolving their issue quickly. Zendesk triggers handle this automation for you.
Triggers are automated business rules that fire immediately when a ticket's created or updated. Think of them as your first line of defense. They handle the repetitive work of categorizing, routing, and responding to tickets so your team can focus on actually solving problems.
This guide walks you through creating a trigger that fires when a ticket's created. Whether you're auto-routing requests to specific teams, setting priority based on keywords, or simply sending an acknowledgment email, you'll learn how to build triggers that actually work.
What you'll need
Before you start building triggers, make sure you've got:
- A Zendesk Support account (Team plan or higher)
- Admin permissions or a custom role with business rule management access
- A clear understanding of your ticket workflow (who should handle what types of requests)
- For time-based routing: Business hours configured (requires Suite Professional or higher for multiple schedules)
If you're just getting started with Zendesk, our guide to the Zendesk ticketing system covers the fundamentals.
Step 1: Access the triggers page
To create or manage triggers, head to the Admin Center. Click the Objects and rules icon in the sidebar, then select Business rules > Triggers.
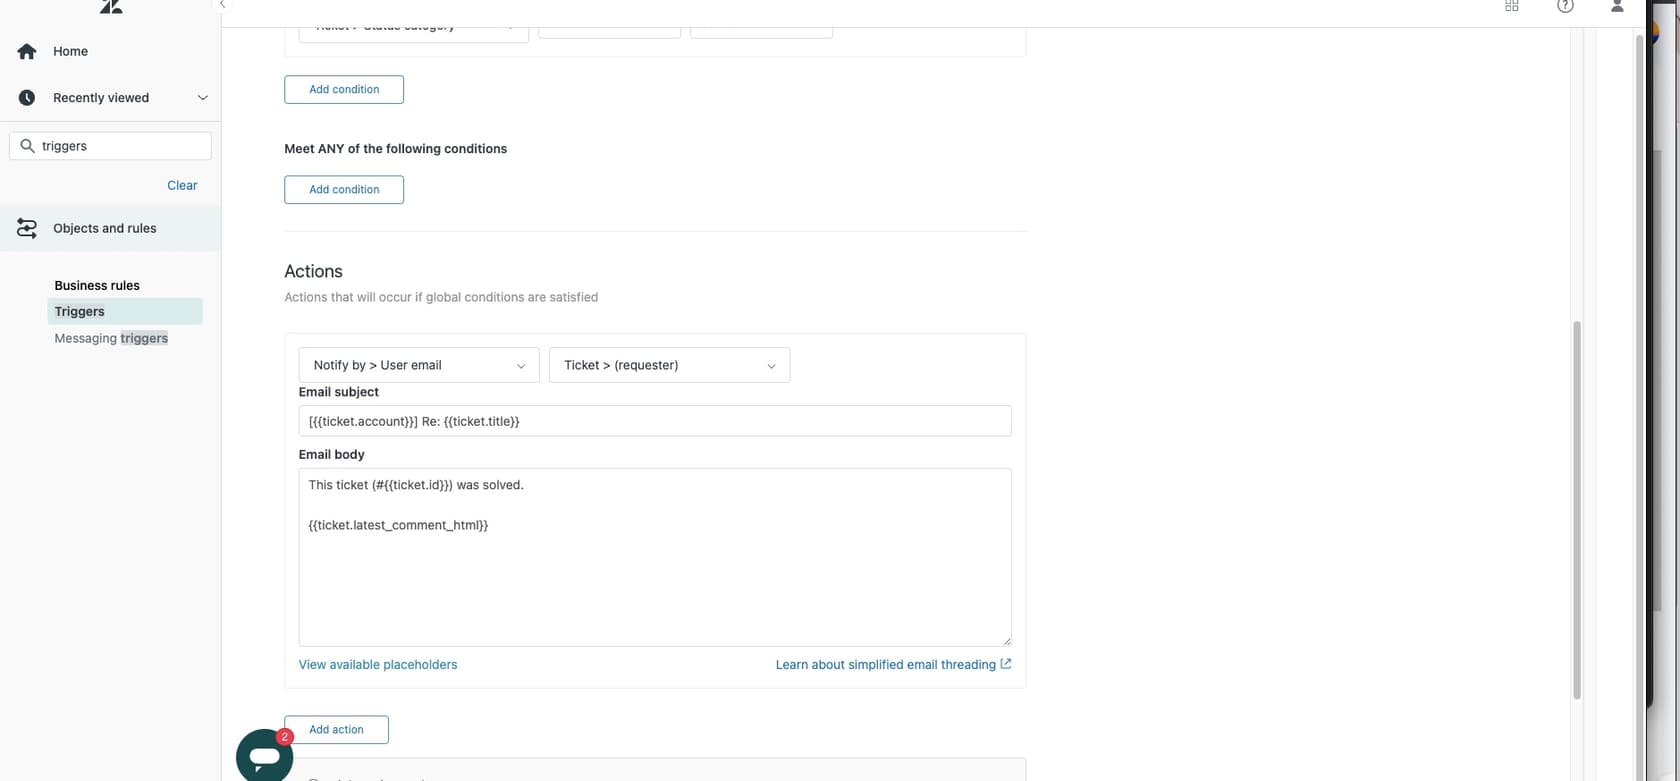
You'll see a list of existing triggers, including the standard triggers Zendesk provides out of the box. These handle basics like notifying requesters when their ticket's received.
Why trigger order matters: Triggers execute from top to bottom. A trigger higher in the list can change a ticket in ways that affect whether triggers lower down will fire. If you're creating a trigger that assigns tickets to specific groups, make sure it runs before any notification triggers that depend on that assignment.
Step 2: Create a new trigger
Click Create trigger to start building your automation.
Give your trigger a descriptive name that explains what it does. Good naming matters more than you'd think. When you have dozens of triggers, "Route VIP tickets to Premium Support" is a lot clearer than "VIP routing."
Add a description that explains the trigger's purpose. This helps other admins understand your logic and makes troubleshooting easier six months down the line.
Select a category for organization. If you don't have categories yet, you can create them on the fly. Many teams organize by function: Routing, Notifications, Escalations, and so on.
Pro tip: You can also clone existing triggers if you want to build something similar to what's already there. Click the three-dot menu next to any trigger and select Clone.
Step 3: Set the ticket creation condition
Here's where you tell Zendesk when this trigger should run. For a trigger that fires when tickets are created, add this condition:
- Ticket > Is > Created
This single condition's the foundation of most ticket creation workflows. Without it, your trigger would fire on every ticket update too, which usually isn't what you want.
Now add the specific conditions that determine which tickets this trigger should affect. You have two types to work with:
ALL conditions (AND logic): Every condition must be true for the trigger to fire.
ANY conditions (OR logic): At least one condition must be true.
Common conditions for ticket creation triggers include:
| Condition | Use Case |
|---|---|
| Ticket > Channel | Route based on source (email, web form, chat) |
| Ticket > Received at | Handle differently based on support email address used |
| Ticket > Subject text | Look for keywords like "urgent" or "billing" |
| Ticket > Comment text | Check ticket body for specific phrases |
| Requester > Organization | Different handling for different customer tiers |
| Requester > Tags | Route based on customer segments |
For example, to catch billing-related tickets, you might add:
- Ticket > Subject text > Contains at least one of the following words: refund invoice payment billing
Step 4: Define the trigger actions
Conditions determine when a trigger runs. Actions determine what happens. When your conditions are met, Zendesk performs every action you specify.
Common actions for ticket creation triggers:
Assignment and routing:
- Set Group: Assign to a specific team (Billing, Technical Support, Sales)
- Set Assignee: Assign to a specific agent
- Set Priority: Mark as Low, Normal, High, or Urgent
- Set Type: Categorize as Question, Incident, Problem, or Task
Categorization:
- Add tags: Apply labels like "vip" or "refund" for reporting and filtering
- Set custom fields: Populate fields specific to your workflow
Communication:
- Notify user email: Send emails to requester, assignee, or groups
- Add CCs: Include additional recipients on ticket updates
External systems:
- Notify active webhook: Send data to external tools via webhooks
Let's say you're building a trigger for billing inquiries. Your actions might be:
- Set Group to "Billing Team"
- Add tag "billing-inquiry"
- Notify group email (Billing Team) with subject "New billing inquiry received"
Important: Each trigger can be up to 65 KB in size. That's plenty for most use cases, but if you're building complex triggers with many conditions and actions, keep an eye on the size.
Common use cases for Zendesk trigger when ticket created
Once you understand the basics, you can build triggers for almost any workflow. Here are patterns we see work well:
Auto-assignment by channel:
- Condition: Ticket > Channel > Is > Chat
- Action: Set Group to "Live Chat Team"
VIP customer routing:
- Condition: Requester > Organization > Is > "Enterprise Customers"
- Actions: Set Priority to High, Add tag "vip", Set Group to "Premium Support"
Keyword-based escalation:
- Condition: Ticket > Subject text > Contains > "outage" OR "down" OR "critical"
- Actions: Set Priority to Urgent, Add tag "escalated", Notify group email (Engineering)
Time-based routing (requires Suite Professional or higher):
- Conditions: Ticket > Is > Created AND Ticket > Within business hours? > Is > No
- Actions: Set Group to "After-Hours Support", Add tag "after-hours"
Best practices for trigger organization
After working with hundreds of support teams, we've seen what works and what doesn't. Here are patterns that save time and prevent problems:
Use one trigger per action. Instead of one massive trigger that assigns, tags, and notifies, break it into focused triggers. "Set billing tag" and "Route to billing team" as separate triggers are easier to troubleshoot than one combined trigger.
Add nullifying conditions. Triggers can loop. If your trigger updates a ticket, that update can cause other triggers to fire. Prevent this by adding conditions like "Tags > Contains none of the following > already-processed" and include an action that adds that tag.
Document your logic. Use trigger descriptions religiously. Future you (and your teammates) will thank you.
Audit regularly. Zendesk allows up to 7,000 active triggers. Most teams accumulate triggers over time and forget what half of them do. Every quarter, review which triggers have fired recently and deactivate the ones that aren't needed.
Consider the full lifecycle. A ticket creation trigger sets things in motion, but think about what happens next. If you auto-assign tickets on creation, do you have triggers that handle reassignments when agents are out of office?
Troubleshooting common issues
Even experienced admins trip over these issues:
Conflicting triggers. Two triggers that set the same field to different values create unpredictable results. The last trigger in the execution order wins, but that order isn't always obvious.
Missing the "Created" condition. Without Ticket > Is > Created, your trigger fires on every update. That "welcome email" gets sent every time the customer adds a comment.
Overly broad conditions. A trigger that runs on "any ticket created" might seem harmless until it's processing thousands of tickets and slowing down your workflow.
Forgetting about updates. If your trigger sets a priority based on subject keywords, what happens when an agent edits the subject? Consider whether you need separate logic for updates.
Taking automation further with eesel AI
Triggers work great for known patterns. If the subject contains "refund," route to Billing. If the requester is in the VIP organization, set high priority. These are deterministic rules. They work or they don't.
But real support isn't always that clean. Customers describe problems in different ways. Urgency depends on context that keywords can't capture. And new types of requests emerge constantly.
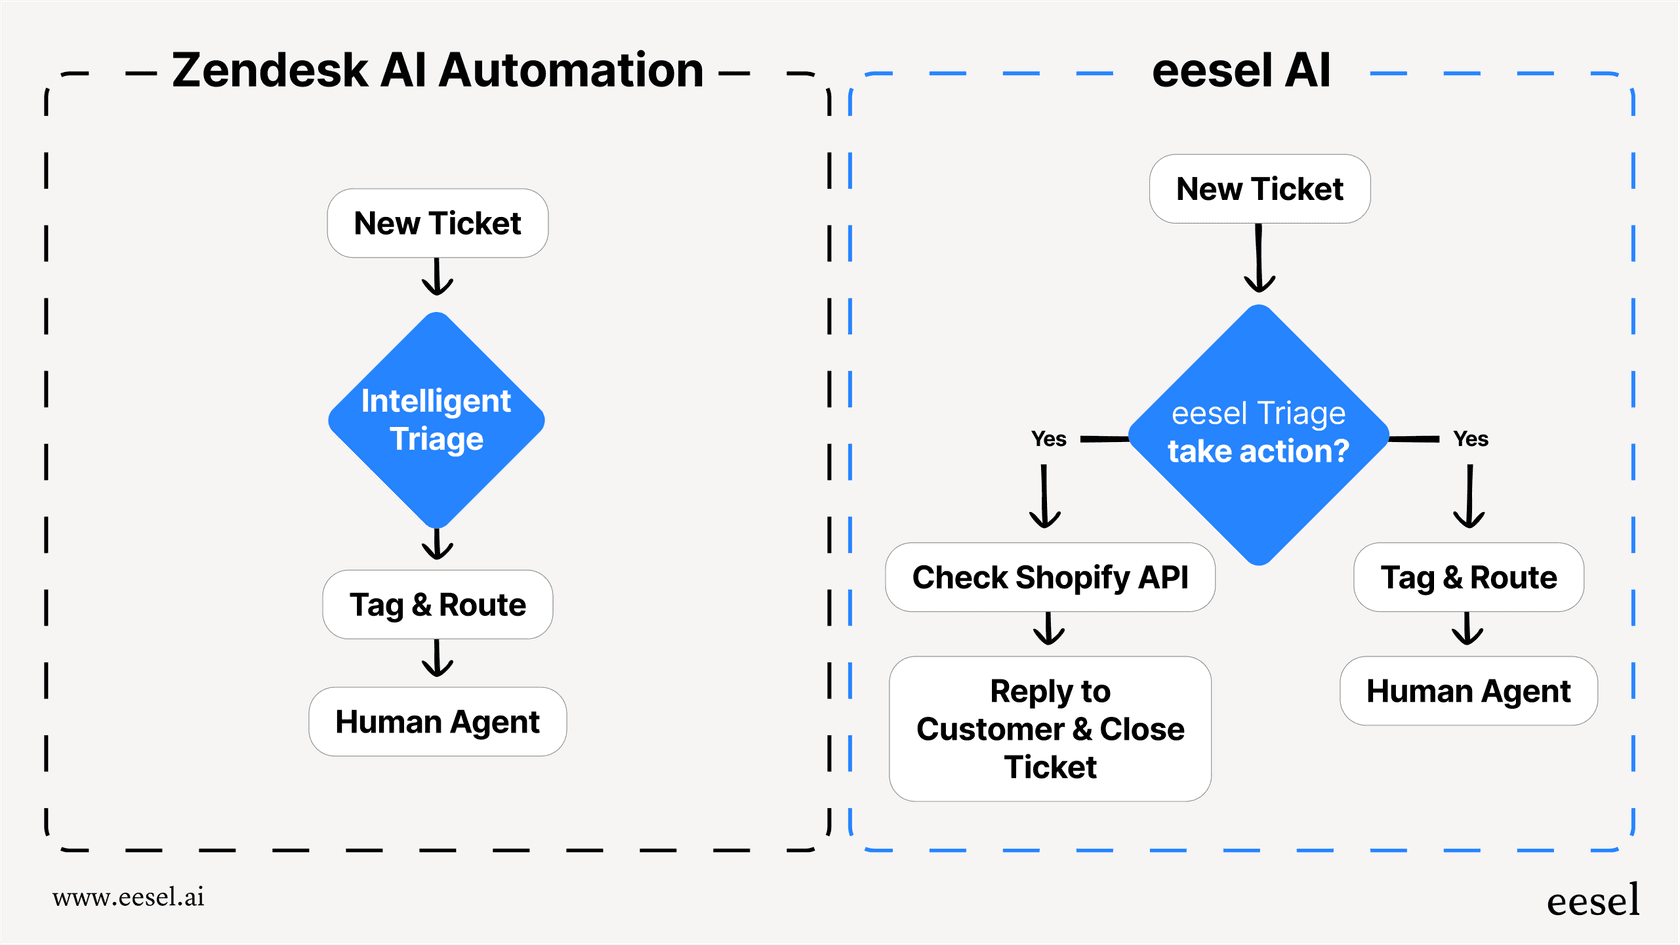
AI-powered triage handles these complex scenarios. Instead of writing rules for every scenario, you train an AI on your past tickets. It learns the patterns you might not even realize exist. The customer who says "I can't log in and my boss needs this report today" gets routed correctly even if they don't use the word "urgent."
We built eesel AI to handle exactly this. It plugs into Zendesk and works alongside your triggers. You can learn more about the full eesel AI agent for Zendesk and how it complements trigger-based workflows. You can start with rules, add AI where it helps, and gradually shift from manual configuration to intelligent automation.
The difference? Rules follow instructions. AI learns from outcomes.
If you're interested in exploring how AI can complement your trigger setup, our practical guide to AI and automation in customer support covers implementation strategies that actually work.
Start building your Zendesk trigger when ticket created
You now have everything you need to build triggers that handle the repetitive work of ticket management. Start simple: one trigger that routes a specific type of request or sends a specific notification. Get comfortable with how conditions and actions interact. Then expand from there.
The best trigger setups grow organically. You add triggers as you encounter new scenarios. You refine them when they don't quite work. Over time, you build a system that routes most tickets correctly without human intervention.
And if you find yourself writing increasingly complex rules to handle edge cases, it might be time to explore whether AI can help.