Managing a busy help desk means handling the same tasks over and over. Agents spend hours routing tickets, sending acknowledgment emails, and escalating urgent issues. Zendesk business rules exist to automate these repetitive workflows so your team can focus on solving actual customer problems.
Think of business rules as your support team's autopilot. They follow simple logic: when something specific happens (the condition), perform a predefined action automatically. This "if x, then y" formula powers everything from auto-assigning tickets to sending follow-up reminders.

Zendesk offers four types of business rules, each serving different automation needs:
- Triggers react immediately when tickets are created or updated
- Automations run on a schedule, checking tickets hourly for time-based conditions
- Macros let agents apply preset actions with a single click
- Views organize and filter tickets for efficient queue management
When configured properly, these rules transform how your team works. Tickets reach the right agents faster, customers get quicker responses, and nothing falls through the cracks. Let's break down how each type works and how to set them up.
Understanding triggers and automations
Triggers and automations form the backbone of Zendesk automation. Both use conditions and actions, but they differ in when and how they execute.
How triggers work
Triggers are event-driven. They fire instantly when a ticket is created or updated, making them ideal for real-time responses. When a customer submits a ticket, triggers can immediately assign it to the right team, send an acknowledgment email, or apply priority tags based on keywords.

Common trigger use cases include:
- Routing VIP customer tickets to a specialized team
- Sending automatic responses when tickets are received
- Escalating urgent issues based on priority or keywords
- Notifying managers when high-value customers need help
- Auto-assigning tickets based on the requester's organization
Triggers evaluate conditions in real-time. If a ticket meets all "all" conditions and at least one "any" condition, the trigger fires immediately. This instant response keeps workflows moving without manual intervention.
How automations work
Automations are time-based. Instead of reacting to events, they run once per hour and check all tickets for conditions involving time. This makes them perfect for follow-ups, escalations, and maintenance tasks.

The most common automation use cases include:
- Closing solved tickets after a set period (Zendesk defaults to 4 days)
- Sending reminders when tickets remain unassigned for too long
- Escalating priorities for tickets approaching SLA deadlines
- Notifying customers about pending ticket responses
- Alerting agents when customers update long-dormant tickets
Time-based conditions use hours since specific events: created, updated, solved, or last comment. You can use either calendar hours (actual time elapsed) or business hours (respecting your operating schedule).
Key differences between triggers and automations
| Aspect | Triggers | Automations |
|---|---|---|
| Timing | Immediate (on create/update) | Scheduled (hourly check) |
| Best for | Real-time routing and notifications | Follow-ups and time-based escalations |
| Conditions | Ticket state, tags, requester data | Hours since events, time elapsed |
| Execution | Once per ticket event | Hourly batch processing |
| Example use | Auto-assign new tickets | Close tickets 4 days after solved |
Choose triggers when you need instant action. Choose automations when timing matters more than speed.
How to create triggers in Zendesk
Creating effective triggers requires understanding your workflow and planning the logic carefully. Here's how to build one from scratch.
Prerequisites: You'll need admin permissions in Zendesk to create and manage triggers.
Step 1: Access the triggers page
Navigate to Admin Center > Objects and rules > Business rules > Triggers. This shows your existing triggers and the option to add new ones. For detailed guidance, see Zendesk's triggers documentation.
Step 2: Create a new trigger
Click Add trigger. Give it a clear, descriptive name that explains what it does. "Escalate VIP tickets to Advanced Support" beats "Trigger #47" when you're troubleshooting six months later.
Step 3: Define your conditions
Conditions determine when the trigger fires. You have two groups:
- All conditions must be true for the trigger to run
- Any conditions require at least one to be true
For example, to escalate VIP tickets, you might set:
- All: Status less than Solved
- All: Tags contains at least one of the following: vip
Step 4: Set up actions
Actions define what happens when conditions are met. Common actions include:
- Setting ticket priority, status, or type
- Assigning to a specific agent or group
- Adding or removing tags
- Sending email notifications
- Adding followers to the ticket
For our VIP example, you might set Group to "Advanced Support" and Priority to "Urgent."
Step 5: Save and test
Click Create to save your trigger. Test it by creating a ticket that meets your conditions and verifying the actions execute correctly.
Practical example: Here's a complete VIP escalation trigger you can adapt:
| Condition | Operator | Value |
|---|---|---|
| Status | Less than | Solved |
| Tags | Contains at least one | vip |
| Action | Value |
|---|---|
| Group | Advanced Support |
| Priority | Urgent |
This trigger runs whenever a ticket has the "vip" tag and isn't solved, immediately routing it to your advanced team with urgent priority.
How to create automations in Zendesk
Automations follow a similar setup process but focus on time-based conditions. Here's how to build one.
Step 1: Access the automations page
Go to Admin Center > Objects and rules > Business rules > Automations. Learn more in Zendesk's automations guide.
Step 2: Create a new automation
Click Add automation. Name it clearly, describing both the condition and action. "Escalate unsolved VIP tickets after 24 hours" tells you exactly what this automation does.
Step 3: Set time-based conditions
Time conditions are unique to automations. Common time fields include:
- Hours since created
- Hours since updated
- Hours since solved
- Hours since pending
- Hours since assigned
You can use calendar hours or business hours depending on your needs.
Step 4: Add additional conditions
Beyond time, add other conditions to narrow the scope. For our escalation example:
- Status less than Solved
- Priority is High
- Tags contains vip
Step 5: Configure actions
Set what happens when the time condition is met. Actions mirror triggers: update fields, send notifications, change assignees, or modify tags.
For escalation, you might:
- Set priority to Urgent
- Email the assigned agent about the escalation
- Add a tag for reporting: "auto_escalated"
Step 6: Save and monitor
Click Create automation. Unlike triggers, you won't see immediate results. Monitor tickets over the next day to verify the automation runs as expected.
Practical example: A complete escalation automation:
| Condition | Operator | Value |
|---|---|---|
| Status | Less than | Solved |
| Hours since created | (calendar) Is | 24 |
| Tags | Contains | vip |
| Priority | Is | High |
| Action | Value |
|---|---|
| Priority | Urgent |
| Email user | (assignee) |
This automation runs hourly, finding VIP tickets that are high priority, unsolved, and 24 hours old, then escalates them to urgent and alerts the assigned agent.
Working with macros for agent productivity
While triggers and automations run automatically, macros give agents manual control over repetitive tasks. A macro is a predefined set of actions agents apply with one click.
How macros differ from automated rules
Triggers and automations work behind the scenes. Macros put power in agents' hands. They're perfect for responses you can't fully automate, like personalized replies to common questions or complex multi-step ticket updates.
Creating macros
Navigate to Admin Center > Workspaces > Agent tools > Macros to get started. Check out Zendesk's macro documentation for complete instructions.
Click Add macro and configure:
- Name and description - Make it obvious what the macro does
- Availability - Personal (just you) or shared (specific groups or all agents)
- Actions - What the macro does when applied
Common macro actions include:
- Adding public or internal comments
- Setting ticket status, priority, or type
- Assigning to agents or groups
- Adding or removing tags
- Setting custom field values

Six essential macros to start with
-
New ticket acknowledgment - Adds a welcoming response with basic troubleshooting steps and links to help resources
-
Priority update - Quickly changes ticket priority with a predefined comment explaining why
-
Escalation handoff - Reassigns to a specialized team, adds context in an internal note, and updates status
-
Ticket closure with disposition - Solves the ticket, adds a closing comment, and applies tags for reporting
-
Frequent response template - Inserts a detailed, pre-written answer to commonly asked questions
-
Quick tagging - Applies multiple relevant tags for categorization and reporting
Organizing macros effectively
As your macro library grows, organization becomes critical. Use consistent naming conventions like [Category] - Action. For example:
[Billing] - Refund processed[Billing] - Payment failed follow-up[Technical] - Reset password[Technical] - Connection troubleshooting
Group related macros using naming prefixes so agents can find them quickly. Review and deactivate unused macros quarterly to keep the list manageable.
Best practices for Zendesk business rules
Well-designed business rules make your team more efficient. Poorly designed ones create confusion and errors. Follow these practices to stay on the right track.
Start simple and expand gradually
Begin with a few essential rules that solve your biggest pain points. Master those before adding complexity. It's easier to debug three triggers than thirty.
Use clear, descriptive naming
Your future self will thank you. Names like "Route Enterprise tickets to Premium Support" are infinitely more helpful than "Trigger 12" when you're troubleshooting at 2 AM.
Test before deploying
Never create a rule and walk away. Test it thoroughly:
- Create test tickets that meet the conditions
- Verify actions execute correctly
- Check that notifications send to the right people
- Confirm no unintended side effects occur
Enterprise plans offer a sandbox environment for safe testing. If you have it, use it.
Document your rules
Maintain a simple spreadsheet or internal doc listing:
- Rule name and purpose
- Conditions and actions
- Date created and last modified
- Owner or creator
This documentation saves hours when team members change or when you need to audit your setup.
Audit regularly
Schedule quarterly reviews of your business rules. Deactivate rules that no longer serve a purpose. Update conditions that reference outdated teams or processes. Rules that made sense last year might be irrelevant today.
Understand execution order
When multiple triggers could fire on the same ticket, order matters. Zendesk processes triggers from top to bottom in your triggers list. Place the most specific triggers first, general ones later. You can reorder triggers by dragging them in the admin interface.
Avoid conflicting rules
Two triggers modifying the same field can create unpredictable results. If one trigger sets priority to High and another sets it to Low, which wins? Usually the last one in the execution order. Design rules to work together, not against each other.
Know when rules reach their limit
Zendesk's business rules work well for straightforward if/then logic. But they struggle with nuance. They can't read ticket sentiment, understand customer history, or learn from past interactions. They follow your instructions exactly, even when the situation calls for flexibility.
When your workflows need intelligence beyond what rules can provide, consider tools designed for that purpose. We built eesel AI to handle the complex scenarios that rule-based systems can't touch. Our AI teammate learns from your past tickets, understands context, and makes judgment calls that would require dozens of rules to approximate.

Troubleshooting common business rule issues
Even well-designed rules occasionally misfire. Here's how to diagnose and fix common problems.
Rules not firing
If a trigger or automation isn't running, check your conditions first. The most common culprit is an "all" condition that isn't met. Verify:
- Are the field values exactly right? ("vip" differs from "VIP")
- Are you checking the right field?
- Did a recent change break a condition?
For automations, remember they run only once per hour. A ticket might meet conditions now, but the automation hasn't checked yet.
Conflicting rules
When multiple rules modify the same ticket, trace through the execution order. Check each trigger's position in the list. The later trigger often overwrites earlier changes. Consider consolidating related rules or making conditions more specific so only the intended rule fires.
Understanding rule analysis
Zendesk Enterprise includes a Rule analysis tool that shows how business rules interact. Access it at Admin Center > Objects and rules > Business rules > Rule analysis. It maps which rules use specific groups, agents, tags, and fields, making it easier to understand dependencies before making changes.
Performance considerations
Hundreds of triggers can slow ticket processing. If you're experiencing delays, audit your rules:
- Deactivate unused triggers
- Merge similar rules when possible
- Use specific conditions to reduce unnecessary evaluations
- Consider whether some automations could be macros instead
Where to find help
Zendesk's documentation at support.zendesk.com covers business rules extensively. The community forums offer solutions from other admins who've faced similar challenges. For complex implementations, Zendesk partners and consultants can provide hands-on assistance.
Streamline your support with smarter automation
Zendesk business rules give you a solid foundation for automating routine support tasks. When configured well, triggers handle instant routing, automations manage time-based follow-ups, and macros speed up agent workflows. Your team spends less time on repetitive work and more time solving meaningful problems.
But rules have boundaries. They work best with clear, predictable conditions. They don't adapt to new situations or learn from experience. When tickets require nuanced understanding, historical context, or flexible judgment, rules alone fall short.
That's where AI changes the equation. Instead of writing dozens of rules to handle edge cases, you can hire an AI teammate that learns your business from your existing tickets and handles complexity naturally.
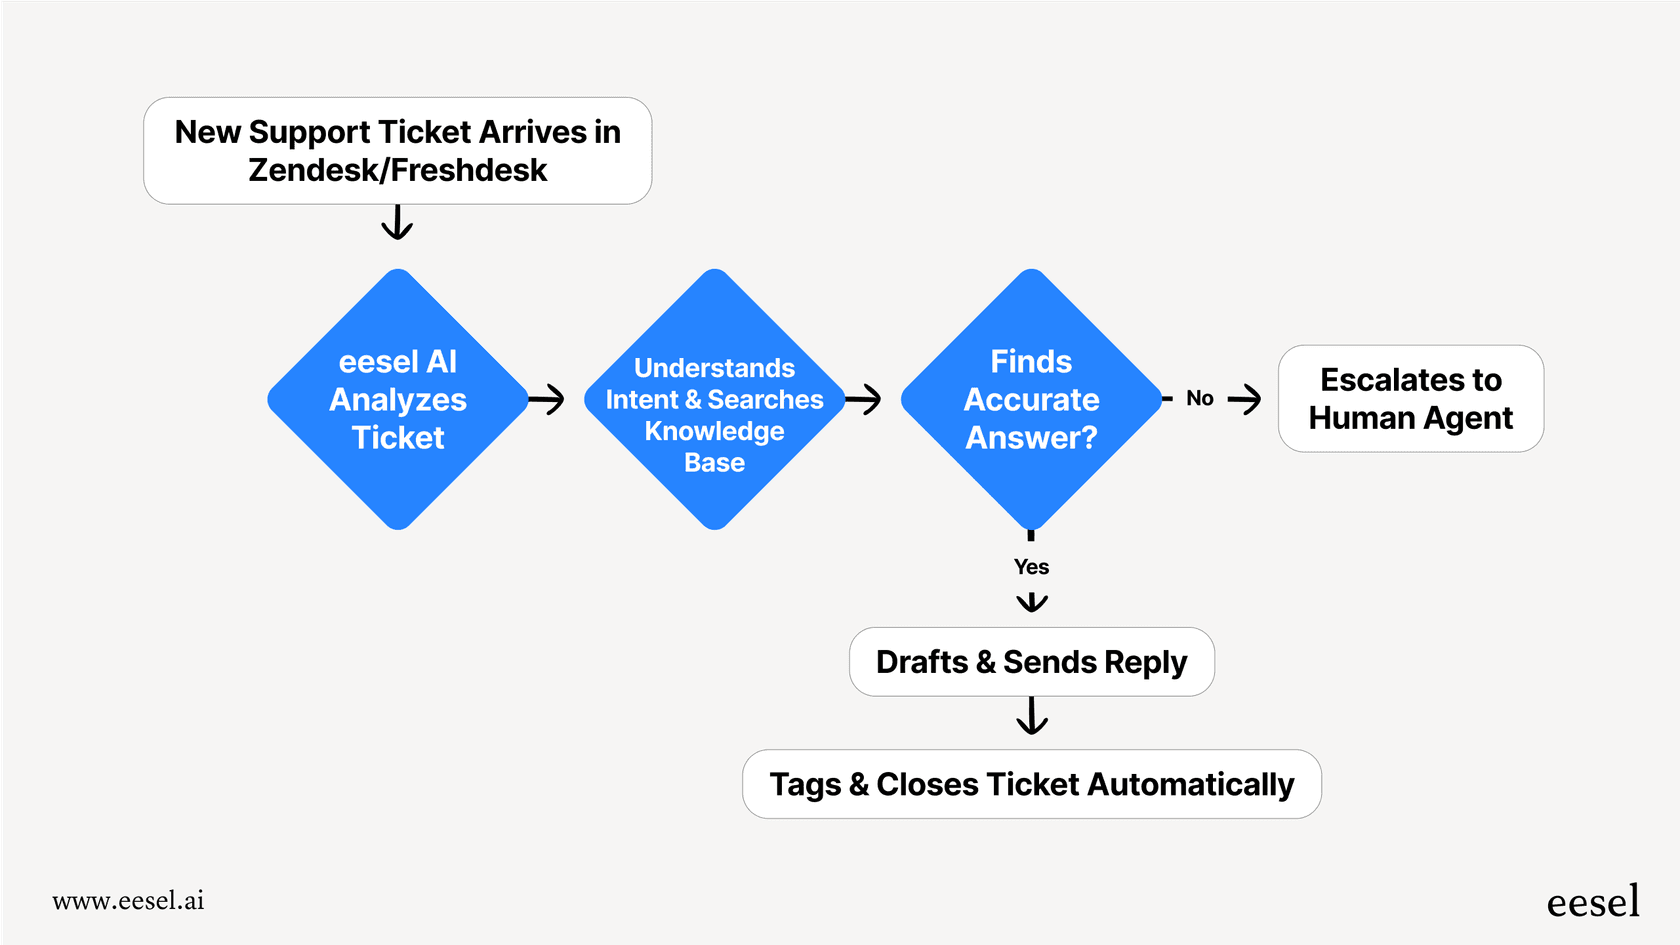
At eesel AI, we've built exactly that. Our AI integrates with your help desk, learns your tone and processes from your historical data, and handles tickets with the judgment of an experienced agent. It routes intelligently, drafts responses in your voice, and escalates only when human expertise is truly needed.
Mature deployments of eesel AI achieve up to 81% autonomous resolution with a typical payback period of under two months. Whether you're looking to enhance your existing Zendesk setup or explore alternatives to complex rule-based systems, eesel AI works alongside your team to deliver better customer outcomes.
Ready to see what intelligent automation looks like? Try eesel AI free and discover how much more your support team can accomplish.
