First impressions in customer support happen fast. The greeting message your customers see when they start a conversation sets the tone for everything that follows. Get it right, and you build immediate trust. Get it wrong, and you might lose them before an agent even enters the chat.
Zendesk messaging gives you multiple ways to greet customers: AI agents can welcome them automatically, proactive messages can reach out based on behavior, and you can even set up notifications when a human agent takes over. But each of these greeting types works differently depending on which version of Zendesk AI you're using.
This guide walks you through configuring greetings for both legacy and advanced AI agents, setting up proactive messages, and implementing agent assignment notifications. We'll also look at ready-to-use templates you can customize for your brand.

What you'll need
Before you start configuring greetings, make sure you have:
- A Zendesk Support account with Messaging enabled
- Administrator permissions in both Support and Knowledge
- The right plan: Team, Growth, Professional, Enterprise, or Enterprise Plus for basic AI agents; AI agents - Advanced add-on for enhanced features
- Clarity on which AI agent version you're using (check if you had AI agents before February 2025)
- Optional: The Delayer app from Zendesk Marketplace (for agent assignment greetings)
If you're unsure which AI agent version you have, look at your Admin Center. If you see "AI agents - Essential" or have legacy functionality, follow the legacy instructions below. If you see "AI agents - Advanced" with use cases and dialogue builders, you're on the advanced version.
Understanding your Zendesk messaging agent greeting options
Zendesk offers three distinct ways to greet customers in messaging channels:
AI agent welcome greetings appear automatically when a customer opens a messaging conversation. The AI introduces itself and offers to help, often with suggested topic buttons.
Proactive greetings trigger based on customer behavior, such as visiting a specific page or spending time on your site. These reach out to customers before they ask for help.
Agent assignment notifications introduce the human agent when they take over a conversation from the AI or when a ticket gets routed to them.
The configuration process differs significantly between legacy/essential AI agents and advanced AI agents. Legacy agents use "standard responses" configured in the Messaging behavior tab. Advanced agents use "system replies" managed through the dialogue builder. Both achieve similar outcomes but require different setup steps.
Setting up AI agent welcome greetings
For legacy and essential AI agents
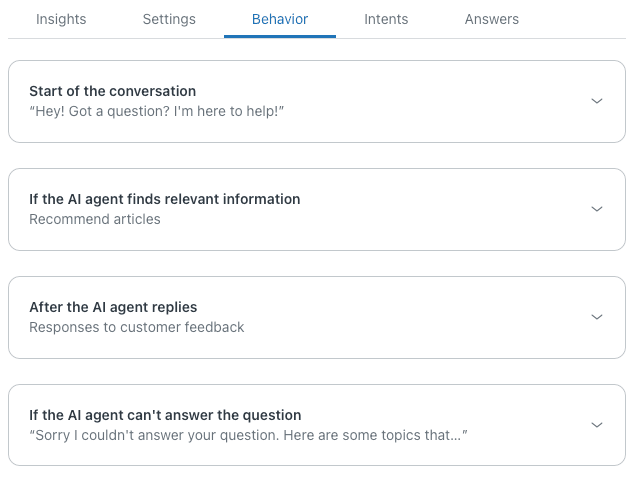
If you're using AI agents - Essential or legacy functionality, your welcome greeting lives in the "Start of conversation" standard response. Here's how to configure it:
- Navigate to Admin Center and click the AI icon in the sidebar, then select AI agents > AI agents
- Click the name of the AI agent you want to edit
- Select the Messaging behavior tab
- Expand the Start of the conversation section
- Choose your greeting type:
- Send a greeting and suggest answers lets you write a custom welcome message and offer up to 10 quick-reply buttons
- Start with an answer triggers a specific answer flow immediately (useful for routing or data collection)
If you choose the greeting option, you'll see a text field for your welcome message and an Answers dropdown. The default greeting is "Hi there. Got a question? I'm here to help." You can customize this to match your brand voice.
For suggested answers, you can include up to 10 options. One default suggestion is included: "Talk to a human." These buttons help customers get to the right topic faster and reduce the AI's workload.
- Click Publish AI agent to make your changes live
For advanced AI agents
Advanced AI agents handle greetings through the Welcome reply system reply, which uses the dialogue builder for full customization:
- In AI agents - Advanced, select the AI agent you want to configure
- Click Content in the sidebar, then select Use cases
- Click the Categories filter, select System replies, and click Apply
- Select the Welcome reply from the filtered list
- Click the Replies tab
- Select the language version you want to edit
- Click Edit dialogue to open the dialogue builder
The dialogue builder gives you more flexibility than the legacy greeting setup. You can add multiple message blocks, include rich media, capture customer information, and branch based on conditions. At minimum, you'll want one AI agent message block with your greeting text.
For Zendesk Chat specifically, you need an extra step. After setting up the welcome reply, create a trigger reply action:
- Click Settings in the sidebar
- Go to Events and actions
- Click the options menu and select Trigger reply on event
- For Select event, choose Conversation started
- For Select reply, choose your welcome reply
- Click Save

Configuring proactive greetings in messaging
Proactive greetings reach out to customers based on their behavior, like visiting a pricing page or spending more than 30 seconds on a product detail page. This can catch customers before they abandon their cart or get frustrated.
To set up proactive messaging:
-
In Admin Center, navigate to Channels > Proactive messaging
-
Click Create campaign
-
Name your campaign descriptively (e.g., "Pricing page help offer")
-
Set your trigger conditions:
- Page URL contains (e.g., "/pricing/")
- Time on page exceeds (e.g., 30 seconds)
- Visitor behavior (e.g., scrolling to specific sections)
-
Compose your greeting message. Keep it concise and relevant to the page context. For example: "Have questions about our pricing? I'm here to help."
-
Set targeting rules to control who sees the message (all visitors, returning customers, specific segments)
-
Choose whether to offer the message once per session or repeatedly
-
Activate the campaign
Proactive messages work best when they're contextually relevant. A greeting on your pricing page should address pricing questions. A greeting on your checkout page should focus on completing the purchase. Avoid generic "Can I help you?" messages that don't acknowledge what the customer is doing.
Setting up agent assignment greetings
Here's where things get tricky. Zendesk Messaging doesn't have a built-in feature to automatically greet customers when a human agent is assigned. The platform assumes the AI handles greetings and the human picks up the conversation where the AI left off.
But many teams want a personal touch when a human takes over. Something like "Hi, I'm Sarah and I'll be helping you today." The good news: there's a workaround using the Delayer app and Zendesk triggers.
The Delayer app workaround
The Delayer app lets you delay trigger actions, which is exactly what you need for agent assignment greetings. Without the delay, the greeting would fire before the assignment completes.
Prerequisites: Install the Delayer app from the Zendesk Marketplace. Search for "Delayer" to find the official app.
Here's how to set it up:
-
In Admin Center, go to Objects and rules > Business rules > Triggers
-
Click Create trigger
-
Set the conditions:
- Ticket channel is Messaging
- Assignee changed (or Assignee is [specific agent] if you want per-agent greetings)
-
Add the action: Notify by > Active Webhook and select your Delayer webhook
-
Configure the JSON payload:
{
  "delay": 0,
  "message": {
    "author": {
      "type": "business",
      "displayName": "{{ticket.assignee.name}}"
    },
    "content": {
      "text": "Hello {{ticket.requester.first_name}}! I'm {{ticket.assignee.name}} and I'll be taking care of you today. Give me just a moment to review your conversation so far.",
      "type": "text"
    }
  },
  "ticket_id": "{{ticket.id}}"
}
The delay: 0 sends the message immediately after the trigger fires (which happens after assignment). The displayName field shows the agent's name as the sender. You can use any Zendesk placeholder in the message text.
- Save the trigger and test it by assigning a messaging ticket to an agent

This workaround has limitations. It requires the Delayer app (a third-party addition), and the greeting won't include the agent's profile picture unless you add the avatar URL to the payload. But it solves the core problem of letting customers know who they're talking to.
If you find yourself needing more sophisticated agent handoffs with context awareness, our AI agent solution handles introductions automatically. We pull in ticket context so the agent greeting includes relevant details about the customer's issue, not just their name.
Ready-to-use greeting templates
Not sure what to write? Here are templates for different scenarios:
Professional AI agent greeting:
"Hello! Welcome to [Company]. I'm your AI assistant, here to help answer questions and guide you to the right resources. What can I help you with today?"
Friendly/casual AI agent greeting:
"Hey there! Thanks for reaching out. I'm here to help you find answers fast. What brings you in today?"
Agent assignment greeting:
"Hi {{ticket.requester.first_name}}! I'm {{ticket.assignee.name}}, a member of the support team. I've reviewed your conversation and I'm ready to help. What questions can I answer for you?"
Proactive greeting (pricing page):
"Have questions about our plans? I can explain features, compare options, or help you choose the right fit. What would you like to know?"
After-hours greeting:
"Thanks for contacting us! We're currently offline but will respond first thing in the morning. For urgent issues, check our help center at [link]."
SaaS onboarding greeting:
"Welcome! I see you're new here. I can help you get set up, explain key features, or connect you with onboarding resources. Where would you like to start?"
E-commerce support greeting:
"Hi! I can help with order status, returns, product questions, or anything else you need. What can I assist you with today?"
When customizing these, keep your greeting under 150 characters for mobile readability. Lead with the greeting, follow with the value proposition, and end with an open question that invites response.
Best practices for effective greeting messages
Getting the configuration right is only half the battle. The copy itself matters just as much.
Set clear expectations. If customers will be talking to an AI first, say so. Something like "I'm an AI assistant" or "I'll connect you with a specialist" prevents confusion later.
Keep it concise. Mobile screens show limited text. Front-load your greeting with the most important information.
Match your brand voice. Zendesk gives you three tone options for a reason. A bank should sound different from a skateboard company. Choose the tone that matches how your human agents actually speak.
Offer immediate value. Suggested answer buttons aren't just navigation. They're a promise of what you can help with. Choose suggestions that represent your most common and solvable issues.
Test on mobile. What looks good on your desktop admin panel might truncate awkwardly on a phone. Open your web widget on a mobile device and see how the greeting displays.
Consider time-of-day. If you have business hours configured, use different greetings for in-hours versus after-hours. An "I'll connect you with a team member" promise doesn't work at 2 AM unless you have 24/7 coverage.
Troubleshooting common greeting issues
Greeting not appearing: Check that your AI agent is published. Changes to standard responses or system replies don't go live until you hit publish.
Wrong greeting displaying: Verify your business hours schedule. Different greetings apply during in-hours versus after-hours periods. Also check that you're editing the right AI agent if you have multiple.
Proactive messages not triggering: Double-check your trigger conditions. Page URL matching is case-sensitive and must match exactly. Test by visiting the page yourself and waiting the specified time.
Agent assignment greeting not sending: Confirm your trigger conditions are correct (Ticket channel is Messaging, Assignee changed). Check that the Delayer app webhook is properly configured. Test the JSON payload for syntax errors.
Formatting issues with placeholders: Zendesk placeholders use double curly braces: {{placeholder}}. Make sure you haven't accidentally used single braces or parentheses.
Alternative: eesel AI for intelligent agent greetings
If you've made it this far, you've probably noticed something: setting up greetings in Zendesk requires jumping through several hoops. Different interfaces for legacy versus advanced agents. Workarounds for agent assignment notifications. Multiple places to configure what seems like a simple feature.
We built eesel AI to simplify this, and you can see how it fits into your setup on the eesel AI for Zendesk page. Our approach treats greetings as part of a continuous conversation flow, not isolated configuration tasks.
With eesel AI connected to your Zendesk workspace, you get:
- Unified greeting management: Configure AI and human agent greetings in one place
- Context-aware introductions: Agent handoffs automatically include relevant ticket context
- Progressive rollout: Start with AI drafting greetings for review, then move to full automation when you're confident
- Consistent voice: Our AI learns from your past tickets to match your team's tone
The setup follows the same pattern for every greeting type. No separate workflows for messaging versus email. No third-party apps for agent assignments. You define the behavior you want in plain English, and the AI handles the technical implementation.
If you're spending more time configuring greetings than optimizing them, it might be worth exploring whether an AI teammate fits your workflow better than a traditional configuration approach.
Start optimizing your Zendesk messaging greetings today
You now have three greeting types to configure: AI agent welcomes, proactive behavior-based messages, and agent assignment notifications. Each serves a different purpose in the customer journey.
Quick wins to implement today:
- Update your AI agent welcome message to something brand-appropriate (not the generic default)
- Add 3-5 suggested answer buttons that reflect your most common customer needs
- Set up one proactive campaign for your highest-traffic support page
For agent assignment greetings, decide whether the Delayer app workaround meets your needs or if you want a more integrated solution. The workaround works, but it adds complexity that might not scale with your team.
The goal with any greeting is simple: make customers feel heard and helped from the first second. Whether that's an AI agent answering immediately or a human introducing themselves professionally, the greeting sets expectations for everything that follows.
If you want to explore how AI can handle greetings more intelligently, check out how we work with Zendesk or book a demo to see it in action.
