How to use Zendesk Group SLA filter by group ID: A complete guide
Stevia Putri
Last edited February 20, 2026
Managing internal team performance in Zendesk can feel like guesswork without the right metrics. While standard SLA policies track how quickly you respond to customers, they don't tell you how efficiently your internal teams handle handoffs and escalations. That's where Group SLA policies come in.
Group SLAs let you set specific targets for how long a team should own a ticket before either solving it or passing it along. The key to making them work? Filtering by group ID. This guide walks you through exactly how to set up Group SLA policies with proper group ID filters, from finding your IDs to configuring policies that actually drive accountability.

What you'll need
Before diving in, make sure you have the basics covered:
- A Zendesk Enterprise or Enterprise Plus plan (Group SLAs aren't available on lower tiers)
- Admin access to your Zendesk account
- The group IDs for the teams you want to track
- A rough idea of what ownership time targets make sense for your workflow
If you're on Professional or Suite Growth, you can still use standard SLAs for customer-facing metrics like first reply time and resolution time. But Group SLAs, which track internal group ownership time, require that Enterprise upgrade.
Understanding Group SLA policies vs standard SLAs
Standard SLA policies in Zendesk measure customer-facing commitments: how quickly you first respond, how fast you reply to follow-ups, and how long it takes to fully resolve an issue. These apply to tickets based on conditions like priority, channel, or customer type.
Group SLAs work differently. Instead of tracking customer wait times, they measure internal team performance through a single metric: group ownership time. This tracks how long a ticket sits with a specific agent group before the group either solves it or reassigns it elsewhere.
Here's why that matters. Imagine your Tier 1 support team escalates complex issues to Tier 2. You want Tier 1 to attempt initial troubleshooting, but you also want escalations to happen promptly. A Group SLA can set a target like "Tier 1 must solve or escalate urgent tickets within 30 minutes." Without this, tickets might sit in Tier 1's queue for hours while customers wait.
The key difference in setup? Group SLA policies require a group_id filter. You can't create one without specifying which groups it applies to. Standard SLAs can use broader conditions like "Priority is High" or "Channel is Email."
Step 1: Find your Zendesk group IDs
You can't set up Group SLAs without knowing your group IDs. Here are three ways to find them.
Method 1: Via the Admin Center URL (easiest)
Navigate to Admin Center > People > Groups. You'll see a list of all your agent groups. Click on any group to open its edit page. Look at the URL in your browser: the group ID is the number at the end.
https://your-subdomain.zendesk.com/admin/people/teams/groups/10001/edit
In this example, the group ID is 10001.
Method 2: Via the Groups API
If you need to fetch all group IDs programmatically, use the List Groups endpoint:
GET /api/v2/groups.json
This returns a JSON response with all groups and their IDs. You'll need an API token and appropriate credentials to access this.
Method 3: Export from Admin Center
Some Zendesk plans allow exporting group data from the Admin Center. Check Admin Center > People > Groups for an export option if you need a spreadsheet of all groups and IDs.
Pro tip: Create a shared reference document with group names and IDs. Your team will need these IDs not just for Group SLAs, but also for triggers, automations, and API integrations.
Step 2: Create a Group SLA policy with group ID filter
Now for the actual setup. Here's how to create a Group SLA policy that filters by group ID.
- Navigate to Admin Center > Objects and rules > Business rules > SLA policies
- Click Create policy and select Group SLA (not Standard SLA)
- Give your policy a clear name like "Tier 1 Escalation SLA" or "Finance Team Response Target"
- Set the filter conditions using your group ID
The filter is where the magic happens. Group SLA policies require at least one condition with the field "group_id". Here's the JSON structure:
{
  "filter": {
    "all": [
      { "field": "group_id", "operator": "includes", "value": [10001] }
    ]
  }
}
Available operators:
includes- The ticket's assigned group matches any group in your value arraynot_includes- The ticket is NOT assigned to any of the groups in your value array
You can include multiple group IDs in the value array:
{ "field": "group_id", "operator": "includes", "value": [10001, 10002, 10003] }
This applies the same Group SLA to multiple related teams, like all regional Tier 1 groups.
- Set your policy position. Group SLAs apply in order from top to bottom, and the first matching policy wins. Put more specific policies (like VIP group SLAs) above general ones.
Step 3: Configure Group SLA targets
With the filter set, it's time to define what you're actually measuring. Group SLAs only offer one metric: group_ownership_time.
This metric measures the clock time from when a ticket is assigned to a group until that group either solves the ticket or reassigns it to another group. The clock pauses if the ticket is reassigned outside the group and resumes if it comes back.
For each priority level (low, normal, high, urgent), set a target in minutes. Consider these example targets:
| Priority | Target | Use Case |
|---|---|---|
| Urgent | 10 minutes | Critical issues needing immediate escalation |
| High | 30 minutes | Important issues requiring quick triage |
| Normal | 2 hours | Standard support workflow |
| Low | 8 hours | Non-urgent requests, backlog items |
Business hours vs calendar hours: Decide whether the clock runs 24/7 or only during your operating hours. For internal handoffs, calendar hours often make more sense so teams can't "wait out" the SLA overnight. For customer-facing commitments, business hours are usually fairer.
To configure targets via the API:
{
  "policy_metrics": [
    {
      "priority": "urgent",
      "metric": "group_ownership_time",
      "target": 600,
      "business_hours": false
    },
    {
      "priority": "normal",
      "metric": "group_ownership_time",
      "target": 7200,
      "business_hours": false
    }
  ]
}
Step 4: Add Group SLA columns to your views
Creating policies is only half the battle. Your agents need to see these SLAs in action. Here's how to add Group SLA tracking to your ticket views.
- Go to Admin Center > Objects and rules > Views
- Edit an existing view or create a new one
- In the Formatting options section, click Add column
- Select Group SLA from the column list (this is separate from the standard SLA column)
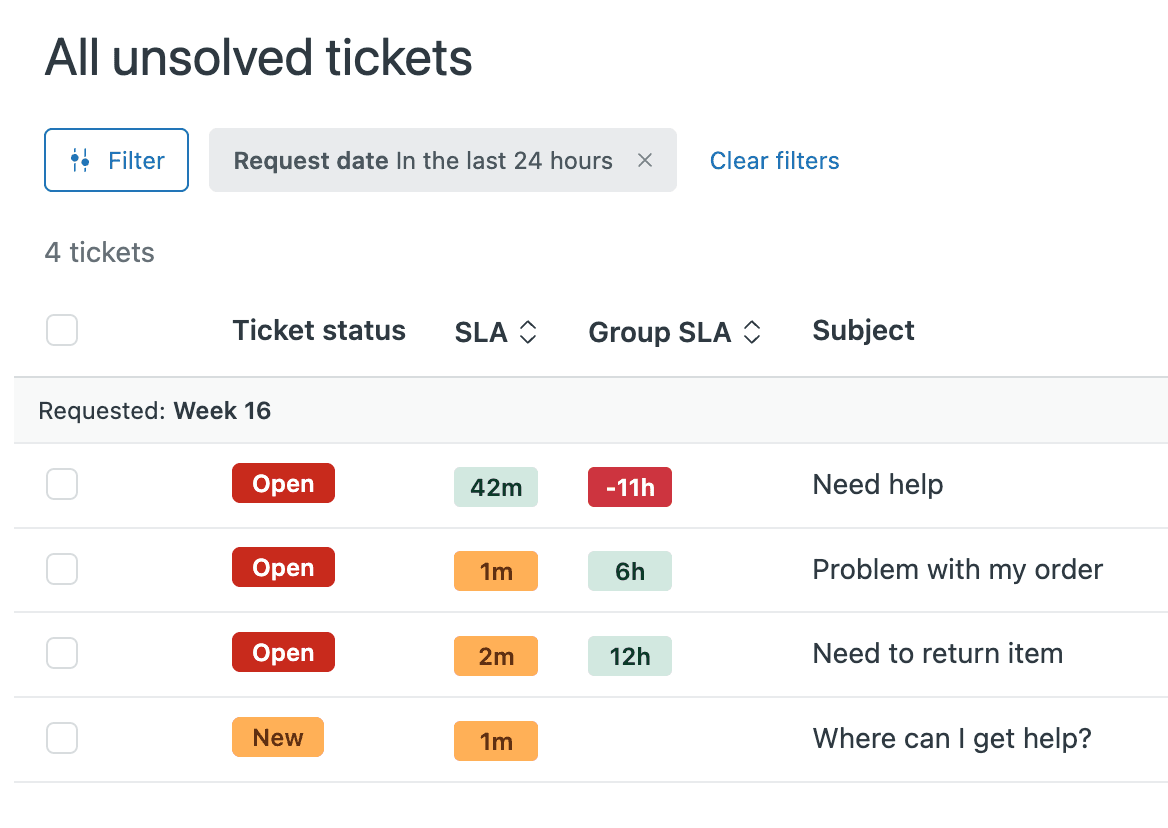
- Set Order by > Group SLA in Ascending order
Sorting by Group SLA in ascending order means tickets closest to breaching appear first. This helps agents prioritize their queue based on internal deadlines, not just ticket creation time.
Best practice: Create dedicated views for each group that shows their Group SLA column. Tier 1 agents should see Tier 1's Group SLA targets. Escalated tickets that land in Tier 2 should show Tier 2's targets.
Note: Group SLA and standard SLA are separate columns. You can't sort by both simultaneously, so choose which metric matters more for each specific view.

Step 5: Set up automations for Group SLA breaches
Views help agents monitor SLAs, but automations can take action when thresholds are hit. Here's how to build automations around Group SLA breaches.
Zendesk offers two automation conditions for Group SLAs:
- Hours until next Group SLA breach - Use this to prevent breaches
- Hours since last Group SLA breach - Use this to catch up on breached tickets
Common automation workflows:
- VIP escalation: If a VIP customer's ticket is 30 minutes from breaching the Group SLA, notify a Slack channel and reassign to a senior agent
- Priority bump: If an email ticket breaches the Group SLA target, automatically increase its priority to ensure faster assignment
- Manager alert: If any ticket breaches the Group SLA by more than 1 hour, email the support manager with ticket details
Important limitation: You cannot create triggers based on SLA or Group SLA breach status. Only automations (time-based rules) can reference SLAs. This means you can't immediately trigger actions the moment an SLA breaches; you need to use time-based automation conditions.
Using the API to manage Group SLA policies
For teams managing multiple Group SLAs or integrating with external tools, the API offers full programmatic control.
List all Group SLA policies:
curl https://your-subdomain.zendesk.com/api/v2/group_slas/policies \
  -H "Content-Type: application/json" \
  -u email@example.com/token:API_TOKEN
Create a policy:
curl https://your-subdomain.zendesk.com/api/v2/group_slas/policies \
  -H "Content-Type: application/json" \
  -X POST \
  -d '{
    "group_sla_policy": {
      "title": "Tier 1 Escalation",
      "filter": {
        "all": [{ "field": "group_id", "operator": "includes", "value": [10001] }]
      },
      "policy_metrics": [
        { "priority": "urgent", "metric": "group_ownership_time", "target": 600, "business_hours": false }
      ]
    }
  }' \
  -u email@example.com/token:API_TOKEN
Retrieve filter definitions:
curl https://your-subdomain.zendesk.com/api/v2/group_slas/policies/definitions \
  -H "Content-Type: application/json" \
  -u email@example.com/token:API_TOKEN
The definitions endpoint returns all available filter fields and operators, which helps if you're building a custom integration.
Common issues and troubleshooting
Even with proper setup, Group SLAs can behave unexpectedly. Here are the most common issues and how to fix them.
Group SLA column not appearing in views This almost always means you're not on an Enterprise plan. Check your subscription level in Admin Center > Account. Group SLAs are Enterprise-only.
Policy not applying to tickets Double-check your group_id value. The ID in the URL when viewing a group in Admin Center is correct. Also verify that tickets are actually being assigned to that group via triggers or manual assignment.
Confusion between ownership and escalation Group SLAs measure total time a group owns a ticket, regardless of whether they received it at creation or via escalation from another team. This means Tier 2's Group SLA clock starts when they receive the escalated ticket, not when the customer first contacted you. Some admins create separate groups like "Tier 2 Escalated" with different targets.
External escalations not tracked Group SLAs only work within Zendesk. If you escalate to a team via Jira, Slack, or Side Conversations, that time isn't measured. Consider using custom fields or internal notes to track external handoffs.
Policy ordering issues Remember that Group SLAs apply top-to-bottom, first match wins. If you have a general "All Support Groups" policy at the top, it will block more specific policies below it.
Streamline your support workflow with eesel AI
Group SLAs give you structure for tracking internal performance, but structure only works if your teams can actually hit those targets consistently. That's where AI assistance becomes valuable.
We built eesel AI to work alongside tools like Zendesk, handling the repetitive work that bogs teams down and makes SLAs harder to achieve. Here's how it complements your Group SLA framework:
Automated ticket routing: eesel AI can triage incoming tickets and route them to the right group immediately. Instead of tickets sitting in a general queue waiting for manual assignment, they land in the right team's queue instantly, giving them the full Group SLA window to work with.
Faster initial responses: When eesel AI handles frontline support, it responds to customers within seconds. This buys your human teams time to work within their Group SLA windows for complex issues, without customers feeling ignored.
Consistent handoff quality: eesel AI summarizes ticket context when escalating, so when a ticket moves from Tier 1 to Tier 2 (triggering that Group SLA clock), the receiving agent has everything they need to start work immediately.
We integrate directly with Zendesk, training on your past tickets, macros, and help center content so the AI sounds like your team. You can simulate responses on historical tickets before going live, ensuring quality stays high even as volume increases.
If you're implementing Group SLAs to improve internal accountability, consider what happens when AI handles the routine work. Your teams get more bandwidth to focus on the complex issues where Group SLAs really matter.
Frequently Asked Questions
Share this article

Article by
Stevia Putri
Stevia Putri is a marketing generalist at eesel AI, where she helps turn powerful AI tools into stories that resonate. She’s driven by curiosity, clarity, and the human side of technology.