How to create Zendesk side conversation emails: A complete guide
Stevia Putri
Last edited March 2, 2026
When a customer ticket requires input from someone outside your immediate team, things can get messy fast. You might find yourself forwarding emails, copying and pasting context into Slack, or juggling multiple threads just to get a simple answer. Before you know it, crucial details slip through the cracks and your response time suffers.
Zendesk side conversations solve this by letting you start email discussions directly from a ticket. Everything stays organized in one place, and anyone you loop in gets the full context they need.
Here's how to set up and use email side conversations in Zendesk, from initial configuration to advanced tips for streamlining your workflow.
Side conversations keep all your external communication organized within the ticket, so nothing gets lost in separate email threads or chat channels.
What you'll need
Before you can create side conversations, make sure you've got the following in place:
- Zendesk Suite Professional plan or higher Side conversations aren't available on lower-tier plans
- Collaboration add-on enabled This is required for the side conversations feature
- Administrator access Only admins can activate and configure side conversations for your team
- A clear use case Know when email makes more sense than Slack or child tickets (email works best for external partners, vendors, or colleagues not on your Slack workspace)
Step 1: Enable side conversations in Zendesk
First, you'll need to turn on the feature in your Zendesk Admin Center. Here's how:
- Navigate to Admin Center → Workspaces → Agent tools → Side conversations
- Toggle on "Turn on emails outside the main conversation" this enables email-based side conversations
- If you plan to use other channels, enable Slack and/or Microsoft Teams as needed
- Critical: Enable "Turn on the side conversations view" under the Context panel heading this makes the feature visible to agents inside tickets
- Click Save
Your agents will now see the Side conversations icon in the context panel when they open tickets.

Step 2: Create an email side conversation
Once enabled, starting a side conversation is straightforward. Here's how it works:
-
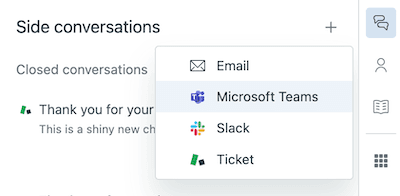
Open any ticket and look for the Side conversations icon (a plus sign) in the context panel on the right. Click it.
-
Select Email from the options.
-
Fill in the details in the composer window:
- To: Enter email addresses of your recipients. You can add up to 100 people total, with a maximum of 48 non-agents. Agent and light agent email addresses autocomplete if they're in your system.
- CC/BCC: Click CC to reveal CC and BCC fields. Note that BCC recipients are hidden from other recipients but visible to anyone who can view the side conversation within Zendesk.
- Subject: Write a clear subject line. This field is required the side conversation won't send without it.
- Message: Compose your message using the rich text editor. If you have an email signature set up, it appears automatically (you can remove it via the Options menu if needed).
-
Add attachments if needed by clicking the paperclip icon. You can upload from your computer or select attachments from the ticket itself (from the 100 most recent comments).
-
Click Send.
Recipients receive a standard email notification sent from your support address. When they reply, their message threads directly back into the side conversation within the Zendesk ticket.

The composer interface gives you all the tools you'd expect from a standard email client, right inside your ticket workflow.

Step 3: Include ticket context in your side conversation
One of the most useful features is the ability to share existing ticket comments instead of re-explaining the situation. Here's how to do it:
To forward a specific comment:
- Locate the comment you want to share in the ticket
- Select Forward via email from the options menu on that comment
- A side conversation opens with the ticket title and comment pre-populated
To include multiple comments:
- Start a new side conversation or open an existing one
- Click the comments icon (speech bubble) at the bottom of the composer
- Select the comments you want to include you can choose individual comments or select Ticket comments to include all of them
- Click Add
The selected comments embed directly into your message, giving recipients the full context they need to respond effectively.
Step 4: Manage and close side conversations
Keeping your side conversations organized helps you stay on top of ongoing discussions. Here's how to manage them:
Viewing side conversations:
- Open the context panel in any ticket and click the Side conversations icon
- You'll see a list of all side conversations on that ticket
- Double-click any conversation to open it
Replying to responses:
- When someone replies to your side conversation, their message appears in the thread
- You can update recipients, add your response, and attach files just like when you created it
- Each message has its own set of recipients, which you can edit at reply time
Closing conversations:
- When a discussion is complete, open the side conversation and click Mark done
- This is an internal status change that helps you track what's still active
- If someone replies to a "done" conversation, it stays marked done but you can click Reopen if needed
Important note on closed tickets: If a ticket is closed and someone replies to a side conversation attached to it, Zendesk automatically creates a new follow-up ticket. This ensures no communication gets lost.
Step 5: Use macros to automate side conversations
For repetitive requests, you can create macros that generate side conversations automatically. This saves time and ensures consistency.
When side conversations are enabled, new macro actions appear:
- Side conversation via email
- Side conversation via Slack
- Side conversation via child ticket
Setting up a side conversation macro:
- Go to Admin Center → Workspaces → Macros
- Create a new macro and add the side conversation action
- Pre-populate recipient lists, subject lines, and message templates
- Save the macro for your team to use
Limitations to be aware of:
- Macro-created side conversations don't support rich text formatting messages are sent as plain text
- You can't apply macros to responses within an existing side conversation
- Side conversation emails don't inherit your Zendesk email template branding
Despite these limitations, macros are valuable for standard requests like escalating to specific teams or requesting information from vendors.
Tips and best practices
Here are some recommendations to get the most out of side conversations:
-
Let the assignee manage side conversations This keeps ownership clear and makes it easier to set up triggers based on the assignee role
-
Set up triggers for side conversation events Create notifications so assignees know when side conversations are created, replied to, or closed. Without these, it's easy to miss activity
-
Choose the right channel Use email for external partners and vendors who aren't on your Slack. Use Slack or Teams for quick internal questions where your team already communicates
-
Remember that creators don't automatically receive replies The person who creates a side conversation won't get email replies unless you add them as a recipient. Plan your recipient list accordingly
-
Avoid sending side conversations to your own support address This isn't supported and will result in those emails ending up in the Suspended tickets view
-
Document outcomes While side conversations are great for resolving active tickets, consider documenting key findings in your internal knowledge base so the information remains accessible
Streamlining collaboration with eesel AI
Side conversations are excellent for organizing communication, but what if you could reduce the need for them altogether? That's where eesel AI comes in.

Our AI teammate connects to your Zendesk instance and learns from your past tickets, help center articles, and connected knowledge sources. Instead of starting a side conversation to find information, agents can get instant answers directly in the ticket.
Here's how we complement Zendesk side conversations:
-
AI Agent handles routine inquiries Up to 81% of common questions get resolved automatically, so they never need escalation or side conversations
-
AI Copilot drafts responses with full context When a ticket does need a reply, our AI drafts it using your knowledge base, past tickets, and brand voice. Agents review and send, cutting response time significantly
-
Unified knowledge across tools We connect to Confluence, Google Docs, Notion, and other sources so agents have one place to find answers instead of starting side conversations to track down information
-
Simulation mode for confidence Test how our AI would handle your tickets before going live. Run it on historical tickets to see resolution rates and quality
If your team finds itself creating side conversations just to find information or get standard answers, an AI teammate might be the better solution. See how eesel AI works with Zendesk.