Support and development teams often work in separate tools. Your support agents live in Zendesk, handling customer tickets all day. Meanwhile, your developers track bugs and features in Jira. This separation creates information silos. Bug reports get copied and pasted between systems. Feature requests fall through the cracks. Status updates require manual checking in two places.
The solution is integrating Zendesk and Jira so you can create issues directly from tickets. This guide walks through the native integration setup, automation options, and best practices. We'll also look at how AI can make this workflow even smarter.
Why connect Zendesk and Jira?
Linking your support and development workflows delivers real benefits:
- Faster bug resolution. Developers get full customer context straight from the ticket. No more hunting through email threads or asking support for details.
- Elimination of manual data entry. Agents stop copying and pasting bug reports. One click creates a properly formatted Jira issue.
- Better visibility. Support agents can see issue status without leaving Zendesk. They give customers accurate updates instead of "I'll check with the dev team."
- Improved customer communication. When issues resolve, agents know immediately and can follow up with customers proactively.
Teams with integrated tools consistently resolve issues faster. The time savings add up quickly when you consider how many bug reports and feature requests flow through support daily.

What you'll need
Before setting up the integration, gather these prerequisites:
- Admin access to your Zendesk account
- Admin access to your Jira instance (Cloud or Data Center)
- The Jira integration app installed in Zendesk, or a third-party tool
- A clear understanding of which tickets should create Jira issues
The exact steps vary slightly depending on whether you use the native integration or a third-party tool, but the core concepts remain the same.
Method 1: Using the native Zendesk-Jira integration
Step 1: Install the Jira integration app
Start by installing the official Jira app from the Zendesk Marketplace.
Navigate to the Zendesk Admin Center, then go to Apps and Integrations, then Marketplace. Search for "Jira" and install the official Zendesk Support for Jira app. Once installed, configure the connection to your Jira instance by entering your Jira URL and credentials.

Step 2: Configure project access and permissions
After installation, you need to set up what the integration can access.
Select which Jira projects Zendesk can create issues in. Set up authentication between the two systems using OAuth or API tokens. Configure user permissions so the right people can create and link issues. Most teams restrict issue creation to agents or admins rather than all support staff.

Step 3: Create a Jira issue from a Zendesk ticket
Once configured, creating issues takes seconds.
Open any Zendesk ticket. Click the Jira app in the right sidebar. Click "Create Issue." Select the project and issue type (Bug, Story, or Task). Fill in the summary and description. The integration can copy fields from the Zendesk ticket automatically. Click Create, and the issue appears in Jira with a link back to the Zendesk ticket.

Step 4: Link to an existing Jira issue
Sometimes you need to link a ticket to an issue that already exists.
Use "Link Issue" instead of "Create Issue." Enter the Jira issue key (like PROJ-123) or search by keyword to find the issue. The ticket is now linked for bidirectional tracking. Any comments added in either system can sync to the other, depending on your configuration.

Method 2: Automating Jira issue creation
The native integration requires manual action for each ticket. For high-volume teams, automation saves significant time.
Option A: Using Zendesk triggers and webhooks
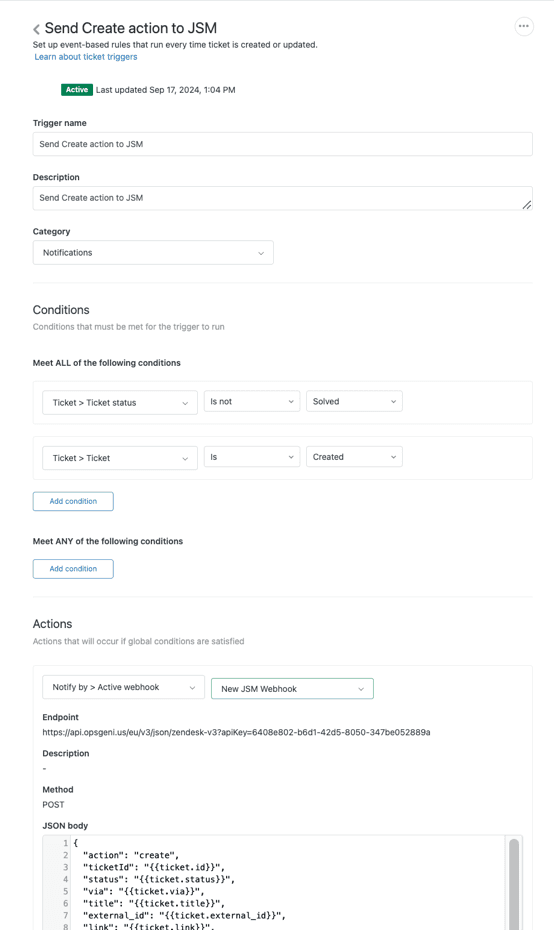
You can set up automatic issue creation using Zendesk's built-in automation tools.
Configure a Zendesk webhook pointing to the Jira API. Create triggers based on ticket conditions like specific tags, priority levels, or ticket types. Configure the JSON payload to include the data Jira needs for issue creation.
This approach requires technical setup and offers limited field mapping compared to other options. But it works without additional software costs.
Option B: Using Jira Service Management integration
For IT service management workflows, Atlassian offers a native bidirectional integration.
This creates alerts in Jira Service Management from Zendesk tickets automatically. You configure action mappings between the two systems. When someone acknowledges an alert in JSM, it can add an internal note to the Zendesk ticket. When a ticket closes in Zendesk, the alert resolves in JSM.
Option C: Third-party integration tools
Several tools specialize in connecting Zendesk and Jira with more features than the native integration.
- Exalate offers advanced bidirectional sync with scripting capabilities. You can map any field between systems and set complex sync rules. It supports AI-assisted script generation for custom mappings.
- Zapier provides simple automation for basic workflows. As of March 2024, Zapier now returns issue URLs from Jira Create Issue actions, making it easier to link created issues back to tickets.
- Unito provides a visual workflow builder for teams that prefer drag-and-drop configuration.
The trade-off is complexity versus ease of setup. Native integration is simplest but requires manual action. Exalate offers the most power but needs more configuration. Zapier sits in the middle for straightforward automation.
Field mapping best practices
Getting field mapping right makes the difference between a smooth workflow and constant frustration.
Map these essential fields at minimum:
- Summary/Subject The ticket title becomes the issue title
- Description Full ticket details with customer context
- Priority Align priority levels between systems
- Reporter Track who originally reported the issue
For custom fields, consider what each team actually needs. Support might track customer tier or product area. Development might need sprint assignment or story points. Only sync fields that add value to both sides.
Status mapping requires careful thought. Zendesk and Jira use different status workflows. Map them logically: "Open" in Zendesk might become "To Do" in Jira. "Pending" could map to "In Progress." "Solved" aligns with "Done."
Attachments and comments can sync bidirectionally, but think about security. Internal notes in Zendesk probably should not become public comments in Jira. Configure sync rules to respect data boundaries.
Common issues and troubleshooting
Even straightforward integrations hit snags. Here is how to fix the most common problems.
"Create Issue" button not appearing. Check that the app installed correctly and that the current user has permission to create issues. The button only appears for users with appropriate roles.
Jira fields not populating correctly. Verify your field mapping configuration. Make sure the fields exist in both systems and that data types match. A text field in Zendesk cannot map to a dropdown in Jira without transformation rules.
Authentication errors. Re-authenticate the integration. API tokens expire. OAuth connections need refreshing. Check that the connecting user account still has admin access in both systems.
Duplicate issues being created. Review your trigger conditions. Add safeguards like checking for existing links before creating new issues. A common pattern is tagging tickets as "jira_created" after successful issue creation, then filtering triggers to exclude already-tagged tickets.
How eesel AI enhances the Zendesk-Jira workflow
Integrating Zendesk and Jira solves the connection problem. Adding AI solves the decision-making problem.

We built eesel AI for Zendesk to handle the judgment calls that slow down support workflows. Here is how it fits into the Zendesk-Jira integration:
- AI-powered ticket analysis suggests when to create Jira issues. Instead of agents manually reviewing every ticket, eesel AI identifies bug reports and feature requests automatically.
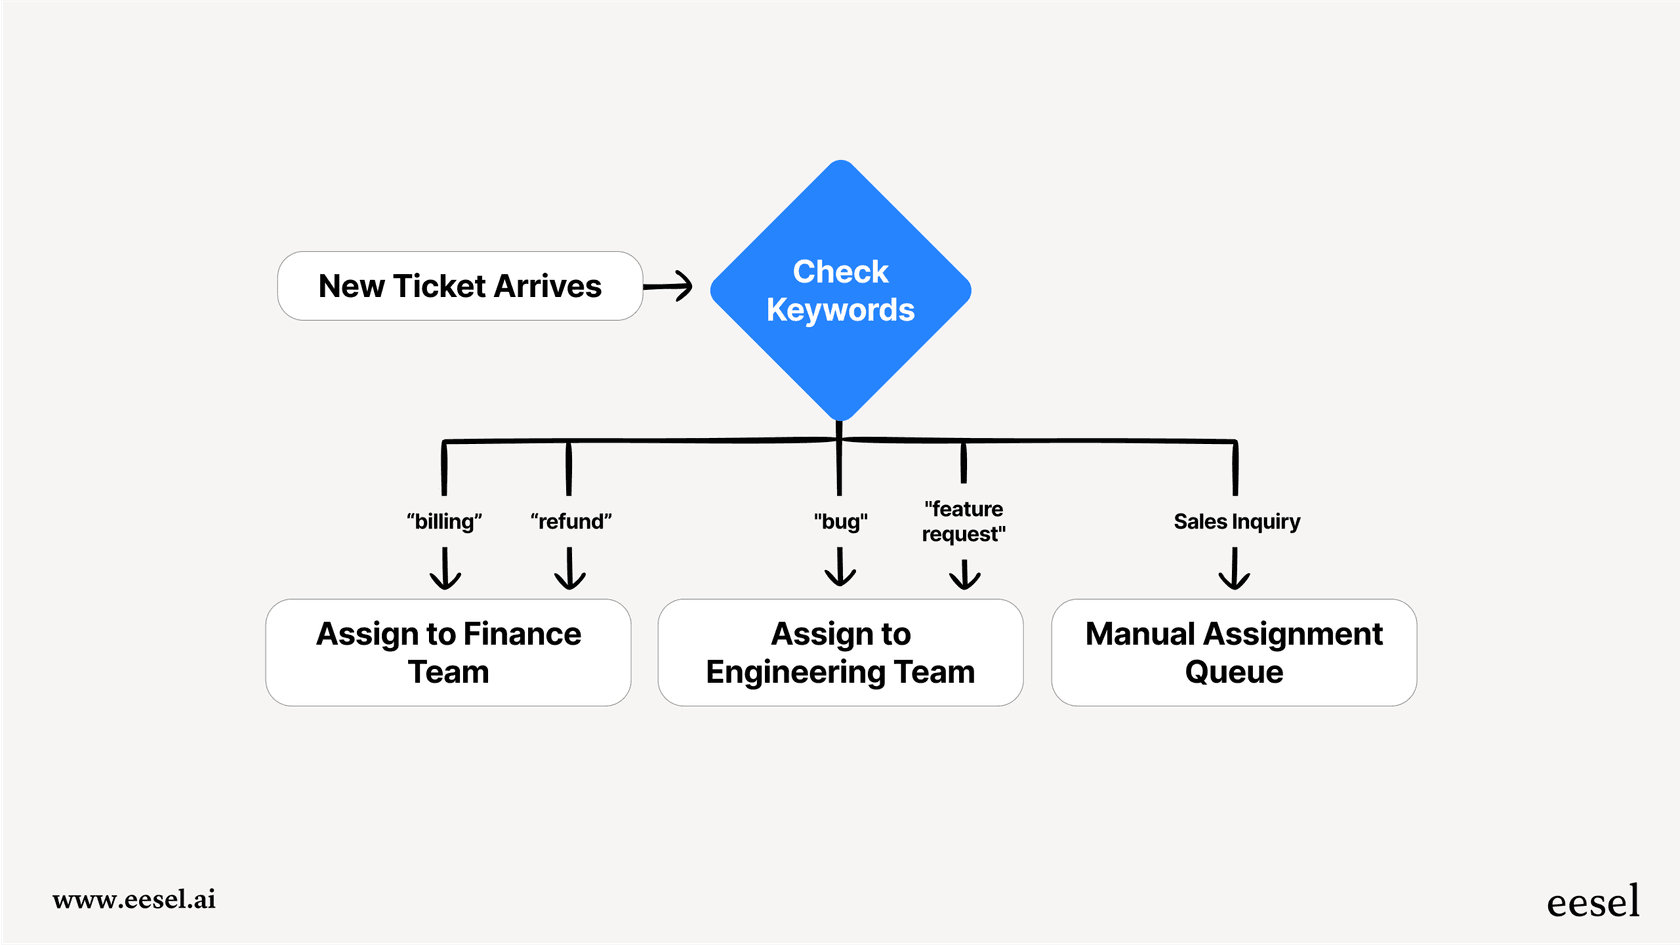
- Automatic categorization sorts tickets as bugs, feature requests, or general support. This routing happens before an agent even opens the ticket.
- Drafting Jira issue descriptions from Zendesk ticket context. eesel AI reads the customer conversation and writes a clear, technical summary for developers.
- Smart routing sends tickets to the right Jira project based on content. Tickets about billing go to one project. Bugs in the mobile app go to another.
- Learning from patterns means eesel AI improves over time. It learns which tickets your team escalates and gets better at suggesting the right action.
The result is fewer manual decisions, faster escalations, and better information flowing between support and development.
Choosing the right approach for your team
The best integration method depends on your specific situation.
Small teams usually do fine with the native integration. The manual workflow keeps humans in the loop for judgment calls, which is appropriate when volume is low.
High-volume support teams should consider automation or third-party tools. The time savings multiply when you are processing hundreds of tickets daily.
Complex workflows need Exalate or custom API integration. If you have multiple Jira projects, custom fields, or sophisticated routing rules, the advanced tools pay for themselves quickly.
IT-focused teams often prefer the Jira Service Management integration. It is built for service desk workflows and includes features like on-call rotation and alert escalation.
Consider these factors when deciding: ticket volume, customization needs, technical resources available for setup, and budget for third-party tools.
Streamline your support-to-development workflow today
Creating Jira issues from Zendesk tickets bridges the gap between support and development. You eliminate manual copying, give developers better context, and keep customers informed with accurate status updates.
Start with the native integration to understand your workflow needs. Add automation as volume grows and patterns become clear. Consider AI tools like eesel AI to handle the judgment calls and routing decisions that slow teams down.
The goal is simple: let support focus on helping customers, let development focus on building, and let the integration handle the handoffs between them.
Ready to see how AI can improve your Zendesk-Jira workflow? Try eesel AI free and discover how intelligent ticket routing and automatic issue creation can save your team hours every week.
