Messaging form templates in Zendesk let you collect structured information from customers without forcing them to type everything out. Instead of asking visitors to describe their issue in a text box, you can present them with dropdowns, date pickers, and predefined options. The result is faster resolution times and cleaner data for your support team.
This guide walks through setting up Zendesk messaging form templates step by step. You'll learn how to create different template types, add them to conversation flows, and apply best practices that keep customers engaged. For teams that want to skip the technical configuration entirely, we'll also look at how eesel AI's Zendesk integration handles data collection conversationally without any template setup.

What you'll need
Before you start building templates, make sure you have the right Zendesk plan and features enabled:
| Requirement | Plan | Notes |
|---|---|---|
| Zendesk AI Agents | Suite Team or higher | Essential AI agents included; Advanced add-on required for structured message templates |
| Messaging | Included in Suite | Must be enabled for your account |
| Sunshine Conversations | Suite Professional+ | Required for structured message templates |
| Admin access | Any | Need permissions to access AI agents - Advanced add-on |
If you're on Suite Team, you can use basic AI agents but will need to upgrade to Suite Professional and add the Advanced AI agents add-on to access structured message templates. The add-on pricing requires contacting Zendesk sales.
Understanding Zendesk messaging template types
Zendesk offers several template types depending on what you're trying to accomplish. Picking the right one upfront saves you from rebuilding later.
Form templates
Form templates present customers with structured input fields: email addresses, text boxes, and dropdown selections. These work well for lead capture, support request categorization, or any scenario where you need specific data points before routing to an agent.
Each form field is limited to 130 characters, and Zendesk recommends keeping forms to five fields or fewer for the best user experience. Form templates also support an optional "block messaging input" setting that prevents customers from continuing the conversation until they've completed the form.

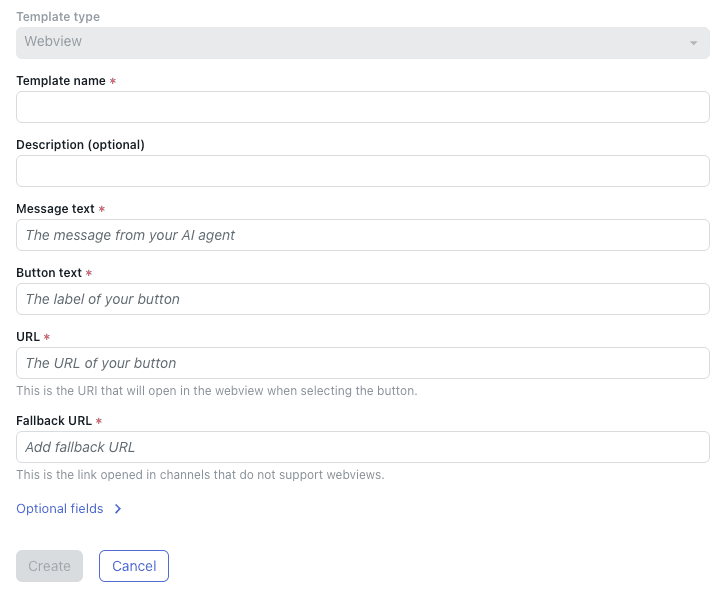
Webview templates
Webview templates embed external websites directly within the messaging widget. Use these when you need more complex forms than Zendesk's native options allow, or when you want to direct customers to an existing form or application without making them leave the conversation.
The webview displays a single primary website with one fallback URL available. For dynamic webviews that change based on customer data, you'll want to use the "Add a webview" CRM action instead of templates.
Rich message templates
Rich messages include carousels, quick replies, buttons, and list templates. These are ideal for product showcases, guided troubleshooting flows, or any interaction where you want to present options visually rather than asking customers to type responses.
Carousel templates display up to 10 scrollable items, each with an image, title, description, and up to three action buttons. Quick replies present up to 11 predefined response buttons that customers tap instead of typing.

Step 1: Access the template configuration
To create structured message templates, you first need to access the AI agents - Advanced add-on.
- Click the Zendesk products icon in the top navigation bar
- Select AI agents from the dropdown menu
- Choose the AI agent you want to work with from the top-right dropdown
- Click Settings in the sidebar
- Select CRM integration
- Click the Templates tab
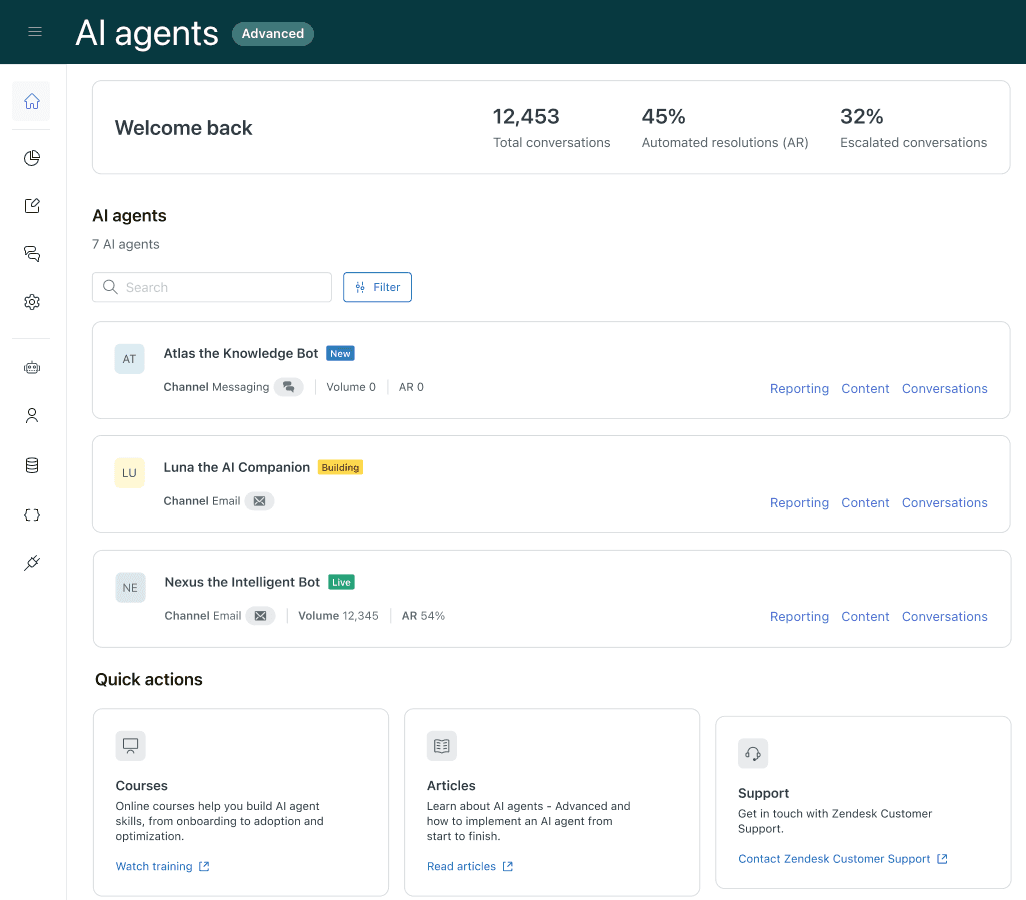
If you don't see the AI agents option in your product tray, verify that you have the Advanced AI agents add-on enabled on your account. The Templates tab only appears for agents connected to messaging channels.
Step 2: Create your first form template
Once you're in the Templates section, you can build your first structured message template.
- Click Create your first template (or Create template if you've made one before)
- Select Forms as the template type
- Enter a Template name using only letters, numbers, hyphens, and underscores (no spaces or special characters)
- Add an optional Description to help other admins understand the template's purpose
Configure form fields
For each field you want to collect:
-
Under Input Field, select the Message type:
- Email: Validates email format automatically
- Text: Free-form text input
- Select: Dropdown with predefined options
-
Enter a Name for the variable that will store this data
-
Enter a Label that customers will see in the widget
-
For Select fields, click Add option and define each option's name and label
-
Click Add field to include additional fields (remember: five or fewer is ideal)
Set messaging behavior
Enable Block messaging input if you want to prevent customers from typing until they complete the form. This is useful when the form collects information required before an agent can help.
Click Create to save your template.
Step 3: Add the template to a conversation flow
Creating a template doesn't automatically make it appear to customers. You need to insert it into your AI agent's conversation flow.
- Open your AI agent's dialogue builder
- Add a Send message step where you want the form to appear
- In the message text, use the template shorthand syntax:
%((template:your_template_name))% - Replace
your_template_namewith the exact name you gave your template - Save the dialogue
The alternative syntax %{{template:your_template_name}}% works too. Use this if the standard syntax conflicts with another templating language in your setup.

Test before going live
Always test templates in preview mode before publishing:
- Click the Preview button in the dialogue builder
- Navigate through the conversation flow to reach your template step
- Verify that all fields appear correctly
- Submit test data and confirm it routes properly
- Check that field validation works (required fields, email format, etc.)
Step 4: Using templates with macros
Agents can also send templates manually during conversations using macros. This works well for common scenarios where agents consistently need to collect the same information.
- Go to Admin Center > Workspaces > Macros
- Create a new macro or edit an existing one
- In the Comment/description action, enter the template syntax:
%((template:template_name))% - Save the macro
Now agents can apply this macro during messaging conversations to instantly send the structured template to customers.

Template best practices
Field design tips
Keep forms short. Every additional field reduces completion rates. If you need more than five fields, consider whether a webview template would work better.
Use clear, action-oriented labels. "What email should we use to follow up?" works better than "Email."
Set realistic character limits. The 130-character field limit exists for a reason - longer inputs don't display well in messaging interfaces.
Test on mobile. Most messaging conversations happen on phones, so verify your forms work on small screens.
User experience guidelines
Only block messaging input when truly necessary. Giving customers the option to skip or type can prevent frustration.
Provide context before presenting forms. A brief message like "To route you to the right team, I need a few details" sets expectations.
Handle errors gracefully. If a customer submits invalid data, the form should clearly indicate which field needs correction.
Technical considerations
Template names cannot be changed after creation without rebuilding the template, so choose naming conventions carefully. Many teams use prefixes to organize templates:
lead-capture-generalsupport-routing-billingfeedback-product-nps
Alternative: Third-party template apps
If Zendesk's native template functionality doesn't meet your needs, third-party marketplace apps extend what's possible. The Interactive Messaging Templates app from Zenplates is one option worth considering.
What the app adds
The Interactive Messaging Templates app enables agents to send rich message types (carousels, quick replies, buttons) that are normally only available to bots. This fills a gap in Zendesk's native functionality where rich messages disappear once a customer connects to a human agent.
Built-in messaging types include:
| Type | Description | Limit |
|---|---|---|
| Carousel | Horizontally scrollable items with images | Up to 10 items |
| Image | Display image/gif with button links | Up to 10 buttons |
| Replies | Clickable reply buttons | Up to 10 buttons |
| Link List | Clickable button links | Up to 10 links |
| File | Clickable attachment | Single file |
Pricing and requirements
The app requires Zendesk Suite Professional or higher with Sunshine Conversations and Sunshine Custom Objects enabled.
| Plan | Price | Features |
|---|---|---|
| Basic | Free | Unlimited Apple Messages for Business templates; up to 5 built-in messaging types |
| Unlocked | $1/agent/month | Unlimited built-in types; group restrictions; on-the-fly template creation |
When to consider third-party apps
Third-party template apps make sense when:
- Your agents frequently need to send rich messages (carousels, buttons) during live conversations
- You want template usage restrictions by ticket group
- You need agents to create templates on the fly rather than using pre-built ones
- The $1/agent/month cost is justified by time savings
For most teams starting with structured message templates, Zendesk's native functionality covers the core use cases. Evaluate third-party options only after you've hit limitations with the built-in tools.
Troubleshooting common issues
Template syntax errors
If your template doesn't appear when testing, check these common syntax mistakes:
- Missing parentheses or brackets:
%((template:name))%requires double parentheses - Typo in template name: Names are case-sensitive and must match exactly
- Wrong syntax variant: Don't mix
%((with%{{- pick one format
Fields not appearing correctly
When form fields display incorrectly:
- Verify the template is saved and published in AI agents - Advanced
- Check that your AI agent is connected to a messaging channel
- Confirm you're testing in the correct environment (sandbox vs. production)
API limits
The Create Template API has a 100kb request body limit. For large templates, particularly those with message overrides for Apple Messages for Business, you may need to use the large template endpoints instead. Large templates return an isLarge: true property when fetched via API.
Simplifying form setup with eesel AI
Setting up structured message templates requires navigating multiple Zendesk interfaces, understanding API syntax, and testing across channels. For teams that want the benefits of structured data collection without the configuration overhead, eesel AI offers an alternative approach.
How it works
Instead of building static forms, eesel AI engages customers in natural conversation and extracts the same information dynamically. Connect eesel AI to your Zendesk account, and it immediately learns from your past tickets, help center articles, and connected documentation. The AI then gathers customer context conversationally rather than presenting rigid form fields.
The setup process takes minutes:
- Connect eesel AI to your Zendesk account (one-click integration)
- Train on your existing knowledge sources (help center, past tickets, internal docs)
- Deploy as a chat bubble on your website or integrate directly with Zendesk Chat

Key advantages
- No template configuration: We handle data gathering automatically through conversation
- Conversational data collection: Visitors answer questions naturally, not through rigid form fields
- Intelligent routing: Our AI determines the right department based on conversation content
- Continuous learning: The system improves based on agent corrections and new tickets
You can start with AI supervision (drafts for human review) and gradually level up to autonomous ticket handling as confidence grows. For teams that prefer traditional forms, the earlier sections of this guide cover Zendesk's native customization options in detail.
Start creating better customer interactions
Zendesk messaging form templates transform how you collect information from customers. Whether you need simple contact forms, complex routing workflows, or rich interactive elements, the platform provides tools to match your requirements. The key is starting with the right template type for your use case, testing thoroughly before going live, and iterating based on customer behavior.
For teams ready to move beyond static forms entirely, eesel AI integrates directly with Zendesk to handle data collection conversationally. You can learn more about this approach in our guides on Zendesk rich message templates and carousels and customizing Zendesk pre-chat forms.
