How to use Zendesk Guide user segments: A complete guide for 2026
Stevia Putri
Last edited February 25, 2026
Not every article in your knowledge base should be public. Sometimes you need to keep certain content restricted to specific groups, whether that's internal IT documentation, premium support resources for VIP customers, or product-specific guides. This is where Zendesk Guide user segments come in.
User segments let you define exactly which users can access specific articles in your help center. Think of them as smart filters that automatically grant or restrict access based on user attributes like tags, organizations, or group membership. Instead of managing permissions article by article, you create segments once and apply them wherever needed.
Modern AI tools can work with these segmented knowledge bases too. For example, you can invite eesel AI to your team to get more value from your restricted content through AI-powered support.

Here's how Zendesk Guide user segments work and how to set them up.
What you'll need
Before you start creating user segments, make sure you've got the right setup:
- Zendesk Suite: You'll need Growth, Professional, Enterprise, or Enterprise Plus. Suite Team's got limited permissions (only "everyone" or "signed-in users" options, no custom segments).
- Guide Professional or Enterprise: Article-level permissions require one of these plans.
- Knowledge admin permissions: Only admins can create user segments and set article permissions.
- User data to segment by: Tags, organizations, or groups already set up in your Zendesk instance.
If you're on Suite Team and need custom segments, you'll need to upgrade your plan. Once you've got the right plan, setting up segments is straightforward.
Understanding Zendesk Guide user segments
What are user segments?
A user segment is a collection of end users and agents, defined by a specific set of attributes, used to determine access to help center content. They're the building blocks for viewing and management permissions in Zendesk Guide.
There are two built-in user segments by default:
- Signed-in users: Includes anyone who has created an account and signed in to your help center
- Agents and admins: Includes all agents (including light agents) and administrators
You can create custom user segments to further refine these groups based on:
- Tags: Users matching specific tags on their profile or organization
- Organizations: Users belonging to specific organizations
- Groups: Staff members in specific agent groups
- Individual users: Specific users added regardless of other criteria
Types of user segments
Signed-in user segments are for external audiences. Use these for customers, partners, or any non-staff users who have accounts. You can filter by tags, organizations, or individual users.
Staff segments are for internal teams only. These include agents and admins, and you can filter by tags, groups, or individual users. Organization filters don't apply to staff segments.
Key limitations to know
Before you start building segments, keep these limits in mind:
- 200 user segments maximum per account (shared across all brands if you have multiple)
- Up to 10 user segments per article (requires Enterprise plan to select multiple)
- 50 tags maximum for ALL or ANY tag filters
- 50 organizations or groups maximum per segment
- 50 individual users maximum per segment
Knowledge admins can access all content regardless of segments, which is intentional for management purposes.

Step 1: Create your first user segment
Navigate to User permissions
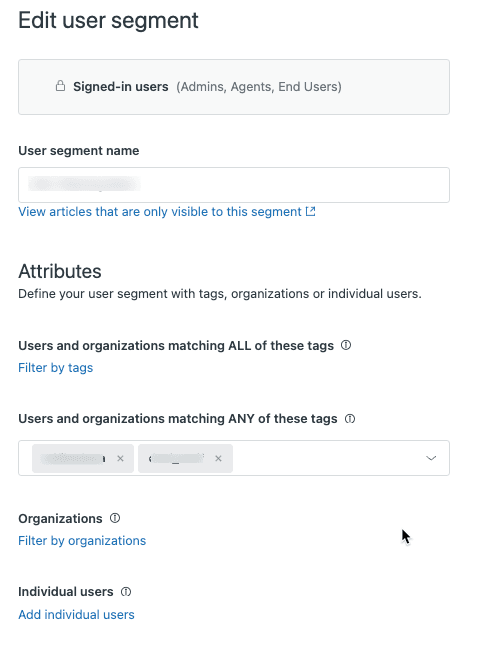
In your Zendesk Admin Center, go to Knowledge admin in the left sidebar, then click User permissions. This opens the User Segments page where you can see existing segments and create new ones.
Configure the segment
Click the Add new button. If you see an error message here, you've likely hit the 200 segment limit. You'll need to delete unused segments before creating new ones.
Select your user type as the base:
- Signed-in users: For end users who have created accounts (internal employees, customers with logins)
- Staff: For agents and admins only (internal team content)
Now apply your filters. Click Filter by tag and choose your logic:
- Users matching ALL of these tags: All specified tags must be present (AND logic)
- Users matching ANY of these tags: At least one tag must be present (OR logic)
For signed-in users, you can also filter by organizations. For staff, you can filter by groups. The user must belong to at least one of the specified organizations or groups to be included.
To add individual users, click Add individual users. You can add up to 50 specific users regardless of other filters. These users are added to the segment even if they don't match the tag, organization, or group filters.
Name and save
Give your segment a clear, descriptive name like "Internal IT Users" or "Premium Support Customers." You'll see a list of matching users on the right side (agents won't appear in this list). Review it to make sure your filters work as expected, then click Create segment.
Step 2: Apply segments to articles
Now that you have a segment, it's time to restrict an article.
Open article settings
Navigate to the article you want to restrict. You can do this from the help center by clicking Edit article in the top menu, or from Knowledge admin by finding the article in your article list.
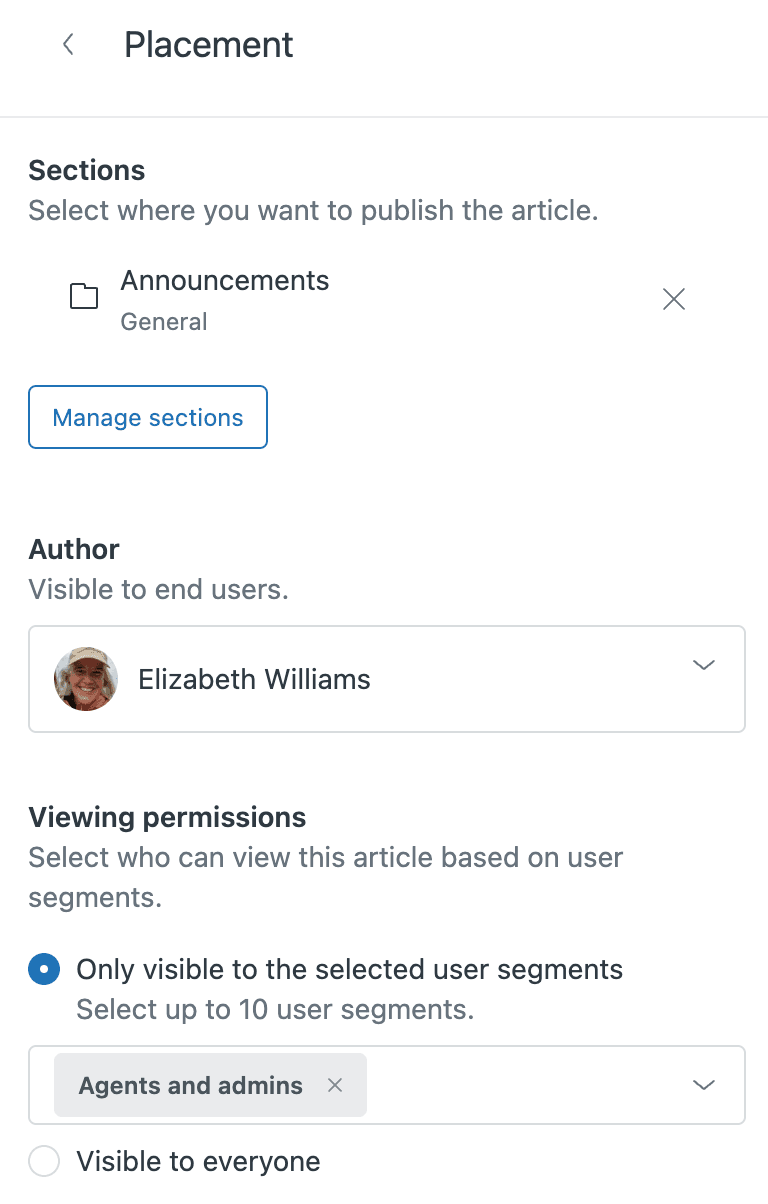
In the article editor, look for the Article settings panel in the sidebar. If you don't see it, click the Article settings icon to expand it. Then click the Placement card to open the placement options.
Set viewing permissions
Under Viewing permissions, you'll see two options:
- Visible to everyone: Anyone can see the article (default)
- Only visible to selected user segments: Restrict access to specific segments
Select "Only visible to selected user segments." Now you can choose which segments can view this article. You can select up to 10 segments per article (Enterprise plan required to select multiple).
Click Update settings, then publish your article. The restrictions take effect immediately. Users who don't belong to the selected segments will no longer see this article in search results or navigation.
Bulk updates
You can update permissions in bulk using article lists. Create a list filtered by section or tag, select multiple articles, and update their permissions all at once. This saves time when applying the same restrictions to many articles.
Common use cases for Zendesk Guide user segments
User segments work well in specific scenarios. Here are the most common use cases:
Internal IT documentation
If you use Zendesk for internal IT support, you can restrict IT policies, network documentation, and procedural guides to employees only. Create a segment for "Staff" or users with an "employee" tag, then apply it to all internal articles.
VIP customer support
Offer premium content to your high-value customers. Create a segment for users with a "vip" or "premium" tag, then create exclusive articles like advanced troubleshooting, early access documentation, or direct contact information.
Product-specific help
If you sell multiple products, you can show documentation only to customers who own specific products. Use organization-based segments (customers tagged by product) or custom user fields that indicate product ownership.
Regional content
Display articles relevant to specific geographic locations. Create segments based on organization ("EMEA Customers," "APAC Customers") and show region-specific compliance information, local contact details, or language-specific content.
SLA-based access
Tier your support content based on service level agreements. Premium SLA customers get access to more detailed documentation, faster escalation paths, and advanced self-service options.
Best practices for Zendesk Guide user segments
Getting the most out of user segments requires planning:
-
Use clear naming conventions: Names like "VIP Customers" or "Internal IT" are self-explanatory. Avoid vague names like "Segment A" or "User Group 1."
-
Test with different accounts: Create test accounts that belong to different segments and verify they see (or don't see) the right content.
-
Document your strategy: Keep a simple spreadsheet of your segments, what they're for, and which articles use them. This prevents confusion as your team grows.
-
Watch the 200 segment limit: You can create up to 200 segments per account. If you have multiple brands, segments are shared across all of them.
-
Remember admin access: Knowledge admins can see all content regardless of segments. This is by design for management purposes.
-
Consider segment overlap: A user in multiple segments can see content restricted to any of those segments. Plan your restrictions accordingly.
-
Plan for scaling: If you have multiple brands, segments work across all of them. Design segments that make sense globally, not just for one brand.
Integrating user segments with AI tools
User segments control who sees what in your knowledge base. But restricting content is just one part of effective knowledge management. The real value comes from making that content work harder for your team and customers.
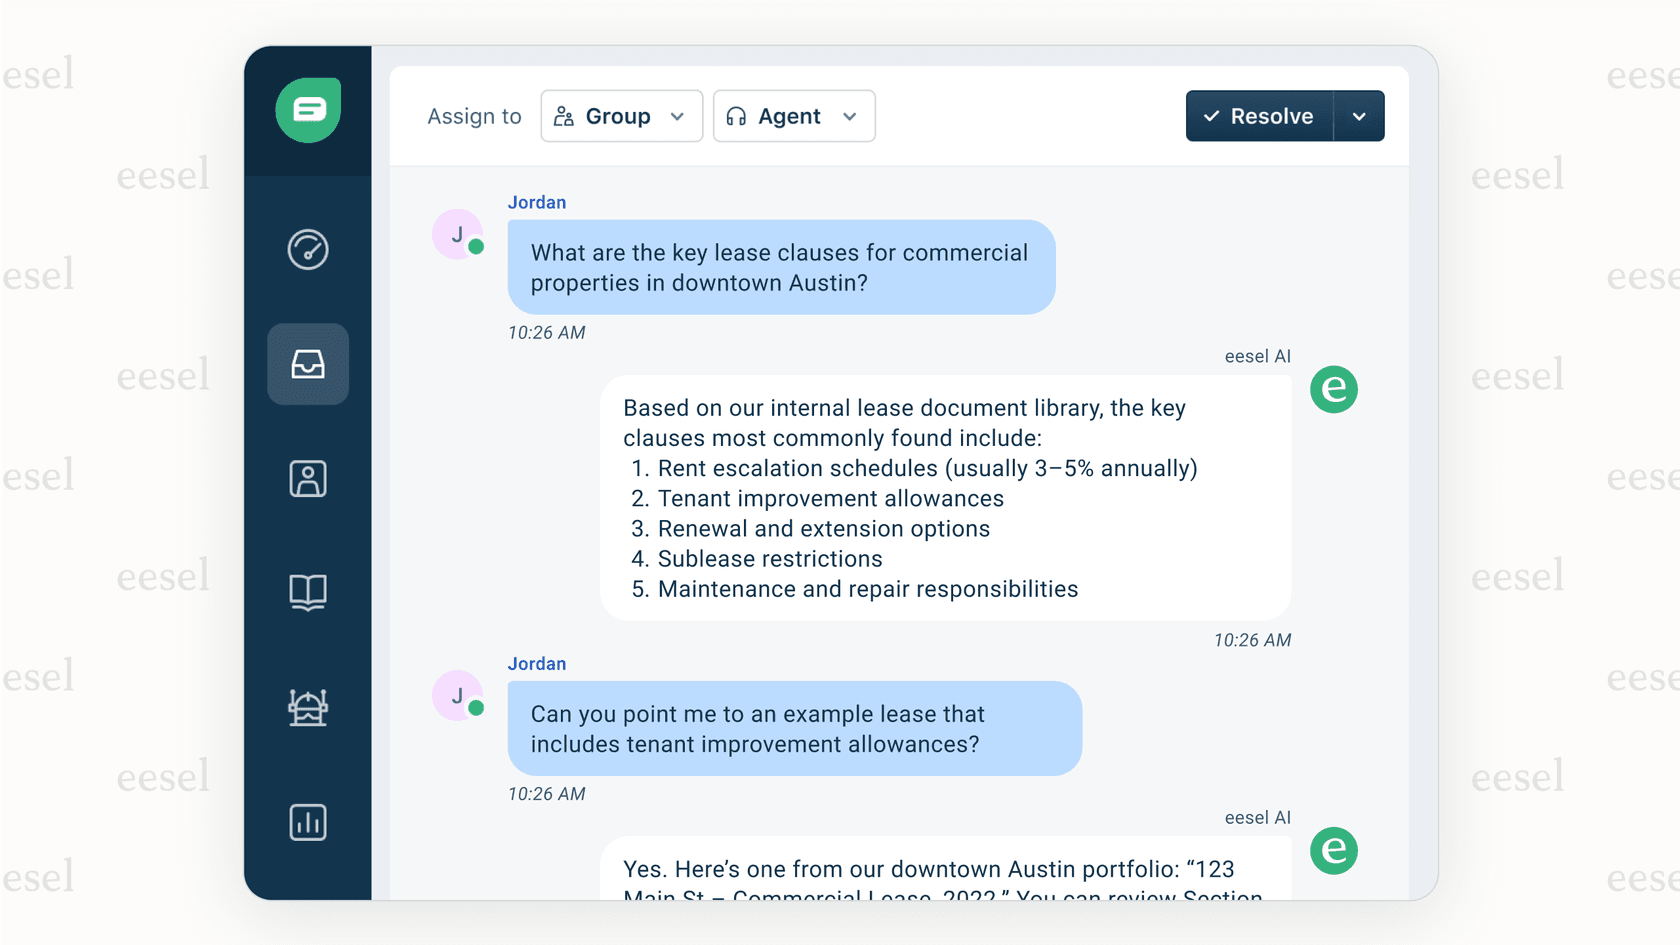
Modern AI tools can help here. eesel AI learns from your articles (both public and restricted) and delivers contextual AI support.
Here's how it works with segmented content:
- AI agents can resolve tickets using your restricted knowledge base, respecting the same access controls
- AI internal chat helps employees find answers from internal documentation instantly
- Access control is maintained - the AI only uses content the user has permission to see
This means your VIP customers get answers from premium content, while regular customers only see public articles. Internal teams can access IT documentation through AI chat without exposing it to external users.

Troubleshooting common issues
Even with careful setup, you might run into issues. Here's how to fix the most common problems.
User not seeing expected content
Check that the user belongs to the segment. Remember that tag filters apply to the user's profile or their organization. Also verify the article is published and the segment is applied correctly.
Segment changes not reflecting immediately
Changes to user segments can take a few minutes to propagate. If a user was just added to an organization or tagged, they might need to sign out and back in to see restricted content.
Permission conflicts between segments
Segments use OR logic, not AND. If Article A is restricted to Segment 1 and Article B is restricted to Segment 2, a user in both segments can see both articles. There's no way to require a user to be in ALL specified segments.
Testing and verification
Create test accounts for each segment type. Sign in as different user types and verify what content is visible. This catches issues before customers encounter them.
Start managing your knowledge base access today
Zendesk Guide user segments give you precise control over who sees what in your knowledge base. Whether you're protecting internal documentation, creating premium customer tiers, or organizing product-specific help, segments let you manage access at scale.
The setup is straightforward: create segments based on user attributes, apply them to articles, and test with different accounts. Watch the 200 segment limit and use clear naming conventions to stay organized.
For teams looking to enhance their knowledge management, eesel AI integrates with Zendesk to add AI capabilities while respecting your existing access controls. Our AI Agent can resolve tickets using your restricted knowledge base, while our AI Internal Chat helps employees find answers from internal documentation instantly.
Ready to get more from your Zendesk knowledge base? See how we can help at eesel.ai.
