How to control Zendesk Guide article visibility with user segments
Stevia Putri
Last edited February 25, 2026
Not every article in your knowledge base should be public. Sometimes you need internal documentation for your team only. Sometimes you want premium content for VIP customers. And sometimes you need product-specific help that only applies to certain users.
Zendesk Guide user segments let you control exactly who can see which articles, based on user attributes like tags, organizations, and groups. Instead of creating separate help centers or manually managing access, you can restrict content right where it lives.
This guide walks you through setting up user segments and applying them to your articles. We'll also look at how eesel AI can help you get more value from your segmented content by making it accessible to the right people at the right time.
What you'll need to get started
Before diving into user segments, make sure you have the right setup. Here's what you need:
- Zendesk Suite plan: Growth, Professional, Enterprise, or Enterprise Plus. Suite Team has limited permissions and only supports "Visible to everyone" or "Signed-in users" (no custom segments).
- Guide Professional or Enterprise: Required for article-level permissions. Without this, you can't restrict individual articles.
- Knowledge admin permissions: You need admin access to create segments and set article permissions.
- User data configured: Tags, organizations, or groups should already be set up in your Zendesk account. These are what you'll use to define who sees what.
If you're looking to enhance your Zendesk setup with AI, our Zendesk integration works alongside user segments to help your team work smarter.
Understanding Zendesk Guide user segment types
User segments in Zendesk Guide fall into three categories. Understanding the difference helps you choose the right restriction level for your content.
Signed-in users
This segment includes anyone authenticated in your help center, whether they're external customers or internal team members. It's useful when you want to hide content from casual browsers but make it available to anyone with an account.
Use this for membership-based content, account-specific help, or anything that requires at least some level of user identification.
Agents and admins
This is your internal-only option. It includes all agents (including light agents) and administrators. Content restricted to this segment is invisible to end users.
This is perfect for internal policies, IT documentation, agent training materials, or anything your team needs but customers shouldn't see.
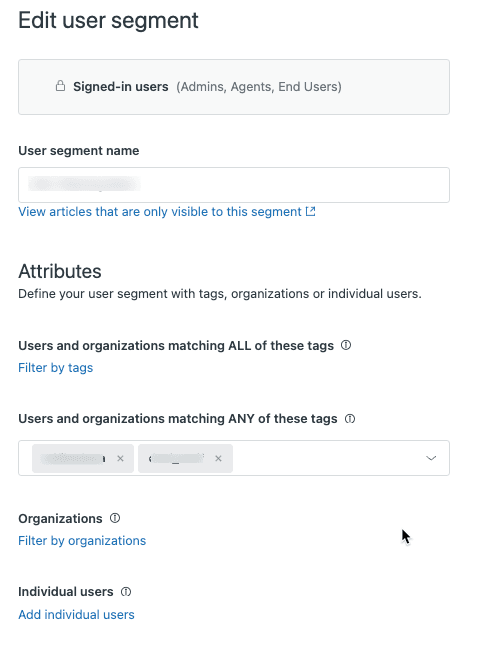
Custom user segments
This is where things get flexible. Custom segments let you define exactly who sees what based on:
- Tags: Users with specific tags (up to 50 tags in "ALL" and 50 in "ANY" categories)
- Organizations: Users belonging to specific organizations (up to 50)
- Groups: For staff segments, agents in specific groups (up to 50)
- Individual users: Specific people you add manually (up to 50)
You can create up to 200 user segments per account, and they work across all brands in your Zendesk account. Note that you'll need an Enterprise plan to apply multiple segments to a single article (up to 10 segments per article).
Creating a user segment
Let's walk through creating your first user segment. The process is straightforward once you know where to look.
Step 1: Navigate to User permissions
In your Zendesk admin center, go to Knowledge admin → User permissions. This is where all segment management happens.
Step 2: Start a new segment
Click Add new to create a segment. Keep in mind the 200 segment limit across your entire account, so plan your naming convention early. Good names like "VIP Customers" or "Internal IT" make management easier as you scale.
Step 3: Choose user type
Select whether this is for Signed-in users or Staff. This determines what filter options you'll see next.
Step 4: Apply filters
Now define who belongs to this segment:
- Tags: Choose whether users need ALL tags or ANY of the tags you specify
- Organizations: Add organizations (users must belong to at least one)
- Groups: For staff segments, add agent groups
- Individual users: Add specific people by name
The interface shows you how many users match your criteria as you build the segment, so you can verify you're targeting the right people before saving.
Step 5: Name and save
Give your segment a clear, descriptive name. Review the matching user count one more time, then save. Your segment is now ready to use.
Applying segments to articles
Once you have segments created, applying them to articles is simple.
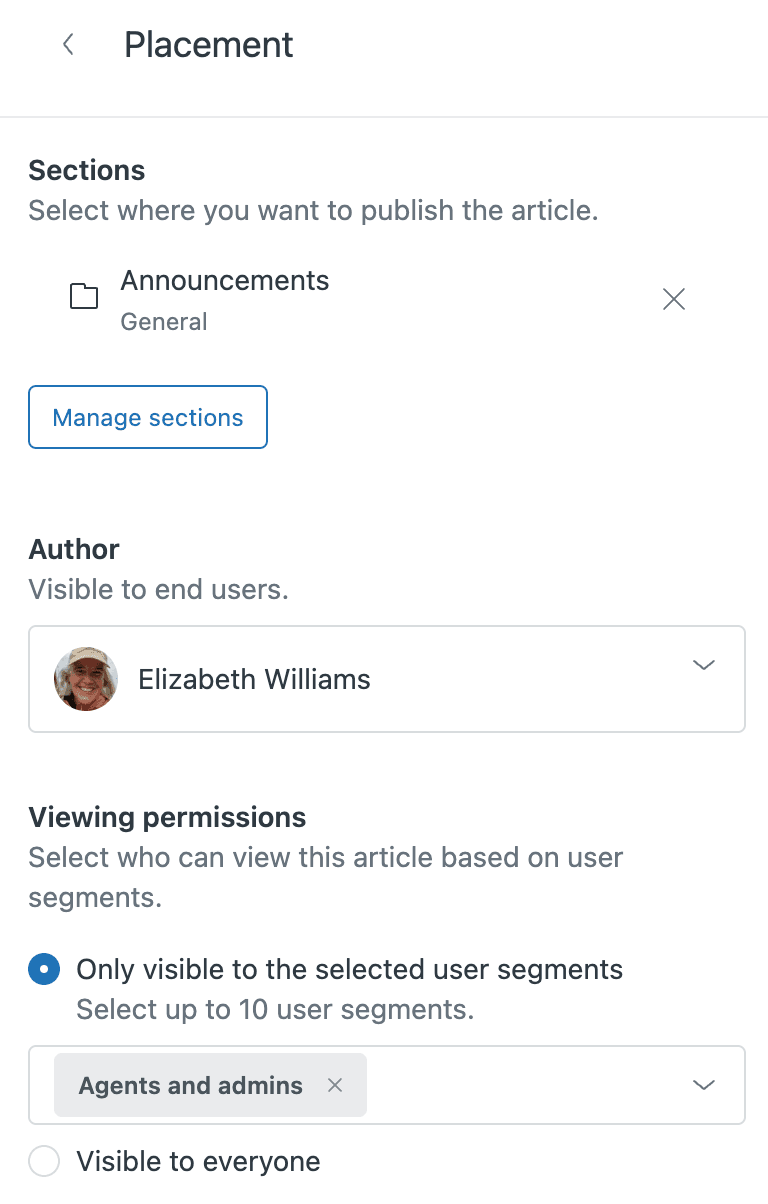
Step 1: Open article settings
Navigate to the article you want to restrict. Click Edit, then go to Article settings → Placement.
Step 2: Set viewing permissions
Under Viewing permissions, change from "Visible to everyone" to "Only visible to selected user segments." Then select the segments that should have access. You can choose up to 10 segments if you're on an Enterprise plan.
Step 3: Update and publish
Click Update settings, then publish the article. The restrictions apply immediately.
Bulk updates
If you need to update multiple articles at once, use the article list view. Filter by section, select the articles you want to update, and change permissions in bulk. This saves time when you're rolling out a new segmentation strategy.
Common use cases for user segments
Here are practical ways teams use user segments to control content access.
Internal IT documentation
Restrict network documentation, security policies, and internal procedures to the "Agents and admins" segment. This keeps sensitive information internal while making it easily accessible to your team.
Alternatively, create a custom staff segment for users with an "employee" tag if you want to include certain end users who are actually employees.
VIP customer support
Create premium content for high-value customers. Set up a segment for users tagged "vip" or "premium," then create articles with advanced tips, priority contact information, or exclusive feature guides.
Product-specific help
If you have customers using different products, create segments based on organization or custom fields. Then create targeted help content that only appears for customers who actually use that product. This reduces confusion and keeps your help center relevant.
Regional content
For global companies, create segments like "EMEA Customers" or "APAC Customers" based on organization tags. Use these to show location-specific compliance information, local contact details, or region-appropriate instructions.
For teams looking to make internal documentation more accessible, our AI Internal Chat can help employees find answers instantly without browsing the help center at all.
Best practices and potential pitfalls
User segments are powerful, but they come with some quirks to watch out for.
Best practices
- Use clear naming conventions: "VIP Customers" is better than "Segment A." You'll thank yourself when you have dozens of segments.
- Test with different user accounts: Always verify restrictions work by viewing the help center as different user types.
- Document your segment strategy: Keep a spreadsheet or document explaining what each segment is for and who should be in it.
- Plan for the 200 segment limit: If you manage multiple brands, remember segments are shared across all of them. Plan accordingly.
Common pitfalls
The agent visibility problem: Here's a frustrating reality - agents can't see which user segments are applied to an article when they're viewing it. They have to open the article editor to check permissions. This means agents might share article URLs with customers who can't actually see them.
Workarounds include adding access level indicators to article titles (like "[Internal]" or "[VIP Only]") or using content blocks to show different text based on user type.
Segment overlap: Users in multiple segments see all content from all their segments. This is usually fine, but be aware that overlapping segments can create unexpected access patterns.
SEO impact: Restricted articles won't be indexed by search engines. This is generally what you want for internal content, but consider the trade-off if you're restricting public-facing content.
Help center vs article-level restrictions
Article-level restrictions (what we've covered here) give you flexibility and preserve SEO for public content. Help center-level restrictions (requiring sign-in for the entire help center) are simpler but less flexible. Choose based on your needs.
Enhancing segmented content with eesel AI
User segments control who can see your articles, but they don't help people find the right information faster.
eesel AI integrates directly with Zendesk to learn from your knowledge base, including restricted articles. Here's how it works alongside your user segment setup:

- AI Agent: Our AI can resolve tickets using your segmented knowledge base, drawing on the right content based on the ticket context and customer type.
- AI Internal Chat: Employees can get instant answers from your internal documentation without browsing the help center. Just ask in Slack or Teams.
- Seamless integration: We work with your existing user segment setup. There's no need to reconfigure anything in Zendesk.
For teams handling complex support workflows, our AI Agent can autonomously resolve tickets using your knowledge base, including content that's restricted to specific user segments. And if you're curious about pricing, our plans start at $299 per month with a 7-day free trial.
Start managing your knowledge base access today
User segments give you precise control over who sees what in your Zendesk Guide help center. Whether you're protecting internal documentation, creating VIP experiences, or organizing product-specific content, segments let you manage access without maintaining multiple help centers.
The key is planning. Map out your segments before you start, use clear naming conventions, and always test with different user accounts. Watch out for the agent visibility issue, and consider workarounds like title prefixes if your team frequently shares article links.
Ready to take your knowledge management further? Visit eesel AI to see how we can help your team find answers faster and resolve tickets more efficiently, all while working seamlessly with your existing Zendesk setup.
Frequently Asked Questions
Share this article

Article by
Stevia Putri
Stevia Putri is a marketing generalist at eesel AI, where she helps turn powerful AI tools into stories that resonate. She’s driven by curiosity, clarity, and the human side of technology.


