Well-formatted help center articles can mean the difference between customers finding answers on their own or submitting support tickets. Tables organize complex information. Images illustrate steps that words alone can't capture. Together, they transform walls of text into scannable, helpful content.
But here's the catch: Zendesk Guide's formatting capabilities have limits. The native editor covers the basics, but many teams find themselves needing more. Whether you're just getting started with Zendesk Guide or looking to level up your article formatting, this guide walks you through everything you need to know about tables and images.
If you're looking for a faster way to create formatted help content, tools like eesel's AI for Zendesk can learn your style and generate articles with proper formatting built in. But first, let's master the fundamentals.
What you'll need
Before you start formatting articles, here's what you'll need:
- A Zendesk account with Guide enabled (Professional or Enterprise plans unlock full formatting features)
- Knowledge admin permissions or article management permissions
- Access to the article editor (not the legacy editor)
- Basic familiarity with HTML (helpful but optional for advanced formatting)
Some features mentioned in this guide, like content blocks and advanced permissions, require Guide Professional or Enterprise. Team plan users can still create tables and add images, but with fewer customization options.
Step 1: Add a table to your article
Adding a table in Zendesk Guide starts with the article editor toolbar. Here's how to insert one:
- Open a new or existing article in your help center
- Place your cursor where you want the table to appear
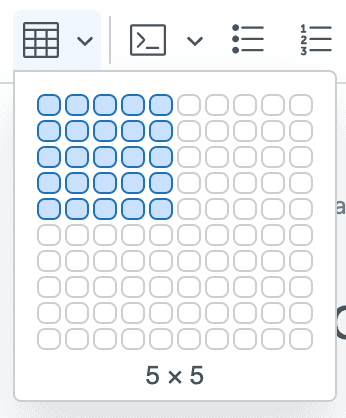
- Click the table icon in the editor toolbar (it looks like a grid)
- Hover over the grid to select your desired number of rows and columns
- Click to insert the table
The table appears immediately in your article. You can start typing content into cells right away. Click any cell to position your cursor there.
Pro tip: Start with more rows and columns than you think you need. It's easier to delete extras than to add them later when the table is full of content.
Step 2: Format your table
Once your table is inserted, you'll want to make it look professional and readable. Zendesk provides several formatting options through the contextual menu that appears when you click inside a table cell.
Cell properties
Click the cell properties icon to customize individual cells:
- Border: Add or remove borders around cells
- Background: Set background colors for cells
- Dimensions: Specify exact width and height in pixels
- Padding: Control spacing inside cells
- Text alignment: Set horizontal and vertical alignment
Table properties
For overall table styling, access the table properties panel:
- Border: Control borders for the entire table
- Background: Set a background color for the whole table
- Dimensions: Define table width and height
- Alignment: Position the table (left, center, right)
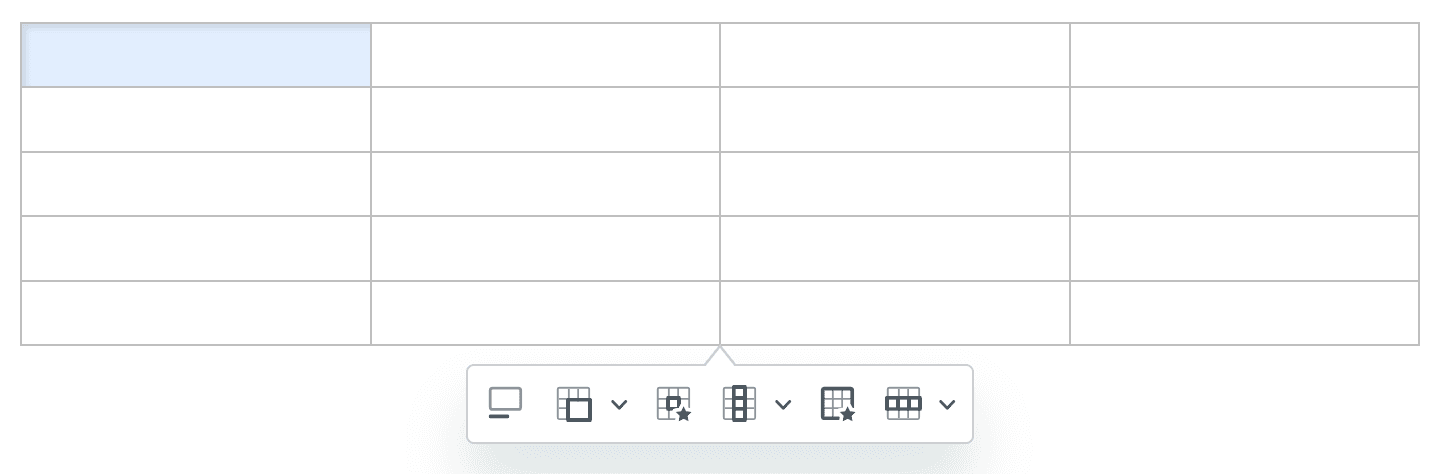
Table captions
Don't forget accessibility. Click the toggle caption icon to add a descriptive caption at the top of your table. This helps screen readers and improves the experience for all users.
Step 3: Edit table structure
Tables rarely stay static. You'll need to add rows, delete columns, or merge cells as your content evolves. Here's how to modify table structure:
Adding and removing rows and columns
Click the Row or Column icons in the contextual menu to:
- Insert rows above or below the current row
- Insert columns to the left or right
- Delete the current row or column
- Select an entire row or column for bulk formatting
Creating headers
Header rows and columns make tables more scannable:
- Select the row or column you want to convert
- Click the Row or Column dropdown
- Choose "Create header row" or "Create header column"
Headers typically appear with bold text and can have different background colors.
Merging and splitting cells
For complex tables, you might need cells that span multiple rows or columns:
- Select multiple adjacent cells
- Click the merge cells icon
- To split merged cells, use the dropdown arrow for additional split options
Resizing with precision
For exact dimensions:
- Select the row or column you want to resize
- Click the cell properties icon
- Enter specific pixel values in the Width or Height fields
- Click Save
Moving or deleting tables
Hover over the table to reveal the table selector icon. You can then:
- Drag the table to reposition it within the article
- Press Delete to remove the entire table
- Click the arrow icons to add blank lines above or below
Step 4: Insert and format images
Images break up text and clarify complex instructions. Here's how to add them to your Zendesk Guide articles:
Inserting images
- Place your cursor where you want the image
- Click the image icon in the toolbar
- Upload a new image or select from existing attachments
- Adjust the image properties (size, alignment, alt text)
Image best practices
- File size limit: Zendesk allows attachments up to 20MB
- Alt text: Always add descriptive alt text for accessibility
- Alignment: Use left, right, or center alignment to flow text around images
- Dimensions: Resize images before uploading for faster page loads
Using content blocks for reusable images
If you use the same images across multiple articles, consider content blocks:
- Create a content block with your image
- Insert the content block into any article
- Update the content block once, and changes appear everywhere
This is especially useful for standard screenshots, logos, or diagrams that appear in multiple help articles.
Common formatting issues and solutions
Even with the right tools, you might run into formatting challenges. Here are the most common issues and how to fix them.
The "unsafe HTML" problem
One of the most frustrating issues in Zendesk Guide is when your carefully crafted table formatting disappears after saving. This happens because Zendesk strips certain HTML tags by default for security reasons.
The fix: Enable "Display unsafe content" in your Guide settings:
- Go to Guide Admin > Settings
- Navigate to the Security section
- Check "Display unsafe content"
- Save your changes
Without this setting enabled, custom HTML (including some table styling) gets stripped when you publish.
When to use HTML vs. the visual editor
The visual editor handles most formatting needs, but sometimes you need HTML:
- Use the visual editor for: basic tables, standard images, simple formatting
- Switch to HTML for: custom CSS classes, advanced table structures, embedded content
Click the HTML button at the end of the toolbar to edit source code directly.
Markdown support
Zendesk also supports Markdown formatting in articles. This can be faster for simple formatting:
**bold text**for bold*italic text*for italics[link to article](https://support.zendesk.com/hc/en-us/articles)for linksfor images
For teams creating help content at scale, AI-powered tools can help generate properly formatted articles that follow your style guidelines automatically.
Enhancing articles with third-party options
If you need formatting beyond what Zendesk provides natively, third-party solutions can help.
Lotus Themes formatting components
Lotus Themes offers a formatting components package ($249 one-time) that adds:
- Callout blocks: Info, success, warning, and danger alerts with icons
- Tabs and accordions: Organize content into collapsible sections
- Font Awesome icons: Access to 1,600+ icons
- Image styles: Borders, shadows, and pop-up viewers
- Code formatting: Syntax highlighting for technical articles
These components require adding code to your Zendesk theme, but Lotus Themes includes free installation.
Zenplates CSS framework
Zenplates provides a CSS framework specifically for Zendesk with table styling classes:
.tablefor standard tables.table-borderedfor borders on all sides.table-borderlessfor clean, borderless tables.table-smfor compact tables with reduced padding.scroll-xwrapper for responsive horizontal scrolling
This approach requires comfort with HTML and CSS but gives you precise control over styling.
Best practices for formatted articles
Creating formatted articles is one thing. Creating effective formatted articles is another. Here are guidelines to keep your help center content useful:
Table best practices
- Keep it simple: Don't over-format. Clean, readable tables beat flashy ones.
- Use headers consistently: Every table should have clear header rows
- Limit column width: Tables that require horizontal scrolling frustrate mobile users
- Align numbers right: Numeric data is easier to scan when right-aligned
- Test on mobile: Many users access help centers from phones. Make sure your tables work on small screens.
Image best practices
- Show, don't just tell: Use screenshots for multi-step processes
- Annotate when needed: Add arrows or highlights to draw attention
- Keep file sizes reasonable: Compress images before uploading
- Update screenshots: Outdated UI screenshots confuse users more than no images at all
Overall article structure
- Front-load important information: Put key points before tables and images
- Use formatting intentionally: Every table or image should serve a purpose
- Maintain consistency: Use the same formatting patterns across articles
- Preview before publishing: Always check how articles look to end users
For teams managing large help centers, maintaining consistent formatting across hundreds of articles is challenging. This is where AI-powered help desk solutions can assist by learning your formatting patterns and applying them automatically to new content.
Create better help center content with eesel AI
Formatting tables and images manually works fine for occasional articles. But if you're managing a growing help center, the manual approach doesn't scale.

eesel AI offers a different approach. Instead of wrestling with editors and HTML, you can:
- Train eesel on your existing articles: It learns your formatting style, tone, and structure
- Generate formatted content automatically: Articles come out with proper tables, images, and styling already applied
- Update content continuously: Message eesel in Slack with policy changes, and it updates relevant articles
- Maintain consistency: Every article follows your established patterns without manual checking
eesel integrates directly with Zendesk and other help desks, so your formatted content flows straight into your knowledge base.
For teams spending hours each week formatting help articles, eesel AI pricing starts at $299/month for up to 1,000 AI interactions. That includes article generation, formatting, and continuous updates across your help center.
