How to report on first reply time in business hours with Zendesk Explore
Stevia Putri
Last edited February 26, 2026
First reply time is one of the most important metrics for any support team. It tells you how long customers wait before getting their first response, and it often shapes their entire perception of your service quality.
But not all first reply time metrics are created equal. If your team only works Monday through Friday, 9am to 5pm, you probably don't want to count the time a ticket sits untouched over the weekend. Business hours reporting solves this problem.
This guide walks you through creating a Zendesk Explore report that measures first reply time within your actual working hours. No more skewed numbers from nights, weekends, or holidays. Just clean data that reflects how your team actually performs.
Tools like eesel AI can help you improve these metrics by automating triage and drafting responses, but first you need to understand where you stand.
What you'll need to get started
Before diving into the report builder, make sure you have the following:
- Zendesk Suite Professional, Enterprise, or Enterprise Plus - Business hours reporting requires these plan levels
- Explore Professional or Enterprise - The reporting functionality is not available on lower tiers
- Editor or Admin permissions - You'll need access to create and modify reports
- Ticket data in Zendesk Support - You'll need some historical tickets to generate meaningful results
- Business hours schedule configured - This is critical. Your report can only show business hours if you've defined what those hours are
The whole process takes about 10 minutes once you know the steps.
Understanding calendar hours vs business hours
Zendesk tracks first reply time in two ways. Understanding the difference is essential before you build your report.
Calendar hours measure the total elapsed time from when a customer submits a ticket to when an agent sends the first public reply. This includes nights, weekends, holidays, and any other time when your team is not working. It represents the complete customer wait time.
Business hours measure only the time that falls within your configured schedule. If your business hours are Monday to Friday, 9am to 5pm, a ticket submitted Friday at 4pm and answered Monday at 10am would show:
- Calendar hours: 66 hours (Friday 4pm to Monday 10am)
- Business hours: 2 hours (Friday 4pm to 5pm, plus Monday 9am to 10am)
Both values are stored with every ticket in your Zendesk account. You simply choose which one to report on.
So which should you use? Calendar hours give you the full picture of customer experience. Business hours show you how your team performs when they are actually working. Most support leaders track both, but business hours is often the better metric for internal performance reviews and SLA compliance.
Setting up your business hours schedule
Before you can report on business hours, you need to define what those hours are. This is done in your Zendesk admin settings.
Navigate to Admin Center > Objects and rules > Business rules > Schedules. If you haven't created a schedule yet, click Add schedule. If you already have one, review it to make sure it reflects your current working hours.
When configuring your schedule:
- Set your time zone correctly. This affects all business hours calculations
- Define weekly hours by dragging time blocks for each day. You can set different hours for different days
- Add holidays to exclude them from business hours calculations. You can schedule holidays up to two years in advance
- Save your changes and verify the schedule is marked as active
If you're on an Enterprise plan, you can create multiple schedules for different teams or regions. On Professional plans, you're limited to one schedule.
One common pitfall: if your hours cross midnight (for example, 10pm to 6am), you'll need to create two separate time intervals. Zendesk doesn't support single intervals that span midnight.
Step-by-step: Creating your first reply time report
Now that your business hours are configured, let's build the report.
Step 1: Create a new report
Open Zendesk Explore and click the reports icon in the left sidebar. Click New report to start building.
On the Select a dataset page, choose Support > Support - Tickets, then click Start report. The report builder opens with a blank canvas.
Step 2: Add the business hours metric
In the Metrics panel on the left, click Add. This opens a list of all available metrics for the Tickets dataset.
Navigate to Duration between events - Business hours (min) and select First reply time - Business hours (min). Click Apply to add it to your report.
A quick tip: if you accidentally select the calendar hours metric (just "First reply time (min)" without "Business hours" in the name), your report will include all hours. The metric name must explicitly include "Business hours" to respect your schedule.
Step 3: Add date attributes
To see how first reply time trends over time, you need to add a date attribute.
In the Columns panel, click Add. From the list of attributes, choose Time - Ticket solved > Ticket solved - Date, then click Apply.
Now click the date attribute you just added and select Edit date ranges. Choose Last week for a recent snapshot, or select a custom range that matches your reporting needs. Click Apply to confirm.
Step 4: Choose visualization
Click the Visualization type menu and select Column to create a bar chart showing first reply time by day.
For deeper analysis, you can enable drill-in functionality. Click Chart configuration > Drill in, then enable it and select attributes like Ticket ID and Assignee name. This lets viewers click into specific days to see individual tickets.
Step 5: Save and share
Give your report a clear name like "First Reply Time - Business Hours" so your team knows exactly what it measures. Click Save to store it in your Reports library.
You can add this report to a dashboard, schedule automated delivery, or share it directly with stakeholders. Set appropriate permissions to ensure the right people have access.
Advanced variations and filters
Once you have the basic report working, you can customize it further.
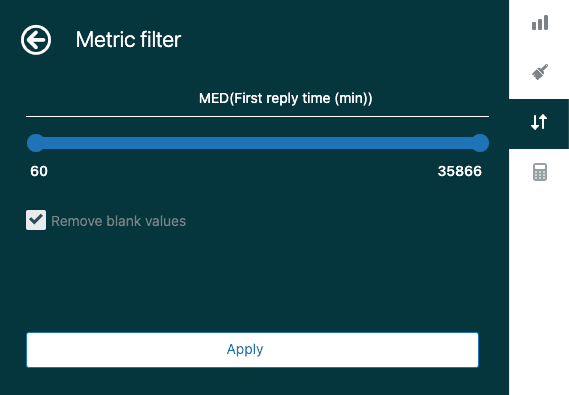
Filter for slow responses: Add a metric filter to show only tickets where first reply time exceeded a threshold. In the Result manipulation menu, click Metric filter, set the left value to 60 (for 60 minutes), and click Apply. This shows tickets that took more than an hour to receive a first reply.
Break down by agent: Add Assignee name to the Rows panel to see individual agent performance. This helps identify who might need additional support or training.
Compare teams: Use Ticket group as a row attribute to compare first reply times across different support teams or departments.
Custom formulas: For advanced analysis, create a standard calculated metric to measure time from assignment to first reply. This isolates the time agents spend working on tickets versus time spent in queue.
Interpreting your results and taking action
Building the report is just the beginning. The real value comes from understanding what the numbers tell you.
A good first reply time depends on your industry and support channels. For email support, many teams aim for under 4 business hours. For chat or messaging, customers expect responses in minutes, not hours.
When analyzing your report, look for patterns:
- Time of day: Are mornings slower than afternoons? This might indicate overnight ticket buildup.
- Day of week: Do Mondays show higher first reply times? Weekend ticket accumulation could be the cause.
- Ticket volume spikes: Correlate high first reply times with periods of unusual ticket volume.
- Agent availability: Check if first reply times increase when key agents are out of office.
The goal isn't just to track a metric. It's to identify opportunities for improvement. If your report shows consistent delays during certain periods, you can adjust staffing or implement automation to address the gaps.
Lower your first reply time with eesel AI
Reporting on first reply time is valuable, but reducing it's even better. We've found that combining Zendesk's analytics with AI-powered support tools creates the best results.
Our AI Triage automatically tags and routes incoming tickets based on urgency and intent. This eliminates the manual sorting that often delays first responses. Tickets reach the right agent immediately, cutting down pre-reply time significantly.
For common questions, our AI Agent provides instant 24/7 responses. Customers get answers immediately, even outside business hours. This creates a near-zero first reply time for routine inquiries while freeing your human agents to focus on complex issues.

When agents do need to craft responses, our AI Copilot drafts replies directly in Zendesk based on your help center and past tickets. Agents review, refine, and send faster than writing from scratch.

If you're already using Zendesk Explore to track first reply time, adding AI assistance is a natural next step. See how eesel AI works with your Zendesk account to turn your reporting insights into actual performance improvements.
Frequently Asked Questions
Share this article

Article by
Stevia Putri
Stevia Putri is a marketing generalist at eesel AI, where she helps turn powerful AI tools into stories that resonate. She’s driven by curiosity, clarity, and the human side of technology.


