Your Zendesk account holds a wealth of customer support data. Tickets, conversations, agent performance metrics, and customer satisfaction scores all live in there. But sometimes you need that data outside of Zendesk. Maybe you're building a custom dashboard in Excel, preparing a quarterly report, or analyzing trends that require combining support data with other business information.
The challenge is getting that data out in a usable format. Zendesk offers several export methods, each with its own quirks, limitations, and ideal use cases. Some are built right into the platform. Others require third-party tools or API access. This guide walks you through all the options so you can choose the right approach for your situation.

What You'll Need
Before diving into the export methods, here's what you'll need:
- Admin access: Most export features require administrator privileges
- Plan compatibility: Dataset exports need Professional or Enterprise plans. Full data exports require Growth, Professional, or Enterprise
- Feature enablement: Full data exports must be enabled by contacting Zendesk support first (the account owner needs to request this)
- Patience: Large exports can take anywhere from minutes to over 24 hours depending on your data volume
Method 1: Exporting from Zendesk Explore (Dataset Exports)
If you're on a Professional, Enterprise, or Enterprise Plus plan with Explore Professional or Enterprise, you can export entire datasets from Zendesk Explore. This method gives you granular, unfiltered data without the 50,000-row limit that applies to regular reports.
Here's how it works:
Step 1: In Explore, click the Dataset exports icon in the left sidebar.
Step 2: Click Create one-time export for a single export, or Create recurring export if you need this data regularly.
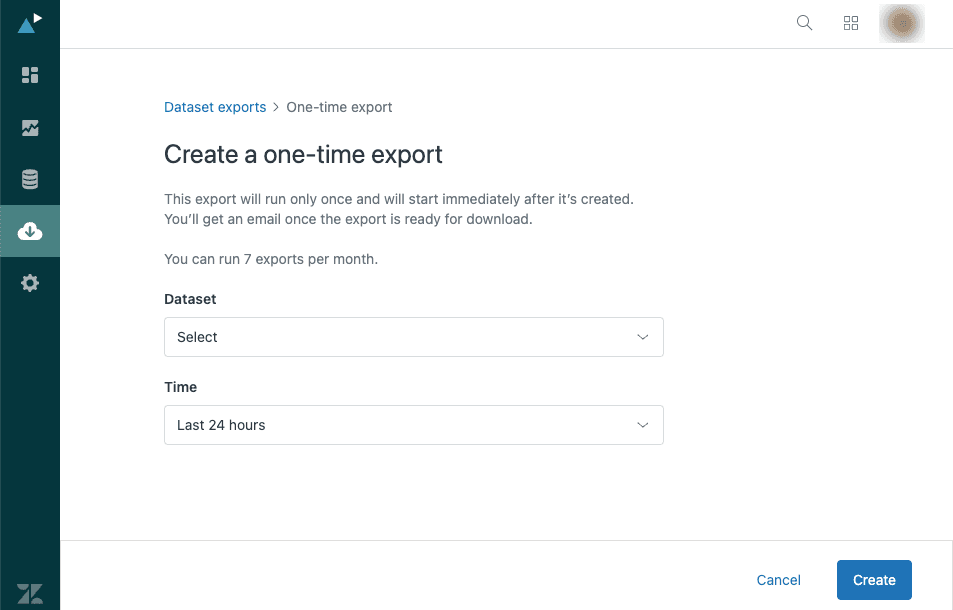
Step 3: Select your dataset. Options include:
- Support - Tickets
- Support - SLAs
- Support - Updates History
- Chat and Messaging - Engagement
- Talk - Calls
- Guide - Knowledge Base
Step 4: Choose your time period (last 24 hours, 7 days, 30 days, 3 months, 6 months, or 12 months) or set a frequency for recurring exports (daily, weekly, or monthly).
Step 5: Click Create. You'll receive an email when your CSV is ready to download.
Key limitations:
- You can have up to 14 recurring exports at a time
- Files are automatically deleted after 7 days
- The number of exports you can run per month equals the number of datasets you have access to
- Only the admin who created the export and the account owner receive email notifications
Method 2: Full Data Export from Admin Center
When you need everything (tickets, users, organizations, and more), the full data export is your option. This is designed for complete account backups, compliance requirements, or preparing for a platform migration.
Important: This feature is not enabled by default. The account owner must contact Zendesk Customer Support to request data export access. Include your Zendesk subdomain in the request. Processing typically takes 24-48 hours.
Once enabled, here's how to export:
Step 1: Navigate to Admin Center > Account > Tools > Reports.
Step 2: Click the Export tab to see your options.

Step 3: Choose your export format. You have three options:
| Format | Best For | Limitations |
|---|---|---|
| JSON | Large accounts (200,000+ tickets), developers, data warehousing | Requires technical knowledge to parse |
| CSV | Quick analysis in Excel, smaller datasets | Excludes ticket comments and descriptions |
| XML | Complete backups with all relationships | 500MB limit (roughly 200,000 tickets) |
Step 4: Select your date range and data type (tickets, users, or organizations for JSON; date range only for CSV).
Step 5: Click Export and wait. Processing time varies from minutes to over a day depending on your account size.
Step 6: Download the ZIP file from the email link when ready. Links are valid for at least three days.
Critical limitation: CSV exports do NOT include ticket comments or descriptions. You get the metadata (ID, subject, status, assignee, timestamps) but not the actual conversation content. If you need comments, use JSON format or consider a third-party tool.
Method 3: Quick Export from Ticket Views
For fast, targeted exports of smaller datasets, ticket views work well. This is the simplest method but comes with strict limits.
Step 1: Navigate to the Views panel in Zendesk Support.
Step 2: Select or create a view containing the tickets you want. You can filter by status, assignee, date range, tags, or any other criteria.
Step 3: Click the Actions menu (three dots) in the top-right corner.
Step 4: Select Export as CSV.
Step 5: Check your email for the download link.
The hard limit: This method can only export a maximum of 1,000 tickets at a time. If your view contains more tickets, the export silently truncates at 1,000 with no warning. For larger datasets, you'll need to use filters to break your data into smaller chunks or use one of the other methods.
What's included: The CSV contains all columns visible in your view plus standard fields like ticket ID, subject, requester details, assignee, status, creation date, and tags. Like the full CSV export, this does NOT include ticket comments.
Method 4: Using Third-Party Tools
When native methods fall short, third-party tools fill the gaps. Here are three options worth considering:
Skyvia
Skyvia is a cloud data integration platform with 200+ connectors including Zendesk. It's designed for teams that need scheduled, automated exports to CSV or cloud storage.
Key features:
- Free plan: 10,000 records per month with daily scheduling
- Paid plans: Start at $15/month for 5 million records
- Export to Dropbox, Google Drive, Amazon S3, FTP, and more
- Data transformations during export (filtering, mapping, splitting)
- Visual pipeline designer for complex scenarios
Best for: Data teams needing regular, automated exports from Zendesk to cloud storage or data warehouses like BigQuery or Snowflake.
Coefficient
Coefficient is an Excel and Google Sheets add-in that connects directly to Zendesk. It pulls live data into your spreadsheets and keeps it synced automatically.
Key features:
- Native Zendesk connector with standard and custom field support
- Scheduled refreshes (daily on Starter, hourly on Pro)
- AI-powered data cleaning and analysis within spreadsheets
- 700,000+ users including teams at Spotify, Uber, and Miro
Pricing:
| Plan | Price | Key Features |
|---|---|---|
| Free | $0 | 3 data sources, 5,000 rows, manual refresh |
| Starter | $49/month | Daily auto-refresh, 500 refreshes |
| Pro | $99/user/month | Hourly refresh, unlimited rows |
Best for: Excel and Google Sheets power users who want live Zendesk data for dashboards and analysis without manual exports.

Export CSV Tool (Zendesk Marketplace)
The Export CSV Tool by Help Desk Migration is a purpose-built Zendesk marketplace app designed specifically for comprehensive data exports.
Key features:
- Exports tickets WITH comments (separate CSV for comments)
- Includes attachments, call recordings, and side conversations
- Exports knowledge base articles, folders, and categories
- Unlimited free demo exports (20 records) to test before paying
- SOC 2 Type I and GDPR compliant
Best for: Teams needing complete ticket data including comments and attachments, or those preparing for a Zendesk migration.
Understanding Export Limitations
Every export method has constraints. Here's what trips people up most often:
| Limitation | Impact | Workaround |
|---|---|---|
| 50,000 row limit on reports | Large reports get truncated | Use dataset exports instead (no limit) |
| 1,000 ticket limit on views | View exports cap at 1,000 tickets | Use filters to segment data or use full export |
| CSV excludes comments | No conversation content in CSV exports | Use JSON format or third-party tools |
| 24+ hour processing time | Large full exports take a day or more | Request exports during off-peak hours |
| 7-day file expiration | Dataset export files auto-delete | Download immediately and store locally |
| Rate limits on full exports | Can only request once per 7 days | Plan ahead and request the right date range |
Opening and Working with Exported Data in Excel
Once you have your CSV file, here's how to work with it effectively:
Opening the file:
- Open Excel and go to Data > Get Data > From File > From Text/CSV
- Select your exported file
- Excel will detect the encoding (usually UTF-8) and delimiter (usually comma)
- Click Load to import
Handling large files:
- If your file exceeds Excel's row limit (1,048,576 rows), use Power Query to filter before loading
- Consider importing into Power BI or a database for very large datasets
Creating pivot tables:
- Select your data range
- Go to Insert > PivotTable
- Drag fields to Rows, Columns, and Values areas
- Common analyses: tickets by agent, resolution times by category, volume trends by week
Common formatting fixes:
- Dates may import as text. Use Data > Text to Columns to convert to proper date format
- Time zones in CSV exports use your account's default time zone (not UTC like JSON)
- Ticket IDs may display as scientific notation. Format the column as text before opening
An Alternative to Exporting Zendesk Data
Here's a question worth asking: do you actually need the data in Excel, or do you just need the insights that data can provide?
Exporting, cleaning, and analyzing Zendesk data manually takes time. You wait for the export, wrestle with CSV formatting, build pivot tables, and by the time you have answers, the data's already outdated.
This is where eesel's AI agent for Zendesk offers a different approach. Instead of exporting data to analyze it elsewhere, eesel AI connects directly to your Zendesk account and analyzes your tickets where they live.

What you get:
- Automated identification of knowledge gaps in your help center
- Analysis of which tickets could be automated based on your historical data
- Insights into common customer questions and agent performance
- AI-powered responses drafted directly in Zendesk
The platform learns from your existing tickets, macros, and help center articles. It can simulate responses on past tickets to show you potential automation rates before you turn anything on. For teams tired of the export-analyze-repeat cycle, this might be a more efficient path.
Choosing the Right Export Method
Still not sure which approach to take? Here's a quick decision framework.
| If You Need... | Use This Method |
|---|---|
| Quick report on under 1,000 tickets | Ticket view export |
| Regular dataset exports for BI tools | Zendesk Explore dataset exports |
| Complete backup with comments | JSON export or Export CSV Tool |
| Live data in Excel/Google Sheets | Coefficient |
| Automated exports to cloud storage | Skyvia |
| Migration to another platform | Export CSV Tool or full JSON export |
Start Analyzing Your Zendesk Data Today
Exporting Zendesk data to CSV or Excel doesn't have to be complicated. For most teams, the native export options (dataset exports from Explore or full exports from Admin Center) handle the majority of use cases. When you need more (comments, attachments, automation, or live syncing), third-party tools like Skyvia, Coefficient, or the Export CSV Tool fill those gaps.
The key is matching the method to your actual needs. Don't over-engineer a simple one-time report with a complex integration. And don't try to force Excel to handle millions of rows when a proper data warehouse would serve you better.
If you find yourself exporting data regularly just to answer the same questions week after week, consider whether an AI-powered approach might save you time. eesel AI for Zendesk can provide many of those insights automatically, right where your tickets live. Sometimes the best export is the one you don't have to do at all.
