How to use Zendesk Explore duration and business hours metrics
Stevia Putri
Last edited February 26, 2026
If you're measuring your support team's performance, you've probably noticed something frustrating. A ticket created at 5 PM on Friday gets its first reply Monday morning, and suddenly your metrics show a 72-hour response time. Your team wasn't even working for most of that period.
This is where business hours metrics come in. Instead of counting every hour on the clock, business hours metrics only count the time your team is actually working. The result is a much fairer and more accurate picture of your team's efficiency.
In this guide, we'll walk through everything you need to know about Zendesk Explore duration and business hours metrics. You'll learn how to configure business hours, set up SLA policies, build accurate reports, and troubleshoot common issues.
What you'll need
Before we dive in, make sure you've got the following:
- Zendesk Suite Professional or higher - Business hours and SLA features require at least the Professional plan. The Suite Team plan doesn't include these capabilities.
- Explore Professional or Enterprise - You'll need one of these to build custom reports with business hours metrics.
- Admin or Editor permissions - You'll need appropriate permissions in both Zendesk Support and Explore to configure schedules and create reports.
- Existing ticket data - Your reports will be more meaningful if you have at least a few weeks of ticket history.
If you're not sure which plan you're on, check with your Zendesk administrator. For details on plan features and pricing, see the Zendesk pricing page. You can also review the Zendesk business hours and holidays setup guide for more configuration details.
Understanding the key concepts
Before we start clicking through menus, let's clarify a few important concepts. Understanding these will make the rest of the setup much clearer.
Calendar hours vs. business hours
Calendar hours count every hour from ticket creation to resolution. Business hours only count the hours your team's scheduled to work.
Here's why this matters. Imagine a ticket created at 4 PM on a Friday, with your team working 9 AM to 5 PM, Monday through Friday:
| Metric Type | Time Calculation | Reported Time |
|---|---|---|
| Calendar hours | Friday 4 PM to Monday 9 AM | 65 hours |
| Business hours | Friday 4 PM to Friday 5 PM | 1 hour |
The same ticket, two very different stories. Calendar hours make your team look slow when they weren't even working. Business hours tell the truth about your team's actual responsiveness.
The two datasets for duration reporting
Zendesk Explore offers two main datasets for reporting on time and duration:
Support: Tickets dataset
- Best for: First reply time, resolution times, agent wait times
- Contains: Ticket-level information like creation date, solve date, and time-based metrics
- Business hours metrics available: Yes, after you configure schedules
Support: Updates history dataset
- Best for: Time spent in each status, group assignment duration, custom field changes
- Contains: Every change made to tickets, including status updates and reassignments
- Business hours metrics available: Limited - Field changes time is calendar hours only
Most teams use the Tickets dataset for SLA reporting and the Updates history dataset for workflow analysis. For more details on these datasets, see the Zendesk Explore metrics and attributes reference.
Native business hours metrics available
Once you configure business hours (which we'll do next), Zendesk automatically calculates these metrics:
- First reply time - Business hours - Time from ticket creation to first public agent reply
- First resolution time - Business hours - Time from creation to first solve
- Full resolution time - Business hours - Time from creation to final solve (includes reopens)
- Requester wait time - Business hours - Time tickets spend in New, Open, or On-hold status
- Agent wait time - Business hours - Time tickets spend in Pending (waiting for customer)
- On-hold time - Business hours - Time tickets spend in On-hold status
Each metric is available in minutes, hours, or days. You can use whichever unit makes sense for your reporting.
Step 1: Configure your business hours schedule
Your business hours schedule is the foundation of accurate reporting. Here's how to set it up.
Navigate to Admin Center > Objects and rules > Business rules > Schedules. For detailed instructions, refer to Zendesk's guide on setting schedules with business hours and holidays.
Click Add schedule to create a new schedule. Give it a clear name like "Standard Support Hours" so your team knows what it represents.
Set your time zone first. This is critical because all business hours calculations will use this time zone as the reference point. If you have teams in multiple time zones, you may need multiple schedules (Enterprise plans only).
In the Weekly schedule section, define your working hours for each day:
- Drag time blocks to set your hours
- Click the X to remove hours from a day (marking it as closed)
- Click anywhere on a closed day to add hours
Each interval must be at least one hour long, and you can adjust in 15-minute increments. If your hours span midnight (like 10 PM to 6 AM), you'll need to create two separate intervals divided by the calendar day.
Don't forget to add your holidays. Click the Holidays tab, then Add holiday. You can schedule holidays up to two years in advance. Holidays are treated as outside business hours and won't count toward any metrics.
When you're finished, click Save. Your schedule is now active and will be used for all business hours calculations. Learn more about reporting on duration of ticket fields in Zendesk Explore.

Step 2: Set up SLA policies with business hours
Now that your schedule's configured, let's create an SLA policy that uses business hours for tracking.
Go to Admin Center > Objects and rules > Business rules > Service level agreements. For more information on how first reply time accounts for business hours, see Zendesk's documentation.
Click Add policy and give it a descriptive name like "Standard FRT - Business Hours".
Set the conditions for which tickets this policy applies to. You might want different policies for different brands, requester types, or ticket priorities. For example:
- All tickets from VIP customers
- All tickets with High or Urgent priority
- All tickets except those tagged "internal"
Under Targets, click Add target. Select First reply time from the dropdown. Here's the important part: change the metric from "Hours" to "Business hours", then select the schedule you created in Step 1.
Set your target goal. A common starting point is 4 business hours for first reply time, but this depends on your team's capacity and customer expectations.
Save your policy. From now on, Zendesk will track first reply time using business hours for any ticket that matches your conditions.
Step 3: Build your first business hours report
With your schedule and SLA policy in place, you can now build reports that'll show accurate business hours metrics.
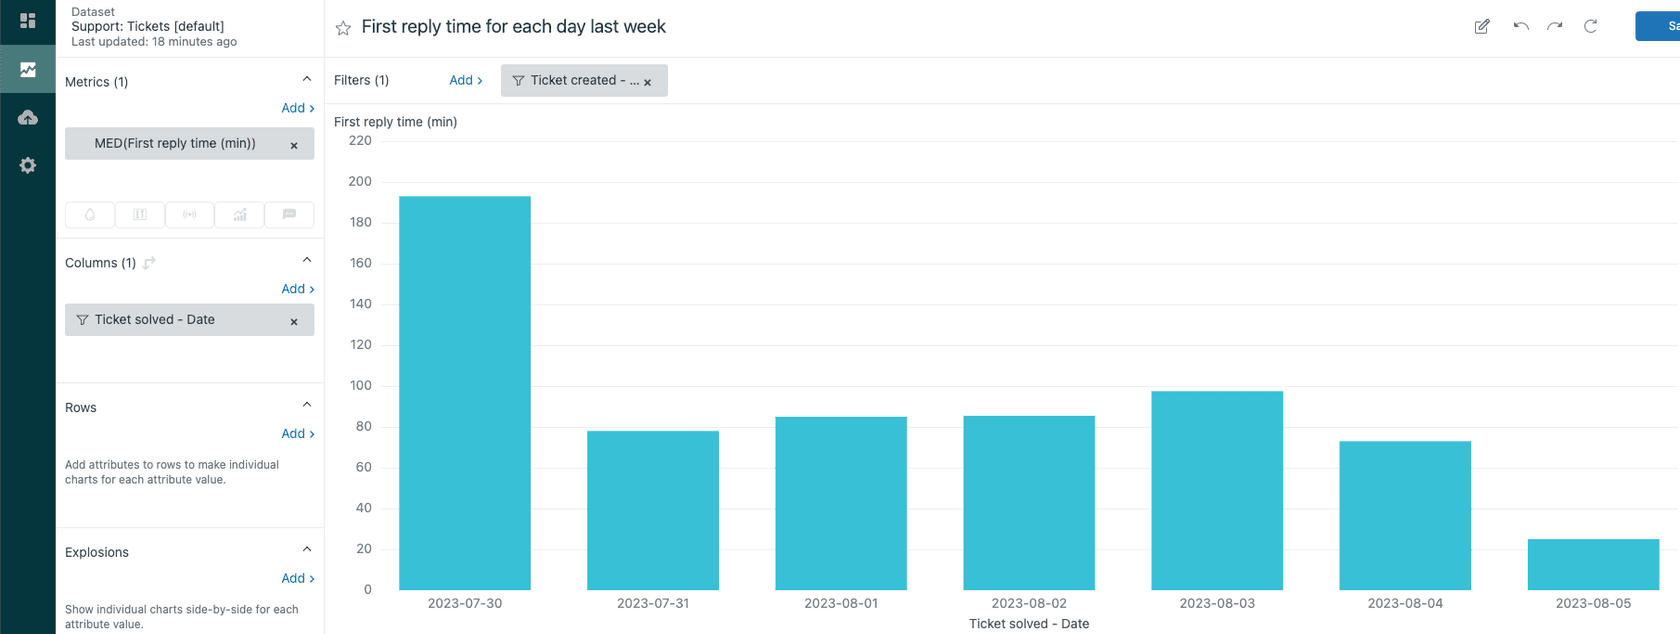
Open Explore and click the reports icon. Click New report.
On the Select a dataset page, choose Support > Support: Tickets, then click Start report.
In the Metrics panel, click Add. Find and select First reply time - Business hours (min). You can also add the hours or days version if you prefer.
In the Columns panel, click Add and select Ticket created - Date. This lets you see trends over time. You might also add Ticket created - Week or Ticket created - Month for higher-level views.
Set your visualization type. A line chart works well for trends over time. A table shows exact numbers for specific periods.
Add filters to focus your report. For example, filter to tickets created in the last 30 days, or exclude tickets that are still unsolved (since their final resolution time isn't known yet).
Your report now shows first reply time measured in business hours, giving you an accurate view of your team's responsiveness during working hours.
Step 4: Create custom duration reports
Beyond basic SLA metrics, you can build more sophisticated reports using calculated metrics and attributes.
Report on time spent in each ticket status
To see how long tickets spend in each status, you'll use the Updates history dataset.
Create a new report using Support > Support: Updates history.
In the Metrics panel, add these metrics from the Duration - Field changes (hrs) folder:
- New status time (hrs)
- Open status time (hrs)
- Pending status time (hrs)
Click each metric and change its aggregator to AVG to see average durations.
Set the visualization type to Table. This shows you the average time tickets spend in each status, helping you identify bottlenecks in your workflow.
Important note: These duration metrics use calendar hours, not business hours. Zendesk doesn't currently offer business hours calculations for custom field duration metrics. See Zendesk's article on duration of fields in business hours for more details on this limitation.
Calculate time tickets spend with specific groups
To measure how long tickets spend with specific support groups, you need to create a calculated metric.
First, find your group ID numbers. Visit your-subdomain.zendesk.com/api/v2/groups.json in your browser. You'll see a JSON response with all your groups and their IDs. Note the ID for the group you want to track.
In your report, click Calculations > Standard calculated metric.
Name it something like "Time in Tier 1 Support".
Enter this formula, replacing 12345678 with your actual group ID:
IF ([Changes - Field name]="group_id") AND ([Changes - Previous value]="12345678")
THEN VALUE(Field changes time (min))/60
ENDIF
This calculates the hours tickets spent in that group before being moved elsewhere. Supported aggregators include SUM, AVG, MIN, MAX, and MED.
Filter reports by business hours only
Sometimes you want to see only tickets created during business hours. You can create a calculated attribute for this.
In your report, click Calculations > Standard calculated attribute.
Name it "Created in business hours".
Enter this formula (adjust hours to match your schedule):
IF (IN([Ticket created - Day of week],ARRAY("Monday", "Tuesday","Wednesday","Thursday","Friday"))
    AND IN([Ticket created - Hour],ARRAY(9, 10, 11, 12, 13, 14, 15, 16)))
THEN TRUE
ELSE FALSE
ENDIF
This returns TRUE for tickets created Monday through Friday between 9 AM and 5 PM. You can then use this attribute to filter your reports or slice data by business hours vs. after-hours creation.
Common issues and how to fix them
Even with proper setup, you might encounter some issues. Here are the most common ones and how to resolve them.
Metrics showing calendar hours when you expected business hours
If your reports show calendar hours instead of business hours, check these three things:
-
Verify your schedule is active - Go to Admin Center > Schedules and confirm your schedule shows as active. If you have multiple schedules (Enterprise), make sure the correct one is applied to your tickets.
-
Check your SLA policy - Confirm the SLA policy is using "Business hours" and not "Hours" for its targets. Also verify the policy conditions match the tickets you're reporting on.
-
Use the right metric - Make sure you're selecting "First reply time - Business hours" and not just "First reply time". The business hours variants are separate metrics in Explore.
Business hours metrics returning NULL
If your business hours metrics show NULL values, several things could be happening. Review the Zendesk Explore recipe for filtering reports by business hours for additional troubleshooting tips:
-
Tickets created before your schedule was configured - Business hours metrics only work for tickets created after the schedule exists.
-
Tickets excluded from SLA policy - If a ticket doesn't match your SLA policy conditions, business hours metrics may not calculate.
-
Time zone mismatches - The report viewer's time zone can affect how business hours are calculated. Zendesk uses the viewer's time zone when displaying reports.
Custom metrics not calculating business hours
Here's an important limitation to understand: custom calculated metrics for field durations (like time in a specific status or with a specific group) can only use calendar hours. Zendesk's business hours calculations are only available for the native metrics like first reply time and resolution time. The Time Tracking app offers additional metrics that may help with more granular time tracking needs.
If you need business hours for custom duration tracking, you have a few options:
- Use the native business hours metrics where available
- Export data and calculate business hours externally
- Consider third-party analytics tools that offer more flexible business hours calculations
Getting more from your reporting
Once you have the basics working, here are some best practices to get the most value from your business hours reporting.
Review your schedules regularly. Business hours change. Teams add shifts, holidays get updated, and time zones shift. Schedule a quarterly review of your Zendesk schedules to keep them accurate.
Combine metrics for deeper insights. Don't just look at first reply time in isolation. Compare it with requester wait time to see the full picture of customer experience. Look at agent wait time to understand how quickly customers respond to you.
Set up alerts for SLA breaches. Use Zendesk's SLA notifications to alert managers when tickets are approaching breach. This is more actionable than reviewing reports after the fact.
Consider AI assistance for faster responses. While Zendesk's reporting shows you where you stand, AI tools can help improve your metrics. At eesel AI, we offer an AI Agent that can provide instant responses to common questions, directly improving your first reply time. Our AI Copilot helps human agents draft faster replies, and AI Triage ensures tickets reach the right agent immediately.

If you're looking to complement Zendesk's reporting with proactive AI assistance, check out eesel's AI agent for Zendesk. We also have a detailed guide on reporting first reply time in business hours that expands on some of the concepts covered here.
Start optimizing your support metrics today
You now have everything you need to configure and use Zendesk Explore duration and business hours metrics. Let's recap the key steps:
- Configure your business hours schedule in Admin Center
- Set up SLA policies that use business hours for tracking
- Build reports using the "- Business hours" metric variants
- Create calculated metrics for custom duration tracking (calendar hours only)
Accurate metrics lead to better decisions. When you measure your team's performance using business hours, you get a fair assessment that reflects reality. No more penalizing your team for nights and weekends when they weren't working.
If you're ready to take your support operations further, consider how AI can complement your Zendesk setup. The combination of accurate reporting and intelligent automation creates a powerful foundation for delivering exceptional customer support.


