Email remains the backbone of customer support. Even with chatbots and messaging apps everywhere, most customers still prefer to send an email when they need help. If you're using Zendesk to manage those conversations, understanding how email replies work (and how to configure them properly) can make the difference between a smooth support experience and a frustrating one.
This guide walks you through everything you need to know about Zendesk email replies. From basic setup to advanced Mail API commands, you'll learn how to handle incoming emails, manage public versus private comments, and even automate responses. Whether you're setting up Zendesk for the first time or troubleshooting an existing configuration, this guide has you covered.
What you'll need to get started
Before diving into email configuration, make sure you have the following:
- A Zendesk Support account (Team plan or higher)
- Admin access to configure email settings
- A support email address (either Zendesk-hosted or your own custom domain)
- Basic understanding of email headers (helpful but not required)
- DNS access if you're connecting an external email domain
If you're on the Support Team plan, you'll have access to email ticketing, triggers, and automations. Suite plans include essential AI features, with advanced AI capabilities available as add-ons.
How Zendesk email replies work
When a customer sends an email to your support address, here's what happens behind the scenes:
- Email becomes a ticket: The incoming email automatically creates a ticket in Zendesk
- Notifications fire: Triggers send email notifications to your support staff
- Replies thread together: When anyone responds, the conversation stays organized in one ticket
- Status updates flow: Customers receive notifications when agents reply or solve tickets
The email channel in Zendesk handles two types of notifications. Incoming notifications go to your support staff when new tickets arrive or customers update existing ones. Outgoing notifications go to customers when agents reply, solve tickets, or trigger other automated actions.

Email notifications are powered by triggers and automations. Triggers fire immediately when tickets are created or updated. Automations run on schedules, like checking for tickets that have been pending for too long. Both can send email notifications based on conditions you define.
One important concept: placeholders. These are dynamic fields (wrapped in double curly brackets like {{ticket.requester.name}}) that populate with real data when emails send. They let you personalize automated messages without writing custom code for every scenario.
Setting up your email channel
Step 1: Access email settings
Navigate to Admin Center > Channels > Talk and email > Email. This is your control center for all email-related configuration.
The interface shows your current support addresses, email authentication status, and various email handling options. Take a moment to familiarize yourself with the layout before making changes.
Step 2: Add a support email address
You have two options for your support email:
Option A: Zendesk-hosted address
- Quick setup with no DNS configuration
- Format: support@yoursubdomain.zendesk.com
- Best for testing or small teams
Option B: External email address
- Uses your own domain (support@yourcompany.com)
- Requires DNS configuration for authentication
- Looks more professional to customers
To add an external address, click Add address then select Add your existing email address. You'll need to verify ownership and configure SPF, DKIM, and DMARC records through your domain provider. Zendesk provides specific DNS records to add.
Step 3: Configure email forwarding
For external addresses, set up forwarding rules that send emails from your mail server to Zendesk. The exact steps depend on your email provider (Google Workspace, Microsoft 365, etc.), but the general process involves:
- Creating a forwarding rule in your email admin console
- Pointing it to your unique Zendesk email address
- Verifying the forwarding works by sending a test email
After setup, check the Email settings page for authentication status. Green checkmarks mean your DNS records are properly configured. Yellow or red indicators mean emails might bounce or land in spam folders.
Step 4: Set up personalized email replies
Personalized email replies include the agent's name in the Reply From address. Instead of "Support support@company.com", customers see "Claire from Support support@company.com".

To enable this:
- In Admin Center, go to Channels > Talk and email > Email
- Check the Personalized email replies box
- Save your changes
This works with both Zendesk addresses and external domains. It also works with wildcard email addresses if you have those configured. Note that if you enable email pass-through (which preserves original email headers), it overrides personalized replies.
Understanding Reply-To headers
Here's where email gets technical. When Zendesk receives an email, it looks at the Reply-To header to determine who sent it. This matters because Reply-To supersedes the From field.
According to RFC 5322 (the email standard), if a Reply-To header exists, responses should go to that address instead of the From address. Zendesk follows this standard. If someone emails you with a different Reply-To than From, Zendesk uses the Reply-To as the ticket requester.
Why does this matter? Some email servers and marketing platforms set Reply-To headers automatically. If a customer forwards a newsletter to your support address, Zendesk might attribute the ticket to the newsletter service instead of the customer who forwarded it.
If you're experiencing tickets threading to the wrong conversations or being attributed to the wrong users, Reply-To header mismatches are a common culprit. Check the original email headers in the ticket to diagnose these issues.
Managing public vs private comments
Not all email replies are created equal. In Zendesk, comments can be either public (visible to the customer) or private (internal notes for agents only). Understanding when each happens is crucial for maintaining professional communication.

When replies become private
Email replies become private comments in several scenarios:
- Using "Reply" instead of "Reply all" when the requester isn't a direct recipient
- Third-party replies from people not on the ticket (they're not automatically added as CCs)
- Agent settings if "Agent comments via email are public by default" is disabled
- Mail API commands when using #note or #private
When replies become public
By default, most email replies become public comments:
- End users replying to ticket notifications
- Agents using Reply All
- CCs on the ticket replying (if your settings allow)
Using Mail API commands
Zendesk's Mail API lets you control comment visibility using special commands in your email. Place these at the very beginning of your email body:
- #public - Forces the comment to be public (useful if your default is private)
- #note or #private - Creates an internal note
- #public false - Makes the comment private

For example, if you're an agent working from your inbox and want to add an internal note:
#note

The customer seems frustrated about the delay. Let's prioritize this and maybe offer a small credit.
This creates a private comment that only agents can see, keeping your internal discussion separate from customer-facing communication.
Automating email replies with triggers
Triggers are the engine behind Zendesk's email automation. They watch for ticket events and fire actions based on conditions you define. Most email notifications in Zendesk come from triggers.
Default email triggers
Zendesk comes with several pre-built triggers for email notifications:
- Notify requester of received request - Sends the initial "we got your email" confirmation
- Notify requester of comment update - Sends replies when agents add public comments
- Notify requester of solved request - Sends resolution notifications
- Notify group of assignment - Alerts agents when tickets are assigned to their group
You can modify these triggers or create new ones. The key actions for email automation are:
- Email user - Sends to a specific user
- Email group - Sends to all members of a group
- Email external - Sends to addresses outside your Zendesk
Using placeholders in emails
Placeholders make automated emails feel personal. Common ones include:
- {{ticket.requester.name}} - The customer's name
- {{ticket.id}} - The ticket number
- {{ticket.comments_formatted}} - The ticket conversation history
- {{ticket.status}} - Current ticket status
For example, your "request received" email might say:
"Hi {{ticket.requester.name}}, thanks for contacting us. We've received your request (#{{ticket.id}}) and will get back to you within 24 hours."
Best practice: Don't deactivate the default notification triggers unless you have a very specific reason. These triggers maintain the communication loop with your customers. Breaking that loop confuses everyone.
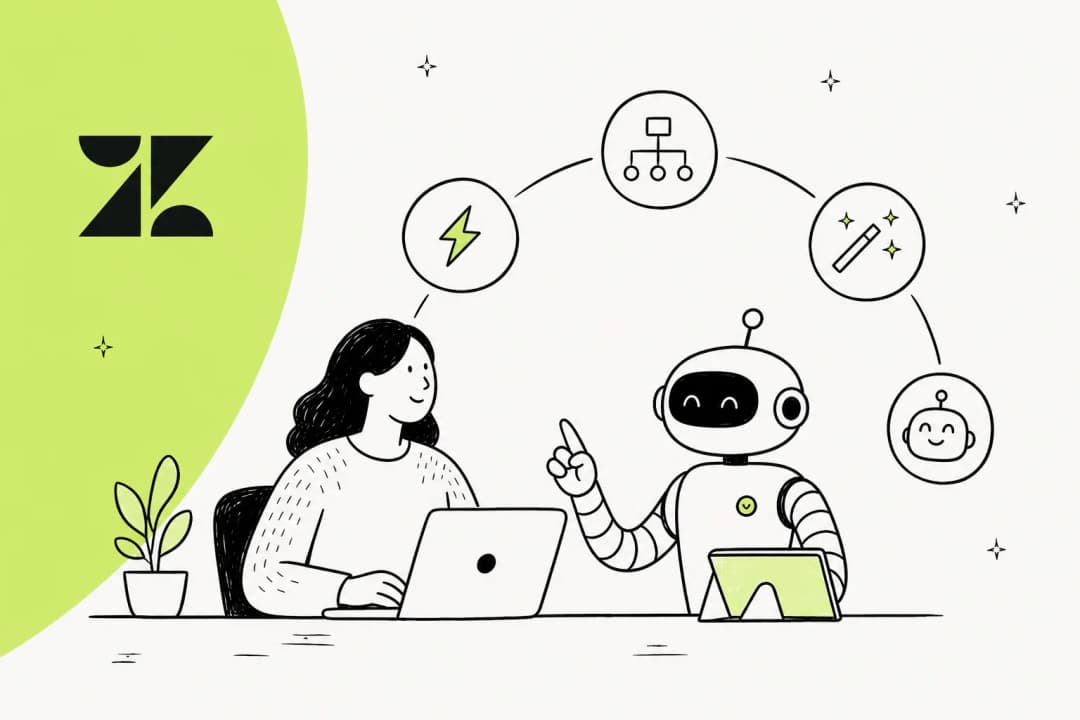
AI-powered email automation alternatives
While Zendesk offers native AI features, there's another approach worth considering. At eesel AI, we've built an AI teammate that learns from your existing support data and handles email responses with a focus on progressive autonomy.
Traditional AI tools often work as black boxes: you turn them on and hope for the best. Our approach treats the AI like a new hire. It starts by drafting replies for your agents to review. As it proves itself, you can give it more responsibility until it's handling full conversations autonomously.

How eesel AI works with email
Our AI Agent integrates directly with Zendesk (and other help desks like Freshdesk, Intercom, and Jira). It learns from:
- Your past ticket replies
- Help center articles and documentation
- Canned responses and macros
- Connected knowledge sources like Confluence or Google Docs
Instead of configuring complex rules, you describe what you want in plain English. For example: "Handle refund requests under $50 automatically, but escalate anything over that to a human." The AI understands and follows those instructions.
Progressive rollout approach
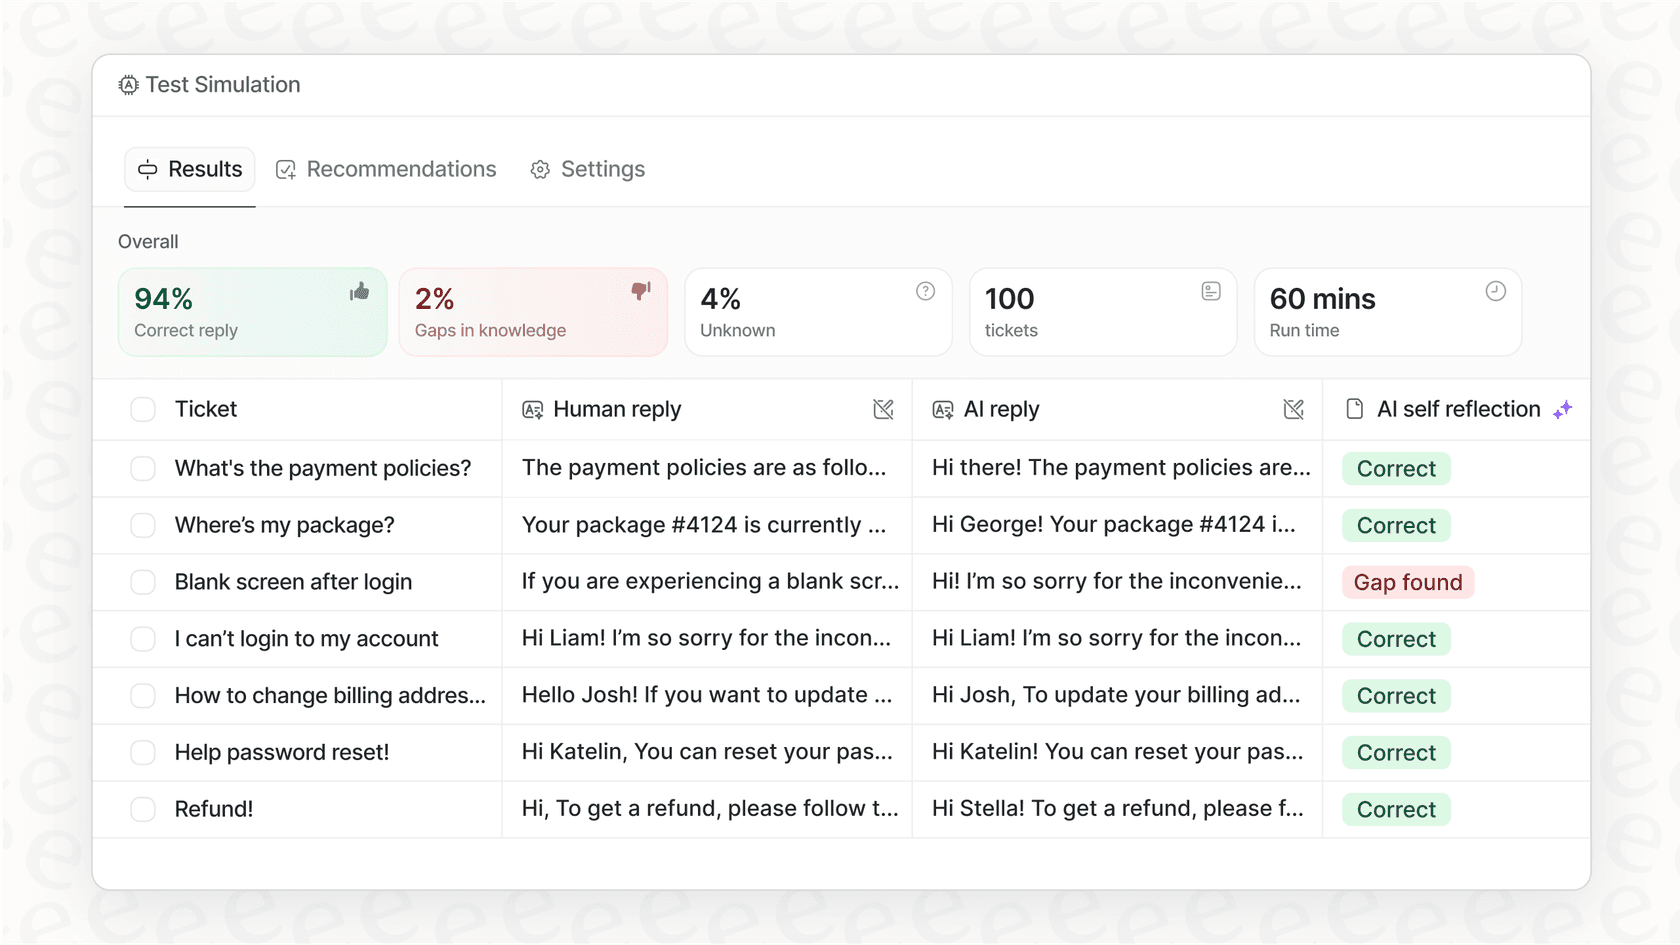
One feature our customers particularly value is the ability to test before going live. You can run simulations on thousands of past tickets to see exactly how the AI would have responded. Measure resolution rates, identify knowledge gaps, and tune the AI's behavior before it touches a real customer conversation.
When you do go live, you control the scope. Start with simple FAQ responses. Expand to order lookups. Eventually handle complex troubleshooting. The AI levels up based on its actual performance, not a predetermined timeline.
Pricing comparison
| Plan | Zendesk Suite Team | Zendesk Suite Pro | eesel AI Business |
|---|---|---|---|
| Monthly cost | $69/agent | $149/agent | $799 flat |
| AI Agent | Essential included | Essential included | Full AI Agent |
| Copilot | $50/agent add-on | $50/agent add-on | Included |
| Training | Help center | Help center + past tickets | Past tickets, docs, macros |
| Testing | Sandbox (Enterprise only) | Sandbox (Enterprise only) | Simulations on all plans |
For teams of 5+ agents, flat-rate pricing often works out more predictably than per-agent fees plus automated resolution charges.
If you're evaluating AI options for email automation, consider whether you prefer a configuration-heavy approach or a teammate model that learns and grows with your team. Both have their place depending on your team's workflow and technical comfort level.
Common email reply issues and solutions
Even with proper setup, email issues happen. Here's a quick troubleshooting guide:
Emails threading to wrong tickets
- Check for matching subject lines or reference IDs
- Look at Reply-To headers in the original email
- Consider disabling email threading for certain addresses
Comments appearing as private when they should be public
- Verify "Agent comments via email are public by default" is enabled
- Check if agents are using Reply instead of Reply All
- Review any Mail API commands in the email
External email authentication failures
- Verify SPF, DKIM, and DMARC records are correctly configured
- Check that DNS changes have propagated (can take 24-48 hours)
- Ensure forwarding rules are active and pointing to the right address
Customers not receiving notifications
- Check spam folders first
- Verify triggers are active and conditions are met
- Look for email suppression lists or bounces in ticket events
When in doubt, Zendesk's Email channel documentation and community forums are excellent resources for specific error messages and edge cases.
Start mastering Zendesk email replies today
You now have a solid foundation for managing email replies in Zendesk. From understanding the email channel workflow to configuring personalized replies and using Mail API commands, you're equipped to handle the most common scenarios.
The key takeaways:
- Email in Zendesk is ticket-centric: every email becomes a trackable ticket
- Triggers and automations power your email notifications
- Public vs private comments depend on reply method, settings, and Mail API commands
- Testing and gradual rollout prevent customer-facing mistakes
If you're looking to add AI automation to your email workflow, remember that you have options. Zendesk's native AI features integrate seamlessly if you're already in their ecosystem. For a teammate approach with simulation testing and progressive autonomy, our AI Agent at eesel AI integrates with Zendesk and might be worth exploring.
Either way, start with the basics. Get your email channel configured correctly, understand how replies work, and build from there. Solid fundamentals make everything else easier.