If your support team stares at the same ticket list all day, you know how important it is to see the right information at a glance. Zendesk views let you organize tickets into customized lists, but the real power comes from configuring which columns appear and how they're arranged.
This guide walks you through everything you need to know about customizing Zendesk view columns. Whether you're an admin setting up shared views for your team or an agent creating personal views to speed up your workflow, you'll learn how to add, remove, and reorder columns to surface the information that matters most.
While Zendesk offers solid basic customization, teams with complex needs sometimes hit its limits. We'll cover those limitations honestly and show you when it might make sense to explore AI-powered alternatives that adapt to your workflow automatically.

Understanding Zendesk views and column customization
What are Zendesk views?
Views are essentially saved filters that organize your tickets into lists based on criteria you define. Instead of scrolling through hundreds of unsorted tickets, views let you group them by status, assignee, priority, or any custom field you have set up.
Support teams use views to guide their daily workflow. You might have a view for new tickets that need triage, another for pending tickets awaiting customer responses, and a third for high-priority issues that need immediate attention. Many teams structure their views to mirror their support tiers, with Level 1 agents handling one set of views and Level 2 agents working from another.
Zendesk offers three types of views:
- Standard views come built into every Zendesk account. You can edit or deactivate most of them, but the Suspended tickets and Deleted tickets views are locked and always appear at the bottom of your list.
- Shared views are created by admins and available to all agents or specific groups. The first 100 shared views appear in the Views list.
- Personal views are created by individual agents for their own use. Agents can have up to 10 personal views in their list.
One important constraint: each view can display a maximum of 15 columns. This sounds generous until you start adding custom fields and realize you need to be selective about what information appears front and center.
What you can customize in view columns
Zendesk gives you control over several aspects of how ticket information displays:
- Adding and removing columns choose which ticket fields appear in your view
- Reordering columns drag columns into the sequence that makes sense for your workflow
- Grouping and sorting organize tickets by specific fields and set default sort order
- Field selection include standard ticket fields, custom fields, dates, and requester information
The column customization happens during view creation or editing, and the changes apply to how tickets display when someone opens that view.
How to create and customize a view in Zendesk
Prerequisites
Before you start, make sure you have the right permissions. Admins can create shared views for teams or personal views for themselves. Agents can only create personal views. You'll also need access to the Admin Center, specifically the Workspaces section where views are managed.
Step 1: Access the Views admin page
Start by navigating to the Admin Center. Click Workspaces in the left sidebar, then select Agent tools and choose Views. This opens the views management page where you can see all existing views and create new ones.
To create a new view, click the Create view button. This creates a view at the end of the list. If you want to position your new view in a specific spot, hover over an existing view, click the options menu, and select Create view below.
You can also clone an existing view if you want to start with similar conditions and modify them. This saves time when creating multiple views with slight variations.

Step 2: Set up view conditions
Every view needs a name that clearly describes what it contains. Use descriptive titles like "Unsolved High Priority" or "Pending Customer Response" so agents immediately understand what they're looking at. You can even add emojis to help differentiate views visually.
Next, set who has access to the view:
- Any agent makes the view available to everyone on your team
- Agents in specific groups limits the view to certain teams or departments
- Only you creates a personal view visible just to you
Now add conditions to filter which tickets appear. Conditions use a simple if-then logic: if a ticket meets these criteria, it appears in the view. You can set conditions for status, assignee, priority, custom fields, and dozens of other ticket properties.
Zendesk requires at least one condition from this list in the "Meet all" section:
- Status
- Status category
- Type
- Group
- Assignee
- Requester
Use the Preview button to test your conditions before saving. This shows you exactly which tickets would appear, helping you catch any mistakes in your logic.
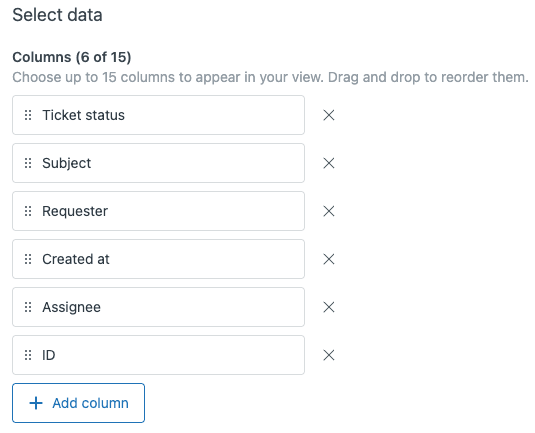
Step 3: Customize your columns
This is where you control what information agents see. In the formatting section, you'll find options for columns, grouping, and ordering.
To customize columns:
-
Drag existing columns into your preferred order. Put the most important information first since that's what agents see without scrolling.
-
Click Add column to include additional fields. You can add up to 15 columns total. Available options include standard ticket fields (subject, requester, status, priority), custom fields you've created, dates (created, updated, due), and requester information.
-
Set Group by to organize tickets into sections. For example, grouping by status creates separate sections for New, Open, and Pending tickets.
-
Set Order by to control the default sort order within groups. You might order by priority (highest first) or by creation date (newest first).
One important limitation: multi-select fields cannot be used as columns. If you have a custom field that lets users select multiple options, it won't appear in the column selection list.
Step 4: Save and test your view
Click Save to create your view. Now open it from the agent workspace to verify everything displays correctly. Check that:
- The right tickets appear based on your conditions
- Columns show the information you selected
- The order makes sense for your workflow
- Grouping and sorting work as expected
If something isn't right, go back to the Admin Center and edit the view. It's normal to tweak views a few times before they work perfectly for your team.
Working with custom fields in view columns
Adding custom fields to views
Custom fields extend Zendesk's default ticket information with data specific to your business. When you add custom fields as columns, agents see this information without opening individual tickets.
These custom field types work as view columns:
- Drop-down lists show the selected option
- Checkboxes display as checked or unchecked
- Date fields show the date value
- Text fields display the entered text
These field types do NOT work as columns:
- Multi-select fields Zendesk doesn't support these in view columns
- Text areas too long to display in a column
- Numeric, decimal, credit card, regex fields not available as view conditions
Here's something that trips up many admins: sorting by custom fields uses the underlying tag, not the field name. Let's say you have a drop-down field for product lines with these value:tag pairs:
- Photography (tag: photography)
- Video (tag: audiovisual)
- Medical (tag: endoscopy)
If you sort ascending, the order would be: Video, Medical, Photography (alphabetical by tag). This surprises teams who expect sorting by the display names.
Also note that custom date fields in views always reference GMT time, not your account timezone. If your timezone is GMT+2 and you create a view showing tickets with a "Next review date" of today, you might see yesterday's tickets due to the timezone difference.

Best practices for custom field columns
To get the most from custom fields in views:
- Use clear, concise field names agents see these as column headers, so keep them short enough to fit
- Plan your tag naming since sorting uses tags, name them with the desired sort order in mind
- Test before rolling out have a few agents test the view to catch any confusion before everyone starts using it
- Document your fields create a reference guide so agents understand what each custom field means
Customizing columns in Zendesk search results (new feature)
What's new in 2026
Zendesk rolled out a significant update in January 2026 that adds column customization to search results. This feature is available on all Support and Suite plans at no extra cost.
Here's what changed:
- You can now add and remove columns in search results tables
- Maximum of 10 column choices for search results
- Applies to tickets, articles, users, organizations, and side conversations
- Custom fields are not yet supported but coming in a future release
This is a welcome improvement since search results previously showed a fixed set of columns that couldn't be changed.

How to customize search result columns
Using the new feature is straightforward:
- Run a search in Zendesk Support
- Click the manage columns icon next to the filter button
- Select which columns to add or remove for your object type
- Arrange them in your preferred order
The catch? Your customizations don't persist. They last until you:
- Log out of Zendesk
- Clear your browser cache
- Perform a hard browser refresh
- Close your browser
When any of these happen, columns revert to the default set. Zendesk has indicated future releases will improve persistence, but for now, treat search column customization as a temporary view for your current session.
Limitations and workarounds
Known limitations
Even with the 2026 updates, Zendesk has some hard limits on column customization:
- Organization view columns cannot be customized this view is hardcoded by Zendesk and doesn't allow column changes
- Multi-select fields don't work as columns no workaround within standard Zendesk
- 15-column maximum per view forces you to prioritize what information matters most
- Custom date fields use GMT timezone can cause confusion for teams in other timezones
- Search customizations don't persist must be reconfigured each session
Workarounds for common issues
When you hit these limits, consider these alternatives:
- Replace multi-select with single-select plus tags instead of a multi-select "Products" field, use single-select "Primary product" and add secondary products as tags
- Create focused views instead of comprehensive ones rather than one view with 15 columns, create three views with 5 columns each for different purposes
- Use custom reports for Organization view needs Zendesk Explore can create reports showing organization-level data with custom columns
- Consider third-party apps tools like SweetHawk's Calendar or Field Rules apps extend Zendesk's native functionality
When Zendesk's customization isn't enough
Signs you need a more flexible solution
Some teams outgrow Zendesk's view system. You might need something different if:
- Your agents constantly need more than 15 columns to do their jobs
- You want column preferences to stick across sessions and devices
- Organization-level ticket visibility is critical to your workflow
- Agents spend more time organizing tickets than resolving them
- You need intelligent prioritization that adapts based on ticket content
These aren't failures of Zendesk. It's a solid platform that works well for many teams. But if your support operation has evolved beyond what static views can handle, you have options.
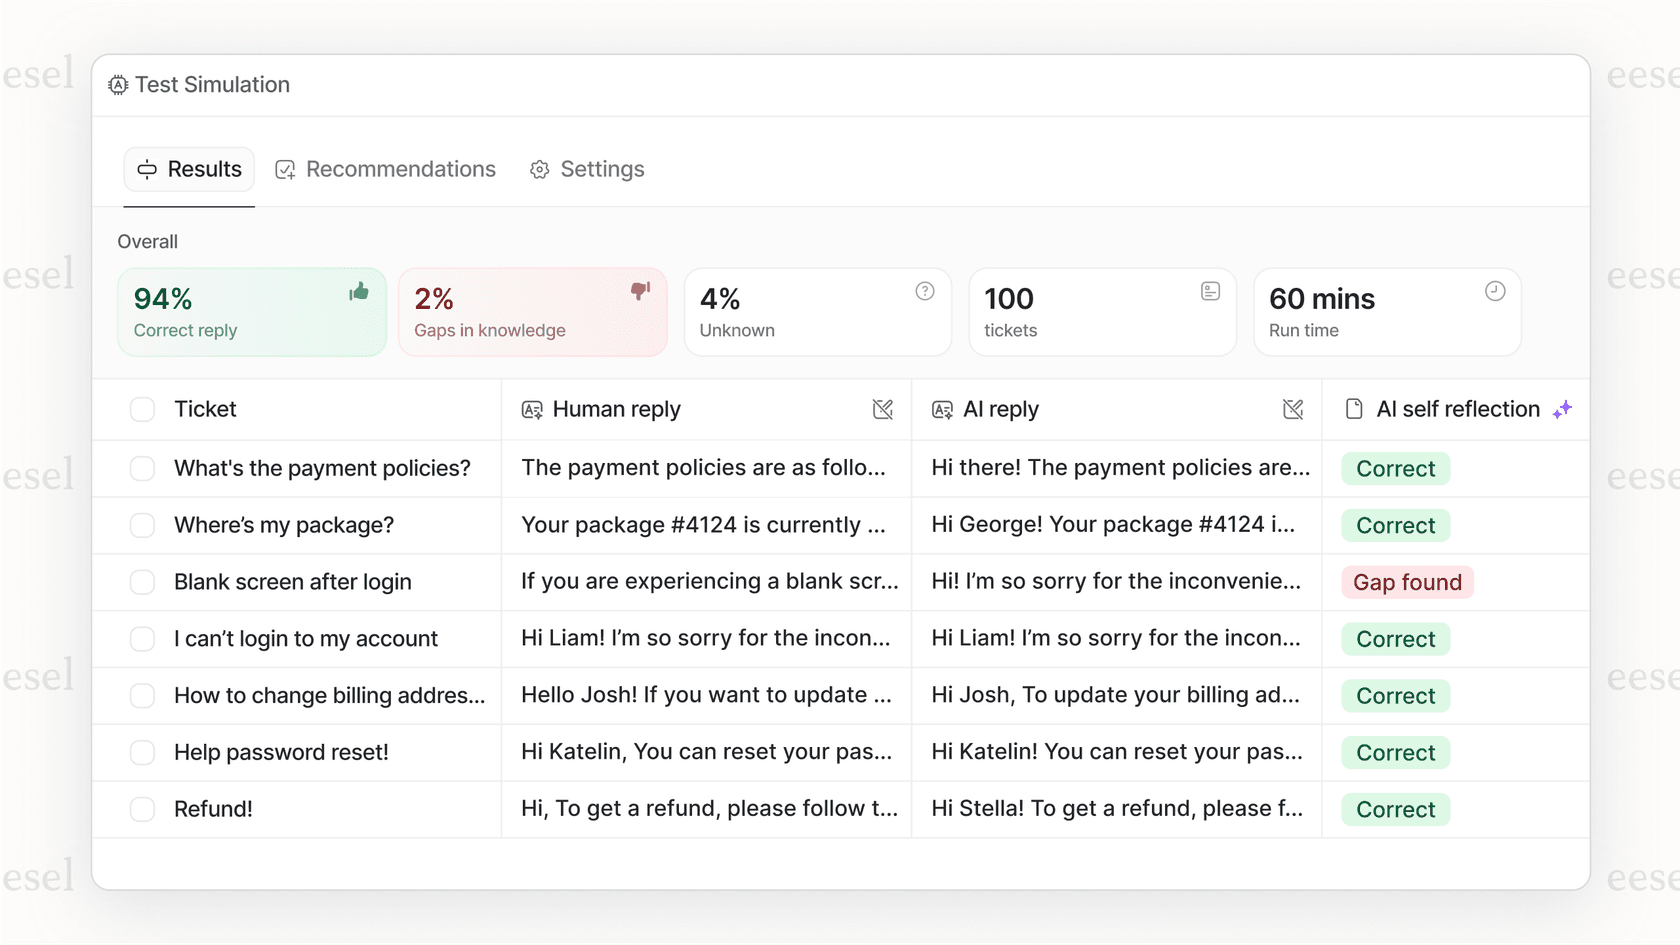
How we extend beyond Zendesk's limitations
At eesel AI, we approach ticket organization differently. Instead of manually configuring views with rigid column limits, our AI teammate learns your business and surfaces the right tickets automatically.
Here's how it works:
- No column limits the AI identifies and displays the most relevant information for each ticket based on context
- Intelligent triage tickets route and prioritize themselves based on content, history, and your business rules written in plain English
- Continuous learning the system learns from your past tickets to predict which issues need attention first
- Works with or replaces Zendesk integrate with your existing Zendesk setup or use eesel AI as a standalone solution
The key difference is that instead of you telling the system exactly how to organize tickets through complex conditions, you describe what matters in natural language. The AI handles the rest.
For example, instead of building a view with 15 carefully selected columns, you might simply tell eesel AI: "Show me urgent tickets from enterprise customers that haven't been updated in 4 hours, and make sure I can see their subscription tier and past issues." The AI understands and adapts.
Start organizing your support tickets more efficiently
Summary of key takeaways
Let's recap what you need to know about Zendesk view column customization:
- You can add up to 15 columns per view, choosing from standard fields and most custom field types
- Multi-select fields won't work as columns, and Organization view columns are locked
- The new search result column customization (January 2026) helps but doesn't persist across sessions
- Custom field sorting uses tag names, not display names, which affects alphabetical ordering
Next steps
Ready to improve your team's ticket organization? Here's what to do:
- Audit your current views identify which ones agents actually use and which just clutter their workspace
- Plan your custom fields create fields that capture the information your team needs most often
- Train your agents show them how to create personal views for their specific workflows
- Evaluate your limits if you're constantly bumping against Zendesk's constraints, consider whether an AI-powered approach might serve your team better
If you've optimized your Zendesk views but still feel like you're fighting the system to get the visibility you need, it might be time to explore alternatives. eesel's AI agent for Zendesk adapts to your workflow automatically, surfacing the right tickets without rigid column limits. Modern AI support tools can adapt to your workflow instead of forcing you to adapt to their limitations.
