How to add and use Zendesk view group SLA column
Stevia Putri
Last edited February 25, 2026
If you're managing a multi-team support operation in Zendesk, you've probably run into this scenario: a ticket gets escalated from Tier 1 to Tier 2, then sits there for hours while the customer waits. Standard SLAs track your customer-facing commitments, but they don't tell you how long each internal team actually held the ticket. Group SLA columns solve this problem.
Group SLAs are internal agreements (technically OLAs, or Operational Level Agreements) that measure how long a specific team owns a ticket before solving it or passing it along. Adding a Group SLA column to your views lets agents see these internal deadlines alongside their regular workload, making it easier to prioritize tickets that are about to breach internal handoff targets.
Here's how to set up and use Group SLA columns in your Zendesk views:

What you'll need
Before you start, make sure you've got the basics covered:
- A Zendesk Enterprise or Enterprise Plus plan (Group SLAs aren't available on lower tiers)
- Admin access to create and modify views
- At least one group already configured in your Zendesk account
- Tickets must have priorities set (Group SLAs apply based on priority levels)
If you're on Professional or Suite Growth, you can still use standard SLA columns in views, but the Group SLA option won't appear in your column list.
Understanding Group SLA columns in Zendesk
Standard SLA columns in Zendesk show customer-facing metrics like first reply time and total resolution time. Group SLA columns work differently. They track group ownership time, which measures how long a ticket sits with a specific internal team.
Here's the key difference: when a ticket moves from Group A to Group B, Group A's ownership timer stops and Group B's begins. If the ticket comes back to Group A later, their timer resumes. This lets you measure internal handoff efficiency separately from customer wait times.
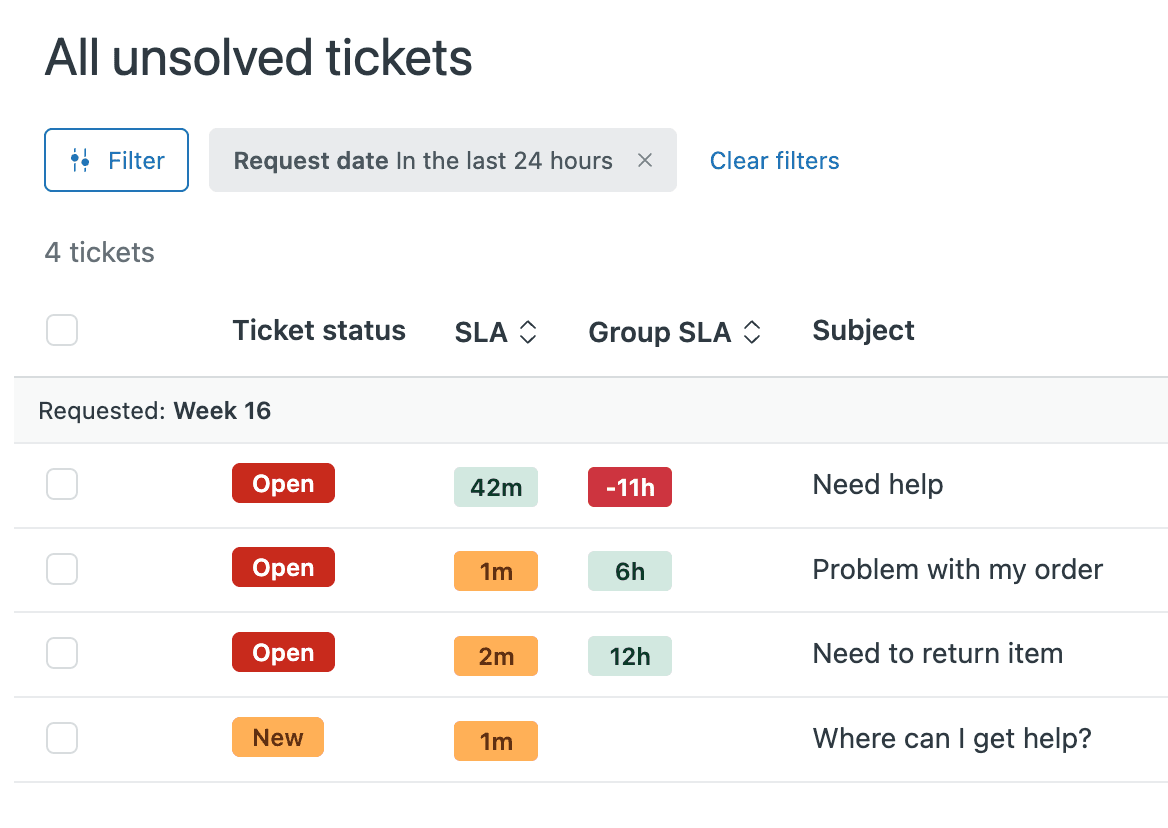
The Group SLA column displays the time remaining until the next ownership target breaches. It works like a countdown timer. If your Tier 2 team has a 2-hour ownership target and they've held the ticket for 45 minutes, the column shows "1 hour 15 minutes." Once they solve it or reassign it, the timer stops.
One important quirk: once a Group SLA target is achieved or breached, the countdown disappears from the column. This confuses admins who expect to see a "breached" status. The column only shows active timers, not historical status.
Step-by-step: Adding Group SLA columns to your views
Step 1: Navigate to Views
Go to Admin Center > Objects and rules > Views to see your existing views list. You can edit an existing view or create a new one specifically for Group SLA tracking.
Step 2: Edit or create a view
Select the view you want to modify and click Edit, or click Create view to start fresh. Give your view a descriptive name like "Tier 2 Queue with Group SLA" so agents understand what they're looking at.
In the view conditions, make sure you're filtering for tickets that would actually have Group SLAs applied. At minimum, filter by the groups you have Group SLA policies for. You might also want to filter by status (Open, Pending) to exclude solved tickets, since those won't show active Group SLA timers.
Step 3: Add the Group SLA column
Scroll down to the Formatting options section. Click Add column, then look for Group SLA in the dropdown list. This is separate from the standard SLA column, so make sure you select the right one. You can learn more about configuring SLA policies in Zendesk from their documentation.
The Group SLA column will show the calendar time remaining before the next Group SLA target breaches for each ticket. If a ticket doesn't have a Group SLA policy applied, this column will be blank.
Step 4: Configure sorting
Here's where the column becomes useful for prioritization. Set Order by to Group SLA in Ascending order. This puts tickets closest to breaching at the top of the queue.
Why ascending? Because the column shows time remaining. A ticket with "15 minutes" remaining is more urgent than one with "3 hours" remaining. Ascending order surfaces the tickets your team needs to act on immediately.
One limitation: you can't sort by both SLA and Group SLA simultaneously. Each view can only have one sort order. Choose which metric matters more for that specific queue. For Tier 1 handling initial customer contact, standard SLA might be more important. For Tier 2 working escalations, Group SLA is probably the better priority signal.
Step 5: Save and test
Click Save to apply your changes. Open the view and verify that:
- The Group SLA column appears in the ticket list
- Tickets assigned to groups with Group SLA policies show time values
- The sort order is working (tickets closest to breach appear first)
- Tickets without Group SLAs show blank values (this is expected)
If the column doesn't appear at all, double-check that you're on an Enterprise plan and that you've actually created Group SLA policies in Admin Center.
Understanding what the Group SLA column shows
The Group SLA column displays different information depending on ticket status:
Active timers: Tickets currently assigned to a group with an active Group SLA policy show the time remaining until the ownership target breaches. This updates in real-time as the clock counts down.
Blank values: You'll see blank values in several situations:
- The ticket is solved or closed (timers stop on resolution)
- The Group SLA target was already achieved or breached
- No Group SLA policy applies to that ticket
- The ticket hasn't been assigned to a group yet
Sorting behavior: When you sort by Group SLA ascending, blank values typically appear at the end of the list. This means solved tickets and tickets without Group SLAs sink to the bottom, while active, urgent tickets bubble to the top.
A common point of confusion: Group SLAs measure ownership time, not escalation time. If Tier 1 escalates to Tier 2, Tier 2's Group SLA clock starts when they receive the ticket, not when the customer first contacted you. Some teams create separate groups like "Tier 2 - Escalated" with different targets to handle this distinction.
Best practices for Group SLA views
Create group-specific views
Don't try to cram every team's Group SLA into one view. Create dedicated views for each group that shows their own Group SLA targets. Tier 1 agents should see Tier 1's Group SLA column. When tickets escalate to Tier 2, those agents see Tier 2's targets in their dedicated view.
Combine with tags for advanced filtering
Use tags alongside Group SLA columns for more sophisticated queues. For example:
- Tag VIP tickets and create a "VIP Escalations" view sorted by Group SLA
- Tag tickets by product line and create product-specific views with Group SLA prioritization
- Tag tickets requiring manager approval and monitor their Group SLA status separately
Set up companion automations
Views show you the problem. Automations can help prevent it. Create automations using these conditions:
- Hours until next Group SLA breach - Use this to notify team leads before tickets breach
- Hours since last Group SLA breach - Use this to escalate tickets that have already breached internal targets
For example, you could create an automation that posts to Slack when a VIP ticket is 30 minutes from breaching its Group SLA, or auto-escalates priority when a ticket breaches by more than an hour.
Use alongside standard SLA columns
Group SLA and standard SLA columns serve different purposes. Consider adding both to your views, but remember you can only sort by one. Choose the sort order based on what matters most for that specific queue:
| View Purpose | Recommended Sort |
|---|---|
| Frontline support queue | Standard SLA (customer-facing urgency) |
| Escalation queue | Group SLA (internal handoff timing) |
| Manager oversight | Standard SLA (overall customer experience) |
Troubleshooting common issues
Group SLA column not appearing in views This almost always means you're not on an Enterprise plan. Check your subscription level in Admin Center > Account. Group SLAs require Enterprise or Enterprise Plus. If you are on Enterprise and still don't see it, verify that you've created at least one Group SLA policy (Admin Center > Objects and rules > Service level agreements > Group SLAs tab).
Column shows blank for all tickets First, confirm tickets actually have Group SLA policies applied. The column only shows data for tickets matching your Group SLA policy conditions. Second, check that tickets have priorities set. Group SLAs require priority to calculate targets. Finally, remember that solved and closed tickets show blank values because their timers have stopped.
Confusion between Group SLA and standard SLA values Standard SLA columns show customer-facing metrics (first reply, next reply, resolution). Group SLA columns show internal ownership time. They're measuring completely different things. If you're seeing unexpected values, verify which column you're looking at and what the underlying policy is configured to measure.
Policy not applying to tickets
Double-check your Group SLA policy conditions. Group SLAs require at least one group_id filter condition. Verify the group ID is correct (you can find it in the URL when editing a group: /admin/people/teams/groups/[ID]/edit). Also confirm tickets are actually being assigned to that group via triggers or manual assignment.
Sorting doesn't seem to work Remember you can only sort by one column at a time. If you set Order by to Group SLA but previously had it set to something else, the change should take effect immediately. If tickets aren't sorting as expected, check that they actually have Group SLA values (blank values often sort to the end).
Streamline your workflow with eesel AI
Group SLA columns help you track internal accountability, but tracking only works if your teams can actually hit those targets consistently. When volume spikes or complex tickets pile up, even the best-organized views won't prevent breaches.
We built eesel AI to work alongside tools like Zendesk, handling the repetitive work that makes SLAs harder to achieve. Our Zendesk integration plugs directly into your existing setup.
Automated ticket routing: Our AI Triage can route incoming tickets to the right group immediately based on content analysis. Instead of tickets sitting in a general queue waiting for manual assignment, they land in the correct team's queue instantly, giving them the full Group SLA window to work with.
Faster initial responses: When our AI Agent handles frontline support, it responds to customers within seconds for common requests. This buys your human teams time to work within their Group SLA windows for complex issues, without customers feeling ignored.
Consistent handoff quality: Our AI summarizes ticket context when escalating, so when a ticket moves from Tier 1 to Tier 2 (triggering that Group SLA clock), the receiving agent has everything they need to start work immediately.
We train on your past tickets, macros, and help center content so the AI sounds like your team. You can simulate responses on historical tickets before going live, ensuring quality stays high even as volume increases.
If you're implementing Group SLAs to improve internal accountability, consider what happens when AI handles the routine work. Your teams get more bandwidth to focus on the complex issues where Group SLAs really matter.
