Views are the backbone of ticket management in Zendesk. They're how your agents know what to work on, how managers track queue health, and how support teams stay organized. But here's the thing: most teams only scratch the surface of what views can do.
If you're still using the default views that came with your Zendesk account, you're missing out on serious efficiency gains. The right view setup can cut ticket handling time, prevent things from slipping through the cracks, and make your team's day-to-day work noticeably smoother.
In this guide, we'll walk through everything you need to know about Zendesk view conditions and sorting. You'll learn how to build views that actually match your workflow, avoid common pitfalls that create ticket "blackholes," and organize your setup so it scales with your team. We'll also look at how AI tools like eesel AI can take your view organization to the next level by automating the tagging and triage that makes views work.
What you'll need
Before we dive in, make sure you have:
- A Zendesk Support plan (Team, Professional, or Enterprise)
- Admin permissions to create and edit views
- Basic familiarity with ticket properties like status, priority, and assignee
- Optional: Zendesk Explore if you want to analyze view performance
Views are available on all Support plans, though some advanced conditions (like SLA-based filtering) require Professional or Enterprise.
Understanding Zendesk view conditions
View conditions are the rules that determine which tickets appear in a view. Think of them as filters: you set criteria, and Zendesk shows you only the tickets that match.
ALL vs ANY logic
Every view has two condition groups:
- ALL conditions (AND logic): Every condition here must be true for a ticket to appear
- ANY conditions (OR logic): At least one condition here must be true
Here's the short version: use ALL for your must-have criteria, ANY for nice-to-have alternatives. For example, you might use ALL to say "status is Open AND priority is High," then use ANY to add "assigned to Group A OR assigned to Group B."
Available condition categories
Zendesk offers dozens of conditions across several categories:
Ticket properties
- Status: New, Open, Pending, On-hold, Solved, Closed
- Type: Question, Incident, Problem, Task
- Priority: Low, Normal, High, Urgent
Assignment and ownership
- Group: Which team owns the ticket
- Assignee: Specific agent or unassigned
- Skills match: For skills-based routing
Requester information
- Requester: Specific end-user
- Organization: Company or account
- Brand: For multi-brand setups
- Requester language: Locale preferences
Time-based conditions
- Hours since created, updated, solved, or closed
- Hours until due date (for tasks)
- Latest update by assignee or requester
SLA conditions
- Next SLA breach: Time until the next target expires
- SLA target status: Active, achieved, or breached
Custom fields
- Dropdown fields
- Checkbox fields
- Date fields
- Text fields

A note on limitations
There's one condition users have been requesting for years that still doesn't exist: subject line filtering. You can't create a view that shows only tickets with specific words in the subject. As one Zendesk admin noted in a community discussion, "This is pretty insane to me, as a former ServiceNow admin. Other tools let us sort views based on subject."
The workaround? Use triggers to tag tickets based on subject keywords, then filter your views by those tags. It's an extra step, but it gets the job done.
How to create a view with conditions
Let's walk through building a view from scratch.
Step 1: Navigate to the Views admin page
Go to Admin Center > Workspaces > Agent tools > Views. This shows you all existing views in your account.
Step 2: Create a new view
Click "Add view" in the top right. Give your view a clear, descriptive name. "High Priority Open Tickets" is better than "View #1."
Step 3: Set your conditions
In the Conditions section, add your ALL and ANY criteria. Start simple: you can always add more conditions later. Test as you go by clicking "Preview" to see which tickets match.
Step 4: Configure formatting
Choose which columns appear in your view. At minimum, you'll want Ticket ID, Subject, Status, and Assignee. Consider adding SLA columns if you track response times, or custom fields that help agents prioritize.
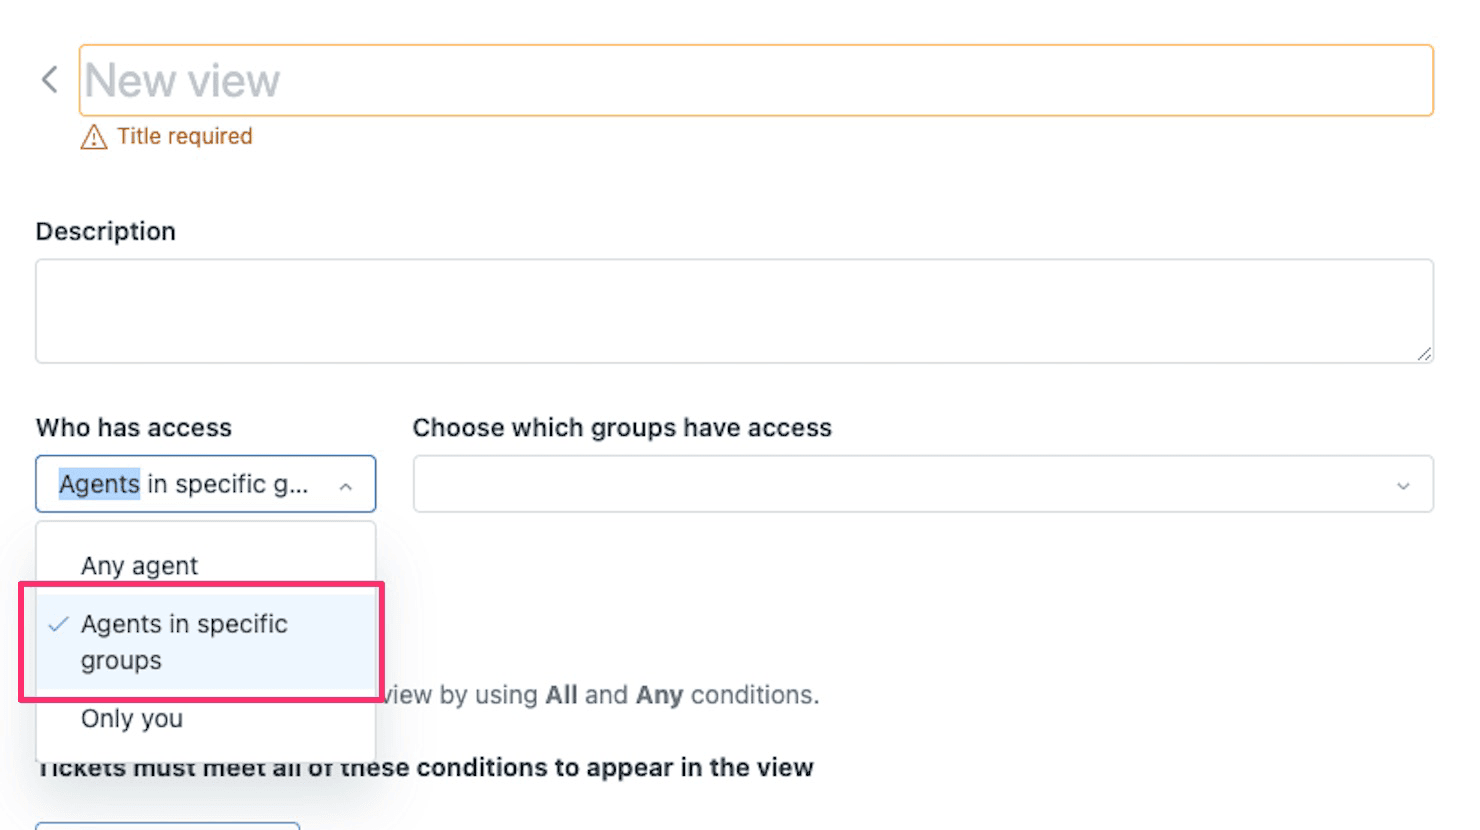
Step 5: Set availability
Decide who can see this view:
- Just you: Personal view
- Specific groups: Shared with certain teams
- All agents: Available to everyone
Step 6: Save and test
Click Save, then open the view from your sidebar to verify it shows the right tickets. If something looks off, go back and adjust your conditions.
Sorting and filtering tickets in views
Once your view is set up, you'll want to organize how tickets appear within it.
Sorting by column headers
Any view can be sorted by clicking the column headers. Click once for ascending order (A-Z, oldest first), click again for descending (Z-A, newest first). An arrow appears showing the current sort direction.
Common sorting strategies:
- Sort by Priority (descending) to see urgent tickets first
- Sort by Request date (ascending) to work oldest tickets first
- Sort by SLA columns (ascending) to prioritize tickets approaching breach
To reset the sort order to your view's default, click "Reset sort order" at the top of the ticket list.
Using filters
The Filter button lets you temporarily narrow down what's shown in a view without changing the underlying conditions. Filters are session-based: they disappear when you log out.
Available filters depend on which columns you've added to your view. If you don't see a filter option, add the corresponding column first.
Pro tip: If a view shows no results after filtering, try refreshing your browser. Sometimes the filter UI gets out of sync with the actual data.
Best practices for organizing views
Now that you know the mechanics, let's talk strategy. A well-organized view setup follows the MECE principle: Mutually Exclusive, Collectively Exhaustive.
What MECE means for views
- Mutually exclusive: Each ticket should appear in only one primary view (to avoid confusion about who should work it)
- Collectively exhaustive: Every ticket should appear in at least one view (so nothing gets lost)
The exception is your failsafe view, which we'll cover next.
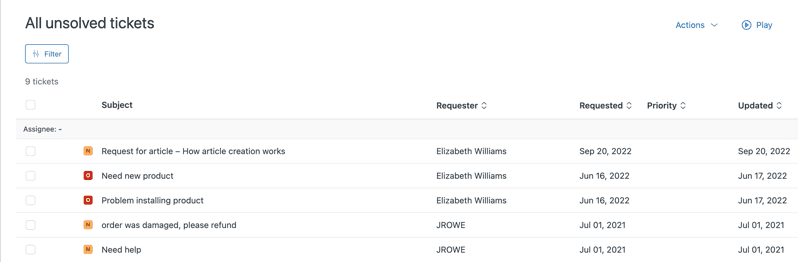
The essential "All Unsolved Tickets" view
Create a view with these settings:
- Condition: Status less than Solved
- Order by: ID (ascending)
- No grouping
This puts your oldest unsolved ticket right at the top. Managers can check this view daily to ensure nothing is stuck or missing from other views.
If your MECE setup is working correctly, the sum of tickets in your primary views should equal the count in this failsafe view.
Organizing by team vs. channel vs. status
There are three common ways to structure views:
By status: One view for New, one for Open, one for Pending. Simple, but tickets pile up in each view.
By channel: Separate views for email, chat, phone. Works well when different teams handle different channels.
By team: Views for Customer Service, Technical Support, Billing, etc. This scales best as you grow because you add channels to existing team views rather than restructuring everything.
For most growing companies, team-based organization wins. It's more stable and easier to maintain.
Naming conventions
Clear names save everyone time. Use consistent formats like:
- "Team - Status" (Customer Service - Open)
- "Team - Priority" (Technical - Urgent)
- "Function - Detail" (Escalations - Tier 2)
Avoid vague names like "My View" or "Important Tickets." Be specific about what the view contains.
Common view issues and solutions
Even with careful setup, things go wrong. Here are the most common problems and how to fix them.
Views showing no results
If a view that should have tickets shows nothing, check:
- Are your conditions too restrictive? (Try removing one at a time)
- Is there a typo in a tag or field value?
- Do you have permission to see the tickets that match? (Group restrictions can hide results)
Tickets appearing in multiple views
This creates confusion: two agents might work the same ticket. Review your conditions to ensure views don't overlap. If a ticket matches "Open" and "High Priority," pick one as its primary home.
Tickets not appearing in any view (the blackhole)
This is the worst-case scenario: a customer is waiting, but no agent can see their ticket. The "All Unsolved Tickets" failsafe view catches these. If you see tickets there that shouldn't be, trace back to find which condition is excluding them incorrectly.
SLA column confusion
Here's something that trips up almost everyone: SLA columns show countdown timers, not historical breach status. Once a target breaches, the countdown disappears. As one admin noted, "I want to see tickets with breached SLA in statuses Solved and Closed. But it seems like Zendesk just removes SLA tracker from solved/closed tickets."
If you need to track historical breaches, use Zendesk Explore or set up an automation that tags tickets when they breach.
Performance issues
Views with complex conditions (many OR statements, lots of custom fields) can load slowly. If agents complain about view performance:
- Simplify your conditions
- Remove unused columns
- Split complex views into multiple simpler ones
Using eesel AI to enhance your Zendesk views
Views are only as good as the data that feeds them. If your tickets aren't consistently tagged, routed, and categorized, your views become unreliable. AI can help bridge this gap.
eesel AI's Zendesk integration automates the work that makes views effective:
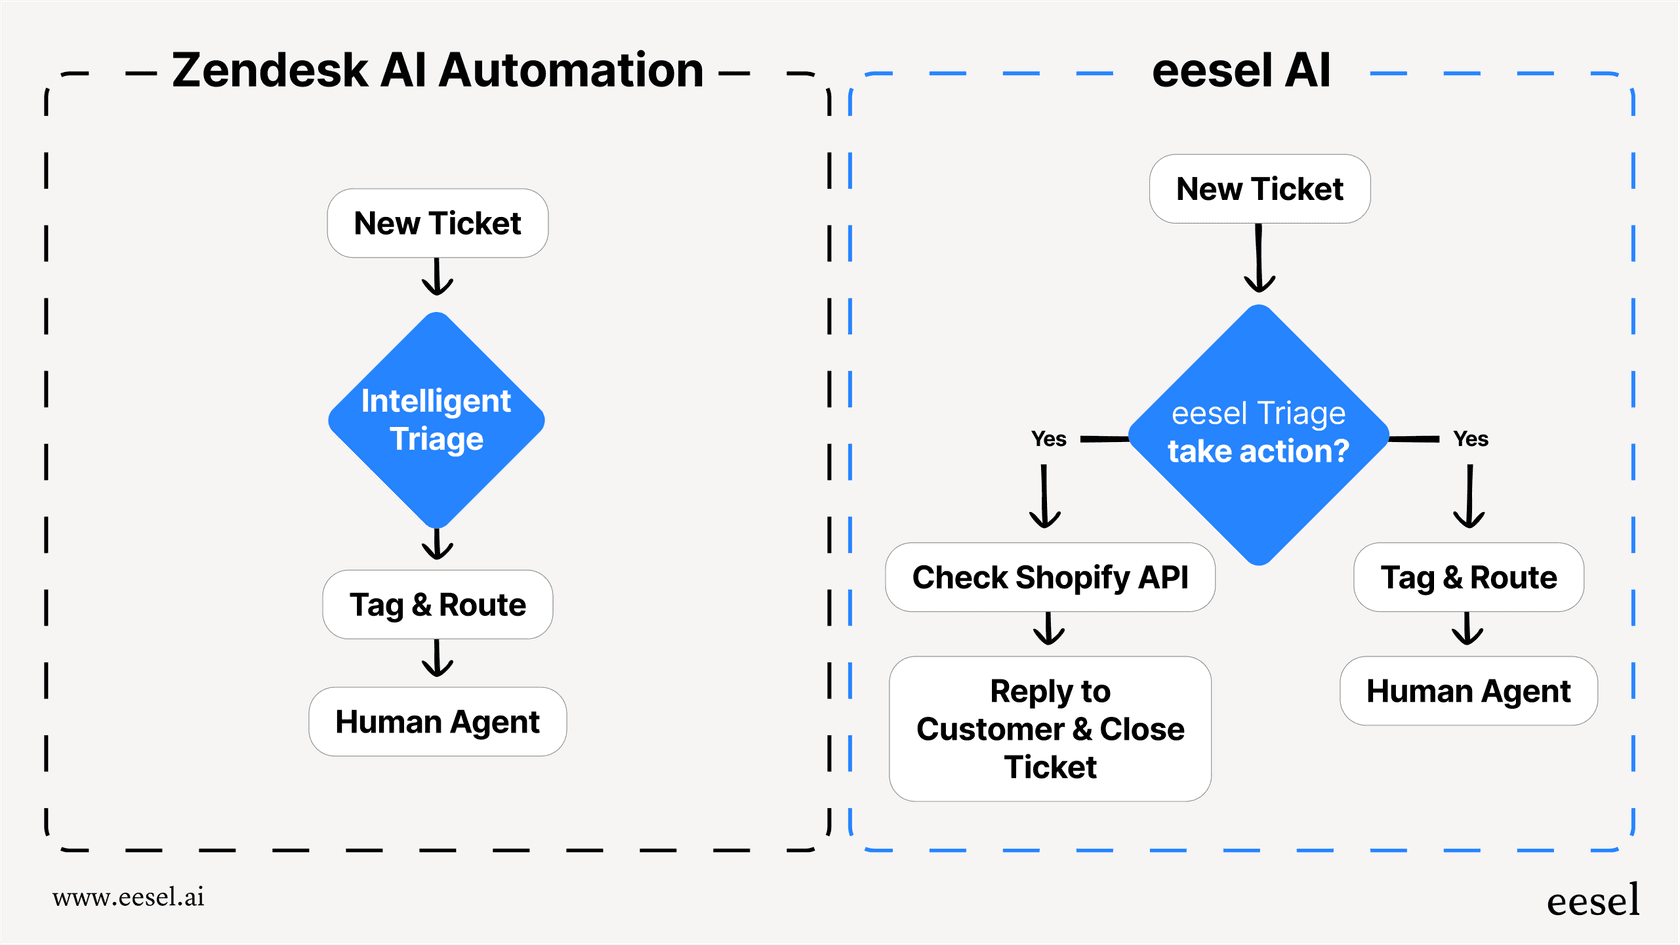
Automatic triage and tagging Our AI Triage reads incoming tickets and applies the right tags automatically. No more relying on agents to categorize consistently. Your views become more accurate because the underlying data is cleaner.
AI Copilot for faster resolution When agents open tickets from their views, AI Copilot drafts replies and pulls relevant information from your knowledge base. Agents spend less time searching and more time solving, which means tickets move through your views faster.

Intelligent routing eesel AI can route tickets to the right team based on content, not just rules. This means your team-based views get populated more accurately, reducing misrouted tickets.
Reduce ticket volume entirely Our AI Agent handles common requests (password resets, order lookups, refund requests) without ever creating a ticket. Fewer tickets means your views stay manageable even as your business grows.
The best part? You can test how eesel AI would perform on your historical tickets before going live. Run simulations to see the impact, then gradually increase automation as you gain confidence.
Start optimizing your Zendesk views today
You've now got a complete playbook for mastering Zendesk view conditions and sorting. Here's what to do next:
-
Audit your current views: Check if they follow the MECE principle. Look for overlaps and gaps.
-
Create your failsafe view: If you don't have an "All Unsolved Tickets" view, build one now.
-
Review your naming: Are your view names clear and consistent? Rename anything ambiguous.
-
Test your conditions: Open each view and verify it shows exactly what you expect.
-
Consider AI enhancement: If tagging and routing are inconsistent, try eesel AI to automate those steps and make your views more reliable.
Well-organized views don't just make agents' lives easier. They prevent tickets from falling through the cracks, improve response times, and give managers visibility into what's actually happening. Take the time to get your view architecture right, and you'll feel the difference every day.
Want to see how AI could improve your ticket organization? Book a demo and we'll show you how eesel AI works with your existing Zendesk setup.
