Setting up automation in your help desk can feel like learning a new language. You're trying to make the system work for you, but sometimes it feels like you're working for the system instead. One of the most common automation needs is triggering actions when a ticket's status changes to open. Whether you want to notify agents of reopened tickets, escalate urgent issues, or simply track workflow metrics, getting this trigger right is essential.
This guide breaks down exactly how to create a Zendesk trigger when status changed to open, along with common use cases and troubleshooting tips for when things don't go as planned.

What you'll need to get started
Before diving into trigger creation, make sure you have a few basics covered:
- Admin access to Zendesk Support. You'll need administrator permissions to create and modify triggers.
- Understanding of your ticket workflow. Know how tickets move through your system (New → Open → Pending → Solved → Closed).
- Clear goal for what the trigger should accomplish. Are you notifying someone? Updating a field? Escalating a ticket?
- Optional: Custom fields or tags. If you want to add conditions, have these ready.
If you're missing any of these, pause here and get them sorted. Creating triggers without a clear plan often leads to automation that creates more problems than it solves.
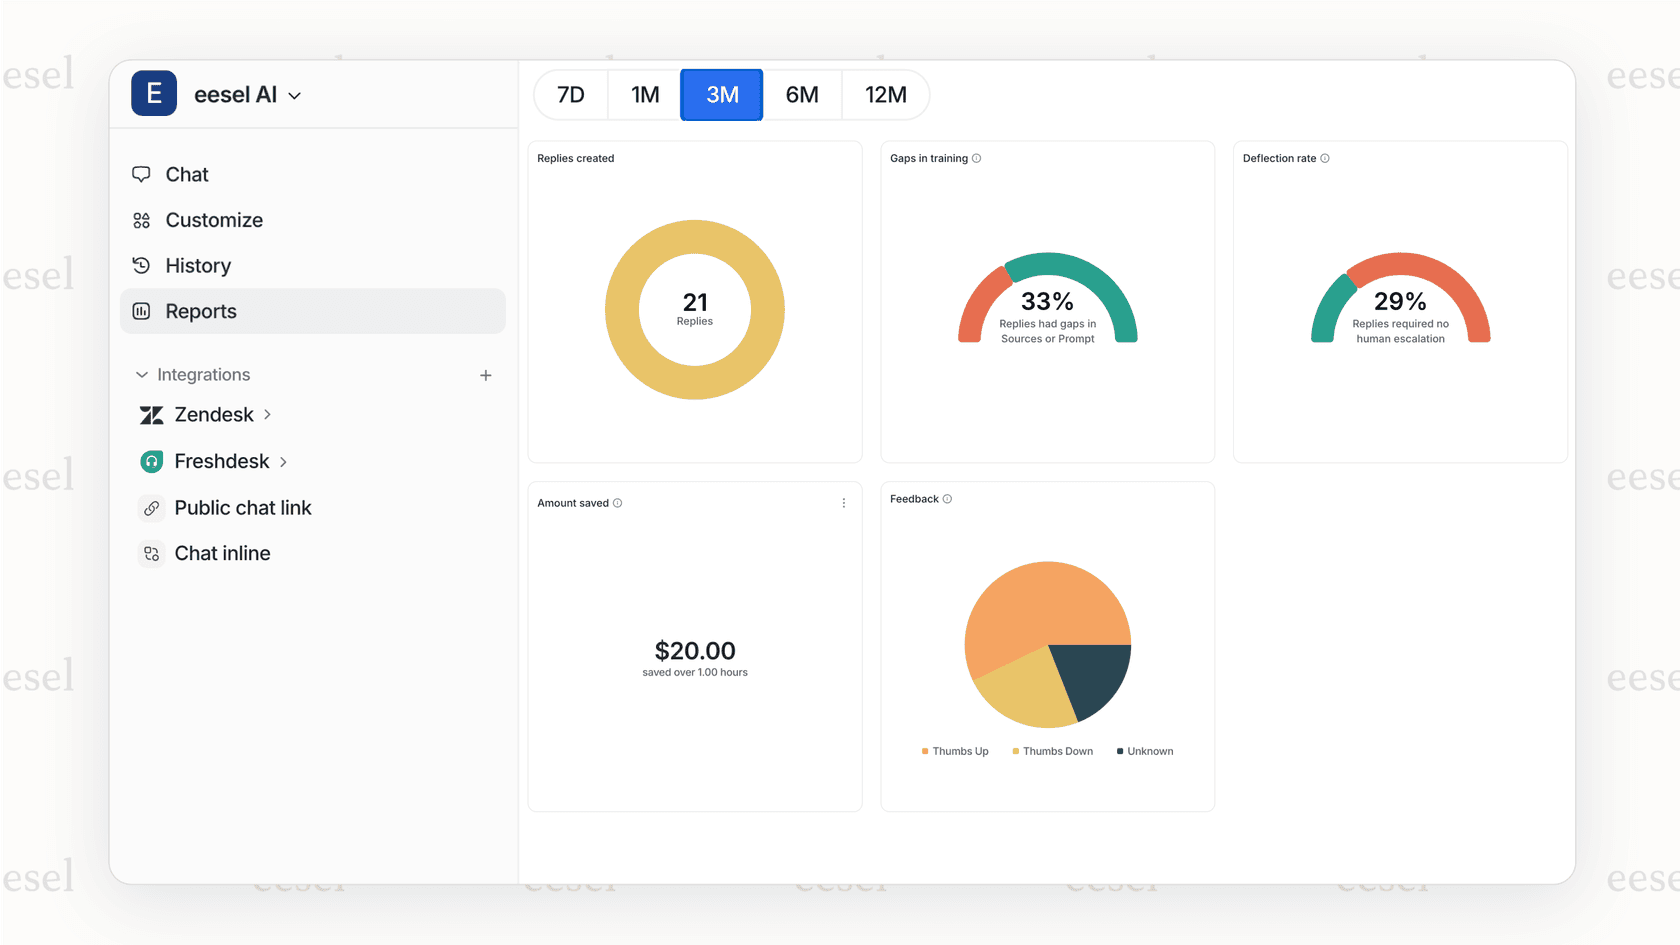
For teams looking to go beyond basic triggers, eesel AI integrates with Zendesk to provide intelligent automation that learns from your existing tickets and help center content.
How Zendesk status change triggers work
Understanding the mechanics behind triggers will save you hours of frustration later. Here's the short version: triggers are built from conditions and actions. Conditions define when the trigger fires, and actions define what happens when it does.
The key distinction for this guide is between "Status is" and "Status changed to":
- "Status is Open" checks the current state. If a ticket is already open, this condition is true.
- "Status changed to Open" checks for a transition. It only fires when a ticket moves from another status (like New, Pending, or Solved) into Open.
This matters because you usually want your trigger to fire when something happens (a status change), not when something is (a static state).
Triggers fire immediately after the qualifying event happens. There's no delay. If a customer replies to a pending ticket and the status changes to open, your trigger runs within seconds.
The standard ticket lifecycle in Zendesk looks like this: New → Open → Pending → Solved → Closed. Tickets start as New when created, become Open when assigned to an agent, move to Pending when waiting for customer input, get marked Solved when resolved, and finally Close (usually automatically after a set period).
One more thing: if your account has custom ticket statuses activated (available on Growth plans and above), you'll work with "Status category" conditions instead of just "Status." The standard statuses become categories that can contain multiple custom statuses.
Step-by-step: Creating a status changed to open trigger
Now let's walk through building your trigger. Follow these steps in order, and you'll have a working automation in minutes.
Step 1: Access the triggers page
Navigate to Admin Center > Objects and rules > Business rules > Triggers. This is your command center for all trigger management.
You'll see a list of existing triggers (Zendesk creates several standard ones for new accounts). Don't delete these unless you know exactly what they do. Many handle basic notifications that keep your help desk functioning.
Step 2: Create a new trigger
Click the Add trigger button. Give your trigger a descriptive name that future you (or your teammates) will understand. Something like:
- "Notify assignee when ticket reopened"
- "Escalate urgent tickets on customer reply"
- "Tag tickets reopened after 7 days"
Avoid vague names like "Trigger 1" or "New trigger." You'll thank yourself later when you have dozens of triggers and need to troubleshoot one.
Step 3: Set the conditions
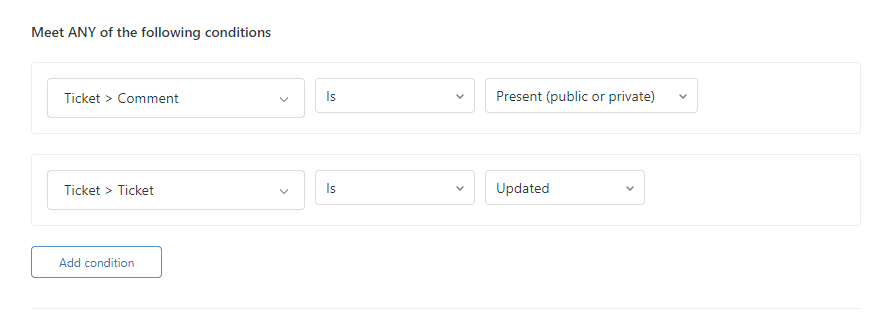
Here's where the magic happens. In the conditions section, add:
Meet ALL of the following conditions:
- Ticket > Status category | Changed to | Open
That's the core condition. But you can add more to make your trigger more specific:
Optional additions:
- Ticket > Comment | Is | Public (to ensure it only fires on customer replies, not internal notes)
- Ticket > Tags | Contains none of the following | [your-tag] (to prevent the trigger from firing twice on the same ticket)
- Ticket > Hours since created | Greater than | 1 (to distinguish new tickets from reopened ones)
The "Status category" vs "Status" distinction matters here. If you have custom statuses enabled, use "Status category" to catch all variations of Open. If you're on a Team plan without custom statuses, you'll see "Status" instead.

Step 4: Configure the actions
Now decide what happens when your conditions are met. Common actions for status-changed-to-open triggers include:
Notify assignee of comment update This sends an email to whoever is assigned to the ticket. It's the most common action for reopened tickets.
Add tags Tags like "reopened" or "customer-replied" help with reporting and can prevent trigger loops.
Set priority If a solved ticket gets reopened, you might want to bump it to High priority automatically.
Update custom fields Track metrics like "number of reopens" or "time to first response after reopen."
Send email to group Notify a specific team (like escalations or tier-2 support) when certain tickets reopen.
You can add multiple actions to a single trigger. Just remember: the more actions, the more complex your troubleshooting if something goes wrong.
Step 5: Test and activate
Before making your trigger live, test it:
- Save the trigger (it activates automatically)
- Create a test ticket or find an existing one
- Change its status to Pending, then have someone (or another account) add a public comment
- Watch the ticket status change to Open
- Verify your trigger fired (check email notifications, tags, or field updates)
If it doesn't work as expected, check the trigger position. Zendesk processes triggers in order from top to bottom. If another trigger is modifying the ticket first, it might prevent yours from firing.
Common use cases for status changed to open triggers
Let's look at real scenarios where this trigger type shines.
Notifying agents of reopened tickets
The classic use case: a customer isn't satisfied with the resolution and replies to a solved ticket. The status changes to open, and you want the original assignee to know immediately.
Conditions:
- Status category | Changed to | Open
- Comment | Is | Public
Actions:
- Email user | (assignee) | Subject: "Ticket reopened by customer"
This prevents tickets from sitting unnoticed in the open queue.
Escalating urgent issues
Some replies need immediate attention. If a ticket contains keywords like "urgent," "escalate," or "manager," you can automatically escalate it when the customer replies.
Conditions:
- Status category | Changed to | Open
- Comment text | Contains at least one of the following | urgent escalate manager
Actions:
- Add tags | urgent-escalation
- Email group | Tier 2 Support
- Set priority | High
Tracking customer replies
Want to distinguish between tickets opened by agents versus reopened by customers? Use comment conditions.
Conditions:
- Status category | Changed to | Open
- Comment | Is | Public
- Current user | Is | (end-user)
Actions:
- Add tags | customer-replied
This tag helps with reporting and can trigger other workflows.
Preventing workflow conflicts
Here's a pro tip: use tags to prevent trigger loops. If your trigger adds a tag when it fires, you can exclude that tag from the conditions to prevent the trigger from running twice on the same ticket.
Conditions:
- Status category | Changed to | Open
- Tags | Contains none of the following | trigger-fired
Actions:
- Add tags | trigger-fired
- (your other actions)
This pattern is essential when you have multiple triggers that might interact.
Troubleshooting common issues
Even with careful setup, triggers sometimes don't behave as expected. Here are the most common problems and how to fix them.
Trigger not firing
If your trigger isn't firing at all, check these in order:
-
Trigger position. Move your trigger near the top of the list. If another trigger deactivates the ticket or changes its status first, yours might never get a chance to run.
-
Condition logic. Double-check that you're using "Changed to" and not just "Is." Also verify you're using "Status category" vs "Status" correctly based on your account settings.
-
Comment requirements. If you included a Comment condition, make sure the update actually includes a comment. API updates or field changes without comments won't satisfy comment conditions.
Conflicts with other triggers
When multiple triggers modify the same ticket, order matters. Zendesk processes triggers sequentially, and each trigger sees the results of the previous ones.
If Trigger A adds a tag that Trigger B looks for, but Trigger B runs first, it won't see the tag. Use the "Up" and "Down" arrows on the Triggers page to reorder them.
API updates causing unexpected opens
This is a tricky one. When third-party tools (like n8n or Make) update tickets via the API, they can trigger status changes unintentionally.
One workaround: add a condition that excludes API updates.
Condition:
- Update via | Is not | Web service (API)
This prevents your trigger from firing on API-based updates while still catching user-initiated changes.
Webhook issues with third-party integrations
If you're using webhooks to integrate Zendesk with other tools, you might encounter issues where webhook IDs change or get deleted. This was reported by users in the n8n community, where webhook instability caused trigger failures.
The solution: monitor your webhooks regularly and consider using API tokens instead of OAuth for more stable authentication.
Status vs. Status category confusion
This trips up almost everyone at some point. Here's the distinction:
- Status (Team plans): The actual status field with values like New, Open, Pending, Solved, Closed
- Status category (Growth+ with custom statuses enabled): Groups of related statuses
If you have custom statuses activated, your standard statuses become categories. Use "Status category" conditions to catch all variations. If you're on a Team plan without custom statuses, use "Status."
When to use eesel AI instead of Zendesk triggers
Zendesk triggers are powerful, but they have limitations. They're rule-based, which means they do exactly what you tell them, nothing more and nothing less. Sometimes you need something smarter.
That's where an AI-powered approach can help. At eesel AI, we approach automation differently. Instead of building rigid trigger logic, you hire an AI teammate that learns your business and makes intelligent decisions.
Here's when you might want to consider eesel AI over (or alongside) Zendesk triggers:
Complex automation requiring AI understanding. Want to escalate tickets based on sentiment, urgency, or customer intent? Our AI reads and understands ticket content, not just field values.
Natural language conditions. Instead of "if tag equals X," you can say things like "if the customer seems frustrated about billing." The AI understands context and nuance.
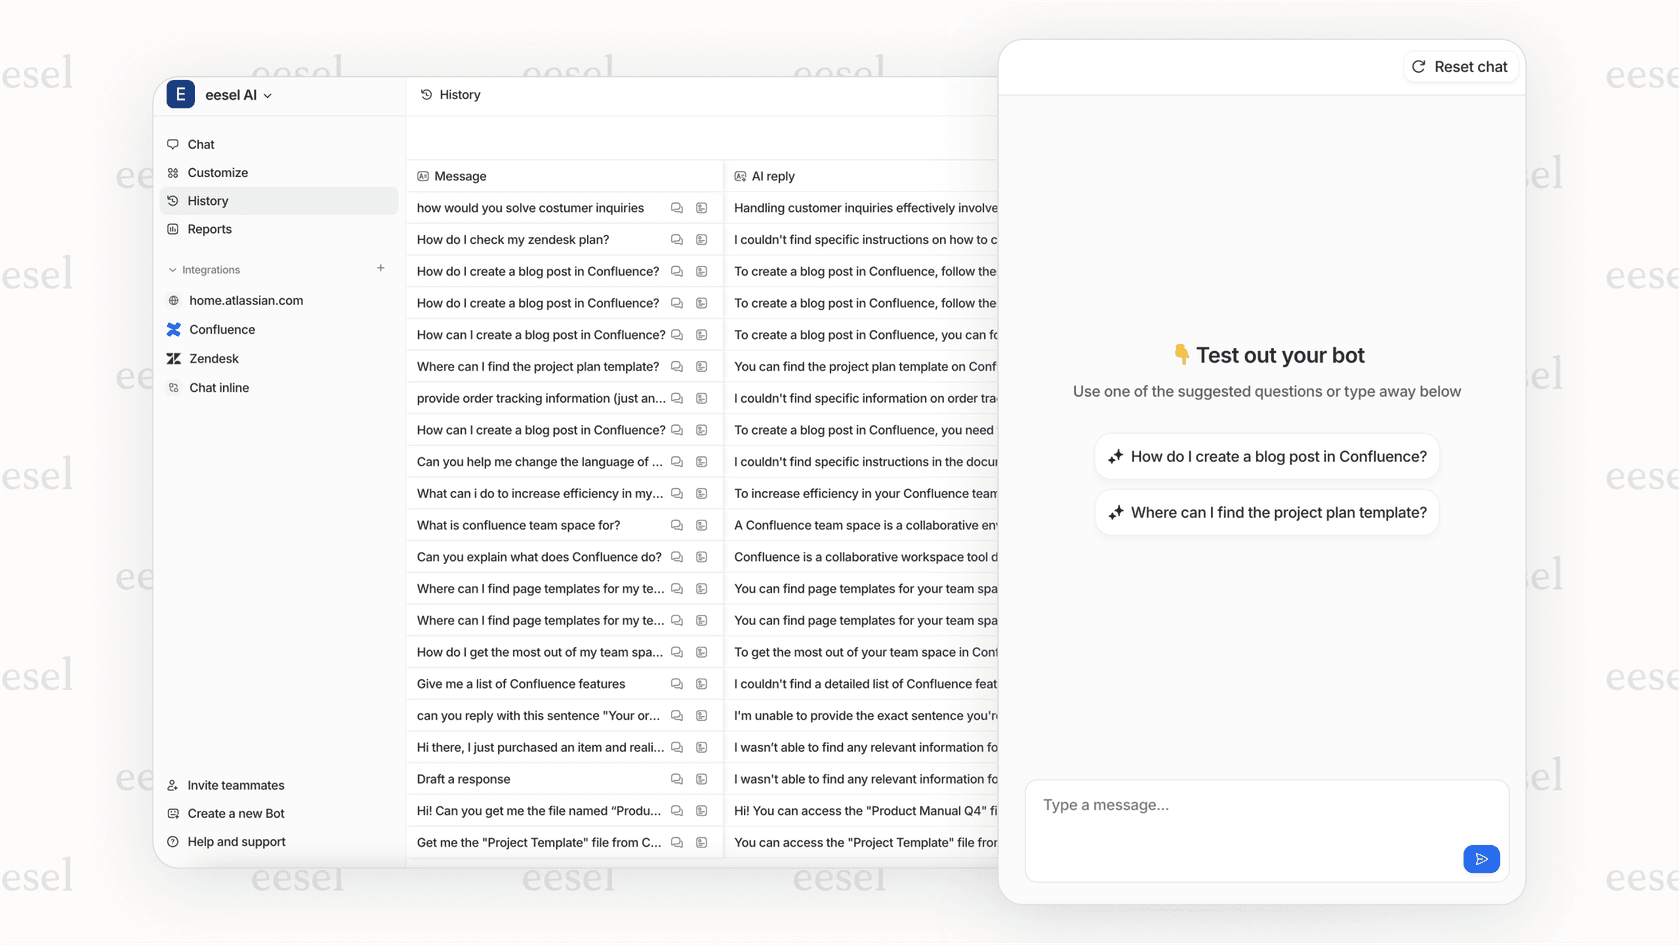
Automatic ticket resolution. While triggers can notify and tag, eesel AI can actually resolve tickets autonomously. It learns from your past tickets and help center to provide accurate responses without manual setup.
Progressive automation. Start with AI drafting replies for agent review. As it proves itself, let it send responses directly. Eventually, it can handle full frontline support. You're in control of the pace.
Easier setup. No complex condition logic or trigger ordering to manage. Connect eesel to your Zendesk, and it learns from your existing data in minutes.
If you're finding Zendesk triggers limiting for your automation needs, our Zendesk integration might be worth exploring.
Start automating your Zendesk workflow today
Creating a Zendesk trigger when status changes to open isn't complicated once you understand the mechanics. The key is using "Status changed to" (not "Status is") and testing thoroughly before relying on the automation.
Remember: start simple. A basic trigger that notifies assignees of reopened tickets provides immediate value. You can always add complexity later as you learn what works for your team.
If you find yourself building increasingly complex trigger chains to handle scenarios that require understanding and judgment, it might be time to explore AI-powered alternatives. eesel AI works alongside Zendesk to handle the nuanced automation that rule-based triggers struggle with.
Ready to take your Zendesk automation further? See how eesel AI can help.
