How to create unassigned ticket views in Zendesk: A complete guide
Stevia Putri
Last edited February 25, 2026
Tickets have a way of disappearing when you need them most. One moment your support queue feels manageable, and the next you're scrambling to find that urgent request from a VIP customer that somehow vanished from everyone's radar.
This is the reality of working with Zendesk ticket views. When a ticket doesn't match the conditions of any view, it becomes invisible to your team. These "lost tickets" can sit unresolved for days or weeks until someone happens to search for them directly.
The good news is that you can prevent this with a few well-configured unassigned ticket views. In this guide, I'll walk you through creating views that catch every ticket, including those that would otherwise slip through the cracks.
What you'll need
Before we start, make sure you've got:
- A Zendesk Support account (Team, Growth, Professional, Enterprise, or Enterprise Plus plans all support custom views)
- Administrator permissions, or a custom agent role with permission to add and edit views
- A basic understanding of how your team organizes tickets (which groups handle what types of requests)
If you're an agent without admin access, you can still create personal views for yourself, but you won't be able to create shared views that the whole team can use.
Step 1: Access the Views management page
Start by navigating to the Views admin page. In Admin Center, click Workspaces in the left sidebar, then select Agent tools > Views.
You'll see a list of all views in your Zendesk instance. By default, this shows active views that are shared with all agents. Take a moment to understand what you're looking at:
- Active views are currently available to agents
- Inactive views are disabled but preserved for later use
- Shared views are available to multiple agents or groups
- Personal views are only visible to the agent who created them
The first 100 shared views appear in the Views list for agents. After that, additional views exist but don't show up in the sidebar (agents can still access them via direct URL). This is why view organization matters, especially as your team grows.

Step 2: Create a basic unassigned tickets view
Now let's create your first unassigned ticket view. Click Create view in the upper right. This creates a new view at the end of the list.
Give your view a clear name like "Unassigned Tickets" or "🆘 Needs Assignment." The emoji helps it stand out in a long list of views. You can also use placeholders like {{zd.all_unsolved_tickets}} if you need the title translated for multilingual teams.
Under Who has access, choose:
- Any agent if you want everyone to see unassigned tickets
- Agents in specific groups if only certain teams should handle unassigned tickets
- Only you if this is a personal monitoring view
Now add your conditions. Click Add condition and set:
- Meet all of the following conditions:
- Status less than Solved
- Assignee is (-)
The "(-)" value means blank or unassigned. This condition captures any ticket that hasn't been assigned to an agent yet.
Click Preview to test your conditions. You should see a list of tickets that match. If the preview is empty, either you don't have any unassigned tickets (great!) or there's an issue with your conditions.
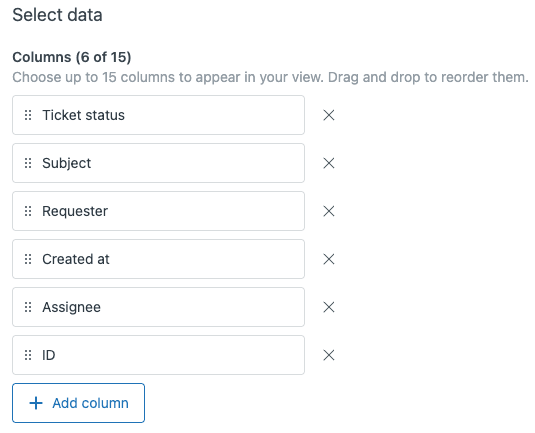
For formatting, I recommend these columns:
- Ticket ID
- Subject
- Requester
- Created (so you can see how long it's been waiting)
- Priority
Under Group by, select Priority. Under Order by, choose Created with Ascending order. This puts the oldest unassigned tickets at the top, so your team tackles them first.
Click Save when you're done.
Step 3: Create a "catch-all" view for lost tickets
Here's where we solve the lost ticket problem. Even with good views, tickets can slip through if they don't match any view's conditions. This happens when:
- A ticket gets created with an unusual combination of fields
- Views use exclusionary conditions that hide certain tickets
- Someone deletes a tag or changes a field that views rely on
To catch these stragglers, create a safety net view. Clone your unassigned tickets view or create a new one called something like "⚠️ Catch-All: Check Me Daily."
Set these conditions:
- Meet all of the following conditions:
- Status less than Solved
- Group is (-)
The Group condition is key here. In Zendesk, every ticket should belong to a group. If a ticket has no group assigned, it likely fell through your routing rules.
This view will show tickets that:
- Are still open (not solved or closed)
- Belong to no group
- May or may not have an assignee
Make this view available to your team leads or system administrators. Check it daily or weekly to catch tickets that need to be routed properly.
Step 4: Configure view formatting and organization
With your core views created, let's make them easy to use. Good formatting helps agents scan tickets quickly and prioritize effectively.
For unassigned ticket views, include these columns:
- Ticket ID for quick reference
- Subject to understand the issue at a glance
- Requester to identify VIP customers or known problem accounts
- Created to see ticket age (critical for SLA tracking)
- Priority so urgent tickets stand out
Under Group by, you have options:
- Priority groups urgent tickets together
- Created organizes by date (useful for FIFO workflows)
- Group shows which team should handle each ticket
Under Order by, I recommend Created with Ascending order for unassigned views. This ensures the oldest tickets get attention first, preventing them from sitting unresolved.
For organization, use Zendesk's view categorization feature. Add double colons to your view names to create folders:
Triage::Unassigned TicketsTriage::⚠️ Catch-AllMy Views::Pending Customer Reply
This creates a folder structure in the Agent Workspace sidebar, making it easier for agents to navigate when you have dozens of views.

Step 5: Set up automation for unassigned tickets
Views help you see unassigned tickets, but triggers can prevent them from piling up in the first place. Here are three automations to consider:
Auto-assign new tickets based on channel or form: Create a trigger that assigns tickets to specific groups based on how they came in. For example, tickets submitted through your sales form go to the Sales group, while technical issues go to Support.
Escalate tickets unassigned too long: Create a trigger that fires when a ticket has been unassigned for more than a few hours. It can add a tag, change priority to High, or notify a manager.
Set SLA policies for unassigned tickets: Even before assignment, tickets should have response time targets. Create an SLA policy that applies to all new tickets, then another for assigned tickets.
For teams ready to go further, consider the Round Robin app from the Zendesk Marketplace. It automatically assigns tickets to available agents in rotation, ensuring even distribution of work.
If you're looking for something more intelligent than round-robin assignment, eesel AI understands ticket content and routes based on context, sentiment, and topic, not just availability.

Best practices and common mistakes
After setting up hundreds of Zendesk instances, I've seen patterns in what works and what doesn't. Here are the key do's and don'ts:
Do:
- Keep view conditions simple and inclusive
- Use tags for routing instead of complex text matching
- Audit your catch-all view weekly
- Name views consistently so agents know what to expect
- Document your view strategy for new team members
Don't:
- Use "NOT" statements or exclusionary conditions (they hide tickets)
- Check for null values across multiple text fields (slows performance)
- Create overlapping views that show the same tickets (causes confusion)
- Let views accumulate without pruning inactive ones
- Forget that views don't include archived tickets
Zendesk recommends avoiding broadly exclusionary conditions because they can cause tickets to disappear from views unexpectedly. Stick to positive conditions that look for what you want to include, not what you want to exclude.
Taking ticket management further with AI
Views are powerful, but they have limitations. They're based on static rules: if X condition is met, show the ticket. They don't understand context, urgency, or customer sentiment.
This is where AI helps. Instead of manually monitoring views and deciding which agent gets which ticket, AI can:
- Read ticket content and understand the topic
- Detect urgency and customer frustration
- Route tickets to the best-suited agent based on skills and workload
- Update ticket fields automatically
- Escalate issues before they become problems
At eesel AI, we approach this as hiring an AI teammate rather than configuring another tool. You connect eesel to your Zendesk instance, and the AI learns from your past tickets, help center articles, and team responses. Within minutes, it understands your business well enough to start routing and responding to tickets.
The difference is context. A view can show you all tickets tagged "billing." An AI agent can recognize that a ticket about "my card was charged twice" is urgent, route it to your billing specialist, and draft a response referencing your refund policy.
If your team is drowning in unassigned tickets and manual triage, it might be time to move beyond views to intelligent automation.
Start managing your unassigned tickets effectively
Lost tickets don't have to be an inevitable part of working in Zendesk. With the right views in place, you can ensure every ticket gets visibility:
- Create an unassigned tickets view with Status less than Solved and Assignee is (-)
- Build a catch-all view using Group is (-) to find tickets that slipped through
- Format your views with the right columns and grouping for quick scanning
- Set up triggers to auto-assign or escalate before tickets pile up
- Audit your catch-all view regularly to catch routing issues
Start with the catch-all view today. Even if you think your current setup is solid, you'd be surprised what might be hiding in the gaps. For more on view management, check out Zendesk's official documentation on creating views.
And if you're ready to stop managing views and start resolving tickets automatically, try eesel AI. It integrates directly with Zendesk and can start learning your business in minutes, not months.
