Managing a high-volume support queue can feel like spinning plates. Your agents need to know which plate is about to wobble, but everything seems to be a priority at once. This is where Zendesk ticket views come in.
Views are saved filters that organize tickets into lists based on specific criteria. Instead of staring at one endless queue, agents can focus on exactly what needs their attention. Whether it's tickets assigned to them, urgent issues, or pending customer replies, views help teams work smarter.
In this guide, we'll walk through how to access your default "my tickets" views, create custom ones tailored to your workflow, and even enhance your setup with AI-powered triage.

Step 1: Access Your Default "My Tickets" Views
Zendesk comes with several pre-built views that help agents get started immediately. Here's how to find them.
Navigate to the Views section in your Zendesk Agent Workspace. You can also find detailed information about accessing your views in Zendesk's documentation. You'll see a sidebar icon that looks like a list (Views icon). Click it to expand your available views.
The most important default view for agents is "Your unsolved tickets." This view automatically uses the (current user) condition, which means it dynamically shows only tickets assigned to whoever is currently logged in. No manual filtering needed.
Other useful default views include:
- Unassigned tickets New tickets waiting to be claimed
- Pending tickets Tickets waiting for customer replies
- Recently solved tickets Tickets you closed in the last 24 hours
These views give you a starting point, but most teams eventually need something more tailored.
Step 2: Create a Custom "My Tickets" View
Ready to build your own view? Let's create one that shows only your urgent and high-priority unsolved tickets.
First, navigate to Admin Center > Workspaces > Agent tools > Views. Only admins and agents with specific permissions can access this area.
Click "Create view" to start building. Here's what to configure:
Title: Give it a descriptive name like "My Urgent Tickets" or use emojis to make it stand out (like 🔥 My Hot Tickets).
Who has access: Select "Only you" to make this a personal view, or choose "Any agent" or specific groups if you're an admin creating a shared view.
Conditions: Set your conditions to meet All of the following:
- Status is less than Solved
- Assignee is (current user)
- Priority is High or Urgent
The (current user) option is key here. It automatically adjusts to show tickets for whoever is viewing the list. This means you'll create one view that works for every agent on your team.
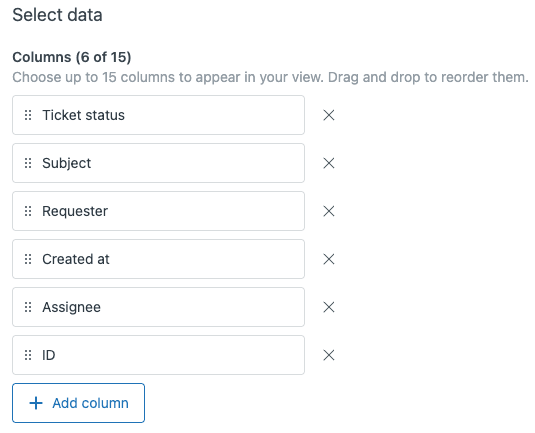
Formatting options:
- Drag columns into your preferred order (add up to 15)
- Group by Request date or Priority
- Order by Due date or Hours since created

Click Save and your new view appears in the sidebar. Test it by opening a few tickets and watching them appear (or disappear) based on your conditions. If something doesn't look right, check that your conditions aren't too restrictive.
Step 3: Build Advanced "My Tickets" Views
Once you've mastered the basics, you can create more sophisticated views for specific workflows.
Priority-based views: Create separate views for each priority level so you can tackle urgent issues first, then work through normal and low-priority tickets.
Time-based views: Use the "Hours since" conditions to catch tickets approaching SLA breaches. For example:
- Hours since pending is greater than 24 (for follow-ups)
- Hours until next SLA breach is less than 2 (for urgent attention)
Channel-specific views: Filter by ticket channel to see only your chat tickets, email tickets, or social media requests. This helps if you're specializing in certain channels.
Organizing with folders: If you create many views, use the :: syntax in titles to categorize them. For example:
- "Urgent:: My Hot Tickets"
- "Urgent:: SLA Breach Risk"
- "Follow-up:: Pending 24h+"
These advanced views help you build a workflow that matches how you actually think. Some agents prefer to work through priority levels. Others like to batch similar ticket types. Views let you organize your work your way.
Step 4: Manage and Optimize Your Views
Views aren't set-and-forget. As your team evolves, you'll need to maintain them.
Editing existing views: Go back to Admin Center > Views, hover over any view, and click the options menu to edit. You'll adjust conditions, formatting, or availability anytime.
Cloning views: Need a similar view with slight tweaks? Use the Clone option instead of starting from scratch. This is perfect for creating team-specific versions of a standard view.
Deactivating vs. deleting: Deactivate views you don't currently need (they'll disappear from the sidebar but stay in your account). Delete only views you're sure you won't need again.
Sharing views: Admins can convert personal views to shared views, or limit shared views to specific agent groups. This works well for specialized teams like billing or technical support.

Best practices for view organization:
| Practice | Why it matters |
|---|---|
| Limit personal views to your most essential 8-10 | Only the first 10 appear in the sidebar |
| Use clear, consistent naming conventions | Makes views easier to find and understand |
| Review views quarterly | Removes outdated ones that clutter the list |
| Document shared views | Helps new agents understand their purpose |
Common Mistakes and Troubleshooting
Even experienced admins run into view issues. Here's how to fix the most common problems.
View not showing expected tickets: Double-check your conditions. The most common mistake is using "is" when you mean "is not," or forgetting that views exclude archived tickets automatically.
Performance issues: Views that check multiple text fields or use exclusionary "NOT" conditions run slowly. Stick to checking tags, status, and assignee for best performance.
Hitting view limits: Remember that only your first 10 personal views and 100 shared views appear in the sidebar. If you have more, agents need to click "More views" to see the rest.
Archived tickets missing: Views never include archived tickets (typically tickets closed for 120+ days). If you need to find old tickets, use search instead.
Conflicting conditions: If your view returns zero tickets unexpectedly, check for conflicting conditions. For example, "Status is New" AND "Assignee is (current user)" won't work because new tickets are unassigned by definition.
Enhance Your Views with AI-Powered Triage
Views are powerful, but they're still rule-based. They can only filter by the conditions you explicitly define. What if tickets could organize themselves based on their actual content?
This is where eesel AI comes in. Our AI triage integrates directly with Zendesk to automatically tag, route, and prioritize tickets based on what customers actually write.

Here's how it works:
Automatic tagging: Instead of manually tagging every ticket, eesel AI reads the content and applies relevant tags (billing, technical issue, feature request, etc.). Your views stay organized without manual work.
Intelligent routing: The AI analyzes ticket content and sentiment, then routes to the right team or agent. Urgent issues get flagged immediately. Complex problems go to your senior agents. Simple requests get automated replies.
Sentiment detection: When a customer is frustrated, eesel AI detects it and can bump the priority or assign to a specialized agent. Frustrated customers won't slip through the cracks.
Spam cleanup: The AI automatically identifies spam, "thank you" messages, and auto-replies, closing them so they don't clutter your views.
Setting up eesel AI takes minutes, not months. Connect your Zendesk account, and the AI learns from your past tickets, help center articles, and macros. You define the behavior in plain English ("If the refund request is over 30 days, politely decline and offer store credit"), and the AI follows your instructions.
Teams using eesel AI see up to 81% of conversations resolved autonomously, with a typical payback period of just two months.
Start Organizing Your Support Queue Today
You now have everything you need to master Zendesk ticket views. Let's recap:
- Access your default "Your unsolved tickets" view for immediate visibility
- Create custom personal views using the
(current user)condition - Build advanced views for priority, time-based, and channel-specific workflows
- Organize views with folders and maintain them regularly
- Troubleshoot common issues like missing tickets and performance problems
Start simple. Create one custom view for your most important tickets and use it for a week. Once that feels natural, add more views to match your workflow. You'll find the right balance through practice.
And if you're ready to take the next step, try eesel AI to add intelligent triage to your Zendesk setup. Let the AI handle the routine sorting so you can focus on what matters: solving customer problems.
