How to set up Zendesk notification routing for messaging
Stevia Putri
Last edited February 19, 2026
When a customer sends a message through your website widget or mobile app, the clock starts ticking. How quickly your agents get notified, and which agents get notified, determines whether that customer gets a fast response or ends up waiting in a queue. Setting up Zendesk notification routing for messaging correctly is one of the most overlooked parts of a Zendesk setup.
The challenge is that Zendesk actually has two different routing systems: the legacy Chat routing (configured in the Chat Dashboard) and the newer omnichannel routing (configured in Admin Center). If you enable omnichannel routing, it overrides your Chat routing settings entirely. This guide walks you through both systems so you can configure the right one for your situation.
For teams looking to go beyond basic routing, tools like eesel AI can handle ticket triage and responses automatically before they ever need to reach an agent, reducing the routing burden altogether.
Understanding Zendesk's notification routing systems
Before configuring anything, you'll need to understand which system applies to your account. Zendesk provides two distinct approaches to notification routing for messaging:
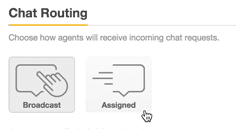
Chat routing is the original system. You configure it in the Chat Dashboard under Settings > Routing. It offers two basic modes: Broadcast (all agents see all requests) and Assigned (requests are distributed one at a time to available agents). This system works well for smaller teams with straightforward needs.
Omnichannel routing is the more sophisticated option. You configure it in Admin Center under Objects and rules > Omnichannel routing. It considers agent status, capacity, skills, and ticket priority when making routing decisions. On Professional and Enterprise plans, you also get custom queues and skills-based routing.
The critical point: if you turn on omnichannel routing, it completely overrides any Chat routing settings you've configured. This catches many teams off guard when they enable omnichannel and suddenly their Chat settings stop working.
When to use Chat routing
Chat routing makes sense when you have a smaller team where basic distribution is sufficient. If you just need to choose between "everyone sees everything" (Broadcast) or "distribute evenly" (Assigned), the Chat Dashboard gives you what you need without the complexity of omnichannel.
You should use Chat routing if:
- Your team's on a Team plan without complex requirements
- You want simple Broadcast or Assigned mode without capacity rules
- You don't need skills-based routing or custom queues
When to use omnichannel routing
Omnichannel routing is the better choice when you need more control over how work gets distributed. It handles email, calls, and messaging through a single routing engine, considers agent capacity before assigning work, and offers features like focus mode (so agents only receive work from one real-time channel at a time).
You should use omnichannel routing if:
- You need capacity rules to prevent agent overload
- You want skills-based routing (Professional and Enterprise plans)
- You're managing multiple channels and want unified routing logic
- You need custom queues to route specific ticket types to specific groups
Setting up basic Zendesk notification routing for messaging in Chat Dashboard
If you're not using omnichannel routing, you'll configure messaging notifications through the Chat Dashboard. Before starting, make sure Chat departments are enabled, as notification routing rules won't work without them.
Step 1: Access routing settings
Navigate to your Chat Dashboard and select Settings > Routing. You'll see the Chat Routing section with options for notification method and chat limits.
Step 2: Choose your routing method
You have two options here:
| Method | How it works | Best for |
|---|---|---|
| Broadcast | All agents are notified of all incoming requests. Agents click "Serve Request" to claim a conversation. | Small teams where any agent can handle any request |
| Assigned | The system distributes requests evenly. Only one agent is notified per request at any time. | Larger teams that need fair distribution |
Broadcast is the default setting. The advantage is simplicity: everyone sees everything and self-selects which conversations to take. The downside is cherry-picking, where agents grab the easy tickets and leave complex ones waiting.
Assigned mode routes requests based on a specific logic:
- First, assign to the agent serving the fewest ongoing conversations
- If there's a tie, assign to the agent with no missed assignments in the last 15 minutes
- If still tied, assign to the agent with the oldest last assignment timestamp
- If no agents have served requests yet, assign randomly
Note that Broadcast mode cannot be used with omnichannel routing.
Step 3: Configure chat limits
Chat limits cap how many concurrent conversations each agent can handle. This prevents any single agent from getting overwhelmed.

To enable limits:
- Next to Chat limit, select On
- Choose whether to apply limits at the Account level (same limit for everyone) or Agent level (individual limits per agent profile)
- If using Account limits, enter a value in the Maximum chats field
An agent's workload is calculated based on active requests. A request is considered "active" if it received a response in the past 10 minutes. Conversations older than that are considered inactive and (by default) don't count toward the limit.
Step 4: Set up reassignment (Assigned mode only)
With Assigned routing, you can configure automatic reassignment if an agent doesn't respond within a set time. This prevents conversations from getting stuck when an agent steps away.

To enable reassignment:
- Next to Reassignment, select On
- Enter a reassignment timeout in seconds (for example, 15 seconds)
- Click Save Changes
If you enable reassignment, you can also enable Automatic Idle. This sets an agent's status to Away or Invisible after a specified number of reassignments, which keeps non-responsive agents from blocking the queue.
Configuring omnichannel routing for messaging
Omnichannel routing provides more sophisticated control over how messaging conversations reach your agents. It works across email, calls, and messaging from a single configuration.
Step 1: Turn on omnichannel routing
Navigate to Admin Center, then click Objects and rules in the sidebar. Select Omnichannel routing > Routing configuration.
Click "Turn on omnichannel routing" to enable it. Remember: this will override any Chat routing settings you have configured.
Omnichannel routing works out of the box once enabled. It can start routing calls and messaging conversations immediately, and email tickets as soon as the auto-routing tag is added or custom queues are created.
Step 2: Configure global routing options
With omnichannel routing enabled, you can configure how tickets are sorted and assigned across all channels.
Key global settings include:
| Setting | Options | What it does |
|---|---|---|
| Ticket sorting | Date created, Priority, SLA breach | Determines queue order |
| Assignment method | Highest spare capacity, Round robin | How work is distributed |
| Skills-based routing | On/Off (Professional+) | Routes to agents with matching skills |
| Focus mode | On/Off | Limits agents to one real-time channel at a time |
The assignment method matters more than you might think. "Highest spare capacity" assigns work to whoever has the most room to take it. "Round robin" distributes work based on time since last assignment, which feels more fair but may not optimize for efficiency.
Step 3: Configure messaging-specific settings
Within your routing configuration, you'll find settings specific to messaging conversations.
Key messaging settings:
- Wait until agent accepts vs. Auto-accept: With "Wait until agent accepts," agents must click to accept each conversation. With auto-accept, conversations are automatically assigned without requiring a click.
- Reassignment timing (Professional and Enterprise): If an agent doesn't accept within X seconds, the conversation reassigns to the next agent. Default is 30 seconds.
- Inactive conversation capacity: Choose whether inactive conversations count toward agent capacity.
Auto-accept can reduce First Reply Time significantly. According to Zendesk, waiting for agents to click Accept represents around 40% of overall FRT numbers. Auto-accept also achieves near 100% acceptance rate since agents can't choose to ignore incoming work.
Step 4: Set up capacity rules
Capacity rules control how much work gets assigned to each agent. Navigate to Admin Center > Objects and rules > Omnichannel routing > Capacity rules.

When creating a capacity rule, you set:
| Channel | Maximum | Notes |
|---|---|---|
| Up to 500 | Open email tickets assigned at one time | |
| Messaging | Up to 500 | Separate limits for messaging conversations and live chats |
| Talk | 0 or 1 | 0 means the agent cannot receive calls |
The messaging capacity applies to both messaging conversations and live chats separately. If you set a capacity of 3, an agent could have up to 3 messaging conversations AND 3 live chats simultaneously.
You can also configure whether inactive conversations count toward capacity. By default, they don't. This means agents can have any number of inactive conversations in addition to their active capacity. When an inactive conversation becomes active again, agents may temporarily exceed capacity until they close some tickets.
Step 5: Create custom queues (Professional and above)
Custom queues let you route specific ticket types to specific groups of agents. This is useful when you have specialized teams handling different product lines or customer segments.
To create a custom queue:
- Navigate to Admin Center > Objects and rules > Omnichannel routing > Queues
- Click Add queue
- Define conditions that match the tickets you want in this queue (for example, tickets from a specific organization or with a specific tag)
- Set primary and secondary (fallback) groups
Tickets that don't match any custom queue fall back to the standard omnichannel routing queue.
Best practices for Zendesk notification routing for messaging
Getting the configuration right is just the start. Here are recommendations based on common patterns teams follow.
Start with conservative settings
Don't enable auto-accept on day one. Start with "Wait until agent accepts" so you can monitor how agents handle the queue. Watch queue times and acceptance rates before automating further.
Similarly, start with moderate capacity limits (3 to 5 concurrent conversations is typical) and adjust based on how your team performs. It's easier to increase limits than to deal with overwhelmed agents.
Balance workload fairly
Assigned mode or omnichannel routing with capacity rules helps ensure work gets distributed evenly. Without these, you often see a few agents handling most of the volume while others coast.
Enable reassignment to prevent conversations from getting stuck with non-responsive agents. A 30 to 60 second timeout is usually reasonable (enough time for an agent to acknowledge but not so long that customers wait unnecessarily).
Handle inactive conversations thoughtfully
By default, inactive conversations (no customer response in 10 minutes) don't count toward capacity. This makes sense in most cases, but consider your workflow:
- If agents need to follow up on inactive conversations, counting them may make sense
- If inactive conversations often become active again quickly, excluding them prevents capacity spikes
- You can configure capacity release settings to automatically release capacity and send customer reminders
Monitor and adjust
Use Chat Analytics to track:
- Acceptance rates (if not using auto-accept)
- Queue times for messaging conversations
- Agent utilization across channels
If you see consistently long queue times, you may need more agents, higher capacity limits, or better routing to available agents. If agents are overwhelmed, lower capacity limits or add focus mode to reduce context-switching.
Troubleshooting common Zendesk notification routing for messaging issues
Even with correct configuration, routing issues come up. Here are the most common problems and how to resolve them.
Agents not receiving notifications
If agents aren't getting notified about incoming messaging conversations, check these common causes:
- Chat departments not enabled: Notification routing rules require Chat departments to be enabled. Verify this in your Chat settings.
- Agent status: Agents must be Online to receive notifications. Check their status in Agent Workspace.
- Capacity limits reached: If an agent's at capacity, they won't receive new notifications until they close some conversations.
Routing not working after enabling omnichannel
Remember that omnichannel routing overrides Chat routing settings completely. If you enabled omnichannel but expected your Chat settings to still work, you'll need to reconfigure everything in Admin Center instead.
Check your routing configuration in Admin Center > Objects and rules > Omnichannel routing. Verify that your capacity rules, queues, and routing settings are configured correctly there.
Messages creating tickets instead of routing to queue
This typically happens when no agents are online during the request. The system creates a ticket, but without available agents, it can't route to anyone.
Consider configuring:
- Offline behavior settings for messaging
- Business hours when agents should be available
- Auto-reply messages for off-hours
Transferred chats going to bottom of queue
This is expected behavior with standard routing. Transferred tickets go to the back of the queue by default. If you need transferred tickets to have priority, you can use triggers to adjust priority on transfer, though this requires careful configuration to avoid unintended side effects.
Simplify your support routing with eesel AI
Routing notifications is just one part of managing your Zendesk messaging workflow. The real challenge is handling the volume of tickets that reach your agents in the first place.
eesel AI works alongside your Zendesk routing setup to reduce ticket volume before it reaches your queue. Our AI Agent can handle frontline support tickets autonomously, resolving common questions without any agent involvement. For tickets that do need human attention, AI Triage automatically tags, routes, and prioritizes tickets based on content, ensuring they reach the right team immediately.

This means your notification routing handles a smaller, more manageable volume of tickets, and the tickets that do reach agents are properly categorized and prioritized before they arrive.
We integrate directly with Zendesk, learning from your existing tickets, help center, and macros in minutes. You can start with AI Copilot (drafting responses for agents to review) and progress to autonomous resolution as confidence builds. Mature deployments achieve up to 81% autonomous resolution, with a typical payback period under 2 months.
If you're spending significant time configuring routing rules to manage volume, there may be a simpler solution. Try eesel AI free to see how it works with your Zendesk setup.
Frequently Asked Questions
Share this article

Article by
Stevia Putri
Stevia Putri is a marketing generalist at eesel AI, where she helps turn powerful AI tools into stories that resonate. She’s driven by curiosity, clarity, and the human side of technology.


