When a customer emails to cancel their support request, what happens to that ticket? For many teams, it sits in "solved" status for days, cluttering views and skewing metrics. The solution is automation that closes cancelled requests properly, but Zendesk's default setup doesn't make this obvious.
Here's the short version: you have two options. You can use Zendesk automations (time-based rules that run hourly) or triggers (immediate actions). Automations are easier to set up but have a delay. Triggers work instantly but require a workaround since Zendesk doesn't allow manual closing. This guide covers both approaches, plus automation recipes for common scenarios and an AI-powered alternative that understands cancellation intent.

Understanding Zendesk ticket statuses
Before configuring any automation, you need to understand how Zendesk handles ticket statuses. The platform uses a specific lifecycle: New, Open, Pending, Solved, and Closed. Each status serves a distinct purpose in your workflow.

Solved vs Closed: The critical difference
This distinction trips up even experienced Zendesk admins. When an agent marks a ticket as solved, the customer can reopen it simply by replying. The ticket jumps back to "open" and lands in your queue again. This is useful for legitimate follow-ups, but problematic for cancelled requests.
When a ticket is closed, it becomes read-only. The customer cannot reopen it. If they reply, Zendesk creates a new follow-up ticket instead. This is exactly what you want for cancelled requests, you don't want a "never mind" email from three days ago suddenly reopening a ticket you considered done.
Why cancelled requests should be closed, not just solved
Cancelled requests are different from resolved issues. When a customer says "actually, please cancel this," they're not looking for a solution. They're explicitly withdrawing the request. Leaving these in "solved" status:
- Inflates your solved ticket metrics with requests that were never actually addressed
- Allows customers to accidentally reopen old cancellations with follow-up emails
- Creates confusion when reporting on actual resolution rates
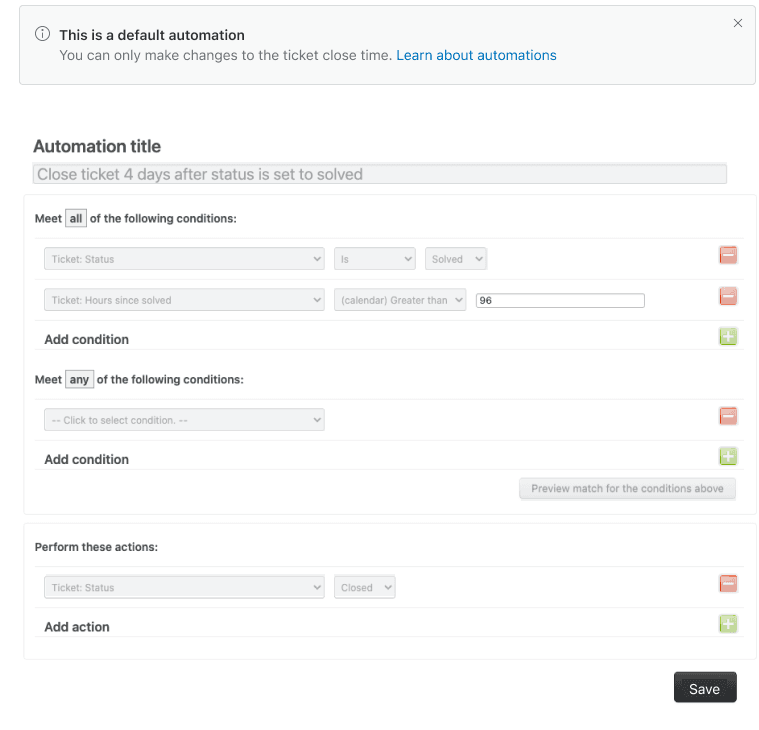
Default Zendesk behavior: 4-day auto-close
Out of the box, Zendesk includes an automation called "Close ticket 4 days after status is set to solved." This automation runs once per hour and changes solved tickets to closed after a 4-day grace period. You can edit the timeframe (anywhere from 1 hour to 28 days), but you cannot disable this automation entirely, it's required for system performance.
The problem? This applies to ALL solved tickets, not just cancelled ones. If you want cancelled requests closed faster, or if you want different handling for cancellations versus actual resolutions, you need custom automation.
Method 1: Using Zendesk automations for cancelled requests
Automations in Zendesk are time-based business rules. They run once per hour on all non-closed tickets and check if their conditions are met. If so, they perform the specified actions. This makes them perfect for "close after X time" scenarios.
Step 1: Navigate to Admin Center
Go to Admin Center > Objects and rules > Business rules > Automations. You'll see a list of existing automations, including the default "Close ticket 4 days after status is set to solved" automation.
Step 2: Create a new automation for cancelled requests
Click Add automation. Give it a clear name like "Close cancelled requests after 1 hour." The name should describe both what it does and when it does it.
Step 3: Set the conditions
Under "Meet ALL of the following conditions," add:
- Ticket > Status | Is | Solved
- Ticket > Tags | Contains at least one of the following |
cancelled - Ticket > Hours since solved | Is | 1
The "Hours since solved is" condition is important. Without a time-based condition, the automation would fire immediately and repeatedly. The "is" operator means this condition is only true once, at exactly the 1-hour mark, preventing infinite loops.
Step 4: Set the actions
Under "Perform these actions," add:
- Ticket > Status | Closed
- Ticket > Remove tags |
cancelled
Removing the tag is critical. Without this step, the automation would continue to match the ticket (since it still has the "cancelled" tag) and would try to fire again on the next hourly run. Zendesk prevents this from creating an infinite loop, but it's cleaner to remove the tag.
Click Create automation to save.
Automation limitations to understand
Automations only run once per hour, and they process in batches. This means:
- A ticket marked solved at 10:15 AM won't be closed until the automation runs (sometime between 11:00-11:59 AM)
- If you have many tickets, the automation may take time to work through them all
- You cannot force an automation to run immediately
For teams that need instant closure, triggers are the better option.
Method 2: Using triggers for immediate closure
Triggers in Zendesk fire immediately when a ticket is created or updated. They don't wait for the hourly batch. This makes them ideal for scenarios where you want instant action.
However, there's a catch: Zendesk doesn't allow agents to manually set tickets to "closed" status. Closed is a system status only. The workaround is using a trigger to automatically close tickets when a specific tag is applied.
Step 1: Create a trigger for force-close
Go to Admin Center > Objects and rules > Business rules > Triggers. Click Add trigger. Name it something like "Force close tagged tickets."
Step 2: Configure trigger conditions
Under "Meet ALL of the following conditions," add:
- Ticket > Status category | Less than | Closed
- Ticket > Tags | Contains at least one of the following |
closenow
The "Less than Closed" condition ensures the trigger only fires on tickets that aren't already closed. This prevents errors.
Step 3: Configure trigger actions
Under "Perform these actions," add:
- Ticket > Remove tags |
closenow - Ticket > Status category | Closed
The order matters here. Remove the tag first, then change the status. This prevents potential issues with follow-up tickets being automatically closed upon creation.
Click Create trigger to save.
Step 4: Create a macro for agents
Now agents need a way to apply the closenow tag easily. Create a macro:
- Go to Admin Center > Workspaces > Agent tools > Macros
- Click Add macro
- Name it "Close ticket immediately"
- Under Actions, add Add tags |
closenow - Click Create macro
When an agent applies this macro to a ticket, the trigger fires instantly and closes the ticket. The agent sees the status change immediately.
When to use triggers vs automations
| Use case | Best option | Why |
|---|---|---|
| Close cancelled requests immediately | Trigger | Instant action when agent applies macro |
| Close all solved tickets after grace period | Automation | Systematic, time-based process |
| Close tickets customer cancelled via email | Trigger | Detect keyword, add tag, trigger closes |
| Bulk close old tickets | Automation | Processes many tickets efficiently |
Automation recipes for common cancellation scenarios
Here are four ready-to-use automation setups for specific cancellation workflows.
Recipe 1: Auto-close when customer cancels via email
This setup detects cancellation keywords in customer emails and handles the entire workflow automatically.
Trigger: Detect cancellation
- Conditions: Ticket > Comment text | Contains the following string |
cancel - Actions: Add tags
cancelled| Set status to Solved
Automation: Close after brief delay
- Conditions: Status is Solved, Tags contains
cancelled, Hours since solved is 1 - Actions: Set status to Closed, Remove tag
cancelled
The trigger catches the cancellation and solves the ticket. The automation waits an hour (giving the customer a brief window to change their mind), then closes it.
Recipe 2: Auto-close abandoned tickets
Sometimes customers disappear mid-conversation. These tickets shouldn't sit in "pending" forever.
Automation: Warn after 5 days
- Conditions: Status is Pending, Hours since pending is 120 (5 days)
- Actions: Add tags
pending_warning, Add comment (warning message to customer)
Automation: Solve after 7 days
- Conditions: Status is Pending, Tags contains
pending_warning, Hours since pending is 168 (7 days) - Actions: Set status to Solved, Add comment (notifying customer of closure)
Automation: Close after 8 days
- Conditions: Status is Solved, Tags contains
pending_warning, Hours since solved is 24 - Actions: Set status to Closed, Remove tags
pending_warning
This three-step automation gives customers a warning, then solves, then closes, keeping your queue clean.
Recipe 3: Bulk close old solved tickets
If you have a backlog of solved tickets that never got closed, you can clean them up with a one-time automation.
Automation: Bulk close old tickets
- Conditions: Status is Solved, Hours since solved is 168 (7 days), Tags contains none of the following:
keep_open - Actions: Set status to Closed
Add the keep_open tag to any tickets you want to exclude. Run this automation once, then deactivate it.
Recipe 4: Close with notification
Transparency matters. When you auto-close a ticket, the customer should know why.
Automation: Close with email
- Conditions: Status is Solved, Tags contains
cancelled, Hours since solved is 1 - Actions:
- Set status to Closed
- Remove tag
cancelled - Email user | Subject: "Your request has been closed" | Body: "Hi {{ticket.requester.first_name}}, We're writing to confirm that your support request (#{{ticket.id}}) has been closed per your request. If you need further assistance, please reply to this email or start a new conversation. Thanks, {{ticket.assignee.name}}"
This professional courtesy prevents confusion and gives customers a clear path if they need help later.
Best practices and common pitfalls
Setting up automation is only half the battle. These practices will keep your workflow running smoothly.
Always warn customers before auto-closing
Never close a ticket without giving the customer a heads-up. Even for cancellations, a brief notification prevents the "what happened to my ticket?" follow-up emails. At minimum, include a comment or email action in your automation.
CSAT survey timing
Zendesk typically sends CSAT surveys when tickets close. For cancelled requests, you probably don't want to survey the customer, they cancelled, they don't need to rate the experience.
Add a condition to your CSAT automation: Tags contains none of the following: cancelled. This excludes cancelled tickets from surveys.
Tagging strategy
Be consistent with your tags. Use cancelled across all your cancellation workflows. If different teams use canceled, cancel, and cancelled, your automations will miss tickets.
Document your tag conventions in an internal wiki or shared doc. Review them quarterly to catch drift.
Common mistakes to avoid
- Closing too quickly: Give customers at least a few hours between solve and close. Immediate closure prevents them from reopening if they change their mind.
- Not removing tags: Always remove trigger tags after the action fires. Lingering tags cause confusion and can interfere with other automations.
- Automation order issues: Zendesk processes automations from top to bottom. If you have multiple automations that could match the same ticket, order matters. Put more specific automations above general ones.
Monitoring your automations
Check your automation logs regularly. Go to Admin Center > Objects and rules > Business rules > Automations, then click an automation to see how many tickets it processed recently. Sudden drops or spikes indicate problems.
Alternative: AI-powered cancellation handling with eesel AI
Rule-based automation works, but it has limits. It can't understand context. It treats "please cancel my request" and "don't cancel my subscription" the same way if they both contain "cancel." It can't tell the difference between a genuine cancellation and a customer asking "can I cancel my appointment?"
This is where eesel AI comes in. Instead of keyword matching, eesel AI uses natural language understanding to detect actual cancellation intent.

How eesel AI handles cancellations differently
When connected to your Zendesk account, eesel AI reads incoming messages and understands:
- "Actually, never mind" means the customer is withdrawing the request
- "Please cancel this order" is a cancellation
- "Can I cancel and reschedule?" is not a cancellation, it's a modification request
- "Don't cancel my subscription" is explicitly NOT a cancellation
The AI makes this distinction automatically and handles each scenario appropriately.
Benefits over native Zendesk automation
| Capability | Zendesk automation | eesel AI |
|---|---|---|
| Detects cancellation intent | Keyword matching only | Natural language understanding |
| Handles ambiguous phrasing | No | Yes |
| Differentiates cancellation types | No | Yes (order vs request vs subscription) |
| Auto-responds to cancellations | Requires separate trigger | Built-in confirmation messages |
| Learns from corrections | No | Yes |
Integration with Zendesk
Setting up eesel AI with Zendesk takes about five minutes:
- Connect via OAuth (no API tokens to manage)
- eesel AI learns from your past tickets automatically
- Configure cancellation handling in plain English: "When a customer cancels a request, solve and close the ticket after 1 hour"
- Test with historical tickets before going live
We offer a 7-day free trial with no credit card required. Our pricing starts at $299/month for the Team plan, which includes up to 3 bots and 1,000 AI interactions monthly.

When to consider AI over rule-based automation
Consider eesel AI if:
- Your customers use varied language to cancel ("never mind," "please disregard," "cancel that")
- You frequently see false positives from keyword matching
- You want intelligent responses, not just status changes
- Your team spends time correcting automation mistakes
For simple, consistent cancellation phrases, native Zendesk automation works fine. For complex, varied customer communication, AI handles the nuance better.
Setting up your first cancellation automation today
Ready to clean up your cancelled requests? Here's your quick-start checklist:
- Choose your method: Use triggers for immediate closure, automations for time-based closure
- Pick your tag: Use
cancelledorclosenowconsistently - Create the rule: Follow the steps in Method 1 or 2 above
- Test first: Apply the tag to a test ticket and verify the behavior
- Train your team: Show agents how to use the macro (if using triggers)
- Monitor for a week: Check that tickets are closing as expected
Recommended starting configuration
If you're not sure where to start, use this setup:
- Trigger: Detect "cancel" in comment text, add
cancelledtag, set status to Solved - Automation: Close tickets with
cancelledtag 2 hours after being solved - CSAT exclusion: Don't survey tickets with
cancelledtag
This gives customers a brief window to change their mind while keeping your queue clean.
Resources for further learning
- Zendesk's automation documentation
- Our guide to Zendesk messaging conversation closure
- eesel AI's Zendesk integration
Cancellation automation is a small change that makes a big difference. Your metrics become more accurate, your queue stays cleaner, and your team spends less time managing tickets that were never going anywhere. Start with a simple trigger or automation today, then iterate based on what you learn.
If you want to explore intelligent automation that understands what your customers actually mean, try eesel AI. We handle the nuance so you don't have to.
