Managing support tickets programmatically is essential for teams looking to automate workflows, integrate with other systems, or build custom tools. The Zendesk Ticketing API gives you full control over ticket updates, from simple status changes to complex bulk operations involving custom fields.
This guide walks you through everything you need to know to start updating tickets via the API, with working code examples you can adapt for your own projects.
What you'll need to get started
Before making your first API call, make sure you have the following in place:
- A Zendesk Support account with admin or agent access. You'll need permissions to generate API tokens and view ticket data.
- API token authentication enabled. Token access must be turned on in your Admin Center under Apps and integrations > APIs > API tokens.
- Basic familiarity with REST APIs. You should understand HTTP methods (GET, PUT, POST) and JSON data formats.
- Your preferred tools. This guide includes examples in cURL and Python using the Requests library, but you can use Postman, JavaScript, or any HTTP client.

If you're just getting started with the Zendesk API, you might want to review the API quick start guide first. It covers the basics of making requests and handling responses.
Setting up API authentication
Zendesk uses token-based authentication for API access. Here's how to get set up.
Generating an API token
- Sign in to your Zendesk account as an admin
- Go to Admin Center > Apps and integrations > APIs > API tokens
- Click the plus icon to add a new token
- Give it a descriptive name like "Ticket Update Script"
- Copy the token immediately. Zendesk only shows it once.

Authentication format
Zendesk expects credentials in this format:
{email_address}/token:{api_token}
For example, if your email is admin@company.com and your token is abc123xyz, your authentication string would be:
admin@company.com/token:abc123xyz
Storing credentials securely
Never hardcode your API token in scripts. Instead, use environment variables:
export ZENDESK_SUBDOMAIN="yourcompany"
export ZENDESK_EMAIL="admin@company.com"
export ZENDESK_TOKEN="your_api_token_here"
Then access them in Python:
import os

subdomain = os.getenv('ZENDESK_SUBDOMAIN')
email = os.getenv('ZENDESK_EMAIL')
token = os.getenv('ZENDESK_TOKEN')

auth = (f"{email}/token", token)
Testing your authentication
Make a simple GET request to verify everything works:
curl "https://yourcompany.zendesk.com/api/v2/tickets.json?per_page=1" \
  -u "admin@company.com/token:your_api_token"
If you receive a JSON response with ticket data, you're authenticated and ready to proceed. If you get a 401 error, double-check your token and email address.
Updating a single ticket
The endpoint for updating tickets is straightforward:
PUT /api/v2/tickets/{ticket_id}.json
Basic update with cURL
Here's how to update a ticket's status and add a comment:
curl "https://yourcompany.zendesk.com/api/v2/tickets/12345.json" \
  -X PUT \
  -u "admin@company.com/token:your_api_token" \
  -H "Content-Type: application/json" \
  -d '{
    "ticket": {
      "status": "solved",
      "comment": {
        "body": "This issue has been resolved. The fix is now live.",
        "public": true
      }
    }
  }'
Python implementation
Using the Requests library, the same operation looks like this:
import requests
import os

subdomain = os.getenv('ZENDESK_SUBDOMAIN')
email = os.getenv('ZENDESK_EMAIL')
token = os.getenv('ZENDESK_TOKEN')

url = f"https://{subdomain}.zendesk.com/api/v2/tickets/12345.json"
auth = (f"{email}/token", token)

data = {
    "ticket": {
        "status": "solved",
        "priority": "normal",
        "assignee_id": 987654321,
        "comment": {
            "body": "This issue has been resolved. The fix is now live.",
            "public": True
        }
    }
}

response = requests.put(url, json=data, auth=auth)

if response.status_code == 200:
    print("Ticket updated successfully")
    updated_ticket = response.json()['ticket']
    print(f"New status: {updated_ticket['status']}")
else:
    print(f"Error: {response.status_code}")
    print(response.text)
Common fields you can update
| Field | Type | Description |
|---|---|---|
status | string | new, open, pending, hold, solved, closed |
priority | string | urgent, high, normal, low |
assignee_id | integer | ID of the agent to assign |
group_id | integer | ID of the group to assign |
tags | array | List of tag strings |
subject | string | Ticket subject line |
When updating the comment field, setting "public": true makes it a public reply visible to the requester. Omitting this or setting it to false creates an internal note.
Working with custom fields
Custom fields are common in Zendesk setups for tracking specific data like product categories, customer tiers, or issue types. Updating them via API requires knowing the field ID.
Finding custom field IDs
You can find custom field IDs in two ways:
- Admin Center: Go to Objects and rules > Tickets > Custom fields. The ID appears in the URL when you edit a field.
- API: List all custom fields with
GET /api/v2/ticket_fields.json
Updating custom fields
Custom fields use a specific format in the API. You provide an array of objects with id and value properties:
{
  "ticket": {
    "custom_fields": [
      {"id": 25356371, "value": "enterprise"},
      {"id": 25356372, "value": 42},
      {"id": 25356373, "value": "billing_issue"}
    ]
  }
}
Here's a complete Python example:
import requests
import os

subdomain = os.getenv('ZENDESK_SUBDOMAIN')
email = os.getenv('ZENDESK_EMAIL')
token = os.getenv('ZENDESK_TOKEN')

url = f"https://{subdomain}.zendesk.com/api/v2/tickets/12345.json"
auth = (f"{email}/token", token)

data = {
    "ticket": {
        "custom_fields": [
            {"id": 360012345678, "value": "premium"},      # Dropdown
            {"id": 360012345679, "value": "2026-03-15"},  # Date
            {"id": 360012345680, "value": 1500.00},        # Decimal
            {"id": 360012345681, "value": True}            # Checkbox
        ],
        "comment": {
            "body": "Updated customer tier and renewal date.",
            "public": False
        }
    }
}

response = requests.put(url, json=data, auth=auth)

if response.status_code == 200:
    print("Custom fields updated successfully")
else:
    print(f"Error {response.status_code}: {response.text}")

Common pitfalls with custom fields
- Wrong data type: Sending a string when the field expects a number will return a 422 error
- Invalid option values: Dropdown fields only accept predefined values. Check the field configuration if updates fail.
- Field permissions: Some custom fields are read-only or only editable by certain roles
Bulk updating multiple tickets
When you need to update dozens or hundreds of tickets, individual API calls are inefficient. Zendesk provides bulk update endpoints for this scenario.
The bulk update endpoint
PUT /api/v2/tickets/update_many.json?ids=1,2,3,4,5
You can specify tickets by ID or use a search query:
PUT /api/v2/tickets/update_many.json?query=status:open+priority:high
When to use bulk updates
Bulk updates make sense when you need to:
- Reassign all tickets from a departing agent
- Close resolved tickets older than 30 days
- Update a custom field value across a category of tickets
- Add tags to tickets matching specific criteria
Rate limiting considerations
Zendesk enforces rate limits that vary by plan: Team plans have 200 requests per minute, Growth and Professional plans have 400, and Enterprise plans have 700. Bulk updates count as a single request regardless of how many tickets they affect, making them much more efficient than individual calls.
Best practices for large-scale updates
- Test on a small batch first. Run your update on 5-10 tickets to verify the logic before processing hundreds.
- Use search queries carefully. A poorly constructed query could match thousands of tickets unintentionally.
- Handle pagination. If your search returns many results, process them in batches.
- Log your changes. Keep a record of which tickets were updated and when.
Here's an example that updates all open tickets assigned to a specific agent:
import requests
import os
import time

subdomain = os.getenv('ZENDESK_SUBDOMAIN')
email = os.getenv('ZENDESK_EMAIL')
token = os.getenv('ZENDESK_TOKEN')

auth = (f"{email}/token", token)
base_url = f"https://{subdomain}.zendesk.com/api/v2"

search_url = f"{base_url}/search.json?query=assignee:987654321+status:open"
response = requests.get(search_url, auth=auth)
results = response.json()

ticket_ids = [str(ticket['id']) for ticket in results['results']]

for i in range(0, len(ticket_ids), 100):
    batch = ticket_ids[i:i+100]
    ids_param = ','.join(batch)

    update_url = f"{base_url}/tickets/update_many.json?ids={ids_param}"
    data = {
        "ticket": {
            "assignee_id": 123456789,  # New assignee
            "comment": {
                "body": "Reassigned to new team member.",
                "public": False
            }
        }
    }

    response = requests.put(update_url, json=data, auth=auth)

    if response.status_code == 200:
        print(f"Updated batch {i//100 + 1}: {len(batch)} tickets")
    else:
        print(f"Error in batch {i//100 + 1}: {response.text}")

    # Be nice to the API
    time.sleep(1)
Error handling and troubleshooting
Even with careful planning, API calls sometimes fail. Knowing how to interpret error responses will save you debugging time.
Common HTTP error codes
| Code | Meaning | What to check |
|---|---|---|
| 401 | Unauthorized | Your token or email is incorrect |
| 404 | Not Found | The ticket ID doesn't exist |
| 422 | Unprocessable Entity | Invalid field value or missing required data |
| 429 | Too Many Requests | You've hit the rate limit |
Handling validation errors
A 422 error usually means your data doesn't match what Zendesk expects. The response body contains details:
{
  "error": "RecordInvalid",
  "description": "Record validation errors",
  "details": {
    "custom_fields": [
      {
        "description": "Field value cannot be blank",
        "error": "BlankValue"
      }
    ]
  }
}
Debugging tips
- Enable verbose logging in your HTTP client to see full request and response details
- Check the Zendesk API logs in Admin Center for failed requests
- Validate your JSON before sending. A trailing comma or missing quote will cause errors.
- Test in Postman or with cURL before writing code to isolate syntax issues
When to contact Zendesk support
Most API issues can be resolved by checking documentation and verifying your request format. Contact Zendesk support if you encounter:
- Consistent 500 errors (server-side issues)
- Unexpected rate limiting despite being under the documented limits
- Behavior that contradicts the official API documentation
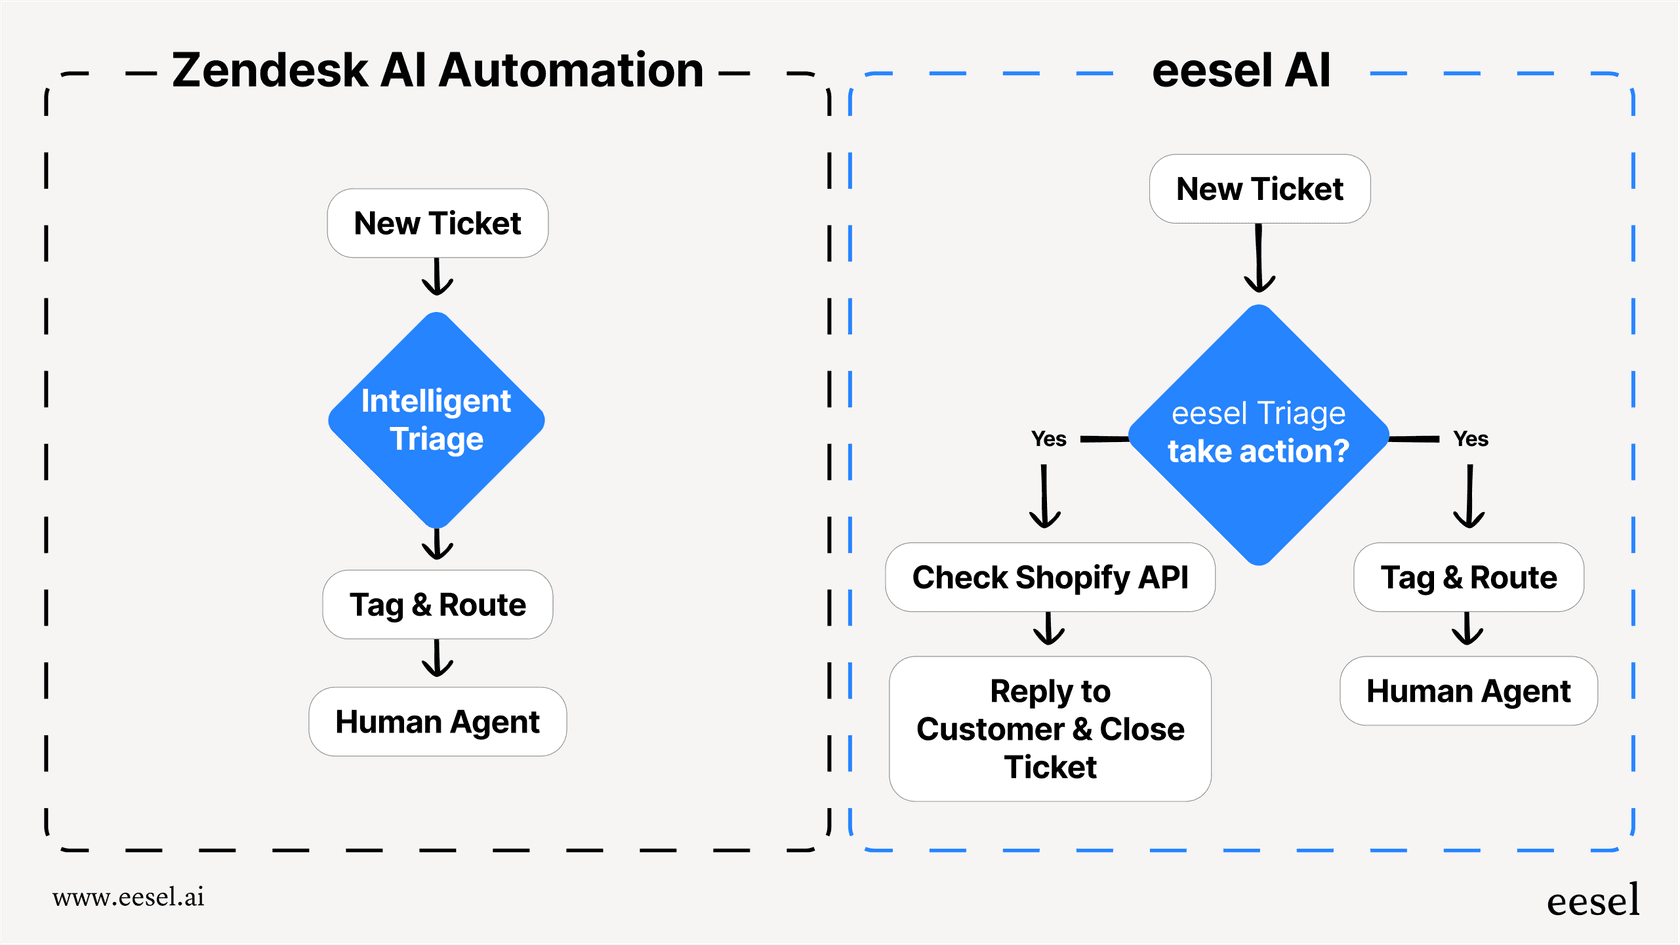
Streamlining ticket updates with eesel AI
Building and maintaining API integrations takes time and engineering resources. For teams that need automated ticket management without writing code, eesel's AI agent for Zendesk offers a different approach.

Why teams choose automation over manual scripting
Custom API scripts work well for specific, one-off tasks. But they become a burden when you need to:
- Continuously update tickets based on changing conditions
- Maintain integrations as your workflow evolves
- Train team members to use and modify the code
- Scale automation across multiple ticket types and channels
How eesel AI connects to Zendesk
Instead of writing API calls, you invite eesel AI to your team as an AI agent. It learns from your past tickets, help center articles, and macros, then handles routine updates automatically.
Here's what that looks like in practice:
- Auto-tagging: eesel reads incoming tickets and applies relevant tags based on content
- Intelligent routing: Tickets are assigned to the right team or agent without manual triage
- Status updates: eesel can change ticket status when specific conditions are met
- Escalation handling: Complex issues are automatically escalated to human agents with context
Use cases for automated ticket management
Teams use eesel AI's Zendesk integration for scenarios that would otherwise require complex API scripting:
- Routing VIP customer tickets to senior agents immediately
- Closing spam or "thank you" messages automatically
- Updating custom fields based on ticket content analysis
- Merging duplicate tickets from the same customer
Getting started with eesel AI
If your team is spending more time maintaining API scripts than benefiting from automation, eesel AI's pricing offers a no-code alternative. Plans start at $239 per month when billed annually, with a 7-day free trial to test how it fits your workflow.
The difference is in the approach. Rather than writing code to update tickets, you describe what you want in plain English. eesel learns your business, starts with guidance, and levels up to work autonomously as it proves itself.
