If you're handling dozens of support tickets daily, you've probably noticed how repetitive the work can get. You write the same explanations, update the same fields, and change statuses over and over. That's where Zendesk macros come in. They let you automate these repetitive actions so you can focus on actually solving problems.
One of the most useful macro combinations is adding a comment while simultaneously setting the ticket status. Instead of typing a response, then manually changing the status, you can do both in a single click. This saves time and ensures your tickets are always properly categorized.
For teams looking to go even further, we offer eesel AI as a way to complement your Zendesk setup with intelligent automation that learns from your past tickets and help center.
What you'll need
Before you start building macros, make sure you have:
- A Zendesk Support account (Team, Professional, or Enterprise plan)
- Admin access or permission to create macros in your role
- A clear understanding of your team's ticket workflow (which statuses you use and when)
If you're not an admin, you can still create personal macros for your own use. Shared macros, which all agents can access, require administrator permissions.
Step 1: Access the macro builder
To create a new macro, start in the Admin Center.
Navigate to Workspaces in the sidebar, then select Agent tools and click Macros. You'll see a list of existing macros if any have been created. Click the Create macro button to start building a new one. See Zendesk's macro creation documentation in the Admin Center for detailed instructions.
Give your macro a clear, descriptive name. The best practice is to use double colon notation to categorize your macros. For example:
Returns::Process refund + SolvedTechnical::Password reset + SolvedEscalations::Transfer to billing + Open
This naming convention makes it easy for agents to find the right macro quickly, especially as your library grows.
Step 2: Add the comment action
Now it's time to define what your macro will actually do. Start by adding the comment.
Click Add action and select Comment/description from the dropdown menu. You will see two important options:
Comment mode determines who can see the comment:
- Public: The customer sees this comment in their email and ticket view
- Private: Only agents can see this (internal note)
Comment text is where you write the actual message. You can use placeholders to personalize the response. For example:
Hi {{ticket.requester.first_name}},

Thanks for reaching out. I have processed your refund and you should see the credit within 3-5 business days.

Let me know if you have any other questions.
Available placeholders include:
{{ticket.requester.first_name}}- The customer's first name{{ticket.requester.name}}- The customer's full name{{ticket.id}}- The ticket number
You can also add formatting, inline images, or attachments to your macro comments. Use the formatting toolbar to add bold text, lists, or links. To attach files, click the Attach files button below the comment field (up to 5 files, 50 MB each).
Step 3: Add the status action
With your comment ready, add the status change. Click Add action again and select Status from the dropdown.
You will see these options:
| Status | When to use it |
|---|---|
| Open | The ticket is actively being worked on |
| Pending | Waiting for the customer to reply with more information |
| On-hold | Waiting for a third party (not the customer or your team) |
| Solved | The issue is resolved and no further action is needed |
Choose the status that matches your workflow. For example, if your macro handles a common request that is fully resolved (like a password reset), select Solved. If you need more information from the customer, select Pending.
Note: If your account has custom ticket statuses enabled, you'll see Status category instead, which groups your custom statuses into the four main categories above. You can enable custom statuses in your Admin Center settings.
Step 4: Add supporting actions (optional)
The real power of macros comes from layering multiple actions. While comment and status are the core actions, consider adding these to make your macro even more useful:
- Set tags: Add tags like
password_resetorrefund_processedfor reporting - Assignee: Route the ticket to a specific agent or group
- Priority: Set to High or Urgent for escalations
- Add followers: CC other team members who need visibility
- Custom fields: Update any custom ticket fields your team uses
For example, a complete escalation macro might:
- Add a public comment acknowledging the escalation
- Set status to Open
- Assign to the Billing group
- Set priority to High
- Add the tag
billing_escalation
All of this happens with one click.
Step 5: Save and test your macro
Once you've configured all your actions, click Create to save the macro.
Before rolling it out to your team, test it:
- Open a test ticket (or create a new one)
- Click Apply macro in the bottom toolbar
- Find your new macro and select it
- Review the changes before submitting
- Submit the ticket and verify both the comment and status updated correctly
You can also apply macros using the keyboard shortcut: type / in the comment box and start typing your macro name.
Check the ticket's events log to confirm all actions fired as expected. If something didn't apply, the log will show what happened.

Common issues and troubleshooting
Even with the right setup, macros sometimes don't work as expected. Here's how to fix the most common problems:
Macro actions aren't applying Check that any ticket fields your macro updates actually appear on the ticket form. If a field is hidden, the macro cannot update it.
Status isn't updating Verify the agent has permission to change ticket status. Also check if any triggers or automations are conflicting with the macro and reverting the status.
Comment isn't appearing Double-check the comment mode. If you intended a public comment but selected private, the customer won't see it.
Placeholders aren't rendering
Make sure you're using double curly braces: {{ticket.requester.name}}. Single braces won't work. Also, on Problem tickets, placeholders render immediately when the macro is applied, not when submitted. Use a backslash to escape if needed: \{{ticket.requester.name}}.
Cannot add public and internal comments in the same macro This is a known Zendesk limitation. A macro can add either a public comment OR an internal note, but not both. If you need both, you'll need to apply two separate macros or add the second comment manually. Many users have requested this feature in the Zendesk community.
Ready-to-use macro examples
Here are four copy-paste ready macro templates you can adapt for your team:
1. Password reset (Solved)
Name: Technical::Password reset + Solved
Actions:
- Comment (Public): "Hi {{ticket.requester.first_name}}, I have reset your password. You will receive a temporary password via email within 5 minutes. Please log in and change it immediately."
- Status: Solved
- Add tags:
password_reset
2. Escalation to billing (Open)
Name: Escalations::Transfer to billing + Open
Actions:
- Comment (Public): "I am escalating this to our billing team who can better assist with your account question. They will review and respond within 24 hours."
- Status: Open
- Assignee: Billing group
- Priority: High
- Add tags:
billing_escalation
3. Waiting for customer info (Pending)
Name: General::Awaiting info + Pending
Actions:
- Comment (Public): "To help resolve this, could you please provide: [list what you need]. I will pause this ticket until we hear back."
- Status: Pending
- Add tags:
awaiting_customer
4. Internal handoff note (Open)
Name: Internal::Handoff note + Open
Actions:
- Comment (Private): "Handing this off: [context about the issue]. Customer is [mood/urgency]. Next step is [action needed]."
- Status: Open
- Assignee: [Specific agent]
- Add tags:
handoff
Best practices for Zendesk macro add comment and set status
Building effective macros is about more than just setting up actions. Here's how to keep your macro library organized and useful:
Use consistent naming conventions. The double colon format (Category::Subcategory::Action) creates an intuitive hierarchy that agents can navigate quickly. Match your macro categories to your ticket field taxonomy for consistency.
Include all relevant actions. Don't just add the comment. If the macro solves a ticket, also set the status to Solved and add appropriate tags. This ensures complete ticket hygiene with one click.
Write answer-style titles. The macro name should describe what response it provides, not what question it answers. For example, use "Order shipped + Tracking link" instead of "Where is my order?"
Review and update regularly. Set a monthly reminder to audit your macros. Remove outdated ones, update language that has changed, and check that links still work.
Track your usage rates. Aim for macros to cover 60-80% of your replies. You can check usage stats in Admin Center if you're on a Professional plan or higher. According to Support Driven, high-performing support teams use macros for more than 60% of their responses.
For more detailed guidance on building a complete macro strategy, see our practical guide to Zendesk automation macros.
When to consider AI-powered alternatives
Macros are excellent for standardized responses. But they've limits. They can't adapt to context, learn from past interactions, or handle nuanced situations.
Consider eesel AI when you need:
- Dynamic, personalized responses that adapt to each ticket's specific context
- Learning from past tickets to improve responses over time without manual updates
- Handling complex scenarios that don't fit neatly into predefined templates
- Automatic resolution for common issues without any agent intervention
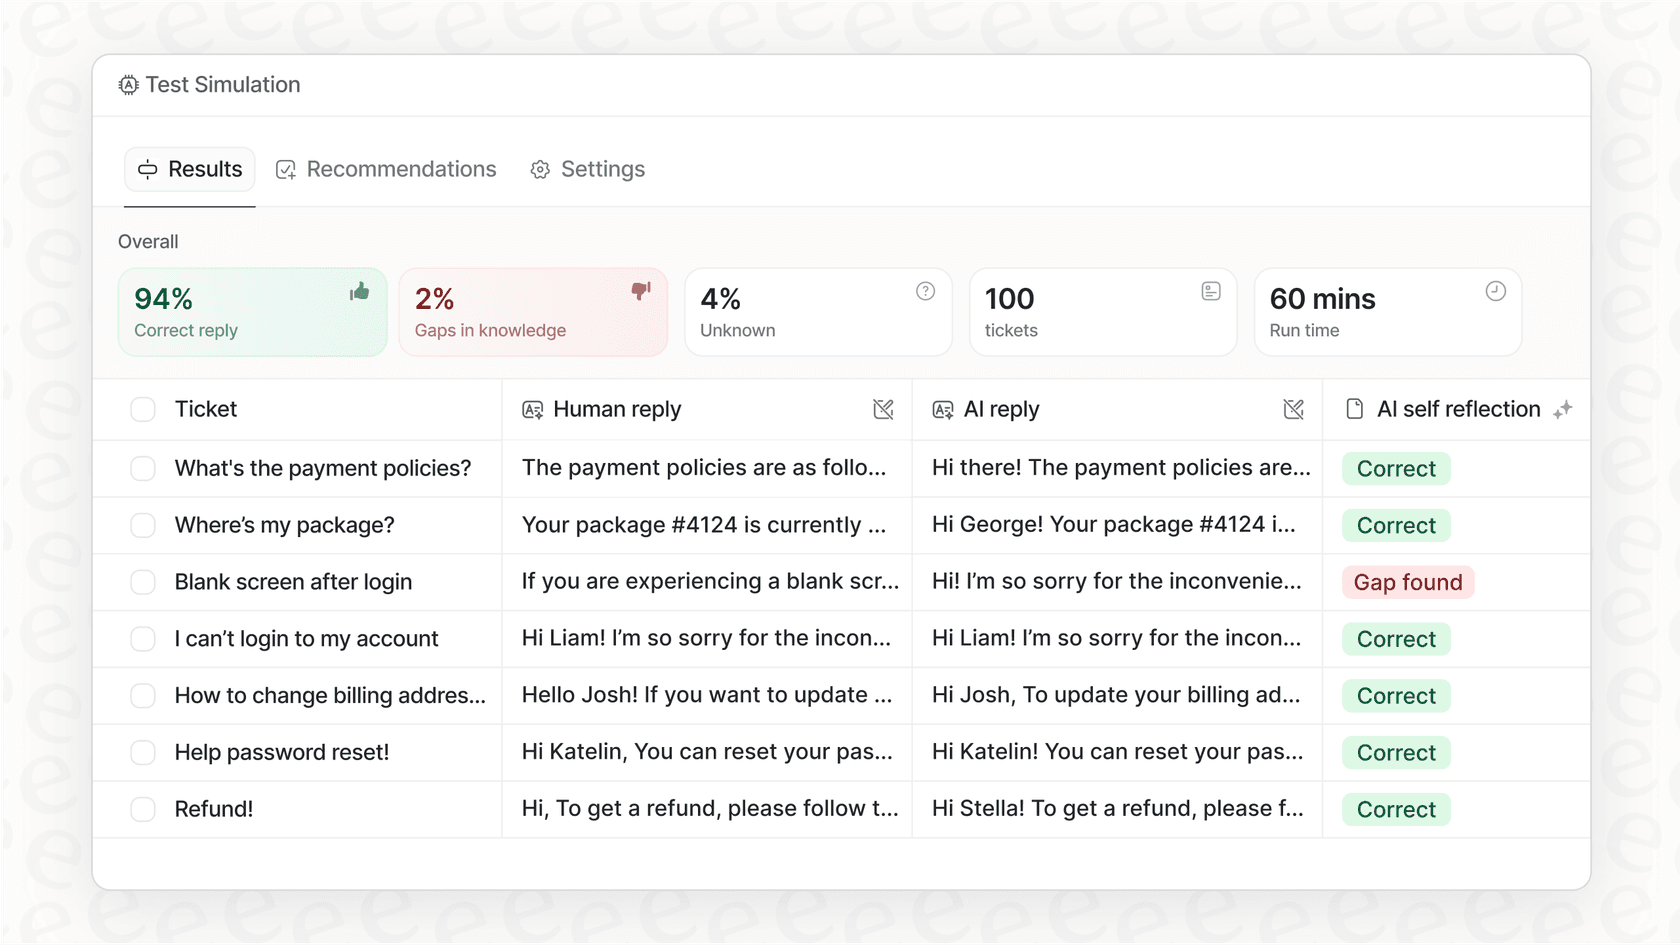
We integrate directly with Zendesk and can run in simulation mode on your past tickets, so you can see exactly how we'd perform before going live. This lets you validate quality and measure potential time savings with real data from your own support history.
Start streamlining your Zendesk workflow today
You now have everything you need to build macros that add comments and update status in one action. Start by identifying your three most common ticket types and creating macros for those. Test them with your team, gather feedback, and iterate.
Once you've got the basics down, expand your library systematically. The goal is to handle routine requests in seconds, freeing your team to focus on the complex issues that actually need human judgment.
If you're ready to take your automation further, we can help. Try eesel AI free or book a demo to see how intelligent automation works alongside your existing Zendesk setup.