How to set up Zendesk Talk IVR phone tree: A complete guide for 2026
Stevia Putri
Last edited February 19, 2026
An IVR (Interactive Voice Response) phone tree is the backbone of any professional call center. It routes callers to the right department, handles basic inquiries automatically, and keeps your support team organized. If you are using Zendesk Talk, setting up an IVR can transform how you handle phone support.
This guide walks you through everything you need to know to set up a Zendesk Talk IVR phone tree. From planning your call flows to testing the final setup, you will get practical, step-by-step instructions that actually work. We will also look at how you can extend your phone support capabilities with AI tools that handle the follow-up work after calls end.

What you will need to get started
Before diving into configuration, make sure you have the prerequisites in place. IVR functionality in Zendesk Talk is not available on all plans, so this is the first thing to check.
Required plan: IVR phone trees are only available on Suite Professional ($115/agent/month) or Suite Enterprise ($169/agent/month). If you are on Suite Team or Support Team, you will need to upgrade to access IVR features.
Administrator access: Only Support administrators can create and modify IVR menus. If you do not have admin permissions, you will need to work with someone who does.
Audio files (optional): For custom greetings, you will need MP3 or WAV files under 10 MB. You can also record directly in your browser if you prefer.
Technical requirements: Each call needs at least 80 kbps of bandwidth (500 kbps recommended), and you will need Chrome or Firefox for the best experience. Refer to Zendesk's getting started guide for complete system requirements.
Planning your IVR structure
Do not start building until you know what you are building. A poorly planned IVR frustrates callers and creates more work for your team.
Start by mapping out your call flows. Who calls you, and what do they need? Common structures include:
- Department routing: Press 1 for Sales, 2 for Support, 3 for Billing
- Language selection: Press 1 for English, 2 for Spanish
- Issue type: Press 1 for technical issues, 2 for account questions, 3 for new orders
Keep your main menu to five options or fewer. Research shows that 75% of consumers get frustrated when forced to listen to irrelevant IVR options. More choices create more confusion.
Limit your menu depth to two or three levels maximum. Callers want to reach a human, not navigate a maze. In fact, 90% of consumers want to speak to a live agent at the start of their support experience. Do not bury that option.
Always include a "press 0 for an agent" escape route on every menu level. This single option can dramatically improve customer satisfaction.
Draw your phone tree on paper or in a diagram tool before you start configuring. Visualizing the flow helps you spot problems early, like circular routes or dead ends.
Step 1: Record your IVR greetings
Your greetings are the voice of your company. They need to be clear, professional, and concise. Here is how to set them up.
Navigate to Admin Center > Channels > Talk and Email > Talk, then select the Greetings tab.

Click Add greeting in the upper-right corner. Give your greeting a descriptive name (up to 64 characters) and select "IVR" as the greeting type.
You have two options for creating the audio:
- Upload a file: Select an MP3 or WAV file under 10 MB. Note that files with album art are not supported.
- Record in browser: Click the record button and speak directly into your microphone. This is often faster for testing.
Script your greetings carefully. State the option first, then the keypress. For example: "For sales inquiries, press 1. For technical support, press 2." This follows how people actually listen, processing the category before the action.
Keep each greeting under 30 seconds. Longer greetings increase abandonment rates. If you need more detail, add it to a submenu, not the main greeting.
Create separate greetings for each menu level in your phone tree. A main menu greeting sounds different from a submenu greeting. The main greeting presents all your top-level options, while submenu greetings can be more specific.
Step 2: Create the IVR menu
Now for the actual phone tree construction. This is where your planning pays off.
Navigate to Admin Center > Channels > Talk and Email > Talk, then select the IVR tab.

Click Add menu and give your IVR a clear name. Something like "Main Support IVR" or "Sales and Support Menu" works well. You will reference this name later when assigning the IVR to phone numbers.
Configure menu levels
Every IVR starts with a "Main menu" level. This is what callers hear first. Click on "Main menu" to configure it.
Select the greeting you created in Step 1 from the dropdown. This greeting should present all your top-level options.
If your phone tree has submenus (like "Press 2 for Support" leading to another menu with "Press 1 for Technical Issues, Press 2 for Billing Questions"), you will need additional menu levels. Click Add menu level to create these. Each level gets its own greeting and set of routes.
Add routes for each option
Routes define what happens when a caller presses a key. For each menu option, click Add Route.

Select a keypress from 0-9, or choose "Default" to handle callers who do not press anything or press an invalid key. The Default route is your safety net, it should always route somewhere helpful, like your main support group or voicemail.
Choose an action type for each route:
| Action | What it does | Best used for |
|---|---|---|
| Voicemail | Sends caller to voicemail, creates ticket | After-hours, overflow, specific departments |
| Group | Routes to an agent group | Directing to Sales, Support, or Billing teams |
| Number | Forwards to external phone number | Routing to outsourced call centers |
| IVR Menu | Routes to another menu level | Creating submenu structures |
| Text back | Converts call to SMS interaction | Deflecting simple requests to messaging |
For Group routes, you can set a primary group and overflow groups. If all agents in the primary group are busy, the call rolls over to the overflow group. This keeps callers from waiting indefinitely. Learn more about routing incoming calls with IVR in Zendesk's documentation.
If you are using omnichannel routing, you can add tags based on the keypress. This is powerful for reporting. You might tag all "Press 1 for Sales" calls with "sales_inquiry" to track volume and outcomes.
Each route can have an optional greeting that plays before the action happens. For example, a route to the Sales group might play "Connecting you to Sales" before the call transfers. If you want immediate transfer without any additional message, set the greeting to "None." See Zendesk's guide on managing outgoing greetings for more details.
Click Save after configuring each route. Add all your routes before moving to the next step.
Step 3: Assign IVR to your phone number
Your IVR menu exists, but it is not active yet. You need to connect it to a phone number.
Navigate to Admin Center > Channels > Talk and Email > Talk, then select the Lines tab.

Find the phone number where you want to enable the IVR. Click the menu icon (three dots) next to the number and select Edit.
Open the Routing tab. You will see a toggle labeled "Enable IVR." Turn this on.
A dropdown appears showing all your IVR menus. Select the one you just created. You can only assign one IVR per phone number, but you can use the same IVR on multiple numbers when needed.
Click Save changes. Your IVR is now live on that phone number.
Important limitation: IVR does not work with digital lines or embedded voice. If your number is configured as a digital line, you will need to switch it to a standard phone line to use IVR.
Step 4: Test your IVR thoroughly
Do not assume your IVR works perfectly on the first try. Test everything before announcing the number to customers.
Call your phone number from an external line (not from within Zendesk). This gives you the true caller experience.
Test every single menu option. Press 1, verify it routes correctly. Press 2, verify that route. Work through your entire phone tree systematically.
Press invalid keys (like 9 when you only have options 1-3). Make sure your Default route catches these gracefully.
Let the greeting play through without pressing anything. The IVR greeting will repeat up to three times if there's no keypress. This is default behavior that cannot be changed, so make sure your greeting sounds okay when looped.
If you have business hours configured, test both during and after hours. The experience should change based on your schedule.
Check that voicemail creates tickets properly. Leave a test voicemail and confirm it appears in Zendesk with the correct tags and group assignment.
Ask a colleague to test it too. Fresh ears catch issues you will miss because you know how it is "supposed" to work.
IVR best practices for better caller experience
A functional IVR isn't the same as a good IVR. Here are principles that separate the two.
Keep it short. Every second a caller spends in your IVR is a second they are not talking to a human. Aim for greetings under 30 seconds and total time-to-agent under 60 seconds when possible.
Use professional voice talent for customer-facing lines. Although browser recording works for internal testing, customers judge your company by the voice they hear. A professional recording costs a few hundred dollars but pays for itself in perceived credibility.
Monitor your abandonment rate. In Zendesk Explore, track how many callers hang up before reaching an agent. If it is high, your IVR might be too complex or your wait times too long.
Review IVR completion rates. This shows how many callers successfully navigate your menu versus giving up or getting lost. Target 80% or higher completion.
Update seasonally. If you know about a product launch or service outage, record a temporary greeting that addresses it. This deflects calls before they reach your queue.
Do not hide the human option. Some companies try to force self-service by making "speak to an agent" the last option or requiring multiple keypresses. This backfires. Frustrated callers who finally reach agents are harder to help.
Common IVR issues and how to fix them
Even with careful setup, things go wrong. Here are the most common problems and their solutions.
The greeting repeats multiple times before routing. This happens when your route has a greeting configured that is the same as your menu level greeting. In the route configuration, set the greeting to "None" for immediate transfer.
Callers hear the wrong greeting at different times. Check your business hours schedule. If you have different IVRs for business hours versus after-hours, verify the schedule is attached to the correct phone number and timezone.
Voicemail is not creating tickets. Make sure voicemail is enabled on the phone number itself. Go to Lines > Edit > Voicemail tab and confirm the toggle is on.
IVR option routes to the wrong group. Double-check your route configuration. It is easy to select "Support Group" when you meant "Support Tier 2." The names can be similar.
Cannot create separate IVRs for business hours and after-hours. Zendesk does not have a clone feature for IVR menus, so you will need to build each variation manually. Document your structure so you can recreate it consistently.
Omnichannel routing will not activate. If you are using omnichannel routing, you must remove all non-primary groups from your IVR routes first. The system will not let you enable omnichannel routing until this is done.
Streamlining your phone support workflow with AI
Setting up your IVR is just the beginning. Once calls start flowing, you will have tickets to manage, voicemails to process, and follow-ups to handle. This is where AI can help.
At eesel AI, we have built an AI teammate that works alongside Zendesk Talk. Here is how it fits into your phone support workflow.
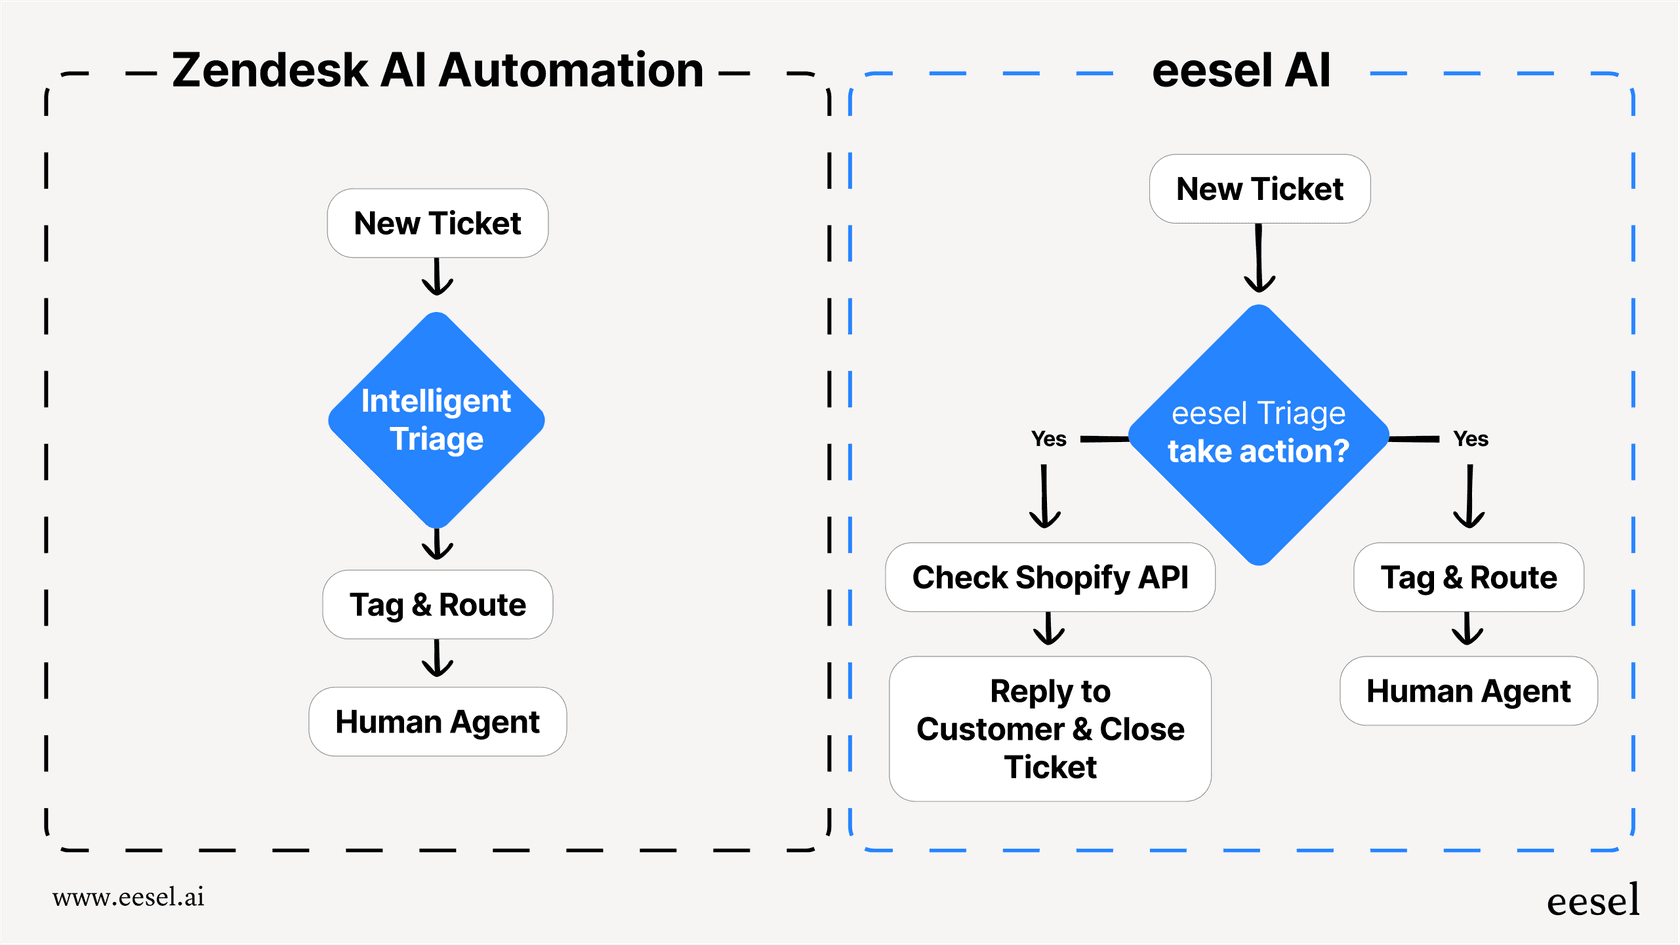
When a caller leaves a voicemail, our AI Triage automatically tags the ticket based on what the caller said. It can detect urgency, categorize the issue type, and route it to the right team without manual sorting.
For follow-up tickets that come in after calls, our AI Copilot drafts responses based on your past tickets and help center articles. Your agents review and send, cutting response time while maintaining quality.
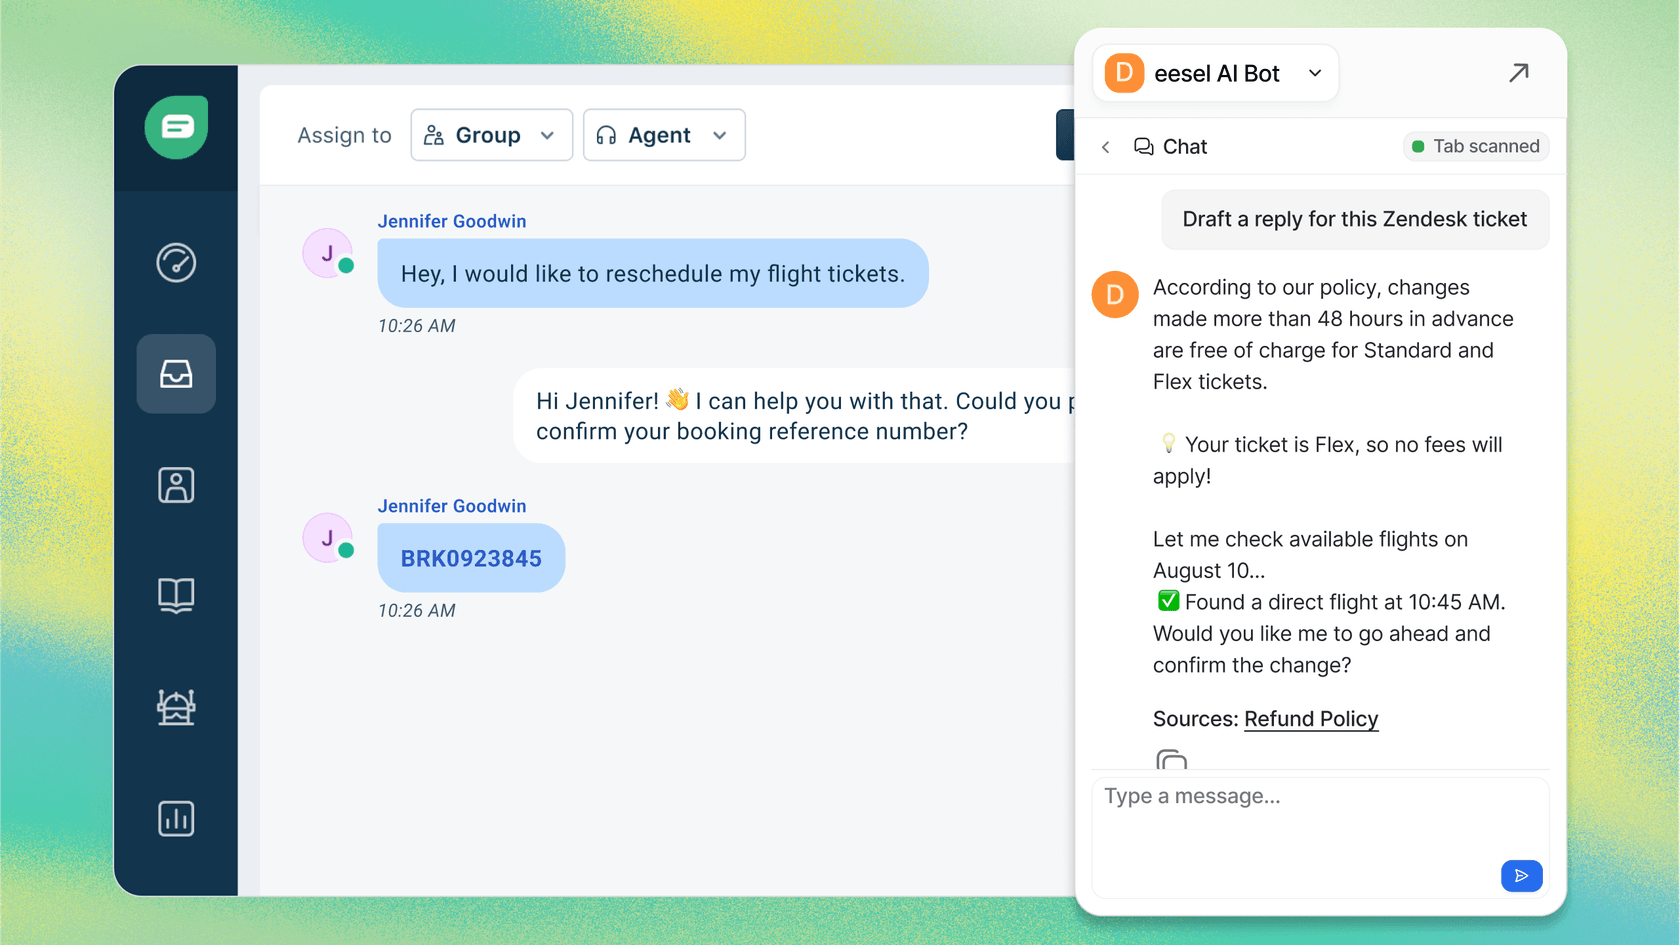
The integration is seamless. Zendesk Talk captures the call and creates the ticket. We handle everything that happens after that, learning your business from your existing data so responses sound like they came from your team.
If you are interested in exploring how AI can complement your Zendesk Talk setup, you can learn more about eesel's AI agent for Zendesk and how it fits into your phone support workflow.
