So, you’re thinking about how to add a chatbot to your website. It's a question a lot of businesses are asking these days, and for good reason. Putting a chatbot on your site isn’t just about being trendy; it’s about making life easier for you and your visitors.
The perks are pretty obvious. You can offer instant support 24/7, grab leads even when you’re asleep, and let your human team focus on the tricky problems that actually need a person’s touch.
The best part? Modern AI chatbots are way easier to set up than you might think. The really good ones connect right into the tools you’re already using, so you don’t have to tear down your whole workflow just to get started. This guide will take you through a simple, 7-step process to get a smart AI assistant on your site.
Things you'll need before you start
Before you jump in, it helps to have a couple of things sorted out first. This isn't a super technical list, but getting these basics in place will make everything else go much more smoothly.
-
A clear goal: What's the main job you want this chatbot to do? Answer common questions? Book demos? Help people track their orders? Figuring this out first is a huge help.
-
Access to your website's backend: You'll need to be able to add a small bit of code to your site. Don't sweat it, it’s usually just a quick copy and paste.
-
Your knowledge sources: Start pulling together the documents you want your chatbot to learn from. This could be your help center, internal FAQs, or even product spec sheets.
A 7-step guide to adding a chatbot to your website
Let's get into it. Here’s a practical, step-by-step walkthrough for getting a chatbot up and running on your website.
Step 1: Figure out your chatbot's main goal
Starting with a clear, specific goal is probably the most important thing you can do. A chatbot that tries to do everything at once usually ends up not being very good at anything. But a focused bot? That can start delivering value right away.
Think about the most frequent or valuable things you'd want it to handle. A few common goals are:
-
Answering common support questions: Instantly handling questions like, "Where's my package?" or "How do I reset my password?" frees up your team for more involved conversations.
-
Qualifying leads: Your chatbot can ask visitors a couple of questions to see what they need, get their contact info, and send them to the right person on your sales team.
-
Pointing users to the right info: Instead of making visitors hunt around your site, the bot can send them directly to the right help article, product page, or pricing info.
Step 2: Choose the right chatbot platform
The market is packed with chatbot options, from super technical developer kits to simple builders you can use right out of the box. It can feel like a lot, but they usually fall into one of three buckets.
-
Building from scratch: This route needs a team of developers, a ton of time, and a lot of upkeep. It gives you total control, but it's really only practical for huge companies with very specific, complicated needs.
-
Basic no-code builders: These tools are fast to set up for simple, scripted chats. Think "if a user clicks this, show them that." They're easy to use, but they don't have real AI, can't learn from different documents, and you'll probably outgrow them quickly. They tend to get stuck if someone asks a question that isn't in their script.
-
Integrated AI platforms: This is where things get interesting. These platforms use smart AI to actually understand what a user is asking and give them good answers based on your company's information.
The best options, like eesel AI, give you the power of a smart AI platform with the simplicity of a no-code tool. What really makes them different is how you get started. You can sign up and have your bot live in minutes without having to book a sales call or sit through a demo, which is a common hurdle with other tools. Plus, it connects directly with your existing help desk, whether you use Zendesk or Intercom, and learns from your knowledge sources. You don't have to change how you work just to add some AI muscle.
Step 3: Train your chatbot with your knowledge
A chatbot is only as good as the information you feed it. This step is all about building its "brain" so it can give answers that are actually helpful.
Most platforms let you do the basics, like uploading PDFs or pointing it to your help center URL. That's a decent start, but a truly great platform can bring together knowledge from all the different places your team's expertise is stored.
This is where a tool like eesel AI really stands out. It goes way beyond the basics by:
-
Learning from past conversations: Imagine your chatbot could read through thousands of your old support tickets from Zendesk or Freshdesk. That's exactly what eesel AI does. It helps the bot automatically understand your brand's voice, common customer problems, and what solutions have worked in the past, all without you lifting a finger.
-
Connecting to messy, real-world documents: Let's be honest, a company's real knowledge isn't always in a perfectly organized help center. It’s usually scattered across Google Docs, Confluence pages, and Notion docs. eesel AI connects to all of those, making sure your chatbot is always working with the most up-to-date and complete information.

Step 4: Customize your chatbot's look and feel
For a chatbot to work well, it needs to feel like it belongs on your website. That means tweaking its appearance and personality.
Appearance:
-
Colors: Change the chat widget's colors to match your website's branding so it blends in nicely.
-
Avatar: Give your bot a face by uploading your company logo or a custom avatar.
-
Position: Choose where you want the chat widget to pop up (the bottom-right corner is pretty standard).
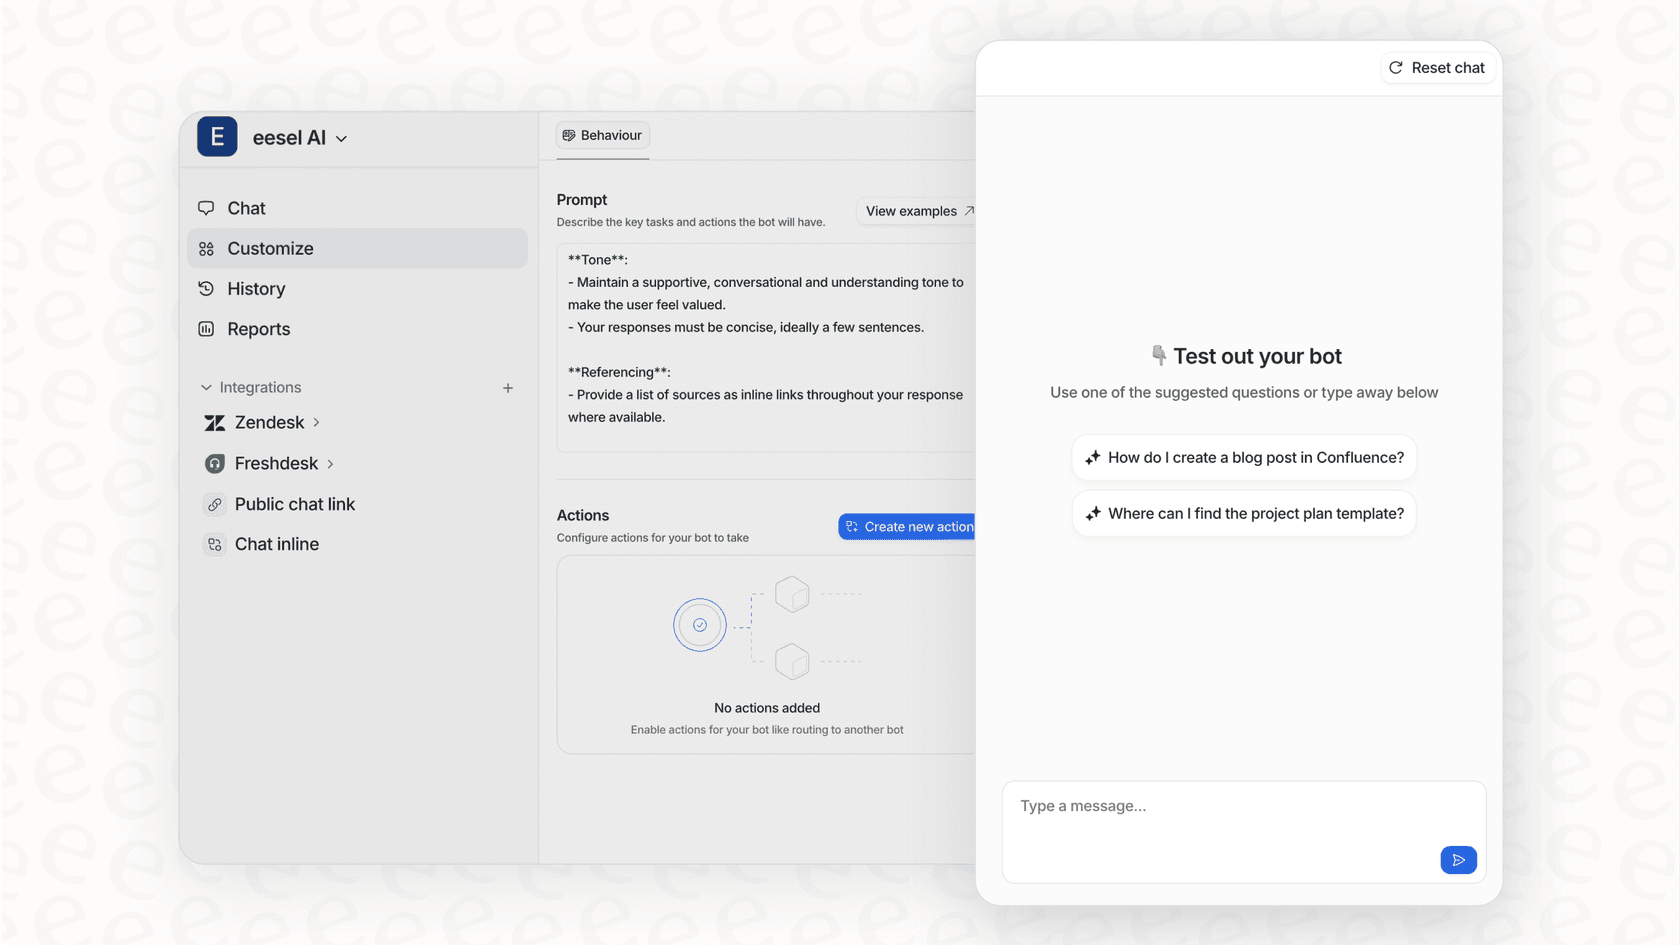
Behavior (The Prompt):
This is about more than just a "hello" message. It's where you define your bot's personality and set the ground rules. With a flexible tool like the eesel AI prompt editor, you're in complete control. You can tell it to be friendly and casual or more formal and professional. Even better, you can set up clear instructions for when it needs help. For example, you can tell it, "If you don't know the answer or if the user asks for a person, say 'Let me get a human agent to help you with that' and hand off the chat."

Step 5: Test your chatbot before you launch
You'd never want to launch a new feature for customers without knowing if it works, and a chatbot is no different.
Guessing can lead to some pretty frustrating experiences for your visitors.
Most platforms have a simple preview window where you can ask a few questions. That's fine for a quick spot-check, but it doesn't really tell you how the bot will handle a flood of real questions from real customers. This is why simulating its performance is so important.
It's also a big reason people like using eesel AI. The Simulation Mode lets you:
-
Safely test your AI on thousands of your actual past support tickets in a private test environment.
-
See every single response the bot would have sent for those real-world questions, all without any risk to your live customers.
-
Get accurate predictions on how many issues it could solve and spot any gaps in your knowledge base before you go live. This lets you launch with confidence, because you already know how your bot is going to perform.
Step 6: Add the chatbot code to your website
You've done all the planning, and now it's time for the last technical bit. The good news is, this part is usually pretty simple and you probably won't need a developer.
Here’s how it generally works, no matter what platform you're using:
-
In your chatbot platform's dashboard, find the "Publish," "Install," or "Channels" area.
-
Look for the "Web Chat" or "Website Widget" option and copy the JavaScript code it gives you.
-
Log in to your website's admin panel (like WordPress, Shopify, Webflow, or whatever you use).
-
Find the section for adding custom code or scripts. You'll want to paste the code into your site's HTML, usually just before the closing "" tag.
-
Save your changes. The chatbot widget should now show up on your site.
With a tool like eesel AI, this whole thing really only takes a couple of minutes.
Step 7: Keep an eye on performance and make it better
Launching your chatbot isn't the end of the road; it's just the beginning. The secret to long-term success is to keep tweaking it based on how people are actually using it.
Check in on your chatbot's analytics dashboard every now and then to see:
-
What are the most common questions people are asking?
-
Are there any questions the chatbot is fumbling? These point to gaps in its knowledge.
-
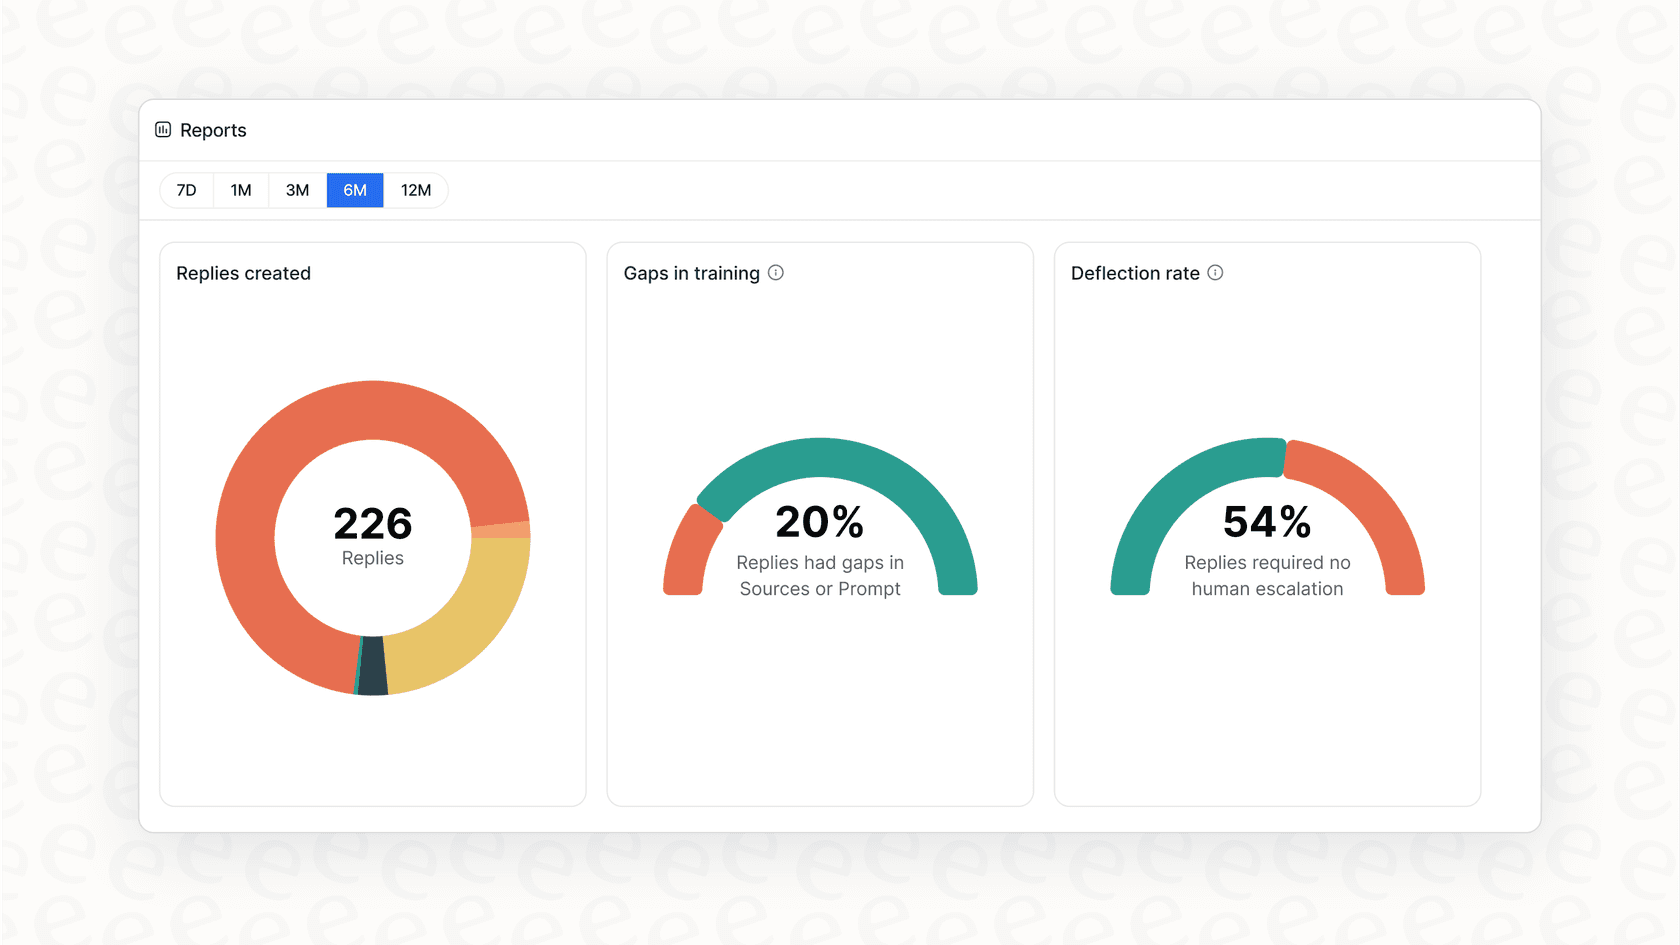
What's your overall resolution rate?
A good platform won't just throw data at you; it will give you ideas. For example, eesel AI reporting not only tracks how your bot is doing but also helps you spot trends and even suggests new articles you could write to fill those knowledge gaps.
Tips for a successful launch
Here are a handful of final tips to make sure your chatbot gets off to a great start.
-
Don't hide the human: Always give users an easy way to talk to a person. It builds trust and makes sure that complicated or sensitive problems get the attention they deserve.
-
Set clear expectations: Use the chatbot's welcome message to be honest about what it can and can't do. A simple "Hi! I'm an AI assistant. I can help with things like tracking orders and product questions. For anything else, I can get you to a human" works wonders.
-
Watch out for the pricing model: Be careful with platforms that charge you for every ticket the chatbot resolves. This can lead to surprise bills that actually punish you for being successful. Look for clear, predictable pricing, like the flat-rate plans from eesel AI, so you always know what to expect.
-
Start small: You don't have to unleash the bot on everyone at once. With eesel AI, you could start by having it handle just one type of question (like password resets) and slowly give it more responsibilities as you get more comfortable with how it works.
Your website is ready for an AI assistant
Adding a chatbot to your website can feel like a massive undertaking, but when you break it down into steps, it's a very manageable, and valuable, project.
By figuring out your goal, picking the right tool, training it on your unique knowledge, and testing it properly, you can add a helpful new member to your team. Your website is ready for an AI assistant that can help out around the clock.
Start building today
Ready to add a smart, accurate, and safe AI chatbot to your website?
With eesel AI, you can be up and running in minutes, not months. Train it on all your existing knowledge, test it out with our simulation engine, and connect it with the tools you already love.
Frequently asked questions
Modern AI chatbot platforms are designed for quick setup, often allowing you to go live in minutes, not months. The process typically involves a simple [copy-and-paste of a JavaScript code snippet](https://help.zapier.com/hc/en-us/articles/21958023866381-Share-and-embed-a-chatbot), meaning no advanced technical skills or developers are usually needed.
A powerful chatbot can [learn from a wide range of sources](https://wonderchat.io/), including your help center, FAQs, PDFs, and even past support conversations. Tools like eesel AI can also integrate with platforms like Google Docs, Confluence, and Notion to ensure your bot has access to all relevant company knowledge.
It's crucial to configure your chatbot to seamlessly hand off to a human agent when it cannot answer a question or if a user specifically requests human assistance. You can define specific instructions for its behavior in these scenarios, ensuring a smooth user experience and maintaining trust.
Utilize simulation modes offered by advanced platforms, which allow you to test your AI on thousands of past support tickets in a private environment. This helps you preview responses, predict resolution rates, and identify knowledge gaps before launching to live customers.
Be wary of platforms that charge per resolution or conversation, as this can lead to unpredictable and escalating costs. Look for clear, flat-rate pricing models, like those offered by eesel AI, to ensure you have predictable expenses.
Regularly review your chatbot's analytics dashboard to track common questions, identify fumbled responses, and monitor its overall resolution rate. Use these insights to refine its knowledge base and continually improve its effectiveness, potentially by creating new help articles.
Share this article

Article by
Kenneth Pangan
Writer and marketer for over ten years, Kenneth Pangan splits his time between history, politics, and art with plenty of interruptions from his dogs demanding attention.