Support agents live in their ticket views. These organized lists determine what work gets done, in what order, and by whom. When views are set up well, agents know exactly what to tackle next. When they're not, tickets slip through the cracks and response times suffer.
This guide walks you through setting up Zendesk ticket views that actually help your team work better. We'll cover the different view types, how to create them step by step, and the best practices that experienced Zendesk admins use to keep their teams organized.
If you're looking to go beyond static rules, eesel AI integrates with Zendesk to automatically route and prioritize tickets based on content, sentiment, and intent. But first, let's get your views set up properly.
What you'll need
Before you start creating views, make sure you have:
- A Zendesk Support account (Team, Professional, or Enterprise plan)
- Admin permissions if you're creating shared views for your team
- Agent access if you're setting up personal views for yourself
- A clear understanding of how your team handles tickets (groups, priorities, workflows)
- Basic familiarity with Zendesk ticket fields like Status, Priority, and Group
Understanding Zendesk view types
Zendesk gives you three types of views. Each serves a different purpose.

Standard views
These come pre-built with every Zendesk account. You get views like "Your unsolved tickets," "Unassigned tickets," "Pending tickets," and "Recently solved tickets." They're useful starting points, though most teams eventually outgrow them.
Note that you cannot edit the "Suspended tickets" and "Deleted tickets" views. These appear at the bottom of your views list and don't count toward your view limits.
Shared views
Admins create these for teams or the entire organization. They're visible to multiple agents based on permissions you set.
You can create up to 12 shared views, though agents can access up to 100 in their views list. Shared views are ideal for team-wide workflows, like an "Open Tickets" queue that everyone works from.
On Enterprise plans, you can use custom roles to limit agents to specific view counts if needed.
Personal views
Agents create these for themselves. They're private and perfect for individual productivity hacks, like a view that shows only high-priority tickets assigned to you.
Each agent can create up to 8 personal views, with up to 10 accessible in their views list.

Step 1: Access the views management page
To create or manage views, head to the Admin Center. Click Workspaces in the sidebar, then select Agent tools > Views.
If you're an agent creating personal views, you can also access view management directly from the views list in your workspace. Click the Actions menu on any view and select Edit view.
Zendesk also offers a setup wizard for views if you're just getting started. It walks you through the basics with templates for common scenarios.

Step 2: Create a new view
Click Create view to start building. You can create a view in the last position of the list, or hover over an existing view, click the options menu, and select Create view below to position it exactly where you want.
Alternatively, clone an existing view if you want to use it as a starting point. This is handy when you need similar views with slight variations.
Give your view a clear, descriptive title. You can use emojis to help agents quickly identify views (paste them from a site like getemoji.com). You can also use the double colon syntax (::) to create folders in the Agent Workspace. For example, "Tier 1 :: Open Tickets" creates a "Tier 1" folder containing that view.
Add a description if the title isn't self-explanatory. This helps other admins understand what the view is for.

Step 3: Set view conditions
This is where you define which tickets appear in your view. Conditions are the filters that determine what makes it into the list.
Understanding condition logic
You can set conditions that tickets must meet All of, or Any of:
- All conditions: Every condition must be true for a ticket to appear (AND logic)
- Any conditions: At least one condition must be true (OR logic)
Here's the critical part: your view must include at least one of these ticket properties in the "Meet all of the following conditions" section:
- Status (or Status category)
- Type
- Group
- Assignee
- Requester
Without one of these, Zendesk won't let you save the view.
Common condition combinations
These combinations work well for most teams:
- Status less than Pending Shows only New and Open tickets (hides Pending, On-hold, Solved, Closed)
- Assignee is current user Shows tickets assigned to whoever is viewing the view
- Group is current user's groups Shows tickets in groups the viewer belongs to
- Tags contain at least one of the following Shows tickets with specific tags for topic-based routing
Conditions to avoid
Some conditions hurt performance or create confusing views:
- Checking multiple text fields (slows down view loading)
- Null value checks like "Assignee is (-)" (use "Assignee is current user" instead for personal views)
- Broad exclusionary "NOT" statements (hard to troubleshoot, can exclude tickets unexpectedly)
Instead, use inclusive conditions that look for what you want to include, not what you want to exclude.
Step 4: Configure view formatting
Once conditions are set, customize how tickets display in the view.
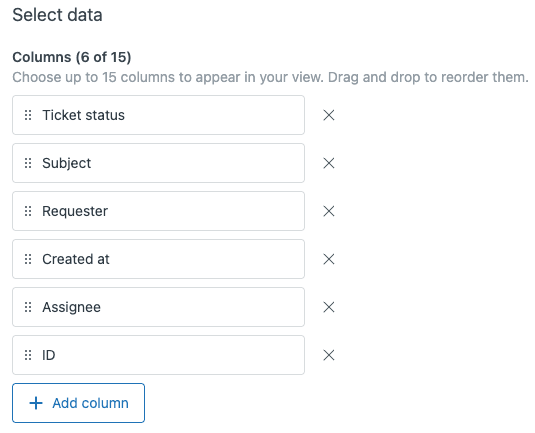
Columns
You can add up to 15 columns. Drag them to reorder. Essential columns for most views include:
- Subject
- Requester
- Priority
- Created (date)
- SLA (to see breach times)
You can also add custom field columns if your team uses specialized ticket fields.
Group by
Group tickets by fields like Priority, Status, or custom fields. This creates visual sections within your view. Choose Ascending or Descending order for the groups.
Note: If you select "Request date" for Group by, your Order by settings won't apply.
Order by
This determines the sort order of tickets within groups (or the entire view if you're not grouping). Common choices:
- SLA (Ascending) Shows tickets closest to breaching first (recommended for working queues)
- Created (Ascending) Oldest tickets first (FIFO approach)
- Priority (Descending) High priority first
Step 5: Set view access permissions
Choose who can see your view:
- Any agent Shared with your entire team
- Agents in specific groups Scoped to relevant teams only
- Only you Personal view for your own use
Use "Any agent" for team-wide workflows like your main "Open Tickets" queue. Use "Agents in specific groups" when you have specialized teams (like Finance or Tier 2) that need their own views. Use "Only you" for personal productivity views.
When you're done, click Save. The view appears immediately for users with access.
Essential view templates for agents
Here are five view configurations that work well for most support teams. Use them as starting points and adjust to fit your workflow.
The "Open Tickets" view
This is your primary working queue.
Conditions:
- Status less than Pending
- Group is current user's groups
Formatting:
- Group by: Priority (Descending)
- Order by: SLA (Ascending)
- Columns: Subject, Requester, Priority, Created, SLA
Access: Any agent (or specific groups)
This view shows agents only the tickets they can actually work on, sorted so the most urgent appear first.
The "My Tickets" view
For personal workload management.
Conditions:
- Assignee is current user
- Status less than Solved
Formatting:
- Order by: SLA (Ascending)
- Columns: Subject, Requester, Priority, Created, SLA
Access: Only you (personal view)
This gives agents a quick view of everything on their plate.
The "Pending" view
Track tickets waiting for customer responses.
Conditions:
- Status is Pending
- Group is current user's groups
Formatting:
- Order by: Assignee updated (Ascending) oldest agent reply first
- Columns: Subject, Requester, Assignee updated, SLA
Access: Any agent
Use this to follow up on tickets that have been pending too long.
The "Unassigned" view
For triage and picking up new work.
Conditions:
- Assignee is (-)
- Status less than Pending
Formatting:
- Order by: Created (Ascending) oldest first
- Columns: Subject, Requester, Priority, Created, Channel
Access: Any agent
This shows tickets that need an owner. Agents can grab work from here.
The "Recently Solved" view
For quality checks and follow-up review.
Conditions:
- Status is Solved
- Hours since solved is less than 24
Formatting:
- Order by: Solved (Descending) most recently solved first
- Columns: Subject, Requester, Assignee, Solved
Access: Any agent (or managers only)
Useful for team leads to review recent resolutions or spot patterns.
Best practices for view setup
After setting up hundreds of Zendesk instances, consultants have identified patterns that work. Here are the key ones.
Use tags for flexibility
Instead of building views on rigid conditions like "Received at is support@company.com," use trigger-based tags. Create a trigger that adds a "support_view" tag to tickets received at that address, then build your view looking for that tag.
Why? Tags can be changed. Email addresses can't. If an agent needs to move a ticket from the Support view to the Sales view, they just need to update tags (ideally via a macro), not fight with unchangeable ticket properties.
Scope views to agent groups
Filter views by "current user's groups" rather than specific group names. This means one shared view works for all teams instead of creating "Tier 1 Open Tickets," "Tier 2 Open Tickets," and so on.
An agent in the Tier 1 group sees only Tier 1 tickets. An agent in both groups sees both. A team lead sees everything. One view, properly scoped, handles it all.
Hide pending tickets from primary views
Add "Status less than Pending" to your working views. Pending tickets are waiting for customer responses, so agents don't need to see them in their main queue. This keeps views focused on actionable work.
Create a separate "Pending" view for when agents do need to check on waiting tickets.
Keep view counts manageable
Don't create views for reporting. That's what Zendesk Explore is for. Views should show work to be done, not provide analytics.
If you find yourself creating views to "get insights" or "see trends," switch to Explore. It has better filters, more nuance, and doesn't clutter your agents' workspaces.
Managing and updating views
Views aren't set-and-forget. Here's how to maintain them.
Editing views
You can edit views from the Admin Center (Admin Center > Workspaces > Agent tools > Views) or directly from the view list in your workspace (Actions > Edit view).
Cloning is useful when you need similar views. Clone an existing one, modify the conditions or formatting, and save as a new view.
Activating and deactivating
Deactivate views you don't need right now rather than deleting them. Deactivated views stay in your account but don't appear in agents' lists. You can reactivate them later.
To delete a view permanently, you must first deactivate it, then delete it from the inactive views list.
Sharing views
You can share a view by copying its URL and sending it to teammates. Access permissions still apply, so the recipient will only see tickets they're allowed to see.
Taking views further with AI automation
Views organize tickets into lists. But how do tickets get into the right views in the first place? That's where AI comes in.
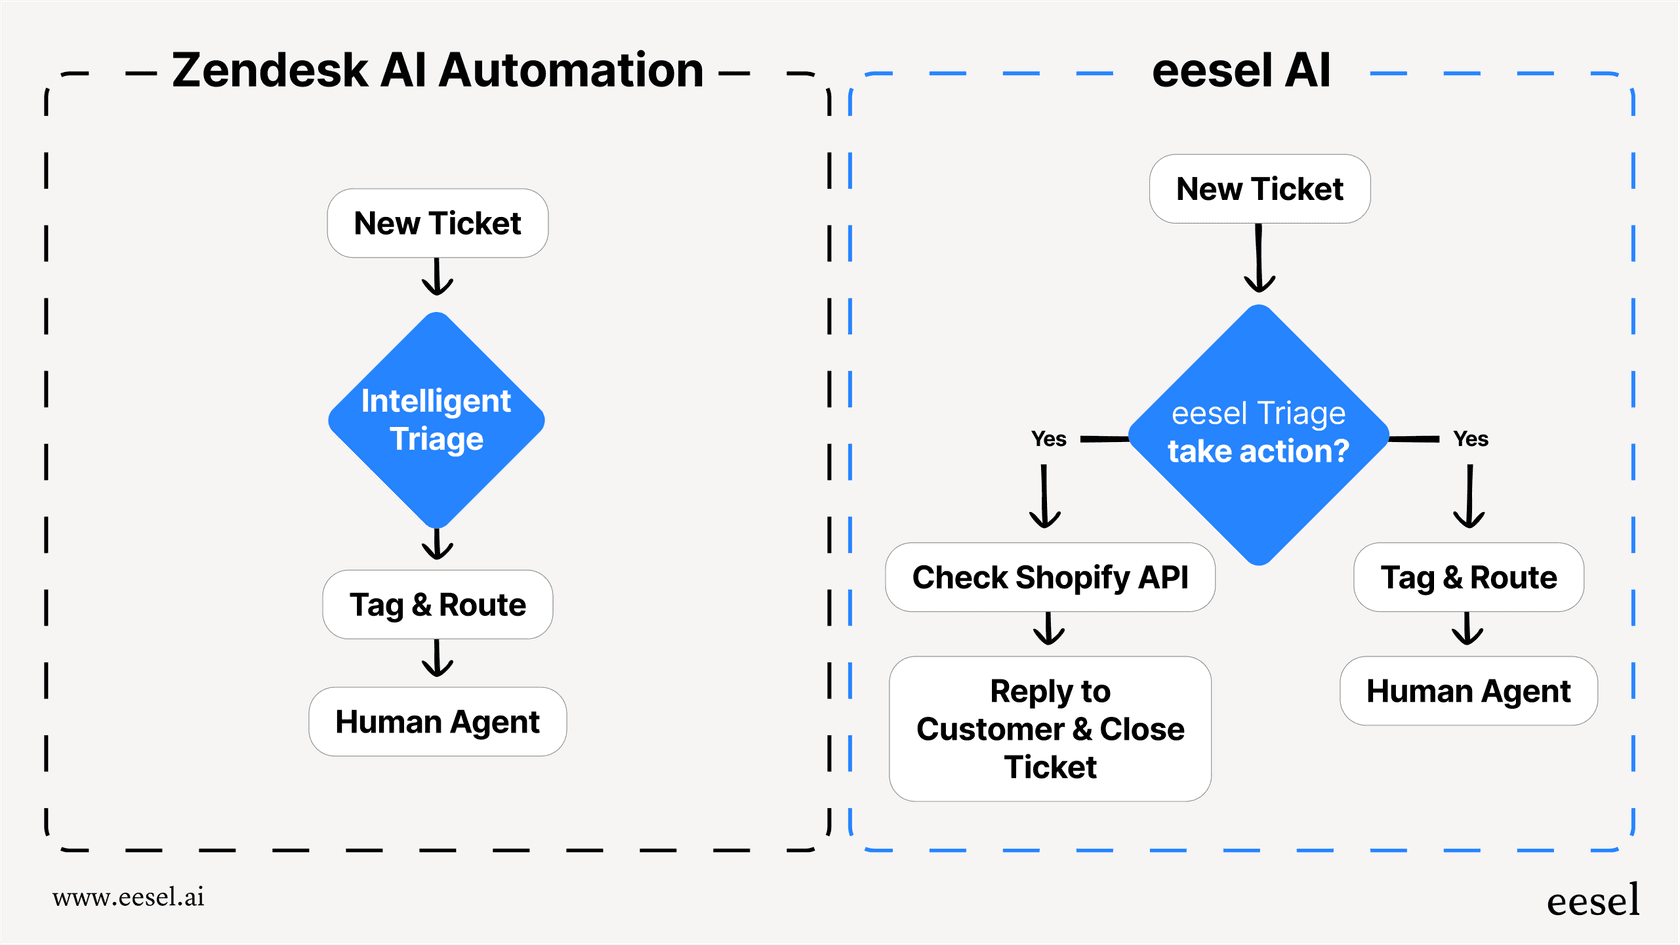
We integrate with Zendesk to add intelligent routing on top of your existing view structure. Instead of relying solely on static rules, our AI Triage analyzes ticket content, detects urgency, understands sentiment, and automatically tags and categorizes tickets.
Here's what that means practically:
- A ticket mentioning "urgent" and "down" gets tagged and routed to your high-priority view automatically
- A frustrated customer's ticket gets flagged for immediate attention
- Refund requests go straight to the Finance team's view without manual sorting
Our AI Agent can even handle routine tickets entirely, resolving them before they ever hit your views. The result? Your agents spend less time sorting and more time solving.
The setup takes minutes, not months. You don't change your existing Zendesk structure. You just add a layer of intelligence that makes sure the right tickets reach the right views faster.
Start organizing your support queue today
Setting up effective Zendesk ticket views comes down to a few key principles:
- Use conditions that look for what you want to include, not exclude
- Scope views to "current user's groups" for flexibility
- Hide pending tickets from working views
- Keep views focused on actionable work, not reporting
Start with the five essential view templates above. Adjust them to fit your team's workflow. Then, as your volume grows, consider how AI automation can help route tickets more intelligently.
Views give your agents organized lists. The right setup ensures those lists contain exactly what each agent should be working on, right now.