When your support inbox is overflowing, the difference between chaos and clarity often comes down to how you organize your tickets. You know the feeling: dozens of tickets waiting, customers expecting responses, and no clear signal telling you which issue needs attention first.
This is where Zendesk SLA targets in ticket views become essential. Instead of letting urgent issues get buried, you can ensure VIP customers are prioritized, SLA deadlines are met, and agents always know what to tackle next. The built-in SLA features in Zendesk give you a powerful framework for monitoring your commitments and maintaining a high standard of service.
In this guide, we'll walk through exactly how to set up SLA targets in your ticket views, explain what those colored badges actually mean, and show you how to build views that help your team consistently hit their targets.
What you'll need
Before we get started, make sure you have:
- A Zendesk Professional or Enterprise plan (SLA policies are included in these tiers but not in Team or Growth plans)
- Admin permissions or the ability to modify views in your Zendesk instance
- Existing SLA policies configured (if you haven't set these up yet, check out Zendesk's guide on defining SLA policies first)
- A basic understanding of ticket priorities (Low, Normal, High, Urgent), since these determine which SLA targets apply
Understanding Zendesk SLA targets and badge colors in views
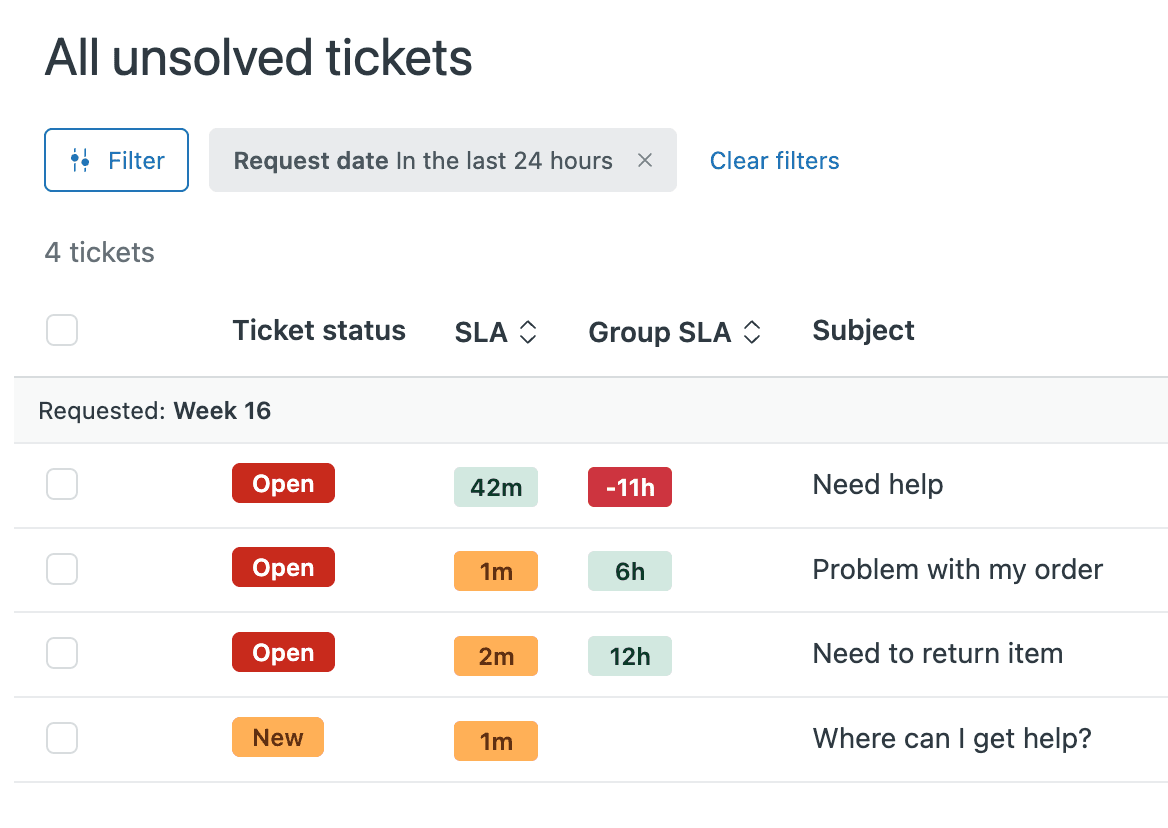
Similar to ticket statuses, SLA targets have different statuses on a ticket. Agents can see these statuses in tickets or in views through the SLA or Group SLA columns. These columns display the calendar time left before the next target on any given ticket will be breached.
The three core statuses
Here's how SLA targets work:
-
Active: An active SLA target is one whose metric has not yet been completed. For example, if the metric is "First Reply Time" and there's been no first public reply on a ticket, the "First Reply Time" target is still active on that ticket.
-
Paused: A paused SLA target is one whose metric has not yet been completed, but the clock has been temporarily paused. A target can get into this state if its metric definition excludes certain statuses, like Requester Wait Time. When a ticket is put into pending, the Requester Wait Time target will be paused.
-
Closed: A closed SLA target is one whose metric has been completed. For example, a ticket that's already received a public reply will have a closed target for the "First Reply Time" metric.
There are also breached variants of each of these three states. Any given SLA target can be both active and breached, or paused and breached, or closed and breached. This just means that in addition to the status definition above, the metric has surpassed the target time assigned to that ticket.
What the badge colors mean
The color of the SLA badge tells you how much time is left before the SLA is breached:
| Color | Meaning | Time Remaining |
|---|---|---|
| Green | On track | Greater than 15 minutes |
| Amber | Warning | Fewer than 15 minutes |
| Red | Breached | 0 minutes or negative time |
SLA badges round to the nearest minute, hour, or day, with the exact halfway point rounding down. For example, if an SLA target is 1:30:00, it'll round down to a 90m badge. If the SLA target is 1:31:00, it'll round up to the 2h badge. Similarly, if the target is 36:30:00, it's rounded down to a 36h badge. If the target is 36:31:00, it's rounded up to a 2d badge.
If a ticket does not have an SLA policy applied or if all of the targets on that ticket are closed, the SLA value will be blank for that ticket. If at least one target on the ticket is active, the calendar time remaining before that target is breached appears. Once the target has been breached, a negative time value (like -15m or -4h) appears in red.
If the next target is paused, a pause icon will appear in the SLA column. For targets that haven't been breached yet, a green pause icon appears. For targets that have already been breached, the pause icon appears in red.
If a ticket has multiple active SLA targets, the soonest expiring target displays. This includes targets that have already been breached.

How to add SLA columns to your Zendesk views
Now let's get into the practical steps. Adding SLA columns to your views gives agents visibility into which tickets need immediate attention.
Step 1: Navigate to your views
First, click the Views icon in the sidebar, then select the view you want to modify. If you're creating a new view specifically for SLA management, you can do that here too.
Step 2: Open the view editor
Click the Actions menu, then select Edit view. This opens the view configuration panel where you can adjust all the settings.

Step 3: Add the SLA column
In the Formatting options section, click Add column. From the dropdown list, select SLA or Group SLA depending on which type of SLA tracking you want to display.
The SLA column will show the calendar time remaining before the next target breaches. The Group SLA column works the same way but for group-specific SLAs (available on Enterprise plans).
You can add multiple SLA-related columns if needed. Consider adding:
- SLA or Group SLA: Shows the time remaining or breach status
- Hours until next SLA breach: A numeric countdown for precise prioritization
- SLA policy name: To see which policy is applied to each ticket
Step 4: Configure the sort order (critical for prioritization)
Here's where the magic happens. To make sure tickets whose targets are most breached or are closest to breaching get attention first, select Order by > SLA or Group SLA in Ascending order.
This sorts tickets so the ones with the least time remaining (or those already breached) appear at the top of the view. Agents will automatically see the most urgent work first.
Click Save when you're done. The column is now added, and you can filter your view by SLA or group SLA to further refine results.

Creating high-value SLA views for your team
Now that you know how to add SLA columns, let's look at specific view configurations that solve common support challenges. Here are five view recipes you can implement immediately:
View 1: At-risk tickets (prevent breaches before they happen)
This view shows tickets approaching their SLA deadline, giving agents a chance to respond before a breach occurs.
Conditions:
- Status is Open
- SLA is About to breach
Columns to include:
- Subject
- Requester
- Priority
- SLA (sorted ascending)
- Assignee
Purpose: Catch tickets before they breach and damage your metrics.
View 2: Breached today (damage control)
When tickets do breach, you need to find them quickly. This view surfaces recently breached tickets so they don't sit unresolved.
Conditions:
- Status less than Closed
- Hours since SLA breach is less than 24
Note: Historical breaches (older tickets) won't show SLA timers in views. Once an SLA target is achieved or breached, the countdown timer disappears from views until the next SLA target becomes active. For historical SLA reporting, you'll need to use Zendesk Explore.
View 3: VIP customer SLA view
Your highest-value customers deserve the fastest responses. This view ensures their tickets never get lost in the queue.
Conditions:
- Organization tags contain "VIP" (or use Organization is VIP)
- SLA is Active
Columns to include:
- Organization
- Subject
- Priority
- SLA
- Assignee
View 4: Paused SLA tickets (customer follow-ups needed)
When tickets are in Pending status, the SLA clock pauses. This view helps you monitor tickets waiting on customer replies and identify when a follow-up might be needed.
Conditions:
- Status is Pending
- SLA shows paused icon
Use case: Review this view daily to see if any customers haven't responded in a while. You might want to send a gentle follow-up or close the ticket if the issue is resolved.
View 5: Unassigned with active SLAs (prevent SLAs from ticking on unowned tickets)
Nothing hurts your metrics like an unassigned ticket breaching its SLA. This view ensures every ticket has an owner while the SLA clock is running.
Conditions:
- Assignee is Unassigned
- SLA is Active
Pro tip: Set up a trigger to notify managers when tickets appear in this view, or use it as part of your triage process.
Troubleshooting common SLA view issues
Even with the best setup, you might run into issues. Here are the most common problems and how to fix them:
Issue 1: SLA badges aren't appearing in my view
If you don't see SLA badges on tickets, check these common causes:
-
No priority set: SLAs are based on ticket priority. If a ticket has no priority, no SLA policy applies. Set up triggers to automatically assign priorities based on ticket conditions.
-
Agent is the requester: Many SLA targets don't work on tickets where the agent is also the requester.
-
No active target: If all SLA targets on a ticket are already closed (achieved or breached), the SLA column will be blank.
-
Private comments only: SLA reply targets activate on public comments, not internal notes. If the only activity is private comments, reply-based targets won't trigger.
-
Ticket solved on creation: SLAs don't apply to tickets that are solved immediately upon creation. The solved status satisfies SLAs and prevents policies from activating.
Issue 2: I can't see historical breached tickets in views
This is a known limitation. As Zendesk community expert Chandra Robrock explains, "Once an SLA target has either been achieved or breached, the countdown timer will no longer be displayed within Views until the next SLA target is active."
Workarounds:
- Use Zendesk Explore for historical SLA reporting and breach analysis
- Set up automations to tag tickets when they breach, before they're resolved
- Create a custom field to track breach status that persists after resolution
Issue 3: Group SLAs aren't sorting correctly with regular SLAs
Group SLAs appear in a separate column from regular SLAs. When you sort by SLA, you're sorting by only one column type. You cannot intermix regular and Group SLA sorting in a single view.
Solution: Create separate views for Group SLA tracking, or use the Group SLA column for sorting in views where group ownership is the primary concern.
Issue 4: SLA times look wrong or don't match my business hours
SLA badges always show hours and days in calendar time to help agents prioritize workflows in real time. However, the actual target due date is based on your SLA policy settings (business hours vs. calendar hours).
For example, a ticket created Friday at 4 PM with an 8-hour business hours target might not be due until Monday morning. The badge will show "3d" (three days in calendar time) even though only 8 business hours are required. This is normal and ensures all badges use the same scale for easy comparison.
Best practices for Zendesk SLA targets in ticket views
Once you have your SLA views set up, a few best practices will help you get the most value:
Start agents' day with the SLA-sorted view. Make your primary "Open Tickets" view sort by SLA ascending. This trains agents to naturally prioritize the most time-sensitive work.
Use SLA columns alongside priority. While SLA sorting is powerful, don't ignore priority entirely. A high-priority ticket with 2 hours left might need attention before a low-priority ticket with 30 minutes left, depending on your business context.
Keep view counts manageable. Aim for 5-7 views per team. Too many views confuse agents; too few limit your ability to organize work effectively.
Train agents on badge meanings. Make sure everyone understands that green, amber, and red badges are based on time remaining, not ticket priority. A red badge doesn't necessarily mean the customer is angry; it means the SLA target has been exceeded.
Set up breach notifications. While you can't create triggers based directly on SLA breach status, you can use automations with conditions like "Hours until next SLA breach" to send notifications when tickets are approaching their limits.
Consider AI assistance for faster responses. If you're consistently struggling to meet SLA targets, tools like eesel AI can help by drafting instant replies for agents or even handling common tickets autonomously. When First Reply Time is your challenge, an AI that responds in seconds can transform your metrics.

Take control of your Zendesk SLA targets in ticket views
SLA targets in views transform chaotic ticket lists into prioritized workflows. By adding SLA columns, sorting by ascending time remaining, and creating targeted views for different scenarios, you give your team the clarity they need to consistently meet customer expectations.
The key takeaway: sorting by SLA in ascending order ensures nothing slips through the cracks. Urgent tickets get priority without completely ignoring older normal-priority items.
Start with one view this week. Add the SLA column to your most-used view, set it to sort ascending, and watch how it changes your team's approach to ticket prioritization. Small changes to view configuration often create surprisingly big efficiency gains.
And if you find that meeting those SLA targets is still a struggle even with better visibility, that's where modern AI tools can help. eesel AI integrates directly with Zendesk to draft replies instantly, helping your team hit those First Reply Time targets without the stress.
