How to set up Zendesk messaging predefined chat responses: A complete guide
Stevia Putri
Last edited February 20, 2026
Your customers expect instant responses when they reach out for support. But your team can't be online 24/7, and even during business hours, agents need time to work through their queue. Predefined chat responses solve this problem. They set expectations, collect information upfront, and keep customers engaged while they wait.
If you're using Zendesk messaging, you have several ways to automate these responses. This guide walks you through each option, from basic greeting messages to advanced AI-powered replies, with ready-to-use templates you can implement today.

What are Zendesk messaging predefined responses?
Predefined responses in Zendesk messaging are automated messages that trigger based on specific conditions. Unlike live chat where conversations happen in real-time sessions, messaging conversations can persist across devices and time periods. This means your automated responses need to handle different scenarios: a customer messaging during business hours, someone reaching out at midnight, or a queue so long that wait times stretch past an hour.
Zendesk gives you four main ways to handle these scenarios:
Default messaging responses are the basic greetings and information collection forms that appear when someone opens your Web Widget. You set these up once, and every customer sees them when initiating a conversation.
AI agent standard responses replace the default responses when you enable Zendesk's AI agent. These include intelligent greetings, answers pulled from your help center, and fallback messages when the AI can't help.
Trigger-based automated messages fire based on specific conditions like queue size, time of day, or customer data. These are more flexible than default responses and can create complex workflows.
Structured messages add interactive elements like quick reply buttons, carousels, and panels. These require the Chat Conversations API and work best for teams with developer resources.
Setting up basic messaging responses
Before diving into advanced automation, start with the fundamentals. Default messaging responses are available on all Zendesk Suite plans, and you can set them up in minutes.
Access your messaging settings
Navigate to Admin Center, then click Channels in the sidebar. Select Messaging and social, then Messaging. Click the name of the channel you want to configure. Scroll down to the Responses section and click to expand it.
Configure business hours
If you want different messages for during business hours versus after hours, you need to apply a schedule. Under Business hours, select a saved schedule. If you haven't created one yet, click Manage schedules to set it up.
Note that schedules aren't available on Team plans. If you're on Team, you can use out-of-office triggers as a workaround.
Customize your message components
The default messaging response has three parts you can customize:
First message: This is the greeting customers see when they open the Web Widget. Keep it friendly and set expectations. Something like "Hi there! Welcome to [Company]. How can we help you today?" works well.
Customer details: Choose what information to collect before handing off to an agent. You can request name, email, or create custom fields. If you're using authentication for messaging, signed-in users won't be asked for their name or email again.
Follow-up message: This appears after the customer submits their details. Use it to confirm receipt and set expectations for response time. "Thanks for reaching out. An agent will be with you shortly" is a safe default.
If you've applied a business hours schedule, you'll see tabs for both "During business hours" and "Outside business hours." Customize each separately.
Ready-to-use response templates for Zendesk messaging
Writing effective response copy is harder than it looks. You need to sound human while being clear about what happens next. Here are templates for common scenarios you can adapt for your business.
Business hours greetings
Professional greeting:
Welcome to [Company] support. We're here to help with any questions about your account, billing, or technical issues. Please share a few details so we can assist you faster.
Friendly/casual greeting:
Hey there! Thanks for reaching out. What's going on? Tell us a bit about what you need help with, and we'll get you sorted.
SaaS product greeting:
Hi! Having trouble with [Product Name] or just exploring what's possible? Let us know what you're working on, and we'll point you in the right direction.
E-commerce greeting:
Hello! Questions about your order, shipping, or returns? We're here to help. Share your order number if you have it handy, and tell us what you need.
Out-of-office messages
Standard after-hours:
Thanks for reaching out! Our team is currently offline, but we check messages first thing in the morning. Leave your email and we'll get back to you within 4 business hours.
Weekend-specific:
Hi there! You've caught us outside business hours. We're back Monday at 9 AM and respond to all messages in the order received. For urgent issues, check our [help center link].
Holiday closure:
Happy holidays! Our team is taking time off to recharge. We're back on [Date] and will respond to your message then. For immediate help, browse our help center articles below.
Queue and wait time notifications
Simple queue position:
You're number [queue position] in line. We typically respond within [X] minutes during business hours. Thanks for your patience.
Estimated wait time:
Thanks for waiting! Current wait time is approximately [wait time] minutes. Feel free to keep this window open, and we'll notify you when an agent is available.
High volume notification:
We're experiencing higher than usual volume right now. Wait times are around [X] minutes. Your message is important to us, and we're working through the queue as quickly as possible.
Handoff and escalation messages
Transfer to agent:
Connecting you with [Agent Name] now. They'll have your details and can pick up right where we left off.
Email collection when offline:
Our team is currently away. Leave your email address, and we'll follow up as soon as we're back online. We typically respond within 4 hours during business hours.
Ticket creation confirmation:
We've created ticket #[Ticket Number] for you. You can reply to this conversation anytime, or check status at [link]. An agent will respond shortly.
Using AI agents for intelligent responses in Zendesk messaging
When you add an AI agent to your messaging channel, it replaces the default messaging response entirely. The AI handles the initial greeting, searches your help center for answers, and only escalates to human agents when necessary.
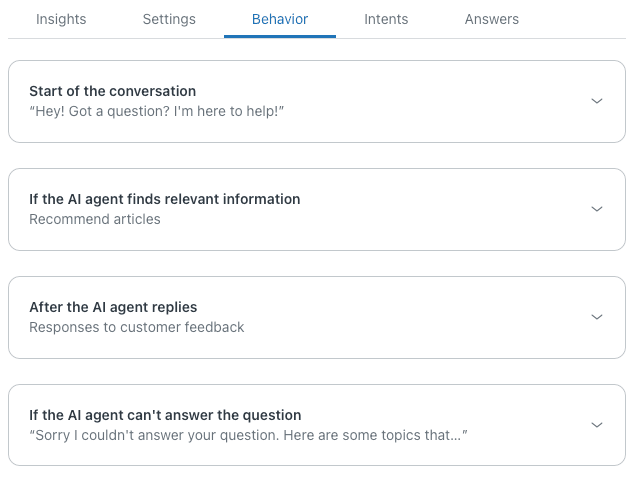
Zendesk's AI agent uses four standard response types you can customize:
Start of conversation: The welcome message customers see when they open the widget. You can use a simple greeting or immediately present suggested answers as quick reply buttons. Presenting answers upfront works well for common questions like "Track my order" or "Reset password."
If the AI agent finds relevant information: This is where the AI delivers help center content. The recommended approach is using generative replies, where the AI summarizes relevant articles into conversational responses. This feels more natural than dumping a link to an article.
After the AI agent answers: Follow-up messages asking if the answer was helpful. You can configure different responses for positive and negative feedback. If the answer wasn't helpful, offering a "Talk to a human" option is a best practice.
If the AI agent can't answer: The fallback response when no help center content matches the customer's question. This should acknowledge the limitation and offer alternatives, like browsing topics or connecting to an agent.
Advanced automation with Zendesk messaging triggers
Triggers take your predefined responses beyond basic greetings. They let you send targeted messages based on real-time conditions like queue length, customer history, or time of day.
Messaging triggers differ from ticket triggers in an important way: they run on conversations before they become tickets. This means they can influence the conversation while it's still happening in the widget, not after it's been assigned to an agent.
Key trigger firing events
You can set triggers to fire when:
- A customer requests a conversation (initial contact)
- A customer sends a message (any message in the conversation)
- A conversation is added to the queue (enters omnichannel routing)
- A conversation is assigned from a queue (agent accepts or auto-accept)
Conditions for automated responses
Triggers can check dozens of conditions before firing:
Time-based: Hour of day, day of week, business hours status Customer data: Name, email, number of previous conversations, page URL Location/device: Country, browser, operating system Queue status: Queue size, estimated wait time, account online status Conversation state: Tags, message content, assignment group
Using placeholders for personalization
Placeholders make your automated responses feel less robotic. Available placeholders include:
| Placeholder | What it inserts |
|---|---|
| @customer_name | The customer's name |
| @wait_time_min | Minimum estimated wait time |
| @wait_time_max | Maximum estimated wait time |
| @queue_size | Current number of waiting customers |
| @account_status | Online, Away, or Invisible |
Example personalized message:
Hi @customer_name! Thanks for reaching out. We're currently handling a higher volume than usual, with a wait time of approximately @wait_time_min to @wait_time_max minutes. We'll be with you as soon as possible.
Common trigger-based response scenarios
Welcome new customers: Set a trigger that fires when previous conversations equals 0. Send a welcome message and perhaps offer a getting-started guide.
Queue overflow notification: When queue size exceeds a threshold, send a message acknowledging the wait and offering self-service options.
VIP customer routing: Use customer tags or email domains to identify VIPs and send personalized greetings or route them to priority queues.
Page-specific responses: Trigger different messages based on the customer_page_url condition. Someone on your pricing page might get different help than someone in your documentation.
Structured messages for richer interactions in Zendesk messaging
Text responses work for most scenarios, but sometimes you want richer interactions. Structured messages add interactive elements like buttons, carousels, and panels to your conversations.
Available structured message types include:
Quick replies display up to 11 buttons that customers can click to send predefined responses. Use these for common questions like "What's my order status?" or "I want to return an item."
Button templates combine a text message with up to 3 buttons. Buttons can trigger quick replies or open URLs. This works well for "Did this answer your question?" with "Yes" and "No" buttons.
Panel templates show an image, title, subtitle, and buttons in a card format. Use these for product recommendations or highlighting featured help articles.
Panel template carousels display 2-10 panels that users can swipe through. This format works for showcasing multiple products or help topics.
List templates present 2-4 items with optional images and a single action button. They're more compact than carousels but still visually engaging.
To use structured messages, you'll need access to the Chat Conversations API. This requires Enterprise or Premium Chat (Legacy) plans and some development work. For most teams, starting with text-based responses and upgrading to structured messages later is the practical approach.

Going beyond Zendesk's built-in response options
Rule-based triggers and predefined responses handle straightforward scenarios well. But they have limitations that become apparent as your support operation grows.
The challenges with rule-based automation include:
- Limited condition options: You can't easily check if a customer was recently surveyed, or if they've contacted you about the same issue before.
- No context awareness: Triggers match conditions, not intent. A message saying "I was charged twice" and "Can I get a refund for a double charge" require separate triggers even though they mean the same thing.
- Single language per trigger: Each trigger message is in one language. Supporting multilingual customers means duplicating your entire trigger setup.
- Maintenance overhead: Complex scenarios need multiple triggers that can conflict or fire in unexpected orders.
This is where AI-powered automation offers a different approach. Instead of writing rules for every scenario, AI agents learn from your existing knowledge and adapt to conversations dynamically.
At eesel AI, we built our AI agent to work alongside or instead of traditional triggers. Here's how the approaches differ:

| Capability | Messaging Triggers | eesel AI |
|---|---|---|
| Setup time | Manual rule creation | Learns from your help center, past tickets, and docs in minutes |
| Language support | Single language per trigger | 80+ languages automatically |
| Context understanding | Keyword/condition matching only | Understands intent and conversation context |
| Complex scenarios | Multiple triggers needed | Single AI handles varied requests |
| Learning | Static rules | Improves from agent corrections |
We integrate directly with Zendesk and can operate as a frontline AI Agent handling tickets autonomously, an AI Copilot drafting replies for agent review, or both. You define escalation rules in plain English, and the AI follows them.
Getting started with smarter Zendesk messaging predefined responses
Whether you stick with Zendesk's built-in options or explore AI-powered alternatives, here's a quick checklist for implementing your predefined responses:
Start simple: Begin with basic greeting messages and business hours responses. Get these working before adding complexity.
Match your brand voice: Your automated messages should sound like they come from your team, not a robot. Read them aloud before going live.
Set clear expectations: Every message should tell the customer what happens next. Will an agent respond in 5 minutes or 5 hours? Should they check their email?
Test everything: Use Zendesk's preview features to see how responses look from the customer side. Check both business hours and after-hours versions.
Iterate based on feedback: Review your messaging analytics regularly. If customers are dropping off after seeing a certain message, that message needs work.
For teams ready to move beyond rule-based automation, eesel AI offers a free trial where you can see how AI-powered responses compare to traditional triggers. You can run simulations on your past tickets to measure quality before going live, something that's hard to do with trigger-based approaches.
