When a customer starts a conversation in your Zendesk chat widget but needs to step away, the transition to email should feel seamless. A clunky handoff frustrates customers and creates extra work for agents who have to piece together fragmented conversations. Done well, Zendesk handoff from chat to email preserves context, maintains the conversation thread, and keeps resolution times low.
This guide breaks down exactly how to configure Zendesk's continuous conversations feature, from the basic setup to advanced timing controls. Whether you're setting up chat-to-email transitions for the first time or troubleshooting why customers can't start new conversations, you'll find step-by-step instructions that work for your Zendesk tier.

What is Zendesk handoff from chat to email?
Before diving into configuration, let's clarify what we're actually setting up. Zendesk uses the term "continuous conversations" for the chat-to-email workflow. It's different from handing a conversation to a live agent (though the two can work together).
Continuous conversations let customers who abandon a messaging chat receive email notifications when agents respond. The customer can then continue the conversation by replying to the email or returning to the website widget. The full conversation history stays intact regardless of which channel they use.
This matters because customer behavior is unpredictable. Someone might start a chat during their lunch break, get pulled into a meeting, and prefer to continue via email later. Without continuous conversations enabled, that conversation sits unread until the customer returns to your website, or worse, gets lost entirely.
The feature is distinct from live agent handoff, which transfers control from an AI agent to a human agent within the same chat session. You can use both: an AI agent handles initial triage, escalates to a human when needed, and if the customer leaves, continuous conversations takes over to keep the thread alive via email.
Prerequisites for Zendesk handoff from chat to email
Before you can enable continuous conversations, your Zendesk account needs to meet several requirements:
- Zendesk Suite OR Support + Chat (Team plan or higher). The feature isn't available on standalone Support plans without Chat.
- Agent Workspace activated. This is the modern Zendesk interface that unifies chat and ticketing. If you're still using the classic Chat dashboard, you'll need to migrate first.
- At least one agent with Chat access. Someone needs to be available to respond when conversations come in.
- A support email address configured. This is the address that sends continuous conversation notifications to customers.
- Web Widget implementation. Continuous conversations only works through the Web Widget. It is not available on mobile SDK implementations.
If you're missing any of these, the continuous conversations option simply won't appear in your Admin Center, or the feature won't function correctly.
Step-by-step: Configuring continuous conversations
Step 1: Enable continuous conversations in Admin Center
Start by navigating to Admin Center > Objects and rules > Tickets > Settings. Scroll down to find the Continuous conversations section and expand it.
Select the checkbox labeled "Switch messaging conversations to email." This activates the core feature.

When you save this setting, Zendesk automatically creates a trigger called "Request email for continuous conversations." This trigger runs after a conversation has been idle for 5 seconds and requests the customer's email address if it hasn't been collected yet.
Step 2: Configure the email request trigger
The auto-created trigger handles most use cases, but you should review and customize it to match your workflow.
Navigate to Admin Center > Objects and rules > Business rules > Messaging triggers and open the "Request email for continuous conversations" trigger.
Review these key settings:
- Conditions: By default, it fires when a conversation is idle for 5 seconds and the customer's email is unknown. You might want to adjust the timing or add conditions based on your business hours.
- Actions: The trigger sends a message requesting the customer's email. Customize this message to match your brand voice.

If you're already collecting email addresses at the start of conversations (through a pre-chat form, for example), you can deactivate this trigger to avoid asking for the email twice.
Step 3: Customize the email notification template
Continuous conversation emails use your standard Zendesk email notification template. They include:
- The number of unread agent messages
- A snippet of the conversation
- Instructions for continuing via email or returning to the website
To review or customize your template, go to Admin Center > Channels > Email > Email templates. The continuous conversations feature pulls from your Support account email notification format.
If you've customized your email template significantly, test how continuous conversation emails render. The template is localized and translated based on the user's profile language in Support.
Step 4: Test the workflow
Before going live, run through a complete test:
- Open your website and start a conversation in the Web Widget
- Send a message, then close the browser or navigate away (simulating abandonment)
- Have an agent respond to the conversation from the Agent Workspace
- Wait for the inactivity threshold (default: conversation deemed inactive with unread messages)
- Check that the email notification arrives with the correct content
- Reply to the email and verify the response appears in the Zendesk ticket
- Return to the website widget and confirm you can continue the conversation there too
Test both paths: email reply and widget return. Both should maintain the full conversation thread.
Managing handoff timing and ticket status
Here's where most teams run into trouble. Zendesk's default ticket lifecycle creates a gap that confuses customers.
When an agent solves a ticket, Zendesk waits 4 days by default before changing the status to Closed. During those 4 days, if the customer returns to your messaging widget, they can't start a new conversation. Their message gets appended to the existing ticket instead, and the previous agent remains assigned.
This causes two problems:
- Customers can't report new issues because they're stuck in an old conversation thread
- Context gets muddled when new problems mix with resolved ones
Adjusting the solved-to-closed timing
You have two options to fix this:
Option 1: Edit the default automation
Zendesk includes an automation called "Close ticket 4 days after status is set to solved." You can reduce this timeframe:
- Go to Admin Center > Objects and rules > Automations
- Find and edit the default close automation
- Change the time condition from 4 days to your preferred duration (as short as 1 hour, as long as 28 days)
- Save and test

Option 2: Create an immediate-close trigger
For more control, create a trigger that closes tickets immediately when tagged:
- Condition: Tags | Contains at least one of the following |
close - Action: Status | Closed
Then add the close tag via macro or automation when solving tickets that came through messaging.
One important caveat: if you're using CSAT surveys, don't close tickets immediately. The survey sends when the ticket is marked Solved, so closing too fast can interfere with the survey experience. Most teams find a 1-4 hour buffer works well.
Preserving context during Zendesk handoff from chat to email
Nothing frustrates customers more than repeating information they already shared. Here's how to ensure context survives the channel transition.
Zendesk automatically attaches the full conversation transcript to the ticket. Agents see everything the customer said in the chat, including their interaction with any AI agent. But raw transcripts can be long, and busy agents don't always read them thoroughly.
To pass structured context:
Custom ticket fields let you capture specific data points during the conversation. If you're using Zendesk AI agents with the dialogue builder, add "Ask for details" steps that map to ticket fields like order number, product category, or issue type. These appear prominently in the ticket sidebar.
Metadata passing handles technical data like account IDs or session information. This requires code in your Web Widget to pass custom data into the ticket. It's more work to set up but valuable for e-commerce or SaaS support where you need to reference specific records.
Internal notes can include AI-generated summaries. Some teams configure their AI agent to write a brief summary of the customer's issue before any handoff occurs. This gives agents the "TL;DR" without digging through transcripts.
The goal is simple: agents should know what the customer needs within seconds of opening the ticket. If they have to ask the customer to repeat information, you've lost the efficiency gains that automation was supposed to provide.
Troubleshooting common Zendesk handoff from chat to email issues
Issue: Tickets defaulting back to Messaging channel
This is a known pain point that Zendesk has acknowledged. When a ticket that started as Messaging gets reopened, it defaults back to the Messaging channel even if the last interaction was email.
The result? Agents hit "send" thinking they're emailing a customer, but they've actually sent a chat message. This is particularly frustrating when the customer isn't online to receive it.
According to a Zendesk Product Manager, this is expected behavior and there are no immediate plans to change it. However, the community has been vocal about the issue:
It's very inconvenient that there's an incoming Messaging ticket and that we change the channel to email to solve the ticket. But if the ticket is reopened, the channel is back to messaging. This doesn't make sense at all.
Workarounds:
- Train agents to always check the channel selector before sending
- Create triggers that tag tickets when the channel changes, alerting agents to verify
- Use internal notes to document when a conversation has moved to email
Issue: Customers can't start new conversations
Symptom: A customer returns to the messaging widget but their previous conversation reopens instead of starting fresh.
Cause: The ticket status is Solved, not Closed. Until it's Closed, the customer can't begin a new conversation.
Fix: Reduce the Solved to Closed delay using the automation or trigger methods described earlier. For most teams, 1-4 hours provides enough buffer for CSAT surveys without causing customer confusion.
Issue: Email notifications not sending
If continuous conversation emails aren't reaching customers:
- Verify your support email address is properly configured in Admin Center > Channels > Email
- Check that the "Request email for continuous conversations" trigger is active
- Review your spam folder and email deliverability settings
- Confirm the ticket status isn't already Closed (emails don't send for closed tickets)
- Verify the conversation was actually inactive with unread messages when the agent responded
Alternative approaches for chat-to-email handoff
While Zendesk's native continuous conversations works for many teams, it's not the only option. Third-party chatbot platforms offer different approaches to the same problem.
Ada provides email handoff blocks that create Zendesk tickets while maintaining thread continuity. Their SMTP connector allows human agents to reply from the same email address as the AI agent, keeping everything in one thread.
Botsonic offers a simpler integration focused on live agent handoff rather than async email continuation. It's easier to set up but doesn't solve the "customer left and needs to continue later" use case as elegantly.
Deepconverse targets Zendesk Chat Classic with widget-based handoffs. This is useful if you haven't migrated to Agent Workspace yet, though Classic Chat is being phased out.
The trade-off with third-party solutions is complexity. You gain flexibility but add another system to manage, another integration to maintain, and another potential point of failure.
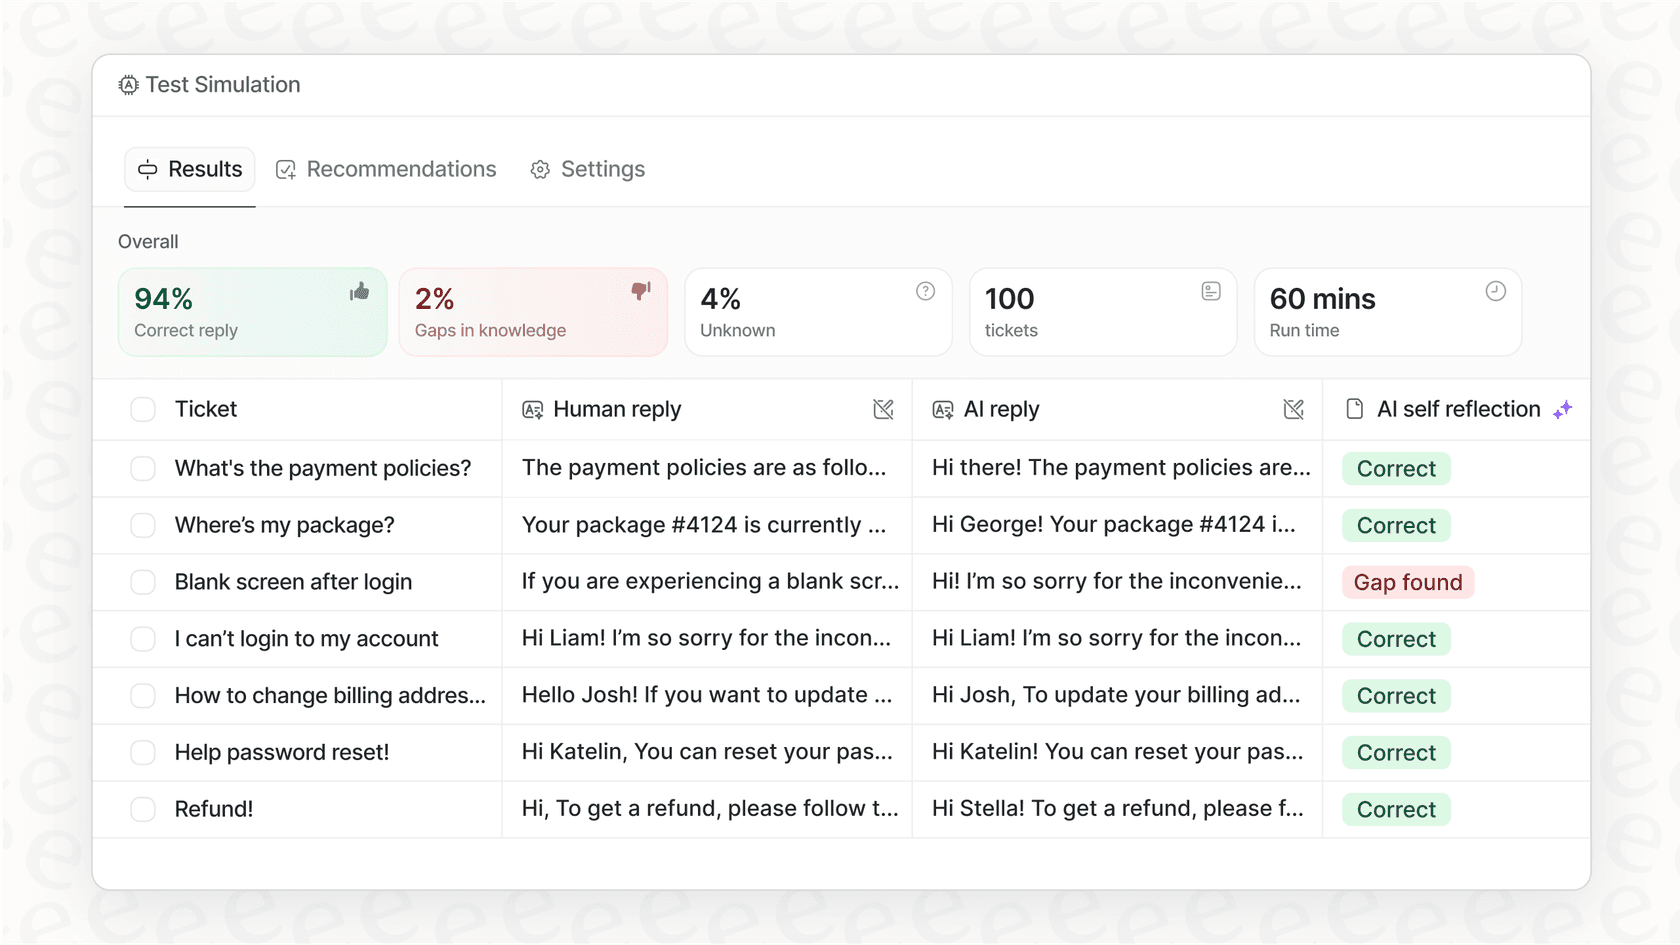
If the native Zendesk configuration feels limiting or the dialogue builder complexity is slowing you down, we offer a simpler approach. At eesel AI, we integrate directly with Zendesk and let you define escalation rules in plain English instead of dragging blocks in a visual builder. You can also run simulations on your historical tickets before going live to see exactly how handoffs would work.

Start handling Zendesk handoff from chat to email smoothly
Getting chat-to-email handoffs right matters more than most teams realize. It's the difference between customers feeling like you understand their journey versus feeling like they're starting over every time they switch channels.
The key points to remember:
- Enable continuous conversations in Admin Center to activate email notifications
- Adjust the Solved to Closed timing to prevent customers from getting stuck in old conversations
- Preserve context through custom fields, metadata, and internal notes so agents never ask customers to repeat themselves
- Train agents on the channel persistence quirk so they don't accidentally send chat messages when they mean to email
If you're finding the Zendesk dialogue builder complex for your escalation needs, or you want to test handoff scenarios before going live, we can help. We handle handoff with plain-English rules, learn from your existing tickets and docs, and let you simulate against historical data before customers see it.
Next steps:
- Audit your current continuous conversations configuration and timing settings
- Test the full workflow from chat start to email reply to ensure context flows correctly
- Review agent training materials to include the channel switching behavior
- Consider whether your escalation complexity warrants a simpler approach