How to automate ticket types in Zendesk: Incident, problem, and task guide
Stevia Putri
Last edited February 24, 2026
Managing a high-volume support queue means making quick decisions about how to categorize and route tickets. When your team manually sets ticket types for hundreds of tickets daily, mistakes happen. Questions get marked as incidents. Tasks sit in the wrong queues. Problems go unnoticed until they've spawned dozens of related tickets.
This is where Zendesk automation comes in. By setting up rules that automatically assign ticket types based on specific conditions, you can reduce manual work, improve categorization accuracy, and ensure tickets follow the right workflow from the moment they're created.
In this guide, we'll walk through exactly how to set up automations that assign ticket types in Zendesk. Whether you need to route outage reports as incidents, flag recurring issues as problems, or convert follow-up items to tasks, you'll learn the specific steps to make it happen.
What you'll need to get started
Before you start building automations, make sure you have the following in place:
- A Zendesk Support account on Team plan or higher (automations are not available on the Essential plan)
- Admin permissions or a custom role with business rule management access
- A clear understanding of your current ticket workflow and which types of requests should be categorized as questions, incidents, problems, or tasks
- Optional: An API token if you plan to set up advanced webhook-based automations for linking incidents to problems
If you're new to Zendesk business rules, it helps to understand the difference between triggers and automations. Triggers fire immediately when tickets are created or updated. Automations run on a schedule (typically hourly) and check conditions then. For time-based workflows like "set ticket type after 2 hours," use automations. For immediate actions, use triggers.
Understanding Zendesk ticket types
Zendesk offers four ticket types, each designed for a specific kind of support interaction. Getting these right matters because each type behaves differently and triggers different workflows.
Question
The default type for most tickets. Use this for general inquiries where a customer needs information or help with something that doesn't indicate a system-wide issue. "How do I reset my password?" or "What's your refund policy?" are classic questions.
Incident
Use this when multiple customers report the same underlying problem. An incident represents one customer's experience of a larger issue. The key feature: incidents can be linked to a problem ticket, and when that problem is solved, all linked incidents solve automatically.
Problem
This represents the root cause behind multiple incidents. When your authentication system goes down and fifty customers can't log in, you create one problem ticket to track the underlying issue. Link the individual customer reports as incidents to that problem, and solving the problem solves them all.
Task
Tasks are for trackable work items that need to be completed by a specific date. Unlike other ticket types, tasks have a due date field. They're useful for internal follow-ups, scheduled maintenance, or any work that needs to happen by a deadline.
The relationship between problems and incidents is particularly powerful. Instead of solving fifty tickets individually, you solve one problem and Zendesk handles the rest. But this only works if your tickets are correctly typed and linked. That's where automation comes in.
Setting up automation to assign ticket types
Let's walk through creating an automation that sets ticket types based on your criteria. We'll use a practical example: automatically marking tickets as incidents when customers report an outage.
Step 1: Access the automations page
Navigate to the Admin Center by clicking the gear icon in your Zendesk sidebar. Select Objects and rules, then Business rules, then Automations.

You'll see a list of existing automations, including any default ones Zendesk has created for your account. Take note of the order: automations run from top to bottom, and you can reorder them if needed.
Step 2: Create a new automation
Click Add automation in the top right. Give your automation a descriptive name that explains exactly what it does. Good names matter when you're troubleshooting six months later.
Good name: "Auto-set incident type for outage reports after 1 hour"
Bad name: "Incident automation"
Add a description that explains the purpose and any special conditions. This helps other admins understand your logic without having to reverse-engineer the conditions.
Step 3: Define your conditions
Here's where you tell Zendesk when this automation should run. Automations require at least one time-based condition and must include logic that prevents them from running continuously on the same ticket.
For our outage example, add these conditions under Meet all of the following conditions:
- Hours since created > Greater than > 1
- Ticket: Type > Is > Question
- Ticket: Subject text > Contains at least one of the following words > outage down unavailable can't login
- Tags > Contains none of the following > type-processed
The first condition makes this time-based, which is required for all automations. The second ensures we only process tickets that haven't been typed yet. The third identifies outage-related tickets. The fourth is our nullifying condition, we'll add the "type-processed" tag as an action to prevent reprocessing.
Important limitation: Time-based conditions can't be used in the "Meet any of these conditions" section. All time conditions must be in the "Meet all" section. If you need OR logic for time conditions, you'll need multiple automations.
Step 4: Set the ticket type action
Under Perform these actions, add:
- Ticket: Type > Incident
This is the core action that changes the ticket type. You can set it to Question, Incident, Problem, or Task depending on your workflow needs.
If you're setting tickets to Incident and want to link them to an existing problem ticket, you'll need to use a webhook action instead. The native automation action only changes the type; it doesn't handle the problem_id field needed for linking. We'll cover webhook approaches in the advanced section.
Step 5: Add nullifying conditions
Add this action to prevent the automation from running repeatedly:
- Ticket: Add tags > type-processed
This works with the "Contains none of the following" condition we added in Step 3. Once the automation runs, it tags the ticket. The next time the automation runs (every hour), that ticket no longer matches the conditions because it now has the tag.
Without nullifying conditions, automations will run every hour on the same tickets, creating duplicate notifications and potentially causing notification spam for your customers.
Step 6: Test and activate
Before activating, use the Preview feature to see which existing tickets would match your conditions. This helps catch logic errors.
Create a test ticket that matches your conditions (subject containing "outage" in our example). Wait for the automation to run (they typically process every hour), then verify:
- The ticket type changed to Incident
- The "type-processed" tag was added
- The ticket appears in your automation's "Tickets affected" count
When you're confident everything works, activate the automation. New automations are active by default, but you can create inactive ones if you prefer to test first.
Practical automation examples for each ticket type
Now that you understand the mechanics, here are specific automation recipes you can adapt for your workflow.
Auto-setting incident tickets
Scenario: When customers submit tickets about service outages, automatically set the type to Incident so they can be linked to a master problem ticket.
Conditions:
- Hours since created > Greater than > 1
- Ticket: Type > Is > Question
- Ticket: Subject text > Contains at least one of the following > outage down unavailable service interrupted
- Tags > Contains none of the following > auto-incident
Actions:
- Ticket: Type > Incident
- Ticket: Add tags > auto-incident
- Notifications: Email group > Support Managers (optional alert)
Creating problem tickets from patterns
Scenario: When multiple tickets arrive with the same tag within a short timeframe, escalate to a problem ticket for root cause analysis.
This requires a two-part approach. First, a trigger tags tickets based on content. Then, an automation checks for volume:
Automation Conditions:
- Hours since created > Greater than > 2
- Ticket: Type > Is > Question
- Ticket: Tags > Contains at least one of the following > potential-outage
- Tags > Contains none of the following > problem-checked
Actions:
- Notifications: Email user > Support Manager with message: "Multiple tickets tagged 'potential-outage' created in last 2 hours. Consider creating a problem ticket."
- Ticket: Add tags > problem-checked
Note: Zendesk automations can't actually create new tickets. For true automated problem ticket creation, you'd need to use the Zendesk API via a webhook or an external tool.
Task automation for internal workflows
Scenario: Convert tickets requiring follow-up after a specific date into Tasks with due dates.
Conditions:
- Hours since created > Greater than > 24
- Ticket: Type > Is > Question
- Ticket: Tags > Contains at least one of the following > needs-followup
- Tags > Contains none of the following > task-created
Actions:
- Ticket: Type > Task
- Ticket: Add tags > task-created
Unfortunately, Zendesk automations cannot set due dates directly. The due date field must be set manually or via the API. When the type changes to Task, agents will see the due date field and can set it appropriately.
Advanced: Using triggers for real-time type assignment
Sometimes you need ticket types set immediately, not after an hour. That's when you use triggers instead of automations.
The key difference:
- Triggers fire instantly when tickets are created or updated
- Automations run on a schedule (hourly) and check time-based conditions
For immediate type assignment, create a trigger instead:
Trigger Conditions:
- Ticket > Is > Created
- Ticket: Subject text > Contains at least one of the following > refund billing charge
Trigger Actions:
- Ticket: Type > Task
- Ticket: Group > Billing Team
- Ticket: Add tags > billing-task
This approach is better when you need instant categorization. The downside: triggers can't use time-based conditions like "hours since created." For more on trigger setup, see our guide on creating Zendesk triggers when tickets are created.
Common mistakes and how to avoid them
Even experienced admins run into these issues:
Missing nullifying conditions. Every automation must have a way to stop running on the same ticket. Without this, you get hourly notifications on the same tickets indefinitely. Always include a tag-based condition and corresponding "add tag" action.
Conflicting automations. If Automation A sets type to Incident and Automation B sets type to Task, whichever runs last wins. Check your automation order and conditions to prevent conflicts. Use specific tags to ensure tickets only match one automation.
Using automations when triggers are better. If you need immediate action, use triggers. Automations have a built-in delay (up to an hour) because they run on a schedule. Don't use "Hours since created > Greater than > 0" as a workaround; that's what triggers are for.
Overly broad conditions. A condition like "Subject contains 'the'" will match almost every ticket. Test your conditions with the preview feature before activating. Narrow your keywords and use "Contains all of the following" instead of "Contains at least one" when possible.
Forgetting about updates. If your automation sets type based on subject keywords, what happens when an agent edits the subject? Consider whether you need separate logic for ticket updates, or add a condition like "Hours since created < 24" to only process new tickets.
Taking automation further with eesel AI
Zendesk's native automation works well for clear, predictable patterns. If the subject contains "outage," set type to Incident. If the requester is in the VIP organization, set priority to High. These are deterministic rules. They work or they don't.
But real support isn't always that clean. Customers describe problems in different ways. Urgency depends on context that keywords can't capture. And new types of requests emerge constantly.
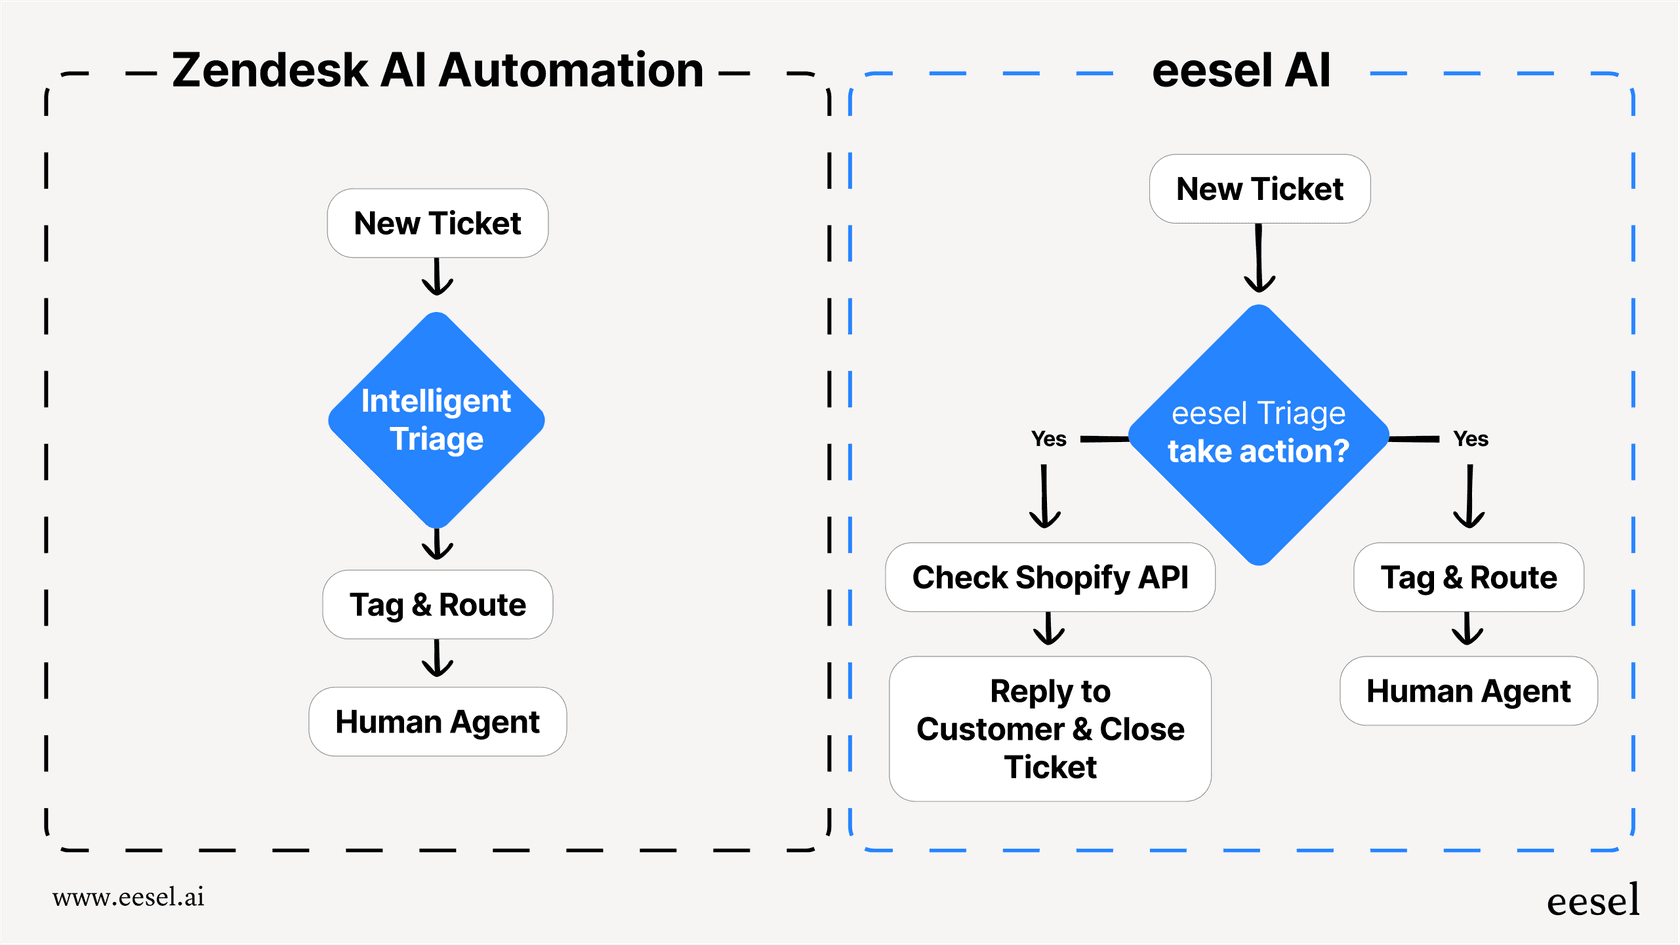
That's where AI-powered triage comes in. Instead of writing rules for every scenario, you train an AI on your past tickets. It learns the patterns you might not even realize exist. The customer who says "I can't log in and my boss needs this report today" gets routed correctly even if they don't use the word "urgent."
We built eesel AI to handle exactly this. It plugs into Zendesk and works alongside your triggers and automations. You can start with rules, add AI where it helps, and gradually shift from manual configuration to intelligent automation.
Our AI Triage product specifically handles ticket classification: automatically suggesting ticket types, priorities, and assignments based on content analysis. It learns from agent corrections, so it gets better over time. And it handles the edge cases that rules miss.
The difference? Rules follow instructions. AI learns from outcomes.
Start automating your Zendesk ticket types today
You now have everything you need to build automations that handle the repetitive work of ticket categorization. Start simple: one automation that routes a specific type of request or sets a specific ticket type. Get comfortable with how conditions and actions interact. Then expand from there.
The best automation setups grow organically. You add rules as you encounter new scenarios. You refine them when they don't quite work. Over time, you build a system that categorizes most tickets correctly without human intervention.
And if you find yourself writing increasingly complex rules to handle edge cases, it might be time to explore whether AI can help. Try eesel AI free or book a demo to see how intelligent triage works alongside your existing automations.
