How to disable Zendesk automations for testing: A complete guide
Stevia Putri
Last edited February 24, 2026
Modifying automations in a live Zendesk environment can feel like performing surgery with the patient awake. One wrong move and tickets start closing prematurely, customers receive the wrong emails, or your entire workflow grinds to a halt.
That's why knowing how to safely disable Zendesk automations for testing isn't just a nice-to-have skill. It's essential for any support admin who wants to iterate on their automation setup without risking customer-facing chaos.
In this guide, I'll walk you through the exact steps to deactivate automations for testing, explain the critical differences between deactivation and deletion, and share best practices we've learned from working with support teams. I'll also show you how modern AI tools can eliminate the risks of testing entirely.
Why you need to disable automations for testing
Picture this scenario: you've got an automation that escalates tickets to your senior team after 24 hours of no response. You want to change it to 12 hours to improve your SLA performance. Seems simple enough, right?
Here's the problem: the moment you save that change, it goes live. If you made a typo in the conditions or accidentally set it to 2 hours instead of 12, you could flood your senior team with escalations for tickets that don't actually need their attention.
Common situations where you need to disable automations for testing include:
- Modifying timing conditions like changing how long a ticket sits in pending before triggering a reminder
- Adding new automations that might conflict with existing rules
- Updating notification logic when your team structure changes
- Troubleshooting unexpected behavior by isolating which automation is causing the issue
- Testing seasonal workflows like holiday auto-responses before they go live
The risks of testing on production tickets range from minor (a few confused customers) to major (breached SLAs, angry VIP customers, or compliance violations). A little preparation goes a long way.
Understanding deactivation vs deletion in Zendesk
Before we dive into the steps, let's clarify something that trips up even experienced Zendesk admins. When you want to stop an automation from running, you have two options: deactivation or deletion. They are not the same, and choosing wrong can cost you hours of work.
Deactivation is like putting an automation in storage. It stops running immediately, but all your conditions, actions, and logic remain intact. You can reactivate it with a single click whenever you're ready. This is what you want for testing.
Deletion is permanent. Once you delete an automation, it's gone forever. You'll have to rebuild it from scratch if you need it again. Only delete automations you're absolutely certain you will never need again.
Here's a quick comparison:
| Action | Effect on Automation | Can Recover? | Best For |
|---|---|---|---|
| Deactivate | Stops execution, preserves settings | Yes, instant reactivation | Testing, temporary changes |
| Delete | Removes entirely from system | No, must rebuild | Permanent removal |
There's one more critical thing to know. Zendesk has a system automation called "Close ticket 4 days after status is set to solved" that cannot be disabled or deleted. This automation exists to prevent performance issues in your account. You can edit the time period (anywhere from 1 to 28 days), but the automation must remain active. Don't waste time trying to deactivate this one for testing.

Step-by-step: How to deactivate Zendesk automations
Now let's walk through the actual process. These steps work for any Zendesk Support plan.
Step 1: Access your automations in Admin Center
First, navigate to the Automations management page. In your Zendesk Admin Center, click Objects and rules in the left sidebar, then select Business rules, then Automations.
You'll see two tabs at the top of the page: Active and Inactive. Active automations are currently running every hour. Inactive automations are the ones you've previously deactivated. They sit there waiting in case you need them again.
Take a moment to review your active automations before making any changes. Make a mental note (or an actual list) of which ones you plan to deactivate for testing.
Step 2: Select automations to deactivate
Find the automation you want to disable. Hover your mouse over it and you'll see an options menu icon (three dots) appear on the right side. Click it to reveal a dropdown menu.
You'll see several options including Edit, Clone, and Deactivate. Click Deactivate.
If you need to disable multiple automations at once, you can use bulk actions. Check the boxes next to each automation you want to deactivate, then use the dropdown at the bottom of the list to select Deactivate.
Which automations should you disable? That depends on what you're testing. If you're modifying a single automation, you might only need to deactivate that one. If you're testing a completely new workflow, you may want to disable any automations that could conflict with your changes.
Step 3: Deactivate and verify
After clicking Deactivate, Zendesk will immediately stop that automation from running. There's no confirmation dialog, so make sure you clicked the right automation.
To verify the deactivation worked:
- Click the Inactive tab at the top of the page
- Look for your automation in the list
- Confirm it shows the correct name and conditions
Pro tip: Document which automations you've deactivated and why. A simple spreadsheet or even a note in your ticketing system works. Trust me, when you're ready to wrap up testing a week later, you'll thank yourself for keeping track.
Step 4: Test your changes safely
With your automations deactivated, you can now test your changes without affecting real tickets. Here's how to do it safely:
Create test tickets specifically for this purpose. Use a clear naming convention like "TEST - Ignore - Automation Testing" so your team knows to skip them. Set these tickets to various statuses and conditions to trigger your new or modified automations.
Wait for the automation cycle to run. Remember, Zendesk automations run once per hour at some point during the hour (not necessarily at the top of the hour). You may need to wait up to an hour to see if your changes work as expected.
Check the ticket events to see what actions were taken. You can view this by opening a test ticket and clicking Events in the upper right corner. This shows you exactly which automations fired and what they did.
Step 5: Reactivate when testing is complete
Once you're satisfied with your testing, it's time to reactivate your original automations. Here's the process:
- Go to the Inactive tab in the Automations page
- Find the automation you want to reactivate
- Hover over it and click the options menu icon
- Select Activate
The automation immediately returns to your active list and will run on the next hourly cycle. Double-check that it appears in the Active tab and that all its conditions and actions look correct.
Monitor your tickets for the first few automation cycles after reactivation to make sure everything is working as expected. Keep an eye out for any unexpected behavior or errors.
Best practices for testing automations safely
Over the years, we've seen support teams develop some smart strategies for testing automations without the risk. Here are the practices that work best:
Use tags to exclude test tickets. Create a tag like "automation_test" and add it to any ticket you're using for testing. Then modify your automations to include a condition that excludes tickets with this tag. This gives you an extra layer of protection.
Create a testing checklist. Before you start, write down exactly what you're testing, which automations you're disabling, and what success looks like. This prevents scope creep and helps you stay focused.
Test during low-volume periods. If possible, schedule your testing during times when ticket volume is naturally lower. This minimizes the impact if something does go wrong.
Have a rollback plan. Know exactly how to revert your changes if things don't go as expected. This might mean keeping a copy of your original automation conditions or knowing which automations to reactivate in what order.
Document everything. Write down what you changed, when you changed it, and why. Future you (or your teammates) will need this information.
Consider using a sandbox environment. If your Zendesk plan includes a sandbox, use it for major automation changes. Sandboxes let you test without any risk to your production tickets.
Test one automation at a time. When possible, isolate your testing to a single automation. This makes it much easier to identify the cause if something goes wrong.
Common mistakes to avoid when disabling automations
Even experienced admins make these mistakes. Learn from their errors:
Deleting instead of deactivating. It's an easy mistake to make when you're in a hurry. The options are right next to each other in the menu. Always double-check that you clicked Deactivate, not Delete.
Forgetting to reactivate critical automations. That CSAT survey automation you disabled for testing? If you forget to turn it back on, you'll stop collecting customer feedback. Set a calendar reminder if you need to.
Not testing the reactivation itself. Sometimes automations don't work quite right after being reactivated, especially if other changes were made while they were inactive. Always verify they still work as expected.
Trying to disable the system automation. Remember, you cannot disable the automation that closes solved tickets. Don't waste time trying. If you need to change the timing, edit it instead.
Testing on production tickets without safeguards. Never use real customer tickets for testing unless you have a very good reason and proper safeguards in place.
Not communicating with your team. If other admins or agents are working in Zendesk while you're testing, let them know. They might see unexpected behavior and think something is broken.
A safer way to test automation changes with eesel AI
Here's the reality about testing Zendesk automations: even when you do everything right, there's always some risk. You're still working in a live environment where mistakes can affect real customers.
Modern AI tools offer a fundamentally different approach.
At eesel AI, we've built a different approach to support automation. Instead of configuring rigid rules that run in your live environment, you invite eesel AI to your team as an AI teammate that learns your business and handles tickets autonomously.
The key difference for testing? Simulation mode.
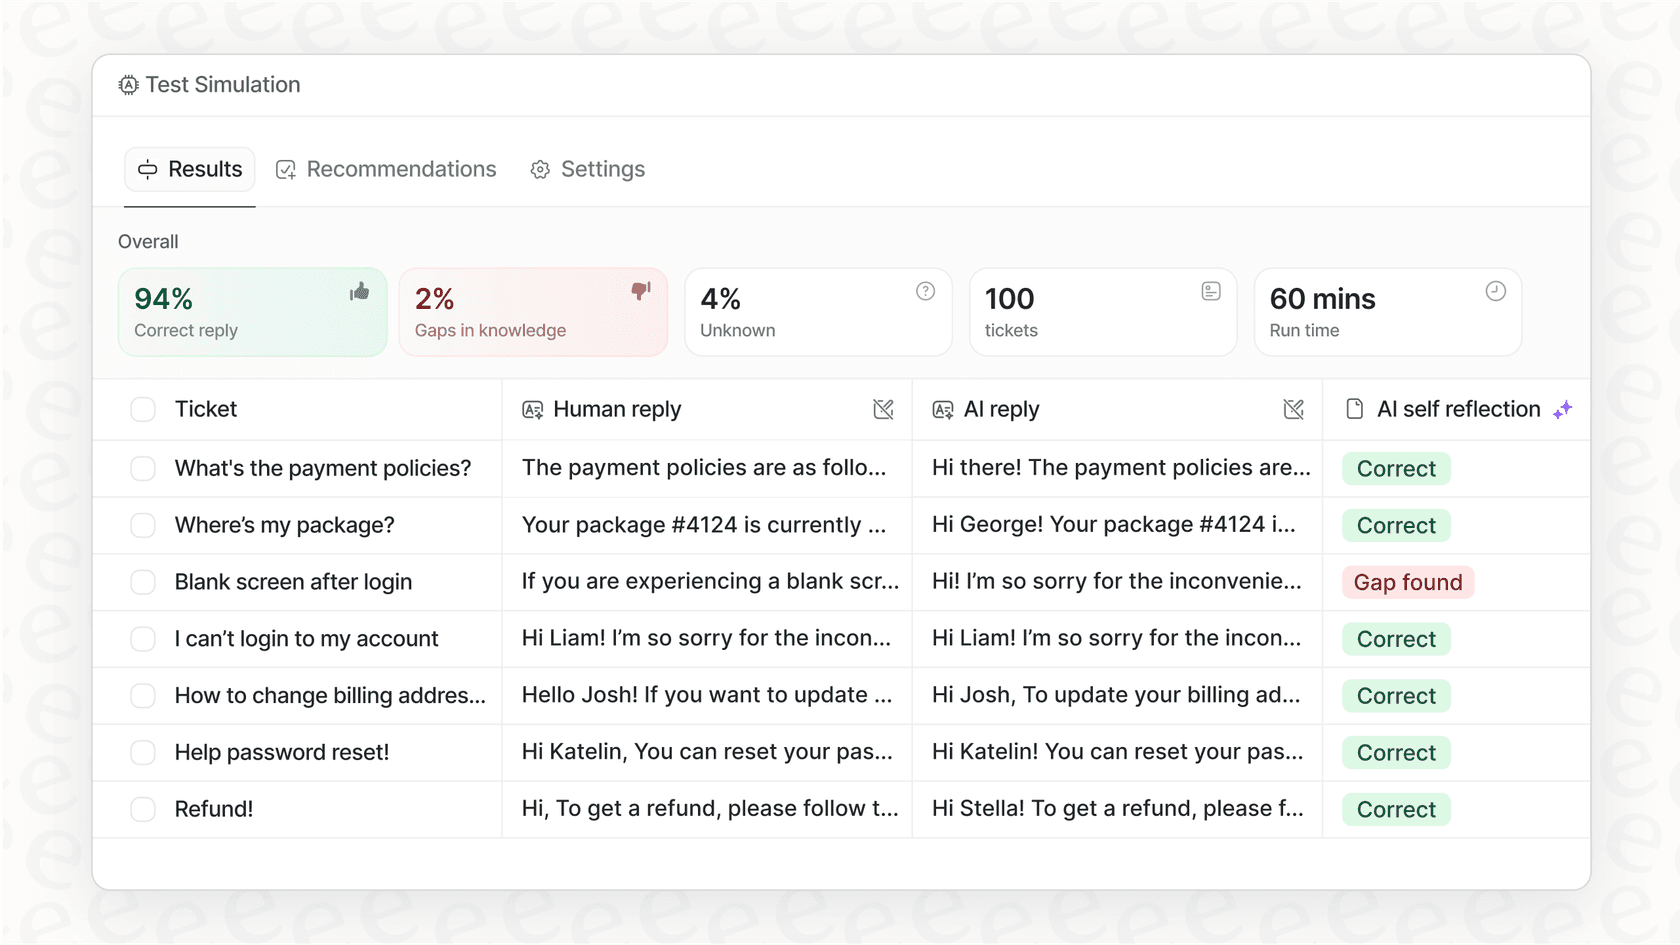
Before eesel AI ever touches a real customer conversation, you can run it on thousands of your past tickets in a completely safe environment. You see exactly how it would respond, measure resolution rates, and identify any knowledge gaps. There's zero risk of affecting live tickets because you're not in production yet.
Here's how it works:
- Connect eesel AI to your Zendesk account
- It learns from your past tickets, help center, and macros in minutes
- Run simulations on historical tickets to see exactly how it performs
- Adjust its behavior with plain English instructions (no complex automation logic)
- Start with draft replies for review, then level up to full automation when you're confident
You control the pace. Start with eesel AI drafting replies that your agents review before sending. As it proves itself, expand its scope to handle specific ticket types, then eventually full frontline support.
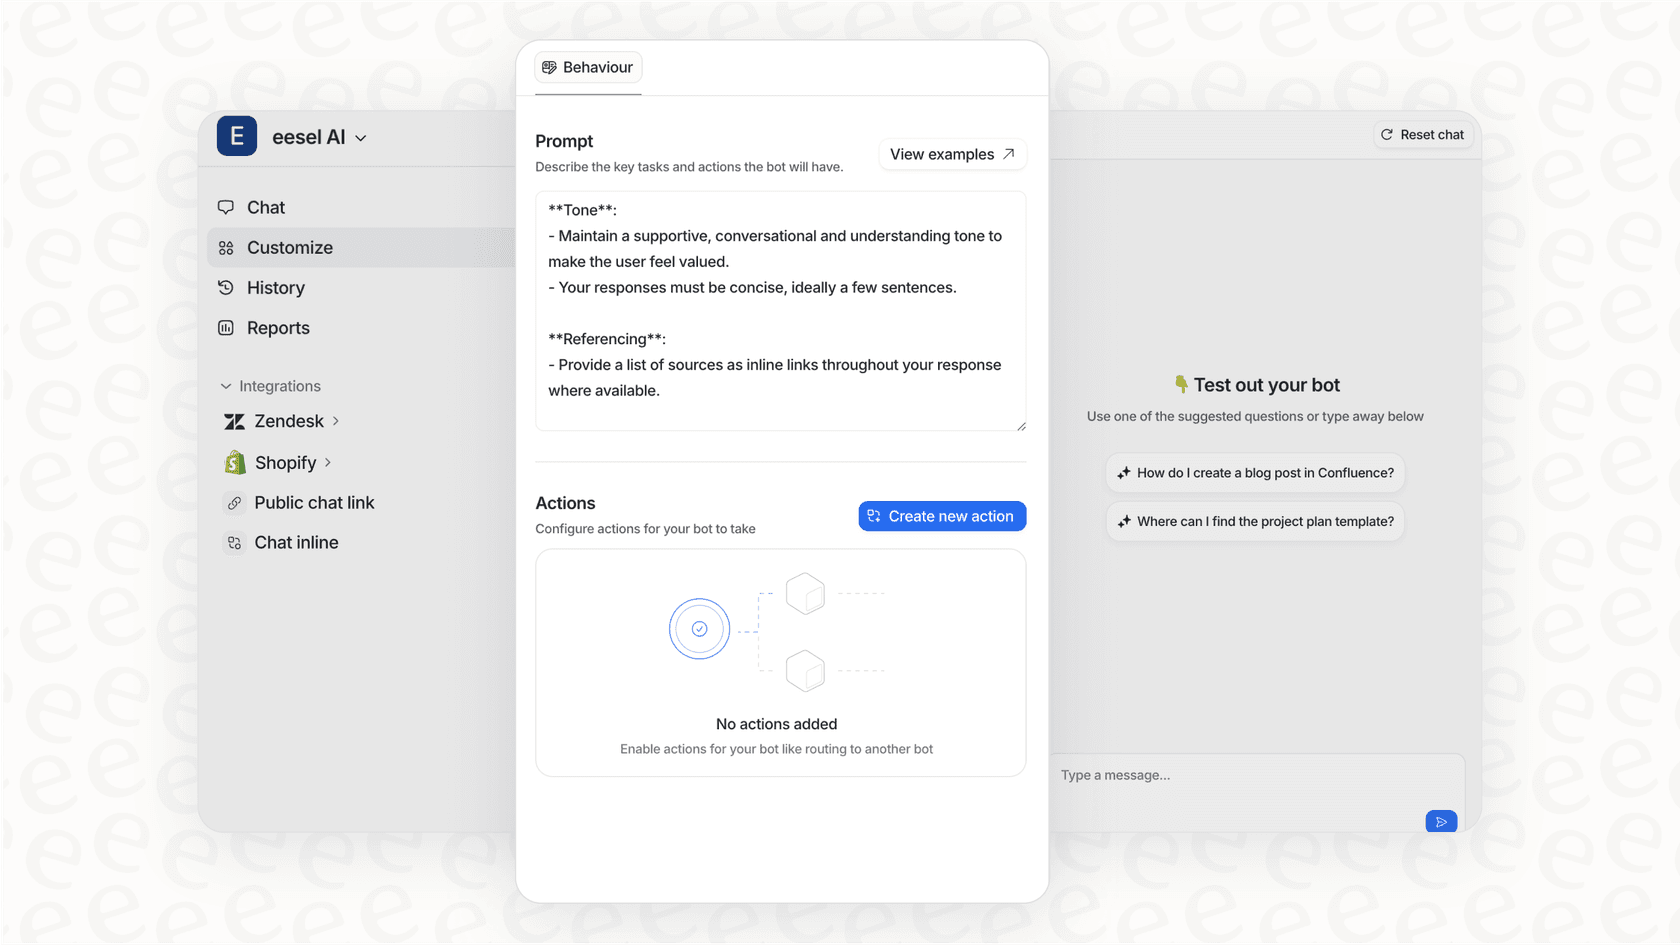
Unlike traditional automations where you configure rigid if-then rules, you simply tell eesel AI what to do in natural language. "If a refund request is over 30 days, politely decline and offer store credit." "Always escalate billing disputes to a human." No code, no complex decision trees.
For teams tired of the risks and limitations of native Zendesk automations, eesel AI offers a path to truly intelligent automation without the testing headaches.
Choosing the right approach for your support team
So when should you stick with native Zendesk automations, and when should you consider an AI-powered alternative like eesel AI?
Native Zendesk automations work well when:
- Your workflows are relatively simple and predictable
- You have a small team with straightforward routing needs
- Your ticket volume is manageable with rule-based logic
- You have the time to test changes carefully
Consider eesel AI when:
- Your ticket volume is growing and rule-based automation is getting unwieldy
- You want to understand customer intent, not just match keywords
- You need to pull information from multiple sources (help center, past tickets, Confluence, Shopify)
- You want to test automation changes safely before going live
- You're looking for a teammate that learns and improves over time
The bottom line? If you're spending more time managing your automations than they're saving you, it's worth exploring alternatives.
Frequently Asked Questions
Share this article

Article by
Stevia Putri
Stevia Putri is a marketing generalist at eesel AI, where she helps turn powerful AI tools into stories that resonate. She’s driven by curiosity, clarity, and the human side of technology.