
Let's be honest, the standard fields in a Freshdesk ticket are fine, but the custom fields? That's where the real gold is. It's the data that's unique to your business: product SKUs, customer IDs, and specific issue types you've created. This is the stuff you actually need for proper analysis, custom reports, or even training an AI model.
This guide will walk you through the exact steps to perform a Freshdesk export of your ticket data that actually includes those all-important custom fields. We'll cover how to get your hands on that crucial information that standard exports often leave behind.
Exporting data is a pretty common task, whether you're building out custom reports, moving to a new platform, or just backing things up. But using that static data for something more dynamic, like training an AI in real time, comes with its own headaches. Let’s get you the data first, and then we’ll look at a smarter way to put it to work.
What you'll need to export Freshdesk ticket data with custom fields
Before jumping in, let's do a quick check to make sure you have everything you need. The process is simple, but a couple of things are required to get started:
-
You'll need an active Freshdesk account with Administrator or Supervisor permissions. Some custom roles can work too, as long as you have the green light to export data.
-
It helps to have a clear idea of the date range and ticket details you want to pull.
-
You'll also need a spreadsheet program like Microsoft Excel or Google Sheets to open up the file once you've exported it.
How to export Freshdesk ticket data with custom fields
Here’s the main event. Follow these steps, and you’ll have a spreadsheet with all your ticket data, custom fields included, in just a few minutes.
Step 1: Filter your tickets
First up, you need to tell Freshdesk which tickets you're actually interested in. Trying to export everything at once is a recipe for a massive, unruly file.
Start by heading over to the Tickets tab on your main dashboard. You'll see the filtering panel on the right-hand side. Use it to narrow down the ticket list to exactly what you need. You can filter by date, status, agent, group, or even those custom fields you want to export. For instance, you could filter for all "Closed" tickets from last quarter in the "Billing Issues" group. Being specific here will save you a lot of clean-up time later.

Step 2: Initiate the export
Once your ticket list shows exactly what you want, look at the top-right corner of the screen. See that Export button? Go ahead and click it. This tells Freshdesk you’re ready to grab the data from the tickets currently on your screen and will bring up a new menu to configure your file.
Step 3: Configure and select fields
This is probably the most important step, so don't rush through it. After you click "Export," a pop-up or a side menu will appear. This is your command center for the export.
First, choose a file format. You'll usually have options like CSV and Excel. If you're not sure which to pick, Excel (.xlsx) is often a safe bet since it handles formatting a little more cleanly.
Next comes the fun part: a checklist of all available ticket fields. This is where you pull in your custom data. Scroll through this list carefully. Every custom field you've ever created in Freshdesk should be listed here. Just tick the boxes next to the ones you want to include. If you have fields like "Order ID," "Product Category," or "Customer Segment," make sure they're all checked before you continue.
Step 4: Download and verify your export file
After you've set up your configuration and clicked the final "Export" button, Freshdesk will start putting your file together in the background. If you're exporting a lot of data, it might take a few minutes.
The file won't download immediately. You'll need to go to Admin > Account Exports to find it. This page keeps a running history of all your data exports. When your file is ready, a download link will appear.
Download the file and open it up. The very first thing you should do is give it a quick check. Scroll through the columns to make sure the custom fields you selected are there and have the right information in them. If it all looks good, congratulations, you've successfully done a Freshdesk export with custom fields.
Advanced method: Scheduling your Freshdesk ticket data export
If you find yourself exporting ticket data over and over again, doing it manually can get old fast. For anyone needing consistent data for external dashboards or other business tools, Freshdesk has a handy feature for scheduled exports.
You can find this under the Analytics section. It lets you set up recurring exports that get delivered right to your email or via an API link. Here’s a quick rundown:
-
Head to Analytics, click the gear icon for Settings, and choose Data Exports.
-
Click Create Export and pick the "Tickets" module.
-
From here, you can set a schedule (daily, weekly, or monthly) and choose all the ticket fields you need, including your custom ones.
This "set it and forget it" method is great for teams that depend on regular data dumps for their reporting.

Common challenges with a manual Freshdesk export
So, you've got your data. Now what? While exporting is a useful trick to have up your sleeve, leaning on it for your day-to-day workflow can cause some real headaches.
-
Icon 1 (Stale Data): A clock with a backwards arrow, labeled "Instantly Outdated."
-
Icon 2 (Manual Work): A person juggling spreadsheets, labeled "Time-Consuming & Prone to Error."
-
Icon 3 (Lost Context): A speech bubble with text missing, labeled "Missing the Full Story."
-
Icon 4 (Disconnected Data): Two separate islands, one labeled "Spreadsheet" and the other "Helpdesk," labeled "Data in a Silo."
-
Your data is instantly stale. The moment you download that file, it's a snapshot of the past. New tickets are already rolling in, and existing ones are being updated. This makes it a poor choice for any kind of real-time analysis or for feeding live systems.
-
It's a lot of manual work. Let's be real, exporting is just the first step. The actual work of cleaning the data, making pivot tables, and finding useful insights takes a ton of time and often requires some serious spreadsheet wizardry.
-
You lose all the context. A single row in a spreadsheet can't capture the back-and-forth of a real customer conversation, not to mention any attachments. This is a huge issue if you're trying to understand customer problems deeply or use the data to train an AI, because the full story is missing.
-
The data is disconnected. The information in your spreadsheet is completely cut off from your helpdesk. You might find an interesting trend, but you can't do anything about it without going back into Freshdesk to find the tickets or build new workflows. The data is stuck in a silo, far from where you actually get work done.
A smarter alternative to manual Freshdesk exports
What if you could get the insights and automation you need directly from your Freshdesk data, without ever having to export a single file? Instead of pulling data out, you can bring intelligence in.
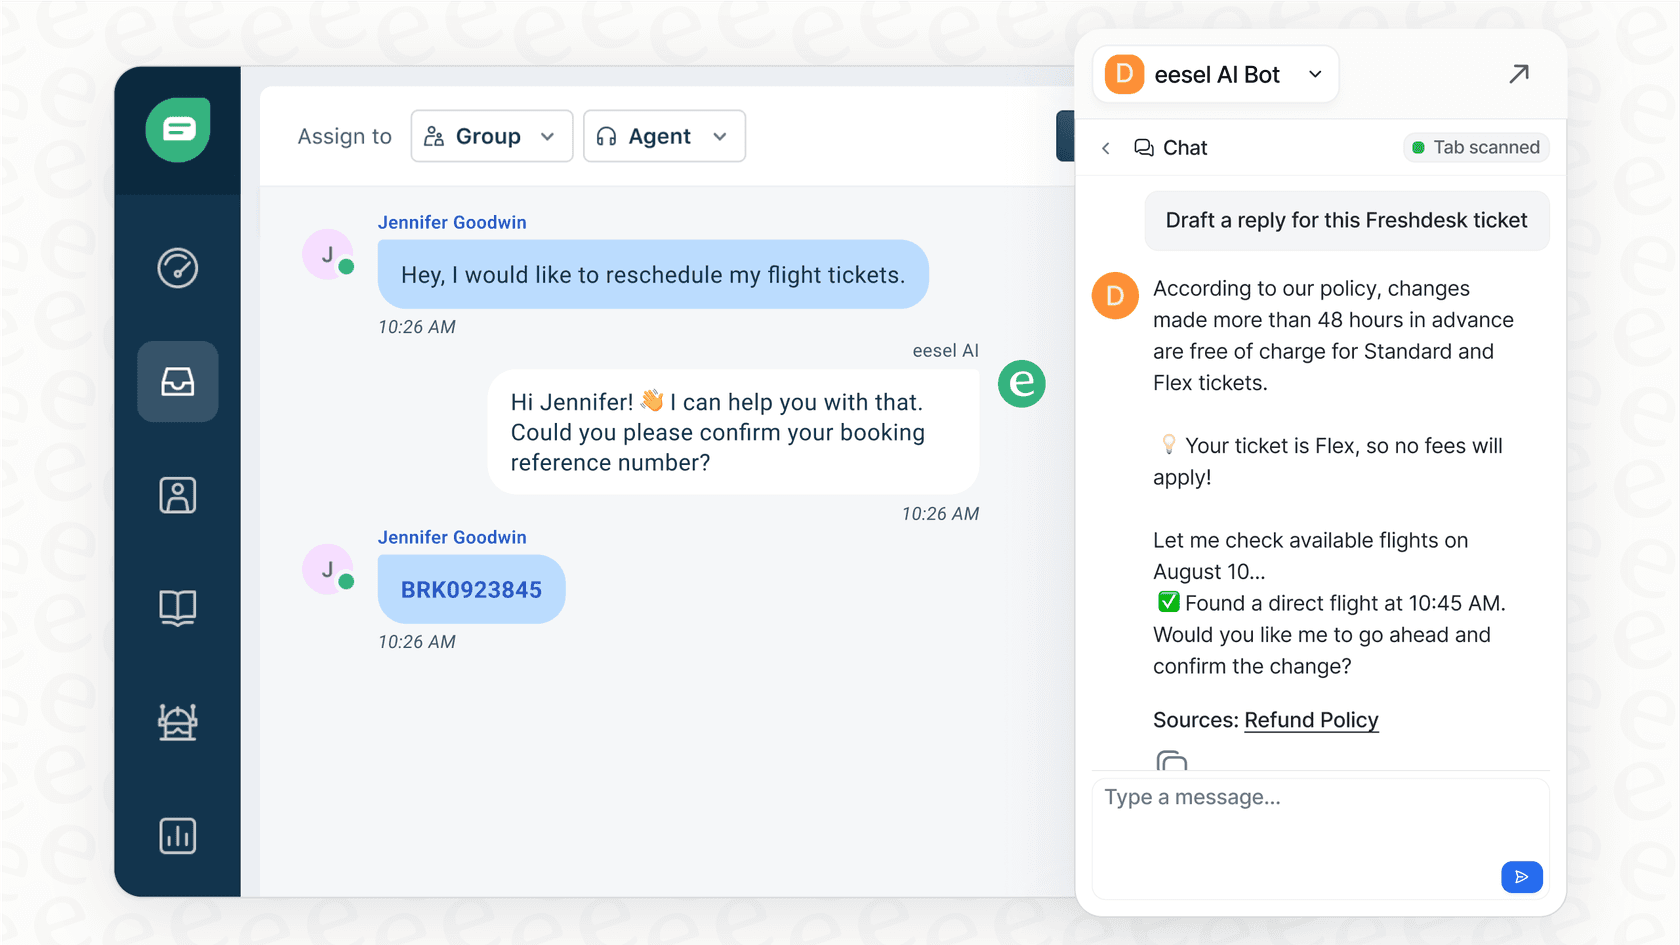
Tools like eesel AI are built to act as a smart layer on top of your existing helpdesk. It uses your data right where it lives, which means no more manual exports for some of the most important tasks.
-
One-click integration: Connecting eesel AI to your Freshdesk account takes just a few minutes. There's no complicated setup or need to bother a developer. You can go from setup to seeing results in less time than it takes to download a big export file.
-
Train an AI on your past tickets automatically. This is often why teams export ticket data in the first place. With eesel AI, you can skip the spreadsheet entirely. It analyzes your historical Freshdesk tickets, including custom fields and the full conversation, to learn your company's voice, policies, and common answers right from the start. This helps make your AI support agent accurate from day one.
-
Get actionable insights, not just raw data. A spreadsheet gives you rows of numbers. A tool like eesel AI gives you a clear path forward. Its reporting dashboard doesn't just show you what happened: it points out trends and identifies gaps in your knowledge base, helping you make your support even better.
-
Simulate with confidence. With an export, you can analyze past data and guess how automation might work. With eesel AI’s simulation mode, you can test your AI on thousands of your actual past tickets before turning it on for customers. This gives you an accurate preview of your automation rate and shows you exactly how the AI would have responded, taking all the guesswork out of the equation.
Export when you need to, automate when you can
You now have two solid ways to handle a Freshdesk export of ticket data with custom fields. For one-off reports, backups, or migrations, the manual process we walked through works great. For anything you do regularly, the scheduled export is a good time-saver.
But when it comes to the heavy lifting, like training an AI, getting real insights into your operations, or automating replies, it's pretty clear that static spreadsheets have their limits. While exporting definitely has its place, the future of data-driven support lies in real-time intelligence, not old files.
Stop wrestling with spreadsheets
Tired of the export-and-analyze cycle? You have a goldmine of information sitting in your Freshdesk history. It's time to unlock its power without all the manual work.
Connect your Freshdesk account to eesel AI for free and see what you can automate in minutes.
Frequently asked questions
Why is it important to include custom fields when I perform a Freshdesk export ticket data with custom fields?
Custom fields contain unique, business-specific data like product SKUs or customer IDs, which are crucial for detailed analysis, custom reporting, or even training AI models. Standard exports often miss this vital information, limiting the depth of your insights.
What kind of permissions do I need to perform a Freshdesk export ticket data with custom fields?
You will need an active Freshdesk account with Administrator or Supervisor permissions to perform an export. Some custom roles may also work, provided they have the necessary data export privileges enabled.
What file formats are available when I perform a Freshdesk export ticket data with custom fields?
When configuring your export, you typically have options like CSV and Excel (.xlsx). Excel is often recommended for cleaner formatting and easier use in spreadsheet programs.
How can I confirm that my Freshdesk export ticket data with custom fields actually includes the custom data I selected?
After downloading the file from Admin > Account Exports, open it in a spreadsheet program and scroll through the columns. Verify that the custom fields you selected are present and contain the correct information.
Is it possible to schedule a recurring Freshdesk export ticket data with custom fields?
Yes, Freshdesk allows you to schedule recurring exports for tickets. You can set this up under Analytics > Settings > Data Exports, choosing a daily, weekly, or monthly frequency for your ticket data.
What are the main disadvantages of relying on a manual Freshdesk export ticket data with custom fields for ongoing analysis?
Manual exports result in instantly stale data, requiring constant re-exporting for up-to-date information. They also involve significant manual work for cleaning and analysis, and often lack the rich context of live tickets.
If I need real-time insights, is there an alternative to doing a manual Freshdesk export ticket data with custom fields?
Yes, tools like eesel AI integrate directly with Freshdesk to provide real-time insights and automation without manual exports. This allows you to train AI on live data and get actionable trends directly from your helpdesk.