Stale tickets are the clutter that every support team accumulates. You reply to a customer, mark the ticket pending, and wait. Days pass. Then weeks. That ticket sits there, inflating your backlog and distorting your resolution metrics. You could hunt them down manually, but that's not a good use of anyone's time.
The better approach? Build a Zendesk automation recipe that handles stale tickets from first nudge to final closure. This guide walks you through creating a three-step workflow: a friendly reminder, a final warning, and automatic resolution. You'll end up with a cleaner queue, more accurate reporting, and customers who know exactly where they stand.
Here's how to build it.
What this Zendesk automation recipe stale close workflow will do
Before diving into the setup, here's what you're building. This automation recipe creates a polite but firm sequence that manages inactive tickets without any manual intervention.
Here's how the flow works:
-
First reminder (48 hours): After two days of silence, your customer gets a friendly check-in email. The ticket gets tagged so the system knows reminder one is complete.
-
Final warning (5 days): If they still have not responded, a second email goes out warning that the ticket will close soon. Another tag tracks this stage.
-
Auto-solve (7 days): No response after a week? The ticket automatically solves itself. Zendesk's built-in automation handles the final closure four days later.
The result is a support queue that stays focused on active conversations. Your agents spend time on tickets that actually need attention. Your metrics reflect reality, not ghost tickets from months ago. And customers get clear communication about what is happening with their requests.
For teams that want to go further, we'll also look at how an AI layer can add context-awareness to this workflow. But first, we'll cover the fundamentals you need to understand.
Before you start: Understanding Zendesk automations
Zendesk gives you two main tools for automatic ticket handling: triggers and automations. They sound similar, but they work very differently.
Triggers are event-based. They fire the instant something happens. A new ticket arrives? A trigger can assign it immediately. A customer replies? A trigger can bump priority right away. Triggers respond to actions as they occur.
Automations are time-based. They run on a schedule, about once per hour, checking for tickets that meet time-based conditions. This makes them perfect for follow-ups and stale ticket management, where you need to wait a specific duration before acting.

Key concepts to understand
Conditions and actions: Every automation has two parts. Conditions define when it runs ("Ticket has been pending for more than 48 hours"). Actions define what happens ("Send email and add tag").
Nullifying conditions: Here's the critical part. Automations run every hour. Without a nullifying action, they'd keep firing on the same ticket indefinitely. That's why you add a tag as an action, then exclude that tag in your conditions. Once the tag is added, the ticket no longer meets the conditions. Problem solved.
The 65kb rule: All your active automations combined must be smaller than 65 kilobytes. This is rarely an issue, but worth knowing if you build dozens of complex rules.
Uniqueness requirement: No two active automations can be identical. They can share some conditions, but there must be meaningful differences between them.
"Greater than" vs "Is": Zendesk checks automations hourly. If you use "Hours since pending | Is | 48", the check might happen at 47.5 hours and again at 48.5 hours, missing the exact window. Always use "Greater than" for time conditions. It catches every ticket that has passed the threshold.
Now that you understand the mechanics, we'll build your first automation.
Step 1: Create the first reminder automation
This automation identifies tickets that have been waiting on the customer for 48 hours and sends a gentle nudge. It also adds a tag to track progress through your workflow.
Start by navigating to Admin Center > Objects and rules > Business rules > Automations. Click Add automation to create a new rule.
Give it a clear, descriptive title like "Stale Ticket - First Reminder (48h)". Future you will thank present you for being specific.
Set your conditions
Under "Meet ALL of the following conditions," add these three rules:
| Condition | Operator | Value |
|---|---|---|
| Ticket: Status | Less than | Solved |
| Ticket: Hours since pending | Greater than | 48 |
| Ticket: Tags | Contains none of the following | stale_reminder_1 |
The "Less than Solved" condition ensures you only touch active tickets. "Greater than 48" catches anything pending for more than two days. The tag exclusion prevents this automation from running twice on the same ticket.
Set your actions
Under "Perform these actions," add:
| Action | Value |
|---|---|
| Notifications: Email user | (requester) |
| Ticket: Add tags | stale_reminder_1 |
For the email, write something friendly but clear. Example subject: "Checking in on your support request." Example body: "Hi there, we wanted to follow up on your recent support request. We're still here to help if you need us. Just reply to this email and we'll pick up right where we left off."

Click Create automation to save. You now have the first piece of your workflow in place.
Step 2: Create the final reminder automation
This automation catches tickets that received the first reminder but still have not seen customer activity. It sends a final warning before closure.
Create another automation. Title it "Stale Ticket - Final Reminder (5d)".
Set your conditions
| Condition | Operator | Value |
|---|---|---|
| Ticket: Status | Less than | Solved |
| Ticket: Hours since pending | Greater than | 120 |
| Ticket: Tags | Contains at least one of the following | stale_reminder_1 |
| Ticket: Tags | Contains none of the following | stale_reminder_2 |
The 120 hours equals five days total. The "Contains at least one" condition ensures this only runs on tickets that already received the first reminder. The second tag exclusion prevents duplicate final reminders.
Set your actions
| Action | Value |
|---|---|
| Notifications: Email user | (requester) |
| Ticket: Add tags | stale_reminder_2 |
For this email, be clearer about the impending closure. Example subject: "Your ticket will close in 48 hours." Example body: "Hi again, we haven't heard back from you regarding your support request. To keep our queue focused on active issues, we'll automatically close this ticket in 48 hours. If you still need help, simply reply to this email and we'll reopen your request immediately."
The tag chaining is what makes this workflow reliable. Each automation checks for the previous tag and adds its own. Tickets flow through the sequence in order, with no skips or repeats.
Step 3: Create the auto-solve automation
This is the final step. After seven days of total inactivity, the ticket automatically solves itself.
Create your third automation. Title it "Stale Ticket - Auto-Solve (7d)".
Set your conditions
| Condition | Operator | Value |
|---|---|---|
| Ticket: Status | Less than | Solved |
| Ticket: Hours since pending | Greater than | 168 |
| Ticket: Tags | Contains at least one of the following | stale_reminder_2 |
The 168 hours equals seven days. This automation only runs on tickets that made it through both reminder stages.
Set your actions
| Action | Value |
|---|---|
| Ticket: Status | Solved |
You can optionally add a public comment explaining the closure: "This ticket has been automatically solved due to inactivity. If you still need assistance, please reply and we'll reopen it immediately."
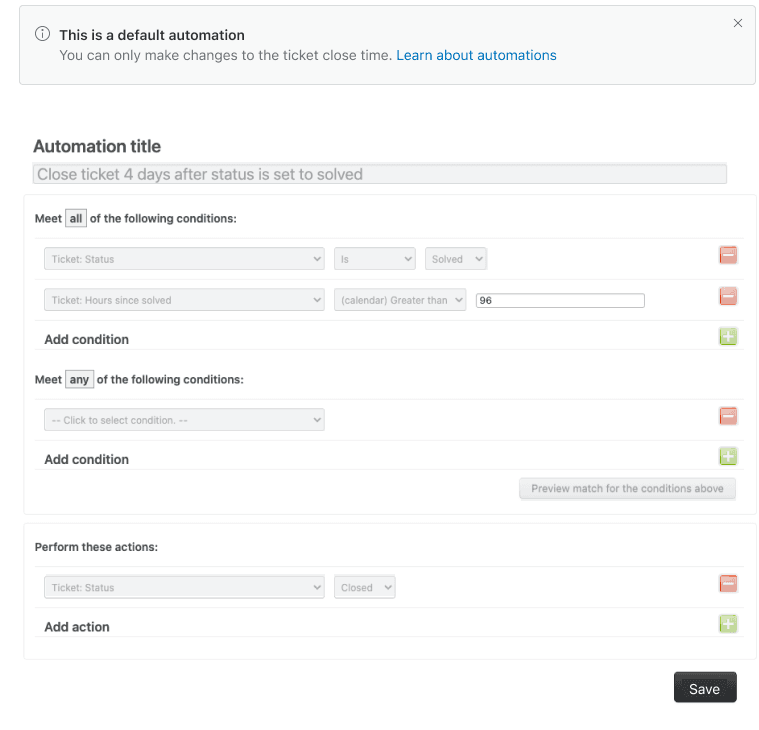
Here's something important: Zendesk automatically closes solved tickets after four days. You don't need to build that part yourself. Your automation marks tickets as solved. Zendesk's built-in "Close ticket 4 days after status is set to solved" automation handles the rest.
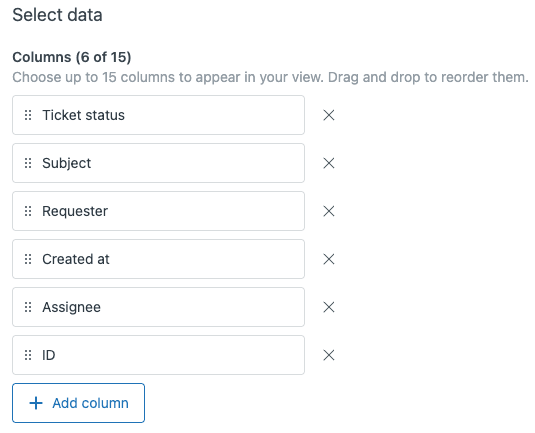
Step 4: Create a view to monitor automated closures
You need visibility into what your automations are doing. A dedicated view lets you verify the workflow is functioning and spot any issues.
Navigate to Admin Center > Workspaces > Agent tools > Views. Click Add view.
Name it something like "Stale Tickets - Auto-Closed".
Set your view conditions
| Condition | Operator | Value |
|---|---|---|
| Tags | Contains at least one of the following | stale_reminder_2 |
| Status category | Is not | New |
This shows you all tickets that reached the final stage of your workflow. You can scan for patterns, check that closures look appropriate, and catch any edge cases that need human review.
Some teams create separate views for each stage (first reminder sent, final warning sent, auto-solved). Do what fits your workflow. The key is having visibility, not flying blind.
Testing your automation safely
Never deploy automations to production without testing. Here's how to verify your workflow works correctly.
Start with a test ticket. Create a ticket in your Zendesk instance, set it to pending, and apply a test tag like "stale_test" to isolate it from real traffic.
Modify conditions temporarily. Clone your automations and add "Tags contains at least one of the following: stale_test" as an additional condition. This ensures only your test ticket gets processed.
Adjust timing for faster feedback. Change "Greater than 48" to "Greater than 1" temporarily. You don't want to wait two days to see if your automation works.
Watch the automation run. Check your test ticket after the hourly automation cycle runs. Did the tag get added? Did the email send? Does the status change correctly?
Verify the customer experience. Send yourself the actual notification emails. Do they look right? Are links working? Is the tone appropriate?
Common testing mistakes to avoid:
- Forgetting that automations run hourly, not instantly
- Testing with solved or closed tickets (automations ignore these)
- Not checking that nullifying tags actually prevent re-runs
- Missing email deliverability issues (check spam folders)
Once testing checks out, deactivate your test versions and activate the real ones. Start with a small subset of tickets if you are nervous. Scale up once you see consistent, correct behavior.
Troubleshooting when automations do not work
Even well-built automations sometimes misbehave. Here's how to diagnose common issues.
Automation is not firing at all:
- Check that ticket status is actually "Pending" (not "Open" or "On-hold")
- Verify the hours condition uses "Greater than," not "Is"
- Confirm no other conditions are filtering out your target tickets
- Remember automations run hourly, not immediately
Customers get multiple reminders:
- Check that your nullifying tag is being added correctly
- Verify the "Contains none of the following" condition is present
- Look for duplicate automations with similar conditions
Wrong tickets are being affected:
- Review your tag conditions carefully
- Check for overlapping automations that might interfere
- Verify your views are showing what you expect
Timing seems off:
- Remember Zendesk counts hours from the last status change
- A customer reply resets the pending timer
- The hourly check cycle means actions happen within an hour of conditions being met, not exactly at the threshold
Where to check automation activity:
Zendesk does not provide a direct "automation log," but you can infer activity from ticket events. Open affected tickets and check the event log. Look for tag additions, status changes, and email notifications. If these appear at expected intervals, your automation is working.
Taking stale ticket management further with eesel AI
Native Zendesk automations handle time-based rules reliably. But they are fundamentally limited to status and timestamps. They cannot read the conversation, understand urgency, or adapt based on what the customer actually said.
That's where an AI layer becomes valuable. At eesel AI, we've built an AI teammate that integrates directly with Zendesk and adds context-awareness to your workflows.
Here's what that looks like in practice:
Intent-based handling: Instead of just checking "Has it been 48 hours?" the AI can ask "What's the customer actually asking for?" A simple password reset might auto-close faster. A complex billing dispute gets flagged for human review regardless of time elapsed.
Simulation before deployment: Our simulation mode lets you test AI handling against thousands of historical tickets before going live. You see exactly how it would have performed, with no risk to real customers.
Progressive rollout: Start with the AI Copilot drafting replies for agent review. Once you're confident in its accuracy, let it send responses directly. Eventually, it can handle full resolution for appropriate ticket types with AI Agent.
Natural language control: Define escalation rules in plain English. "Always escalate tickets mentioning 'legal' or 'lawyer' to the compliance team." No complex condition builders required.
The approach is complementary, not replacement. Your Zendesk automations handle the time-based foundation. The AI layer adds intelligence on top. Together, they create a system that's both reliable and adaptive.
If your team is drowning in stale tickets or spending too much time on manual triage, it's worth exploring what AI can add to your workflow.
Start automating your stale ticket cleanup today
You now have a complete Zendesk automation recipe stale close workflow ready to deploy. Three automations working in sequence. A monitoring view to track results. Testing procedures to verify everything works. Troubleshooting steps for when things go sideways.
The workflow you built will keep your queue clean, your metrics accurate, and your customers informed. No more manual hunting for stale tickets. No more inflated backlogs distorting your reports. Just a reliable system that handles routine cleanup while your team focuses on tickets that actually need human attention.
Before you activate these automations in production, run through your test checklist one more time. Verify the email copy matches your brand voice. Confirm the timing aligns with your service standards. Make sure your team knows the workflow is going live.
Once you're confident, turn them on. Watch your monitoring view over the first few days. Adjust timing or messaging based on what you see. Like any automation, it gets better with iteration.
And if you find yourself wanting more than time-based rules can deliver, remember that AI-powered tools like eesel AI can add that context-aware layer. The combination of Zendesk's reliable automation foundation plus intelligent AI handling gives you the best of both worlds: predictable process where you need it, adaptive intelligence where it matters.
Your support queue deserves to be focused on active conversations. Go set up that automation and make it happen.
