When you search for "Zendesk automation conditions ticket created," you might be looking for something that doesn't quite exist. Here's the short version: automations in Zendesk are time-based and run hourly. They don't have a "ticket created" condition. What you're actually looking for is a trigger.
Triggers and automations are both business rules in Zendesk, but they work on completely different timelines. This confusion confounds even experienced admins. Here is exactly how these tools work, when to use each one, and how to set up ticket creation workflows that do what you expect.
Understanding the confusion: Triggers vs automations
The terminology Zendesk uses doesn't help. Both triggers and automations are "automation" in the general sense. They automatically handle tickets based on rules you define. But they operate on different schedules and serve different purposes. For the official distinction, see Zendesk's documentation on triggers and automations.
Triggers are event-based. They fire immediately when something happens to a ticket. When a customer submits a new request, a trigger can instantly route it to the right team, set its priority, and send an acknowledgment email, all within seconds.
Automations are time-based. They run once every hour and check for conditions that involve the passage of time. Think "follow up after 48 hours" or "close tickets 96 hours after they're solved." Automations handle the "wait and see" scenarios that triggers can't manage.
The key distinction: triggers respond to events, automations respond to time. If you need something to happen immediately when a ticket is created, you need a trigger with the Ticket > Is > Created condition. If you need something to happen hours or days later, that's when automations come into play.
Here's a simple way to decide which tool to use:
| Scenario | Tool to Use |
|---|---|
| Route new tickets immediately | Trigger |
| Send acknowledgment emails | Trigger |
| Set priority based on keywords | Trigger |
| Follow up after 24 hours of no response | Automation |
| Close solved tickets after 4 days | Automation |
| Escalate pending tickets after 48 hours | Automation |
The bottom line is this: if your workflow starts with "when a ticket is created," you're building a trigger. If it starts with "after X hours," you're building an automation.
The "ticket is created" condition explained
The Ticket > Is > Created condition is the foundation of most ticket creation workflows. Without it, your trigger would fire on every ticket update, not just when tickets are first submitted. See the Zendesk trigger conditions reference for the complete list of available conditions.
Here's how the condition syntax works:
- Category: Ticket
- Field: Is
- Operator: Created (or Updated)
When you add this condition, you're telling Zendesk: "Only run this trigger when a brand new ticket enters the system." This prevents the trigger from firing when an agent adds a comment, changes the status, or modifies any ticket field.
Zendesk triggers use two types of condition logic:
ALL conditions (AND logic): Every condition in this section must be true for the trigger to fire. This is where you put your "Ticket > Is > Created" condition along with other requirements.
ANY conditions (OR logic): At least one condition in this section must be true. Use this for scenarios like "if the subject contains 'urgent' OR 'emergency.'"
Common conditions you'll combine with "Ticket is Created" include:
- Channel: Route differently based on whether the ticket came from email, web form, chat, or API
- Subject text: Look for keywords like "refund," "billing," or "urgent"
- Received at: Handle tickets differently based on which support email address was used
- Organization: Apply different rules for VIP customers or specific client groups
- Requester tags: Route based on customer segments you've defined
Setting up your first ticket creation trigger
Let's walk through creating a trigger that fires when tickets are created. This example will route billing-related tickets to your finance team.
Step 1: Navigate to Admin Center triggers
Go to Admin Center > Objects and rules > Business rules > Triggers. For detailed navigation help, refer to Zendesk's guide on creating ticket triggers.
You'll see a list of existing triggers, including the standard ones Zendesk provides. These handle basics like notifying requesters when their ticket is received. Notice the order: triggers execute from top to bottom, so position matters.
Step 2: Create a new trigger
Click Create trigger and give it a descriptive name. Good naming matters: "Route billing tickets to Finance" is clearer than "Billing trigger."
Add a description explaining what the trigger does and why it exists. Future you (and other admins) will thank you when troubleshooting six months from now.
Select a category for organization. If you don't have categories yet, you can create them. Many teams organize by function: Routing, Notifications, Escalations.
Step 3: Add the ticket creation condition
In the Meet ALL of the following conditions section, add:
- Ticket > Is > Created
This is your foundation. Without it, the trigger would fire on every update.
Now add your specific routing condition:
- Ticket > Subject text > Contains at least one of the following words: refund invoice payment billing

Step 4: Define additional conditions
Add any other conditions that should narrow down when this trigger fires. For example:
- Requester > Organization > Is not > VIP Customers (if you handle VIP billing differently)
- Ticket > Channel > Is > Email (if you only want this for email tickets)
Remember: ALL conditions must be true for the trigger to fire. If you want "either this OR that" logic, use the ANY conditions section.
Step 5: Configure actions
Conditions determine when the trigger runs. Actions determine what happens.
For our billing example, add these actions:
- Group > Finance Team
- Priority > Normal
- Add tags > billing
- Notify group > Finance Team (optional, if they want immediate alerts)
Click Create to save your trigger. Test it by creating a ticket with "billing" in the subject and verifying it gets routed correctly.
Common automation recipes for ticket creation
Here are five practical trigger configurations you can adapt for your workflow:
Recipe 1: Auto-route by email address
Use case: You have separate support addresses for different departments (support@billing.com vs support@technical.com).
Conditions:
- Ticket > Is > Created
- Ticket > Received at > Is > support@billing.com
Actions:
- Group > Billing Team
- Add tags > billing-inquiry
Recipe 2: Priority escalation for VIP customers
Use case: VIP customers get high priority automatically.
Conditions:
- Ticket > Is > Created
- Requester > Organization > Is > VIP Customers
Actions:
- Priority > High
- Group > Premium Support
- Add tags > vip-priority
Recipe 3: Tag and categorize by subject keywords
Use case: Automatically tag tickets based on what customers are asking about.
Conditions:
- Ticket > Is > Created
- Ticket > Subject text > Contains at least one of the following words: bug error broken not working
Actions:
- Add tags > technical-issue bug-report
- Type > Problem
Recipe 4: Auto-assign based on organization
Use case: Specific account managers handle specific clients.
Conditions:
- Ticket > Is > Created
- Requester > Organization > Is > Acme Corporation
Actions:
- Assignee > Sarah Johnson
- Group > Enterprise Accounts
Recipe 5: Send acknowledgment emails with custom messaging
Use case: Different auto-replies for different types of requests.
Conditions:
- Ticket > Is > Created
- Ticket > Channel > Is > Web form
Actions:
- Notify requester > Email subject: "We received your request" > Body: Custom acknowledgment message
Best practices and common pitfalls
Even experienced Zendesk admins make these mistakes. Here's what to watch for:
Trigger ordering matters. Triggers execute from top to bottom. A trigger higher in the list can change a ticket in ways that affect whether triggers lower down will fire. Put your most specific triggers first, general ones last.
Always include the "Ticket is Created" condition for new-ticket workflows. Without it, your trigger fires on every update. That's rarely what you want.
Test before going live. Create test tickets that match your conditions and verify the actions execute correctly. Check ticket events to see exactly which triggers fired.
Use clear, descriptive names. "Route VIP tickets to Premium Support" is infinitely better than "VIP trigger 2." Include the purpose in the name.
Watch for conflicting triggers. Two triggers modifying the same field can create unpredictable results. Document your trigger logic and review quarterly.
Remember the automation limits. If you're using automations for time-based follow-ups, know that each automation can only process 1,000 tickets per hour. If you have more tickets meeting the conditions, they'll queue for the next hour. See Zendesk's automation documentation for more details on these limits.
Nullifying conditions prevent loops. Automations must include an action that nullifies a condition (like changing status from Solved to Closed). Without this, automations can fire repeatedly.
Enhancing Zendesk with eesel AI
Zendesk triggers and automations handle the mechanics of ticket routing and basic workflows. But they don't understand the content of customer requests. They can't read a ticket and determine intent, sentiment, or urgency beyond simple keyword matching.
That's where we come in. eesel AI integrates with Zendesk to add intelligent automation on top of your existing triggers.

Our AI Agent can resolve tickets autonomously. It reads incoming requests, drafts responses based on your knowledge base, and can even send replies without human intervention. For tickets that need a human touch, it escalates intelligently with full context.
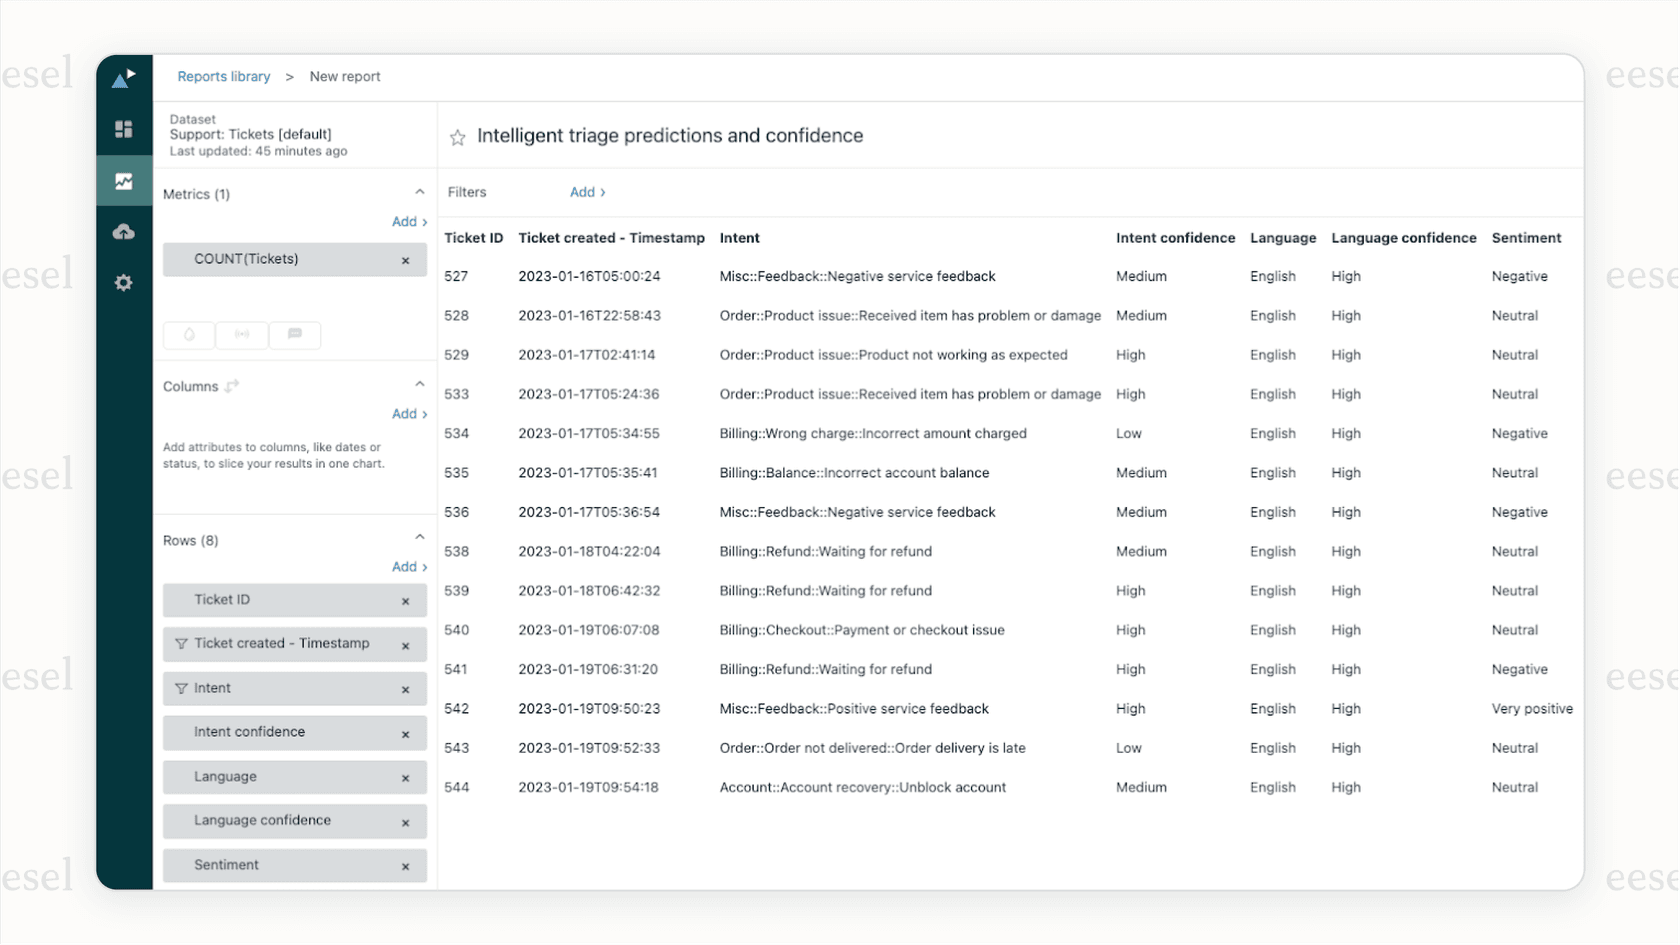
AI Triage goes beyond simple keyword tagging. It understands what customers are actually asking and categorizes tickets by intent, sentiment, and urgency. It can route tickets more accurately than rule-based triggers alone.
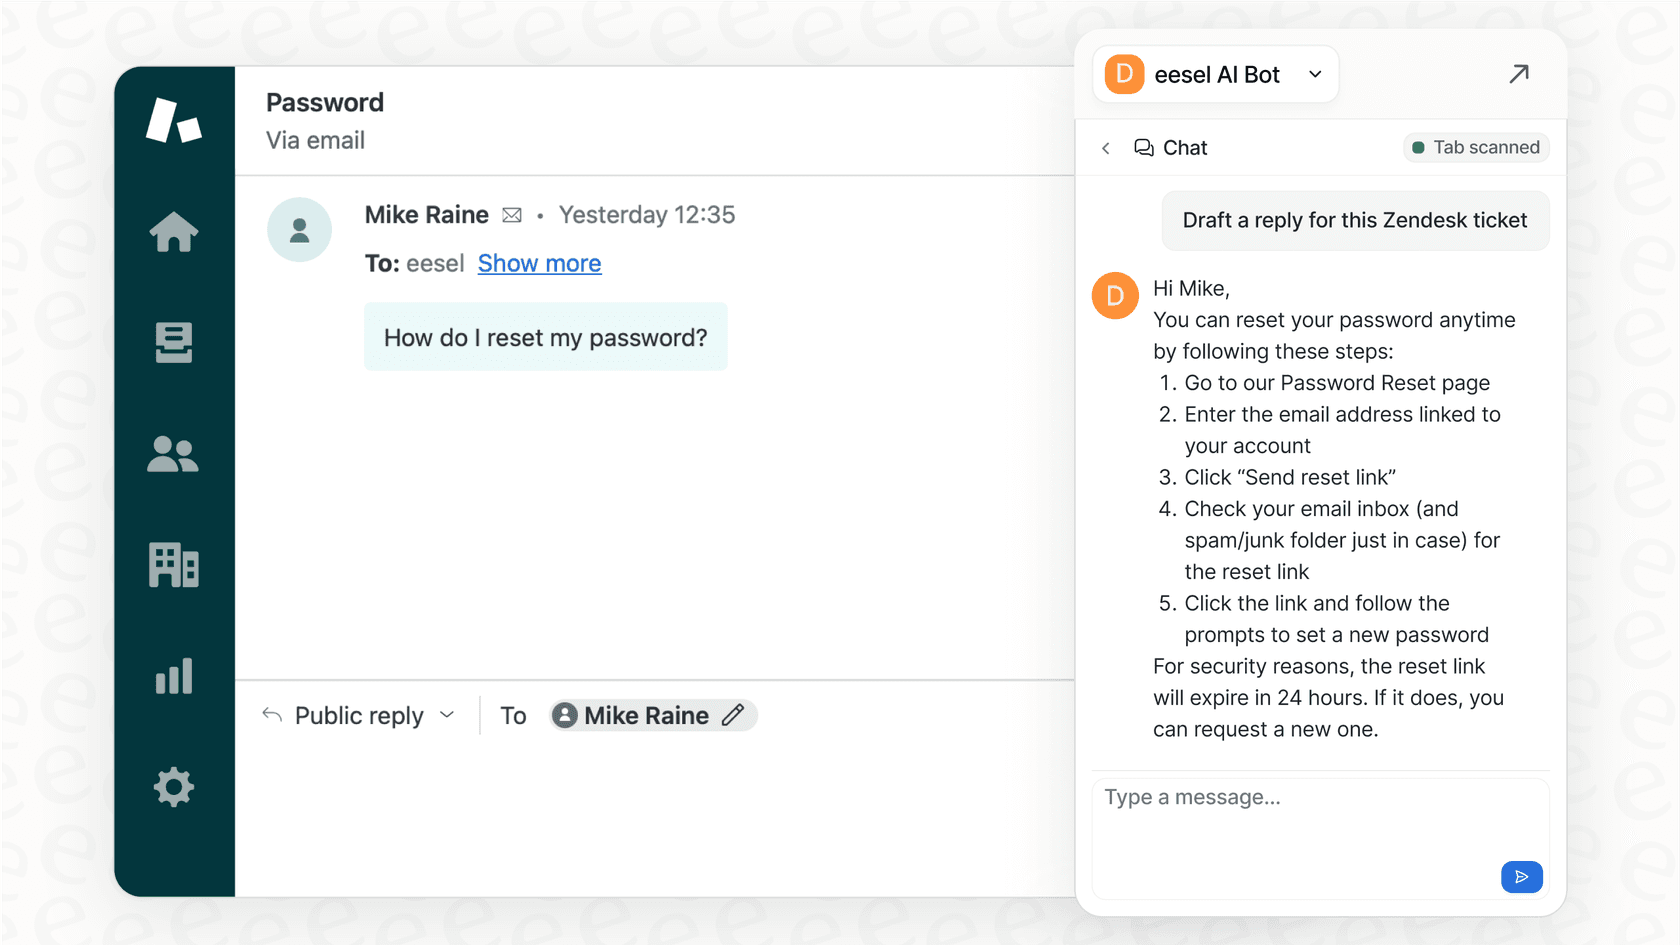
For your human agents, AI Copilot drafts replies instantly. Agents see a ready-to-send response based on your past tickets and knowledge base. They review, edit if needed, and send. Response times drop dramatically while quality stays consistent.
The approach we recommend: start with guidance, then level up to autonomy. Run eesel on your past tickets to see how it would perform. Once you're confident, have it draft replies for review. When it proves itself, expand to full autonomous resolution.
Start automating your Zendesk workflow today
You now understand the key distinction: triggers handle immediate actions when tickets are created, automations handle time-based follow-ups. The Ticket > Is > Created condition is your foundation for event-based workflows.
Start with simple triggers. Route by email address or organization. Add tags based on keywords. Send acknowledgment emails. As you get comfortable, build more sophisticated workflows with multiple conditions.
Remember to test everything before going live. Use descriptive names. Document your logic. Review your triggers quarterly to catch outdated rules.
If you want to go beyond rule-based automation and add true intelligence to your Zendesk workflow, try eesel AI. We connect to your existing Zendesk account, learn from your past tickets and knowledge base, and start helping your team resolve tickets faster. Check our pricing to see which plan fits your volume. You can also explore Zendesk's AI agent features to understand native options available in your help desk.
