How to set up the Freshdesk Freddy AI chatbot to handle order status requests
Kenneth Pangan
Stanley Nicholas
Last edited January 16, 2026

Let's be honest, if your support team had a dollar for every "Where is my order?" ticket, you could probably fund the whole department for a year. These repetitive WISMO requests are a constant drain on time and energy, pulling agents away from issues that actually need a human touch. The good news? You can automate them away.
Getting these simple, high-volume questions off your team’s plate is one of the quickest wins for improving both team efficiency and customer happiness. Your customers get instant, 24/7 answers, and your agents get to focus on solving tougher problems. This guide will walk you through exactly how to set up the Freshdesk Freddy AI chatbot to handle order status requests, step-by-step. We’ll cover everything from hooking it up to your order system to building the conversation and planning for a smooth handoff to a human when things get complicated.
What you'll need to get started
Before we jump into the setup, let's get our ducks in a row. This process involves connecting Freshdesk to your backend order management system, which means you’ll need a few things on hand.
-
A Freshdesk Account: To really unlock the Assist Bot and its API library, you’ll need to be on one of the higher-tier plans, like the Enterprise Omnichannel plan.
-
Admin Access: You'll need to be an administrator in your Freshdesk account to get into the settings and configure the bots. No sneaking around IT for this one.
-
Order System API Access: This is the big one. You need the API documentation for whatever e-commerce platform or system holds your order data. This could be Shopify, Magento, or a custom-built database. Make sure you have the API key or token ready to go.
-
A Basic Grip on APIs: You don't need to be a developer, but knowing a little about how APIs work (specifically what a GET request is and what a JSON response looks like) will definitely help.
A step-by-step guide
Alright, let's build this thing. We're going to create a bot flow that says hello, asks for order details, pulls that info from your system using an API, and then shares it with the customer right there in the chat.
Step 1: Head to the assist bot builder
First things first, you need to find where the bot magic happens. Log into your Freshdesk account as an admin.
-
From the main dashboard, navigate to Admin > Agent Productivity > Assist bot.
-
You can either pick an existing bot to work on or create a new one from scratch. Think of this area as your command center for all your bot conversations.
Step 2: Connect to your order system via the API library
Before your bot can talk about orders, it needs a direct line to your e-commerce platform. This is where Freshdesk's API Library comes in, which is basically a phonebook for your API connections.
-
Inside the bot builder, find and click the API Library icon on the right-hand menu.
-
Click the + New API button. It’s a good idea to give it a name you'll remember, like "GetOrderStatus".
-
Now for the technical bit. You’ll need to configure the API call:
- Method: Select GET, since you're just retrieving (or "getting") information.
- URL: This is the specific API link from your order system's documentation for fetching a single order. You’ll use a placeholder for the order number the customer gives you. It might look something like this: "https://api.yourstore.com/orders/{{order_number}}".
- Headers: Most APIs need some kind of password to let you in. You'll add that here, usually in the form of an API key or an authorization token.
-
Once that's filled in, use the Test feature. This lets you pop in a real order number from your system to make sure the connection is working. When you see a successful response, you can save the API and move on.
Step 3: Map out a new conversation for order status
A dialog flow is just the script the bot follows when talking to a customer. We need to create a new script specifically for when someone asks about their order.
-
Back in the bot builder, create a new flow and give it a clear name, maybe "Order Status Check."
-
The first thing the bot should say is a friendly greeting that also tells the customer what it needs. Something like, "I can help with that! What's your order number?" is perfect.
-
Next, you need to tell the bot to listen for the customer's reply and save it. Let's call the saved information "order_number". This is how the bot will remember what to look up in the next step.

Step 4: Trigger the API and share the results
This is the moment of truth. We'll use the API we just set up and the order number from the customer to get the live order status.
-
In your "Order Status Check" flow, right after the bot gets the order number, add a new action.
-
Choose Trigger API as the action type and select the "GetOrderStatus" API you made in Step 2. The bot is smart enough to automatically use the "order_number" it just saved.
-
Now, add a new message to show the customer what the bot found. Use the content picker "[+]" to pull data straight from the API's response. Your message could be something like: "Great news! Your order status is: "{{api_response.status}}"."
-
If your API also shares details like a tracking number or delivery date, you can add those into the message too.
Step 5: Plan an escape route
Automation is fantastic, but what happens when something goes wrong? A customer might mistype their order number, or your system might be down for a moment. You need a fallback so the customer isn't left talking to a brick wall.
-
Use the Conditions tab in your dialog flow to check if the API call worked.
-
Create a condition that looks for a successful response. If it's all good, the bot continues with the happy message we created in the last step.
-
Create another condition for a failure or an error message (like "Order not found"). If this happens, the bot should send a different message. For example: "I couldn't find that order number. Let me connect you with someone on the team who can help."
-
Finally, add an action to transfer the chat to a human agent. This ensures a smooth handoff, and the agent gets the full chat history to see what the customer was trying to do.
Tips for success and common mistakes to avoid
Getting an AI chatbot live is a big deal, but a bit of planning can make all the difference. Here are a few things to keep in mind.
-
Don't try to boil the ocean. It's tempting to build a bot that can do everything, but you'll get much better results if you start small. Nailing a single, high-impact workflow like handling order status requests is way more effective than launching five different automations that only sort of work.
-
Test, test, and test again. Use the tools in Freshdesk to run through the entire conversation multiple times before it goes live. Try it with real order numbers, fake ones, and anything else you can think of. A broken bot is often more frustrating for a customer than no bot at all.
-
Keep an eye on performance. Once your bot is live, don't just forget about it. Check its resolution rate and look for places where it's getting stuck. Your analytics will show you where customers are dropping off so you can go back and tweak the conversation or the API connection.
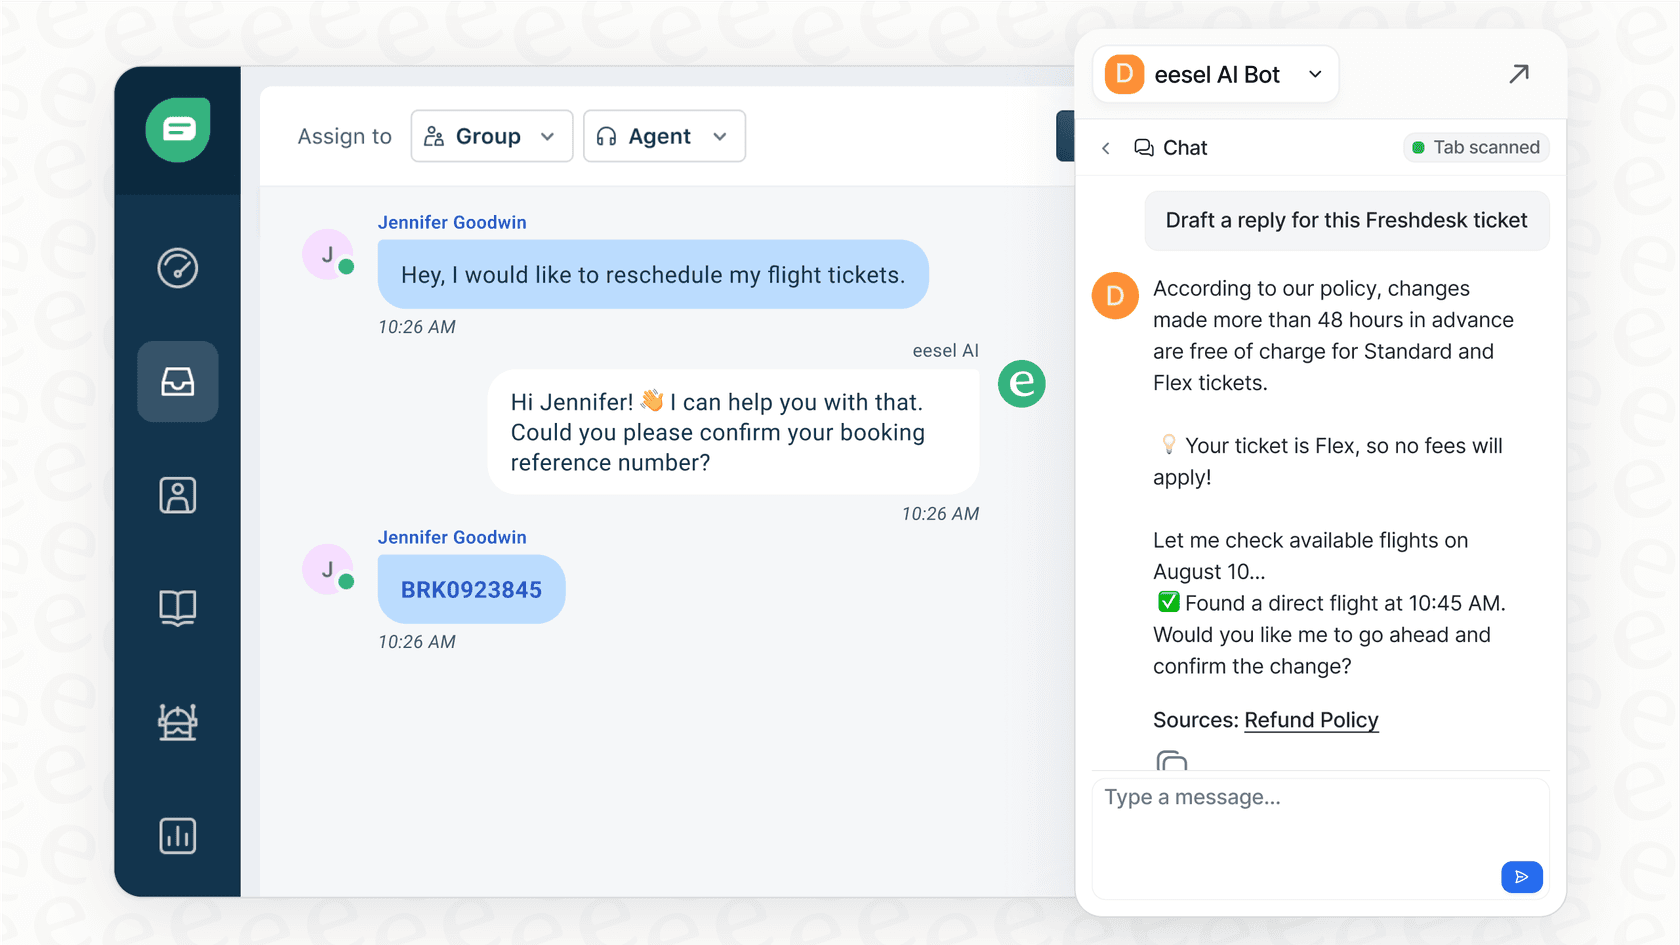
One of the biggest hurdles with any AI project is feeling confident that it will actually work before you unleash it on customers. This is an area where Freshdesk's ecosystem can be further enhanced by specialized simulation tools.
A common mistake is to build a bot without a clear idea of how it will handle the messy reality of customer questions. This can lead to frustrated users and a loss of trust in your automated support. This is exactly why tools like eesel AI were built as a complementary addition with a powerful simulation mode. You can safely test your entire AI setup on thousands of your actual past tickets in a practice environment. This gives you a data-backed forecast of its resolution rate and shows you exactly where to make improvements, so you can launch knowing it’s ready.
| Feature | Freshdesk Freddy AI | eesel AI |
|---|---|---|
| Setup Process | Comprehensive setup offering deep customization and control over every interaction. | Quick-start option with simplified one-click integration for rapid deployment. |
| Custom Actions | Fully capable via API Library, allowing for powerful, custom-tailored system connections. | Easily create custom actions to look up data or trigger workflows in any system. |
| Pre-launch Testing | Robust manual testing tools within the bot builder to verify every conversational path. | Unique simulation mode tests the AI on thousands of past tickets for a precise performance forecast. |
| Knowledge Sources | Leverages your knowledge base and structured flows for high accuracy. | Instantly unifies knowledge from past tickets, help centers, Confluence, Google Docs, and more. |
What's the takeaway?
Automating routine questions isn't just a nice-to-have anymore: it's essential for running a modern, efficient support team. By following the steps in this guide, you can get the Freshdesk Freddy AI chatbot to handle order status requests, which will immediately free up your agents' time and give your customers the instant answers they expect.
Freshdesk Freddy AI provides a robust and comprehensive toolkit for teams who want deep control over their automation. While setting up API connections and building detailed flows requires some initial integration expertise, the resulting automation is powerful and reliable. For teams that want to move even faster or add an extra layer of testing to their AI rollout, it is worth looking at complementary options built for a more flexible experience.
Get powerful, self-serve automation that just works
If you’re looking for an AI solution that you can set up in minutes to work alongside your helpdesk, give eesel AI a try. It plugs directly into Freshdesk and over 100 other tools, learning from your past tickets and other knowledge sources automatically. With our simulation mode and a fully customizable workflow engine, you can confidently automate even your most complex support issues.
Start your free trial today and see for yourself how easy frontline support automation can be.
Frequently asked questions
To fully utilize the Assist Bot and its API library for this functionality, you'll generally need one of Freshdesk's higher-tier plans, such as the Enterprise Omnichannel plan. This ensures you have access to all necessary features for [integration and automation](https://www.eesel.ai/blog/using-ai-with-zendesk-and-freshdesk-challenges-and-solutions).
The setup time can vary based on your familiarity with APIs and the complexity of your order system. With all prerequisites in place (API access, admin rights), the core setup can often be completed in a few hours, though testing and refinement will add more time.
This guide focuses on retrieving order status using a GET API request. While Freshdesk's API library supports other methods (like POST for updates), configuring the bot to perform modifications would require additional API setup and careful flow design.
You should configure a fallback mechanism. The bot can detect if the API returns an error or "order not found" message and then offer to connect the customer to a human agent, ensuring they aren't left without assistance.
It's crucial to monitor the bot's performance after it goes live. Utilize Freshdesk's analytics to track resolution rates and identify points where customers might be getting stuck, allowing you to iterate and improve the conversation flow.
Yes, absolutely. During Step 3, you'll map out the conversation flow, which allows you to completely customize all the bot's messages, greetings, and responses to match your brand's specific tone and language.
While you don't need to be a professional developer, a basic understanding of how APIs work, especially GET requests and JSON responses, is very helpful. The guide walks you through the steps, but some technical comfort is beneficial.
Share this article

Article by
Kenneth Pangan
Writer and marketer for over ten years, Kenneth Pangan splits his time between history, politics, and art with plenty of interruptions from his dogs demanding attention.