What Zendesk's automation stack actually is
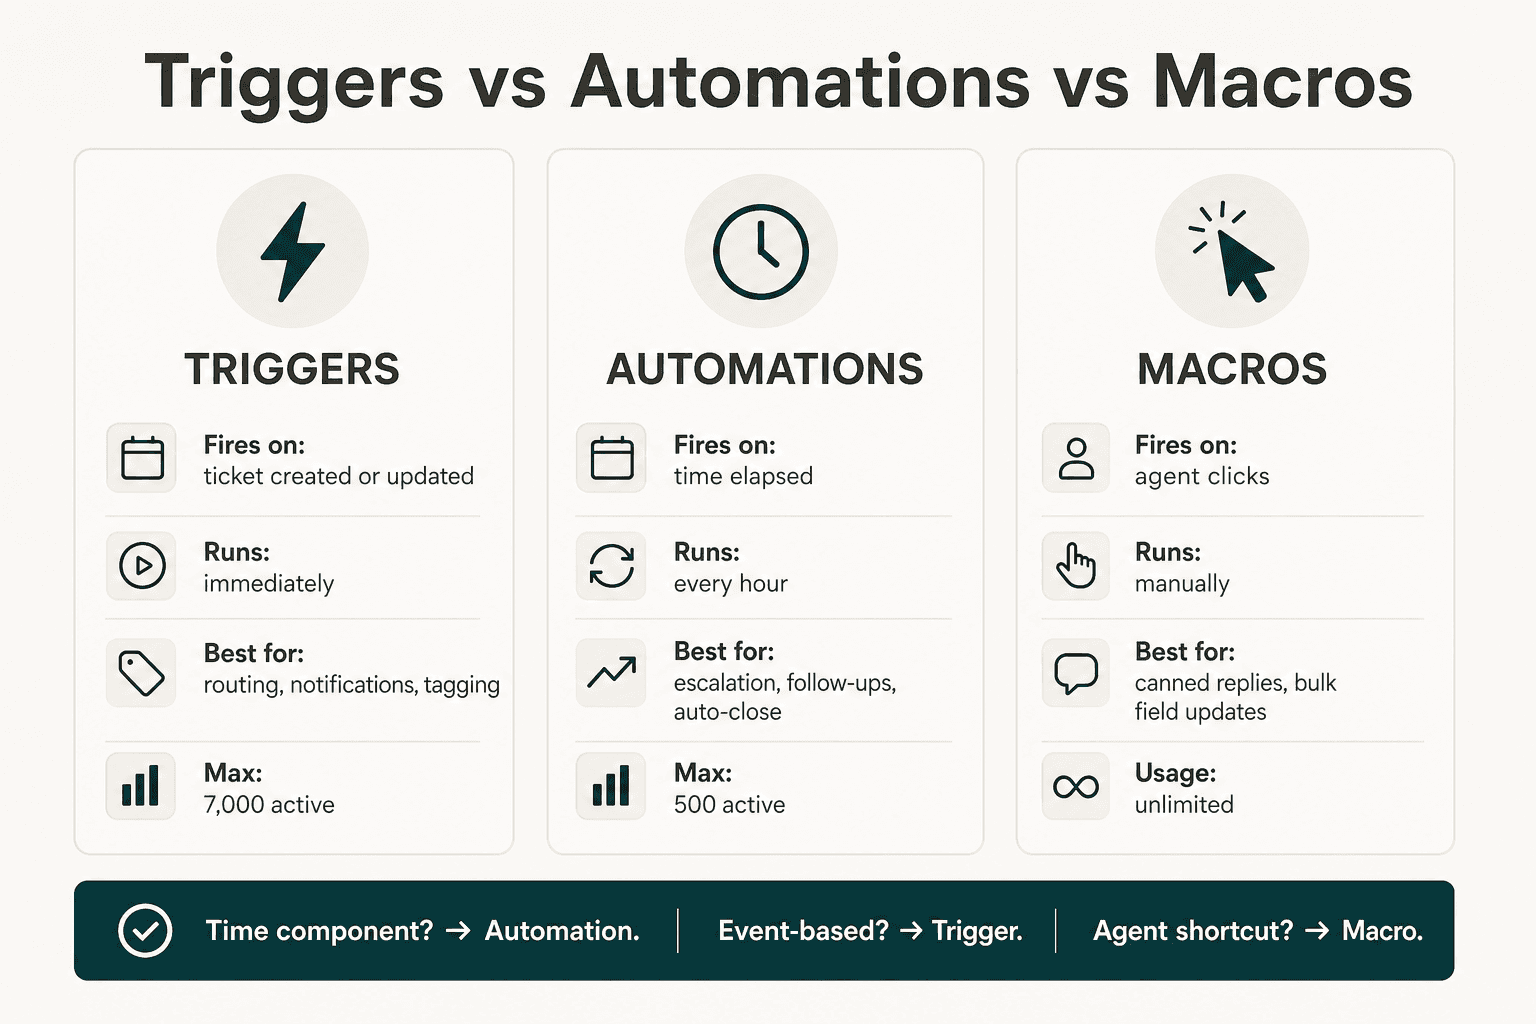
Every time someone says "Zendesk automations," they might mean one of three different things. Zendesk calls them all business rules, but they operate on completely different mechanics.
All three live in Admin Center > Objects and rules > Business rules. The decision rule for choosing between them is almost embarrassingly simple:
- Time component? Use an automation.
- Fires the moment a ticket changes? Use a trigger.
- Agent applies it manually? Use a macro.
Once you internalize that distinction, most setup questions answer themselves.
Triggers: event-based rules
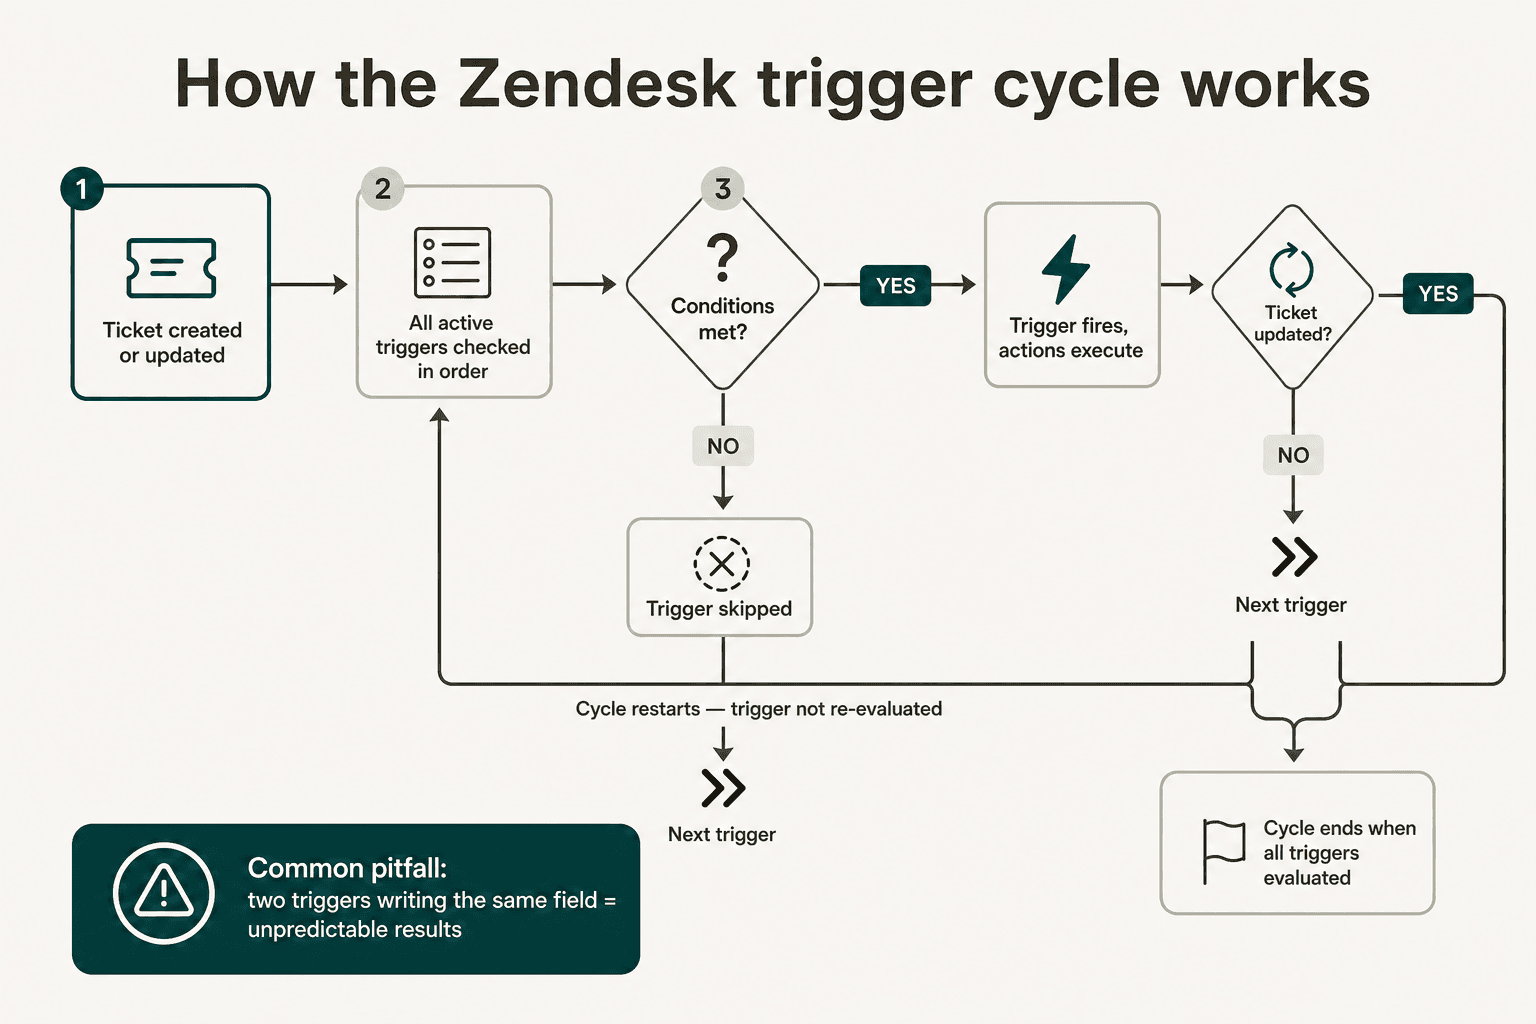
Triggers are the workhorses of the system. Any time a ticket is created or updated, Zendesk runs every active trigger in order against that ticket - checking conditions, firing actions where conditions are met. The Zendesk ticket status lifecycle feeds directly into trigger logic, so understanding how statuses move matters before you build complex trigger chains.
How the trigger cycle works
The part most admins don't fully internalize: if a trigger fires and updates a ticket, the entire cycle restarts - but the trigger that just fired doesn't run again. Earlier triggers can create the conditions later triggers check. Two triggers both writing to the same field (like "Assignee") produce unpredictable results. The cycle ends when all triggers have been evaluated without any new updates being made.
Hard limits worth knowing upfront (per Zendesk's official docs):
- Up to 7,000 active ticket triggers per account
- Each trigger must be under 65 KB (roughly 65,000 characters of combined condition/action text)
- Triggers don't run on closed tickets - they can fire when a ticket is being set to closed, but not after
What Zendesk ships by default
New accounts come with a set of standard triggers already active:
| Trigger | Fires when |
|---|---|
| Notify requester of received request | New ticket created by end user |
| Notify requester of comment update | Ticket updated with a public comment |
| Notify assignee of comment update | Comment added; assignee is not the current user |
| Notify assignee of assignment | Assignee changed to someone else |
| Notify assignee of reopened ticket | Solved ticket reopened |
| Notify group of assignment | Group assignment changed |
| Notify all agents of received request | New ticket created (usually worth deactivating on teams larger than 5) |
The "notify all agents" trigger is the first one most admins kill - it floods inboxes on any team beyond a handful of people. It's harmless on a two-person support setup; it's chaos on a 30-person team.
Setting up a trigger
- In Admin Center, go to Objects and rules > Business rules > Triggers
- Click Add trigger
- Name it descriptively -
Route billing tickets to billing groupbeatsTrigger 47 - Under Meet ALL of the following conditions, add your conditions
- Under Meet ANY of the following conditions, add optional "or" conditions if needed
- Under Actions, define what happens when conditions are met
- Save - the trigger is active immediately
One setup detail that trips up new admins: always add a Ticket | Is | Created or Ticket | Is | Updated condition to narrow scope. Without it, the trigger evaluates on every qualifying create and update event, which causes unexpected re-fires on tickets you thought you'd already handled.
For detailed guides on specific trigger setups: tag tickets by channel automatically, set custom fields via trigger actions, use regex in trigger conditions for advanced routing, and trigger-based internal notes.
Common trigger use cases
Routing and assignment:
- Route tickets from a specific email domain to a VIP support group
- Tag tickets by channel for Explore reporting
- Assign tickets with subject-line keywords to the right team
Notifications:
- Alert a Slack channel via webhook when a ticket is tagged
urgent - Notify the newly assigned agent when a ticket changes hands - use the
Assignee | Changedcondition, notIs Created - Fire a Jira issue creation when ticket type is set to Bug
Status workflows:
- Trigger on status change to Pending to kick off a customer follow-up sequence
- Trigger when tickets are solved or closed to queue a CSAT survey
- Email triggers and notifications for email-channel-specific routing
Understanding trigger order of execution becomes critical as your rule set grows - which triggers run first determines which conditions downstream triggers see.
Automations: time-based rules
Automations are the tool most Zendesk admins underuse. They run every hour across all non-closed tickets, checking time-based conditions and firing when they're met. Zendesk ships one automation out of the box: close solved tickets after 96 hours. Most teams can and should build more.
How the hourly run works
Every hour - not necessarily on the hour, at some random point during the hour - Zendesk evaluates all active automations against every non-closed ticket. Automations run in list order. Because one automation's actions modify a ticket, subsequent automations in the same hourly pass see the updated state.
Example: Automation #1 escalates priority to High for tickets pending 48+ hours. Automation #2 notifies the escalation group when priority is High. A ticket that just crossed the 48-hour mark gets both fired in the same hourly pass - #1 fires, sets High, #2 sees High, notifies the group.
The hard limit most teams hit silently: each ticket can be updated by automations a maximum of 100 times total. When the limit is reached, Zendesk adds a system note to the ticket - but there's no email alert, no dashboard indicator. You find out via the ticket audit API or by noticing behavior has stopped.
The must-run-once rule
Every automation needs either a nullifying action (one that makes the condition false after it fires) or a naturally one-time condition. Without this, the automation loops every hour indefinitely.
The standard loop-prevention pattern:
- Add an action:
Tag | Add | automation_sent_24h - Add a condition:
Tags | Does not contain | automation_sent_24h
The tag is added on first fire; the condition fails on every subsequent run. Zero extra coding, works every time. This tag also gives you an Explore-queryable signal for how often the automation is firing.
One timing nuance: use "Greater than" rather than "Is" for time conditions. The condition hours since created | Is | 24 fires only during the one hourly run that catches the ticket at exactly 24–25 hours old. If Zendesk's scheduler checks at 23.5 or 25.5 hours, the window is missed entirely. Greater than 24 fires on any run after the 24-hour mark - far more reliable for anything SLA-related. Our Zendesk automation conditions guide goes deep on the timing mechanics.
Common automation use cases
Escalation:
- Escalate priority from Normal to High after 24 hours open
- Notify an agent's manager group if a ticket remains unresolved after 48 hours
- SLA breach automations for teams with contractual response commitments
Follow-up:
- Send pending reminders after 24 hours with no customer reply
- Auto-solve tickets pending customer reply for 7+ days
- Final closure note before the auto-close fires
Auto-close:
- Close tickets 24 hours after solved (faster than the 96-hour default - common on high-volume teams)
- Mark abandoned tickets (14+ days with no update) as Solved
After-hours:
- After-hours automation conditions for routing when tickets arrive outside business hours
- Schedule-based conditions for teams spanning time zones
See also: automate Zendesk tickets for a broader overview of what can be automated across the full ticket lifecycle, and how to automate replies in Zendesk for response-level automation.
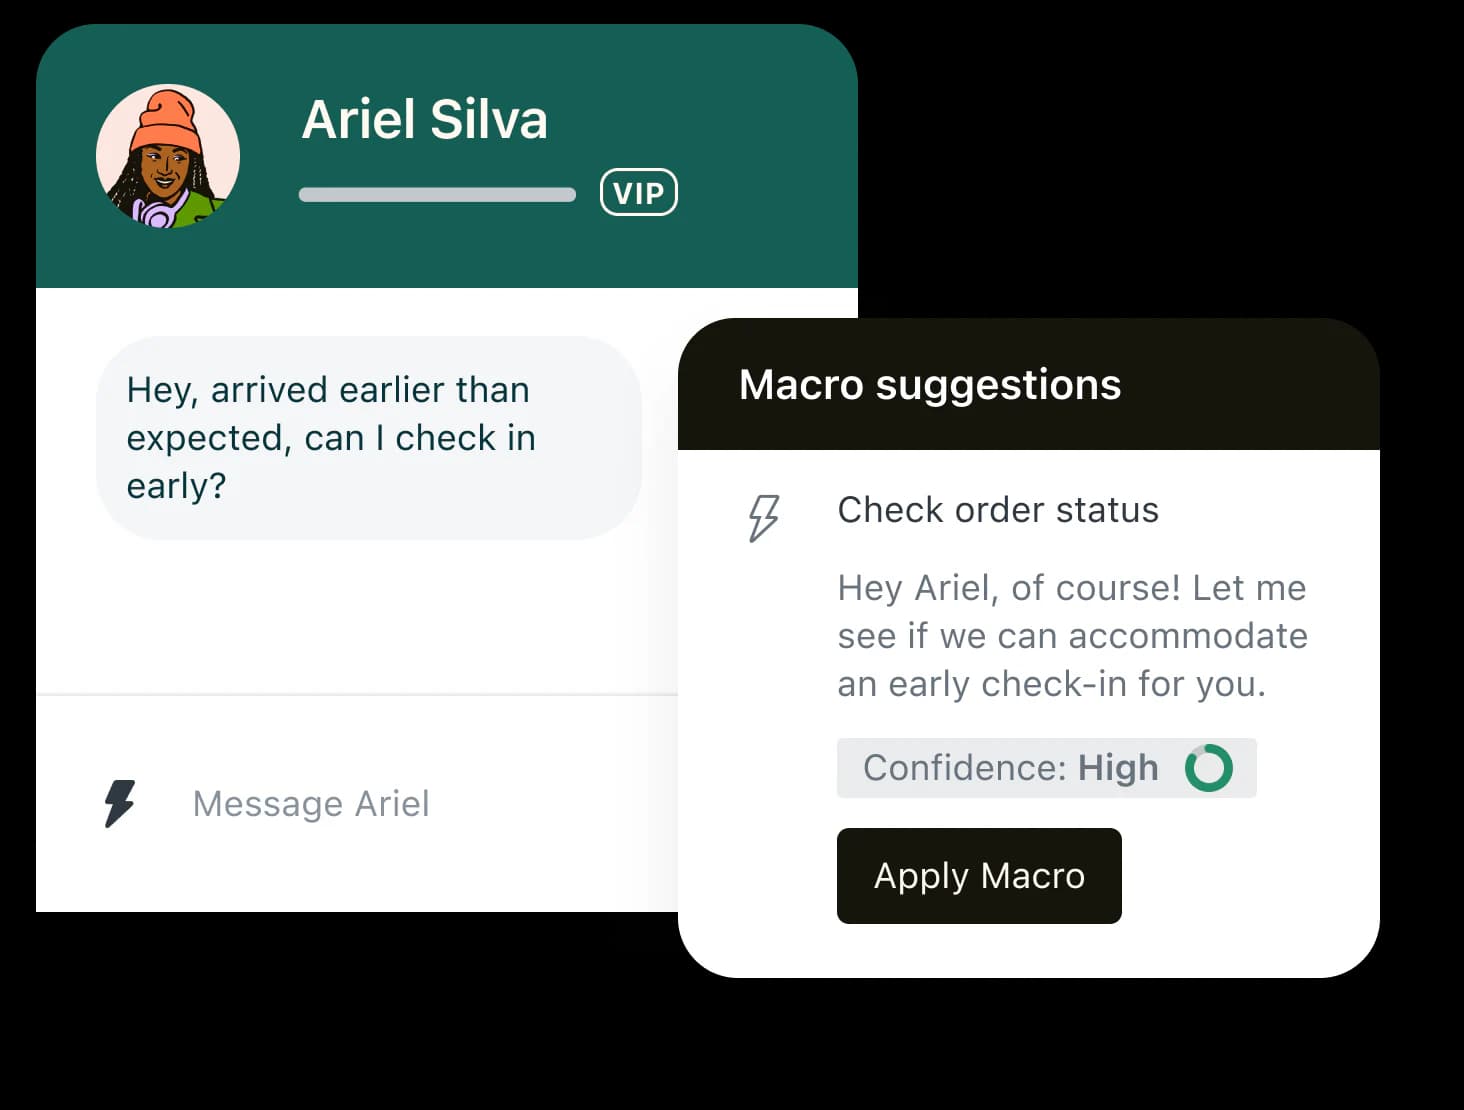
Macros: the manual layer
Macros are different in kind from triggers and automations - they're agent shortcuts, not automatic rules. An agent applies a macro by clicking on it while viewing a ticket; nothing fires automatically. The distinction matters: macros are where you put workflows that need a human judgment call before executing, not ones that should run on every qualifying ticket.
What a macro can do in one click:
- Set ticket fields: status, priority, assignee, type, tags, custom fields
- Add a public comment with templated text
- Add an internal note
- Any combination of the above
The value comes from bundling multiple steps. A macro that only changes a field without sending a message wastes the slot - most high-value macros do at least two things: set status + send the standard message that goes with it.
Common macro patterns:
- Awaiting reply - Adds internal note + sets Pending + sends: "Hi [name], could you send us [X] so we can continue?"
- Escalate to engineering - Sets Priority: Urgent + assigns to Engineering group + adds internal note: "Escalated per [reason]"
- Resolved - closing - Sets Status: Solved + sends: "We've resolved [issue]. Let us know if anything else comes up!"
- Request more info - Adds internal note + sets Pending + comments requesting specific details
For naming, the [Team] Action - Context convention pays off once you have dozens of macros: [Billing] Refund - request received, [Engineering] Bug - escalated to Jira. It keeps the list filterable without needing to build a separate taxonomy.
For detailed reference: macro action reference, adding internal notes via macros, combining comments and status changes in macros, and the difference between personal vs shared macros - which determines who on the team sees each macro.
10 automation templates worth stealing
These are the automations and triggers most teams eventually build. All are straightforward to set up in Admin Center:
1. Route tickets by channel
Trigger. Ticket channel | Is | [channel] → Add tag channel_[name] + Assign to group [channel team]. One trigger per channel, run in order.
2. VIP customer escalation
Trigger. Organization | [VIP custom field] | Is | true + Ticket | Is | Created → Set Priority: Urgent + Assign to group: VIP Support + Notify group.
3. Unassigned ticket alert
Automation. Ticket: Assignee | Is | (nobody) + Ticket: Hours since created | Greater than | 4 + Tags | Does not contain | unassigned_alerted → Notify group: Support + Add tag unassigned_alerted.
4. Pending follow-up reminder
Automation. Ticket: Status | Is | Pending + Ticket: Hours since pending | Greater than | 48 + Tags | Does not contain | pending_reminder_sent → Comment on ticket (request info) + Add tag pending_reminder_sent. Full setup: send reminders after 24 hours pending.
5. Auto-solve abandoned tickets
Automation. Ticket: Status | Is | Pending + Ticket: Hours since pending | Greater than | 168 → Set Status: Solved + Comment: "We're closing this ticket after 7 days without a reply. Reopen anytime."
6. Priority escalation on open tickets
Automation. Ticket: Status | Is | Open + Ticket: Priority | Is | Normal + Ticket: Hours since created | Greater than | 24 + Tags | Does not contain | priority_escalated → Set Priority: High + Add tag priority_escalated. See automation conditions: SLA breach for more escalation patterns.
7. Fast close on solved tickets
Automation. Ticket: Status | Is | Solved + Ticket: Hours since status | Greater than | 24 → Set Status: Closed. Replaces the default 96-hour rule for high-volume teams that need the queue to clear faster.
8. Webhook to Slack on urgent ticket
Trigger. Ticket: Priority | Is | Urgent + Ticket | Is | Created → Notify webhook [Slack webhook URL] with {{ticket.title}} - {{ticket.url}}.
9. Internal note on tag
Trigger. Ticket: Tags | Contains | needs_legal_review → Add internal note: "Legal review required - assign to Legal team per policy." Full setup guide.
10. After-hours auto-reply
Trigger. Ticket | Is | Created + Ticket: Schedule | Outside business hours → Comment (public): "Thanks for reaching out - our team is currently outside business hours and will reply by [next business day]." See Zendesk auto reply for more after-hours automation options.
Best practices and pitfalls
What to do
Order triggers intentionally. Routing and assignment triggers should always run before notification triggers - you want the ticket in the right group before the "notify group" trigger checks who to send to. Trigger order is managed via drag-and-drop in Admin Center. See trigger order of execution for a detailed breakdown of how ordering affects complex setups.
Clone before modifying standard triggers. The standard triggers are your email notification delivery system. Deactivate the original, work from a clone. If something breaks, reactivate the original while you debug.
Use "Preview match" before saving automations. Admin Center's "Preview match for the conditions" button shows you exactly how many tickets currently match before the automation runs. Discovering you've configured an automation to fire against 15,000 tickets instead of 150 is a much less stressful experience when you catch it pre-save.
Tag every automation fire. Adding a tracking tag as an action (e.g., auto_followup_sent) does three things at once: loop prevention, Explore reporting, and silent-failure detection. If you notice an automation stopped firing at the expected rate, check the tickets for the tag accumulation pattern - it usually points straight to the 100-update limit or a condition that changed.
What breaks things
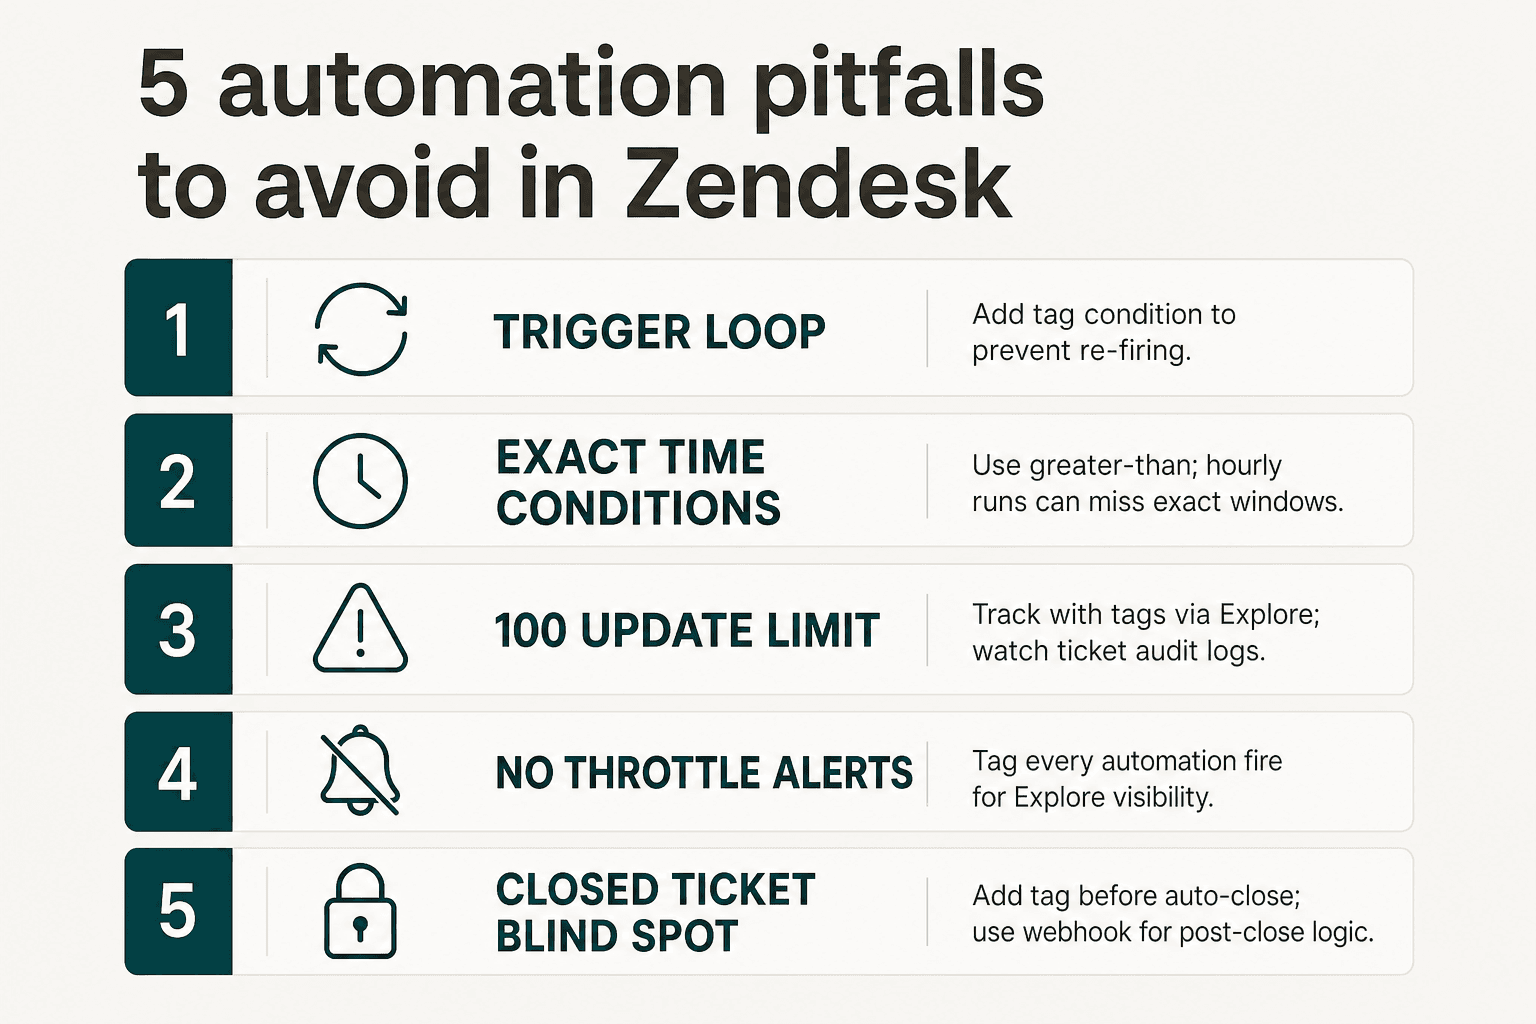
Trigger loops. Two triggers that each fire on the other's actions loop indefinitely until the cycle exhausts itself. The debugging move: add Ticket: Update via | Is not | Trigger as a condition on any trigger that is behaving unexpectedly. Then add a loop-prevention tag as described above.
Exact time conditions. Hours since created | Is | 24 can be missed by Zendesk's hourly scheduler entirely. Always use Greater than.
The silent 100-update limit. Zendesk adds a note when a ticket hits the limit, but there's no alert and it isn't searchable in the UI. The only native way to detect it is the ticket audit API. Track automation fires with tags so you can build Explore queries that surface tickets hitting unusual automation update counts before they fail silently.
Automation editor UX lag. As of March 2026, the automation condition picker doesn't support typing to filter - you scroll through the full list to find a custom field. The trigger editor has search, the automation editor doesn't (yet). Workaround: keep custom field names short and alphanumeric so they cluster predictably in the list.
Closed ticket blind spot. Automations don't run on closed tickets, period. For post-close logic (CSAT follow-ups, data cleanup), fire the action before the ticket closes: add a tag as part of your close automation, then use a webhook or AI automation layer to handle the downstream workflow while the ticket is still in Solved state.
When native Zendesk automation hits its ceiling
Rule-based automation covers a lot. What it doesn't do: understand ticket content, detect sentiment, learn from patterns across ticket history, fill knowledge gaps in your KB, or make judgment calls about how to respond to a ticket you've never seen before.
The ceiling shows up in a few predictable places:
- You want replies that are actually tailored to what the customer wrote, not canned templates
- You need ticket classification based on intent, not keyword matching
- You're spending hours keeping macros and canned responses up to date as the product evolves
- You want the AI to handle tier-1 tickets end-to-end, not just route them
Teams that hit this ceiling often describe Zendesk's native AI as "inadequate for what we need" - rules are great for deterministic workflows, but support conversations aren't deterministic. The support ticket automation landscape has matured significantly; there are now tools built specifically to complement Zendesk's rule layer rather than replace it.
That's where eesel fits. It's an AI agent that runs natively inside Zendesk - not a separate inbox, not a chatbot widget sitting outside your workflow. It reads tickets, drafts and sends replies grounded in your help center and past tickets, updates fields, routes escalations, and respects your existing triggers, automations, and business-hour rules exactly as configured. Everything you've built above keeps working. See our Zendesk AI alternatives comparison if you're evaluating options for the layer above rule-based automation.
Try eesel
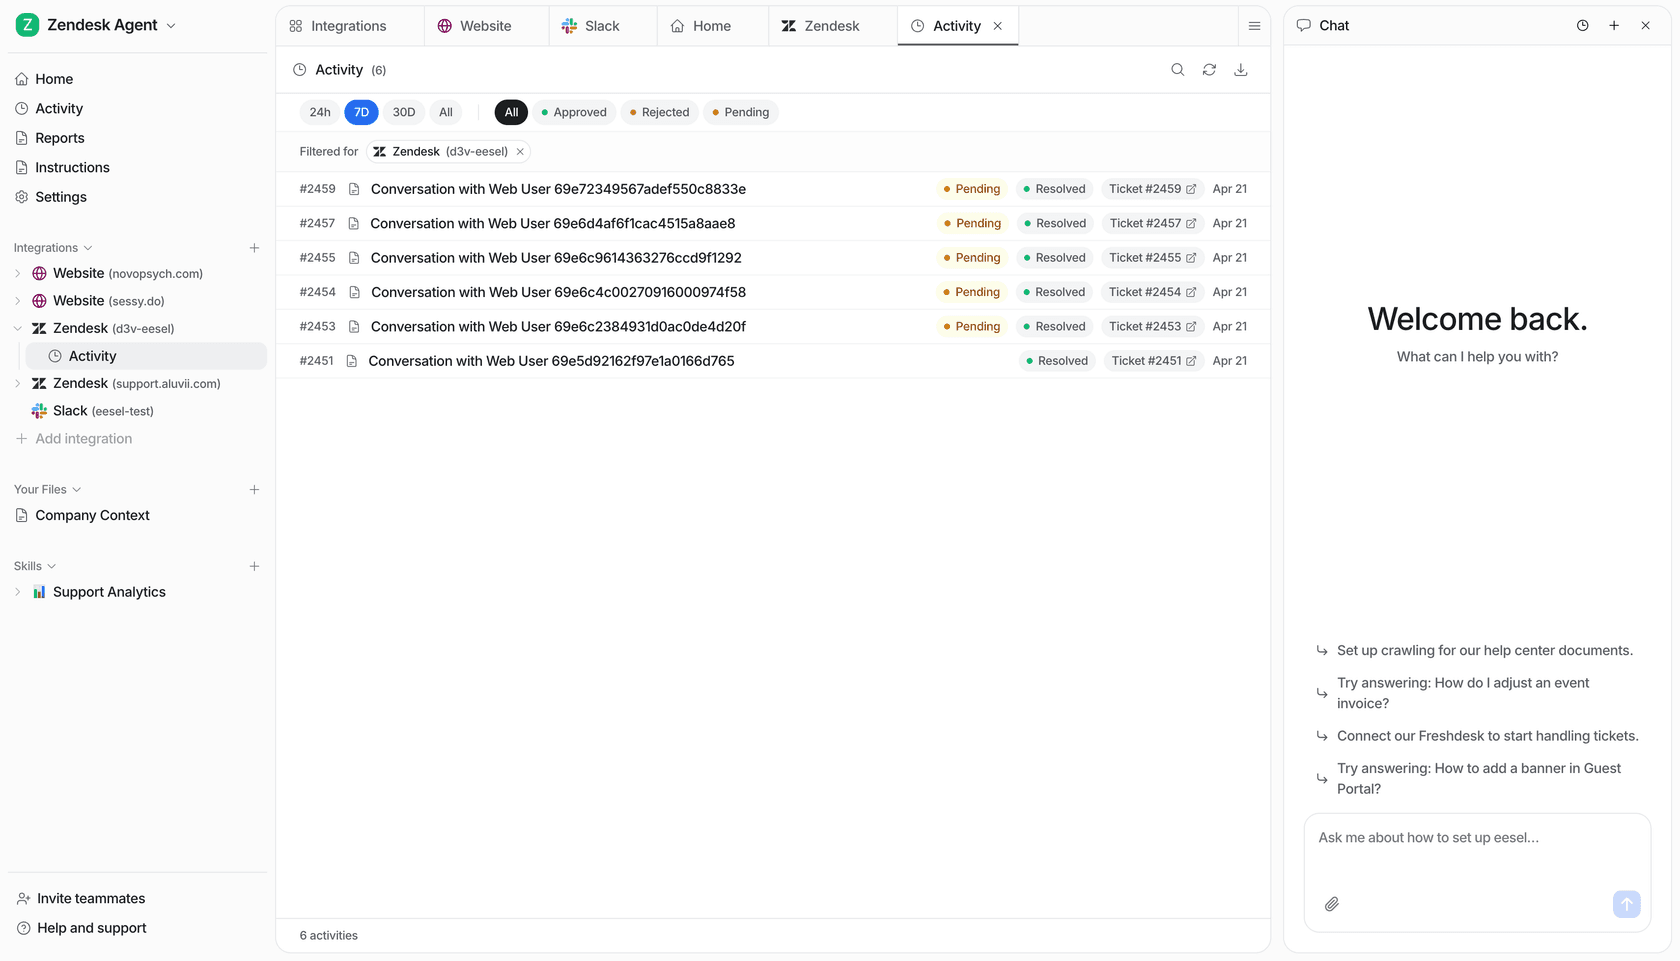
eesel is an AI teammate that installs as a native agent inside Zendesk. It reads incoming tickets, drafts and sends replies in the customer's language, updates ticket fields, handles routing and escalations, and manages SLA timelines - all while respecting the triggers, automations, and business-hour rules already in place. Setup takes under 30 minutes; eesel auto-imports your help center articles, past tickets, and macros as knowledge sources before it touches a single live ticket.
Pricing is $0.40 per ticket - no platform fee, no per-seat cost, no "resolution" billing surprises. Smava runs 100,000+ tickets/month through eesel in German. Kim Simpson at Gridwise put it directly:
"In the first month, eesel is resolving 73% of our tier 1 requests. eesel offers easy Zendesk implementation and setup. Our team implemented and achieved results quickly during our 7-day trial. The platform even includes automations for ticket tagging, assignment, and status updates!"
Kim Simpson, Gridwise (G2 review)
Try eesel free - $50 credit, no card required.
Frequently Asked Questions
What is the difference between Zendesk triggers and automations?
How many automations can I have in Zendesk?
Why is my Zendesk automation not firing?
Can Zendesk automations run on closed tickets?
How do I prevent a Zendesk trigger from looping?
notification_sent), then add a condition that checks the tag is not already present. This ensures the trigger only fires once per event cycle. You can also add Ticket: Update via | Is not | Trigger as a condition to prevent downstream triggers from starting a loop. Read more in our guide to Zendesk trigger order of execution.
Article by
Riellvriany Indriawan
Riell is a designer and writer at eesel AI with about two years of experience researching CX platforms, AI chatbots, and helpdesk software. She combines her design background with a sharp eye for how these tools actually look and feel in practice — making her comparisons unusually visual and user-focused.