Personalized customer experiences start with knowing who you're talking to. When a customer reaches out to your AI agent, they expect more than generic responses. They want you to know their name, understand their history, and have context about their issue. User data in Zendesk Sunshine Conversations makes this possible.
Sunshine Conversations serves as the messaging layer beneath Zendesk's AI agents, handling everything from WhatsApp messages to web chat. But accessing the user data stored within it requires understanding the API architecture and knowing which endpoints to call. This guide walks you through exactly how to retrieve and use customer data to create more personalized AI agent experiences.

If you're looking for a simpler approach that doesn't require building custom API integrations, we offer an alternative. Our platform connects directly to Zendesk and handles user data access automatically. But if you're building custom solutions or need full control over the data flow, this technical guide will show you exactly what you need to know.
Understanding the Sunshine Conversations data architecture
Sunshine Conversations (formerly Smooch.io) operates as the underlying data layer for all messaging interactions in Zendesk. Originally a standalone product, it's now fully integrated into the Zendesk Suite and handles the heavy lifting of routing messages between customers, AI agents, and human agents. The platform provides a unified messaging API that connects multiple channels to a single conversation interface.
Here's how the data flows: when a customer sends a message via WhatsApp, web widget, or any other channel, Sunshine Conversations receives that message, identifies the user, and routes it to the appropriate handler. Your AI agent then interacts with Sunshine Conversations to access user profiles, conversation history, and metadata.
The platform stores user data in several distinct locations:
User object: This contains core profile information including the user's ID, name (profile.surname and profile.givenName), email address, locale preferences, authentication status, and when they first signed up (signedUpAt). The User API endpoint gives you access to all of this.
Clients object: Each user can have multiple "clients" representing different channels they use. A customer might have a WhatsApp client, an SMS client, and a web chat client. Each client stores channel-specific data, including phone numbers for WhatsApp and SMS users.
Conversation metadata: This is contextual data you pass from your website or application, such as page URLs, order IDs, or custom fields. It's stored at the conversation level and can be accessed or updated during the chat.
Participants: Every conversation has participants, and this linkage is how you connect a conversation ID to a specific user ID.
To work with this data, you'll need a few prerequisites: a Sunshine Conversations license (included with Zendesk Suite Professional and above), API keys created in Admin Center, and the AI agents Advanced add-on for the Integration Builder features.
Setting up API access to user data
Before you can retrieve any user information, you need to configure authentication. Sunshine Conversations uses a two-credential system for API access that you'll need to set up once and reference in all your API calls.
Head to Admin Center, then navigate to Apps and integrations, select APIs, and click on Conversations API. If you don't see this option, verify you're on Suite Professional or higher and that Agent Workspace is enabled. You'll find detailed setup instructions in the Conversations API documentation.
Click "Create API key" and give it a descriptive name like "AI Agent User Data Access." The system will generate three pieces of information:
- App ID: This identifies your Zendesk account and appears in most API URLs
- Key ID: This serves as the username for Basic Authentication
- Secret Key: This serves as the password. Copy it immediately, it only appears once
For API integrations in the Integration Builder, you'll use Basic Auth with the Key ID as the username and the Secret Key as the password. The App ID gets embedded in the API endpoint URLs. You'll need all three credentials for every API call.
Here's a quick tip: create separate API keys for development and production environments. The Integration Builder supports multiple environments, so you can configure different credentials for testing versus live usage. You can store up to 10 keys, so there's room to organize them by use case. It's worth setting this up early so you don't accidentally modify live data while testing.
Retrieving user profile data
Getting user data requires a two-step API process because of how Sunshine Conversations structures its data model. First, you need to find the user ID associated with the current conversation. Then you use that user ID to fetch the full profile.
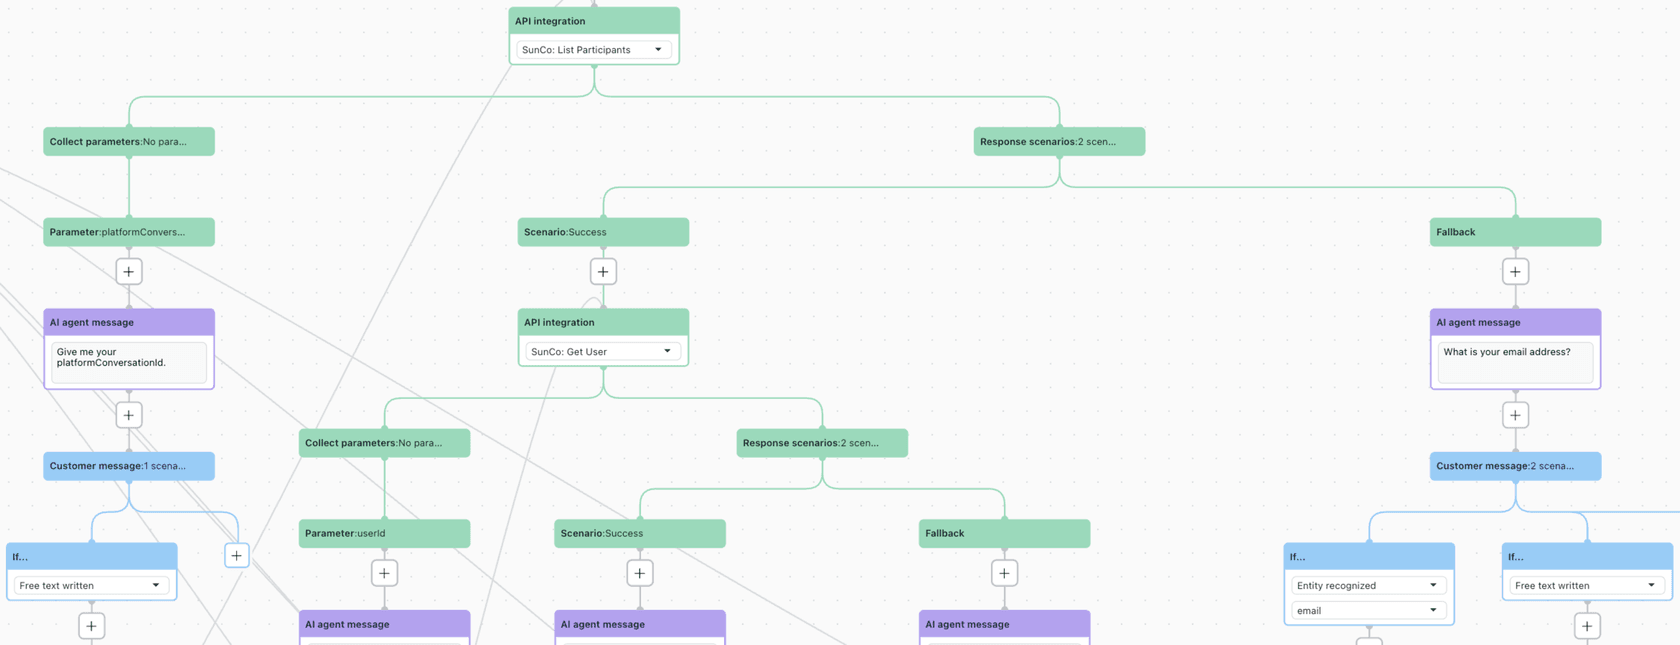
Step 1: List participants to get the user ID
Every conversation has a unique ID that's automatically generated when the chat starts. In AI agents Advanced, this is available as a system parameter called platformConversationId. You use this to call the List Participants endpoint.
Create an API integration in the Integration Builder with these settings:
- Method type: GET
- URL:
https://YOUR_DOMAIN.zendesk.com/sc/v2/apps/YOUR_APP_ID/conversations/{{platformConversationId}}/participants
The response includes an array of participants. For a typical customer conversation, you'll get one participant object containing the userId you need. Use this JSONata query to extract it: data.participants.userId
Step 2: Get user details from the User API
Now that you have the userId, create a second API integration to fetch the full user profile:
- Method type: GET
- URL:
https://YOUR_DOMAIN.zendesk.com/sc/v2/apps/YOUR_APP_ID/users/{{userId}}
The response contains a comprehensive user object. Here are the key fields you can extract with JSONata queries:
| Field | JSONata Query | Example Value |
|---|---|---|
| First name | data.user.profile.givenName | "Sarah" |
| Last name | data.user.profile.surname | "Johnson" |
data.user.profile.email | "sarah@example.com" | |
| Locale | data.user.profile.locale | "en-US" |
| Authenticated status | data.user.authenticated | true/false |
| Zendesk user ID | data.user.zendeskId | "35104420567444" |
Step 3: Use the data in your bot flows
Store these values as session parameters in the Integration Builder, then reference them in your dialogue using double curly brackets like {{givenName}}. You can also use them in conditional logic, for example checking {{authenticated}} to show different flows for authenticated versus guest users.

One pattern that works well: create a "Chat Started" event action that runs both API calls automatically whenever a conversation begins. This ensures user data is available before the customer sends their first message, enabling personalized greetings right from the start.
Accessing channel-specific data (WhatsApp, SMS, and more)
The user object gives you profile information, but what about channel-specific details like phone numbers? That's where the Clients API comes in. This endpoint reveals which channels a user is connected through and provides channel-specific identifiers.
Why the Clients API matters
If a customer contacts you via WhatsApp, their phone number isn't stored in the main user object. Instead, it lives in the clients array as part of their WhatsApp client record. This is critical for use cases like:
- Looking up customer orders by phone number in your CRM
- Sending follow-up SMS messages
- Identifying returning customers across different phone numbers
- Verifying user identity through phone matching
Retrieving client data
Create an API integration that calls:
- Method type: GET
- URL:
https://YOUR_DOMAIN.zendesk.com/sc/v2/apps/YOUR_APP_ID/users/{{userId}}/clients
The response includes an array of client objects, each representing a different channel connection. For WhatsApp users, you'll see something like this:
{
  "type": "whatsapp",
  "externalId": "1234567890",
  "displayName": "Sarah Johnson",
  "raw": {
    "from": "+15551234567"
  },
  "linkedAt": "2024-01-15T10:30:00.000Z"
}
Extracting the WhatsApp phone number
Use this JSONata query to get the phone number: data.clients[type="whatsapp"].raw.from
You can adapt this pattern for other channels. For SMS users, change the type filter: data.clients[type="sms"].raw.from
One practical application: store this phone number as a session parameter, then use it in a subsequent API call to your CRM to look up the customer's order history. When the AI agent greets them by name and says "I see you have an order from last week," the experience feels genuinely personal.
Passing custom data via conversation metadata
Sometimes you need to pass information from your website or application into the conversation. Maybe it's the page URL where the customer clicked help, their order ID from the checkout flow, or their subscription tier. Sunshine Conversations handles this through metadata.
Passing data from the Web Widget
If you're using Zendesk's Web Widget, you can attach custom data when the conversation starts:
zE("messenger:set", "conversationFields", [
  { id: "7662882404114", value: "Premium Plan" }
])
This data appears in the conversation metadata with a key formatted as zen:ticket_field:7662882404114, where the number is your custom field ID. The key requirement: the custom field must be end-user editable in Zendesk.
Retrieving metadata in AI agents
In the Integration Builder, create an Action using the CRM actions with:
- Target: Sunshine Conversations
- Task: Get conversation metadata
- Retrieve the metadata object and extract specific keys
Reference the full key name including the zen:ticket_field: prefix when setting up your parameter mapping. The value you passed from the widget is now available as a session parameter in your dialogue.
Setting metadata from AI agents
You can also update metadata during the conversation. This is useful when the AI agent collects information that should appear in the Zendesk ticket when escalated to a human agent.
Create an Action with Task set to "Update conversation metadata." Use the same key format (zen:ticket_field:FIELD_ID) and pass your parameter as the value. When the conversation escalates to Agent Workspace, that custom field will be pre-populated.
A few things to keep in mind: for dropdown fields, pass the tag value rather than the display name. For lookup fields, pass the ID of the related record. System fields like subject or status can't be updated through this method, only custom fields.
Practical implementation examples
Let's put this into practice with some real-world scenarios.
Personalized greeting with fallback
Set up your "Chat Started" event to trigger an API integration that fetches the user's first name. Store it as {{givenName}}. In your welcome message, write: "Hi {{givenName}}, how can I help you today?"
But what if the name is missing? Add a conditional check. If {{givenName}} is empty, branch to a message that says "Hi there, how can I help you today?" This prevents awkward blank spaces in your greetings.
CRM lookup for order history
Combine the Clients API with your own CRM API. First, get the WhatsApp number using data.clients[type="whatsapp"].raw.from. Then create a second API integration that calls your CRM's lookup endpoint, passing that phone number as a parameter.
When the CRM returns order data, extract key details like recent order number and status. Now your AI agent can say "I see you have order #12345 from yesterday. Are you calling about that?"
Authenticated user flows
Use the authenticated field from the User API to show different experiences. Authenticated users might get access to account-specific actions like "Check my order status" or "Update my subscription." Guest users see a more limited menu focused on general help topics.
The authentication status is especially useful for security-sensitive actions. Before processing a refund or account change, verify that {{authenticated}} equals true and that the email identity verification level meets your requirements.
Troubleshooting common issues
Even with the right setup, things don't always work perfectly. Here are the most common issues and how to resolve them.
User ID not found: If your List Participants call returns empty, verify that platformConversationId is actually being passed. Check your Integration Builder test panel to see what values are available at runtime. The conversation needs to exist before you can list its participants.
API authentication failures: Double-check your Basic Auth header format. It should be Base64 encoded KeyID:Secret. A common mistake is swapping the Key ID and App ID, or forgetting to include the App ID in the URL path.
Missing client data: Not all channels populate the clients array with the same fields. WhatsApp typically includes phone numbers, but web chat clients might not. Check the channel-specific documentation to understand what's available.
Metadata not appearing in Agent Workspace: Ensure your custom field is end-user editable. Also verify the exact key name format, it must be zen:ticket_field:12345 with no extra spaces or variations. The field ID must match exactly.
Session parameters empty: Check the order of operations in your dialogue. API integrations must run before you try to use their output parameters. If you're using parameters from one API call in a subsequent call, verify the first one is completing successfully.
Rate limiting: Sunshine Conversations has rate limits per account. If you're hitting 429 errors, implement exponential backoff in your retry logic or cache user data to reduce repeat lookups for the same conversation.
Simplifying user data access with eesel AI
Everything we've covered works well if you have developer resources and time to build custom integrations. But not every team does. If you need AI-powered support without the engineering overhead, there's a simpler path.

We built eesel AI specifically for teams that want sophisticated AI agent capabilities without building custom API integrations. Instead of creating Integration Builder workflows and managing API credentials, you connect eesel directly to your Zendesk account through a simple OAuth flow.
Here's the difference in approach. With the Sunshine Conversations API method, you're building the infrastructure: creating API keys, writing JSONata queries, handling error scenarios, and maintaining the integration over time. With our approach, that infrastructure is already built. You focus on configuring the AI behavior while we handle the data plumbing.
When you connect eesel to Zendesk, we automatically access user profiles, ticket history, and custom fields without requiring you to build separate API calls. You define escalation rules in plain English like "If the customer mentions a billing issue, pass them to the finance team" instead of building complex conditional logic in the Integration Builder.
| Use Case | Sunshine Conversations API | eesel AI |
|---|---|---|
| Setup time | Days to weeks | Minutes |
| Technical requirements | Developer resources | None |
| Custom channel integrations | Full flexibility | Standard channels |
| Multi-step API orchestration | Full control | Pre-built |
| Maintenance overhead | Ongoing | Minimal |
If you're building highly custom solutions with unique channel requirements or complex multi-system orchestration, the Sunshine Conversations API approach gives you the flexibility you need. But if your goal is deploying AI-powered customer support quickly without engineering resources, our Zendesk integration handles the complexity for you.
Start building personalized AI agent experiences
You now have the complete picture for accessing user data in Zendesk Sunshine Conversations. The architecture involves three main data sources: the User API for profile information, the Clients API for channel-specific details like phone numbers, and conversation metadata for custom context from your applications.
The implementation pattern is consistent across use cases: create API integrations in the Integration Builder, use JSONata to extract the fields you need, store them as session parameters, and reference those parameters in your dialogue flows. With the two-step process of getting participants first, then user details, you can access everything from basic names to WhatsApp phone numbers.
Before you start building, audit what user data you actually need. It's easy to get carried away collecting every available field, but focus on the data that genuinely improves the customer experience. A personalized greeting using the customer's first name has more impact than displaying their internal user ID.
If you're ready to implement but concerned about the development effort, try our platform alongside your Zendesk setup. You can compare approaches and choose what works best for your team's capabilities and timeline.
